|
The selected cell is referred to as the active cell. In the
previous lesson, we saw that the active cell is represented by an object called ActiveCell.
Therefore, to programmatically add a value to the active cell, assign that value
to this object.
|
Programmatically Referring to a Cell |
|
In the previous lesson, we saw different ways of referencing
a cell. Here is one of the examples we used:
Sub Exercise()
    Workbooks.Item(1).Worksheets.Item("Sheet1").Range("D6")
End Sub
To enter value into a particular cell, reference it and then
assign the desired value to it.
|
 Practical Learning: Introducing
Data Entry Practical Learning: Introducing
Data Entry
|
|
- Start Microsoft Excel
- On the Ribbon, click Developer
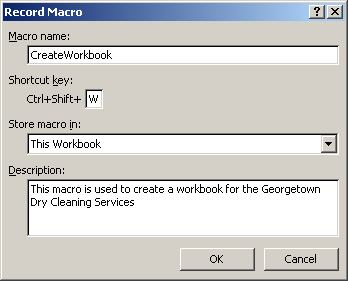
- In the Code section, click Record Macro

- Set the Macro Name to CreateWorkbook
- In the Shortcut Key text box, type W to get Ctrl + Shift + W

- Click OK
- On the Ribbon, click Stop Recording
- In the Code section of the Ribbon, click Macros

- In the Macro dialog box, make sure CreateWorkbook is selected and
click Edit
- Change the code as follows:
Option Explicit

Sub CreateWorkbook()
    ' CreateWorkbook Macro
    ' This macro is used to create a workbook for the
    ' Georgetown Dry Cleaning Services

    ' Keyboard Shortcut: Ctrl+Shift+W

    Rem Just in case there is anything on the
    Rem worksheet, delete everything
    Range("A:K").Delete
    Range("1:20").Delete

    Rem Create the sections and headings of the worksheet
    Range("B2") = "Georgetown Dry Cleaning Services"
    Range("B5") = "Order Identification"
    Range("B6") = "Receipt #:"
    Range("G6") = "Order Status:"
    Range("B7") = "Customer Name:"
    Range("G7") = "Customer Phone:"

    Range("B9") = "Date Left:"
    Range("G9") = "Time Left:"
    Range("B10") = "Date Expected:"
    Range("G10") = "Time Expected:"
    Range("B11") = "Date Picked Up:"
    Range("G11") = "Time Picked Up:"

    Range("B13") = "Items to Clean"
    Range("B14") = "Item"
    Range("D14") = "Unit Price"
    Range("E14") = "Qty"
    Range("F14") = "Sub-Total"

    Range("B15") = "Shirts"
    Range("H15") = "Order Summary"
    Range("B16") = "Pants"
    Range("B17") = "None"
    Range("H17") = "Cleaning Total:"
    Range("B18") = "None"
    Range("H18") = "Tax Rate:"
    Range("I18") = "5.75"
    Range("J18") = "%"
    Range("B19") = "None"
    Range("H19") = "Tax Amount:"
    Range("B20") = "None"
    Range("H20") = "Order Total:"

    Rem Change the widths and heights of some columns and rows
    Rem In previous lessons, we learned all these things
    Range("E:E, G:G").ColumnWidth = 4
    Columns("H").ColumnWidth = 14
    Columns("J").ColumnWidth = 1.75

    Rows("3").RowHeight = 2
    Range("8:8, 12:12").RowHeight = 8

    Rem Hide the gridlines
    ActiveWindow.DisplayGridlines = False
End Sub
|
- To return to Microsoft Excel, click the View Microsoft Excel button

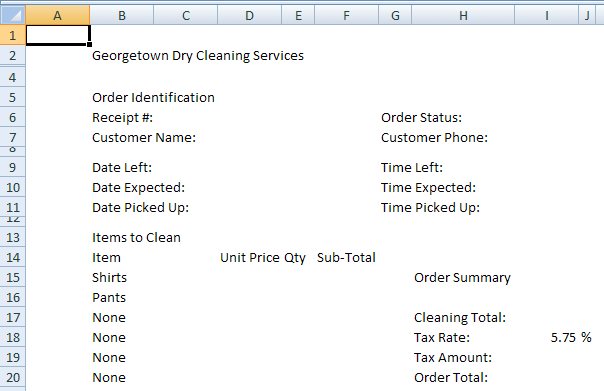
- To fill the worksheet, press Ctrl + Shift + W

- Return to Microsoft Visual Basic
|
|

