 |
The Properties Window
|
| |
|
Introduction to the Properties Window |
|
|
|
After you have added a control to a work area or to a form, in order to perform any type of configuration on the control,
we saw that you
must first select it. Besides the techniques we reviewed, to select a control, if you know its name, you can
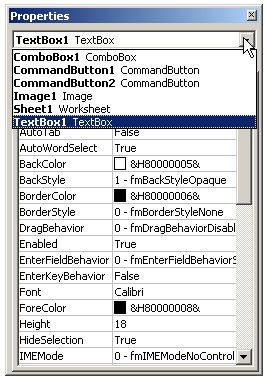
click the arrow of the combo box in the top section of the Properties
window and select it:
|

|
 Practical
Learning: Creating a Form Practical
Learning: Creating a Form
|
|
- Start Microsoft Excel and, on the Ribbon, click Developer
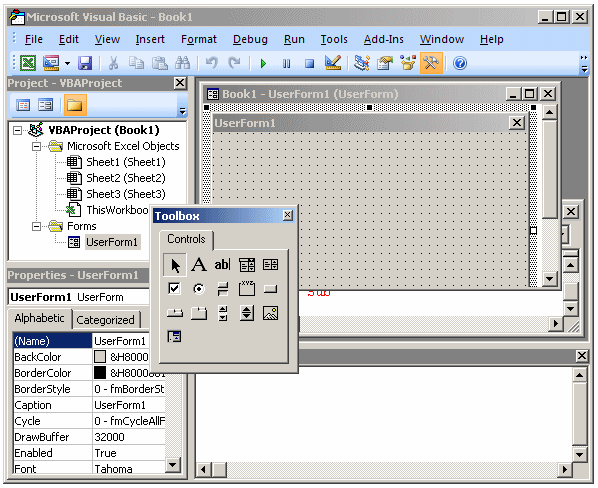
- In the Code section, click Visual Basic
- To create a form, on the main menu, click Insert -> UserForm
- To access its associated module, right-click the form and click View Code
- To return to the form, on the main menu, click Window and click the menu
item that has (UserForm)
- In Microsoft Visual Basic, notice that a Toolbox appears next to the form

- To return to Microsoft Excel, on the Taskbar, click Microsoft Excel
- To display the controls, in the Controls section of the Ribbon, click
Insert
- To add a control to the document, Under ActiveX Controls, click the
Command Button
button
 and click a box (any box in the work area)
- To add another control, in the Controls section of the Ribbon, click the
arrow under Insert and click the Combo Box button
 and
click somewhere in the work area away from the previously added button
- On the Taskbar, click Microsoft Visual Basic to return to it
- On the Toolbox, click the CommandButton and click somewhere in the
top-left section of the form (no need for precision at this time)
- On the Toolbox, click the ComboBox and click somewhere in the
middle-center section of the form (no need for precision at this time)
- On the Toolbox, click the CheckBox and click somewhere in the lower-right
section of the form (no need for precision at this time)
- To return to Microsoft Excel, click the View Microsoft Excel button

- Position the mouse on CommandBut that was positioned on the form and click.
Notice that you are able to
select the button
- In the Controls section of the Ribbon, click the Design Mode button

- In the work area, click the CommandBut
button again
- Click the combo box. Notice that, this time, you cannot select the
controls
- To return to controls to edit mode, in the Controls section of the Ribbon, click the
Design Mode button

- To return to Microsoft Visual Basic, in the Code section of the Ribbon,
click the Visual Basic button

- On the form, click one of the controls
- Press and hold Ctrl
- Click one of the other controls
- Release Ctrl
- To dismiss the selection, press Esc
- While still in Microsoft Visual Basic, press Ctrl + A to select all
controls
- Press Delete to remove them
- To display them again, press Ctrl + Z
- To return to Microsoft Excel, click the View Microsoft Excel button

- To view the properties of the button, in the work area, right-click the
CommandBut button you added and click Properties
- On the Taskbar, click
Microsoft Visual Basic
- To see the properties of a Visual Basic object, right-click an unoccupied
area of the form and click Properties.
Notice that the Properties window
displays the characteristics of the form
- To see the properties of another object, on the form, click the button
After adding a control to your application, you can manipulate its
characteristics. If you are working in Microsoft Excel, to put a control
into edit mode, in the Controls section of the Ribbon, click the Design
Mode button  . .
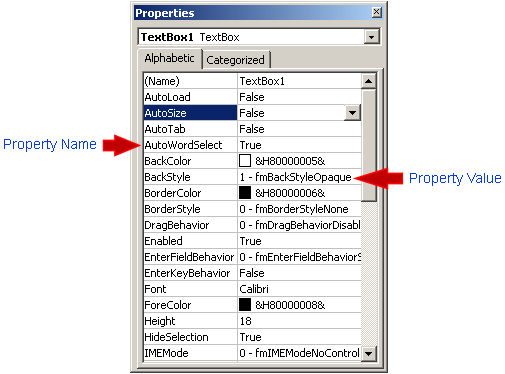
Each field in the Properties window has two sections: the property’s
name and the property's value:

The name of a property is represented in the left column. This is the
official name of the property. Notice that the names of properties are in
one word. Based on this, our House class would have been defined as
follows:
House
[
      Address
      TypeOfHouse
      NumberOfBedrooms
      NumberOfBathrooms
      HasIndoorGarage
      LivingRoomCoveredWithCarpet
      KitchenHasIslandStove
]
You can use this same name to access the property in code.
|
Accessing a Control's Property |
|
To access a property of a control using code, type the
name of the control, followed by a period, followed by the name of the
property. Based on this, if you have a House object named Langston, to
access its TypeOfHouse property, you would write:
Langston.TypeOfHouse
The box on the right side of each property name represents the value of
the property that you can set for an object. There are various kinds of
fields you will use to set the properties. To know what particular kind a
field is, you can click its name. To set or change a property, you use
the box on the right side of the property’s name: the property's value,
also referred to as the field's value.
|
The Default Value of a Control's Property |
|
To programmatically change the value of a property, type the
name of the control, followed by a period, followed by the name of the
property, followed by =. Then, on the right side of equal, you must
provide the value but this depends on the type of value.
The people who developed the controls also assigned some primary values to
their properties. This is the type of value that a property either is most
likely to have or can use unless you decide to change
it. The primary value given to a property is referred to as its default
value. Most of the time, you can use that property. In some other
assignments, the default value will not be suitable.
|
|
