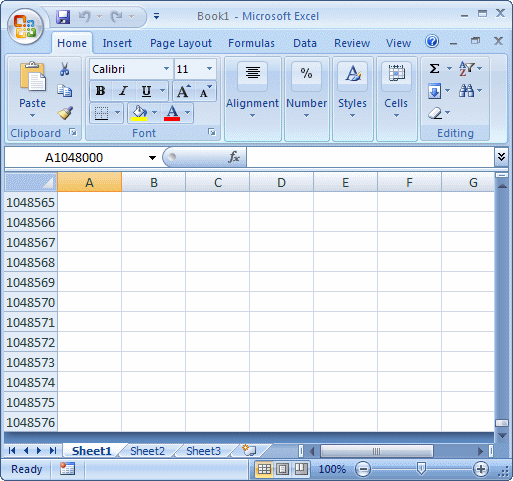
You can use just a few of the rows for your assignment but
all of them are always available.
When using a row, you can click it or use the keyboard
to get to it. You can also right-click a row. When you do this, a menu
would appear:

To support the rows of a worksheet, the Worksheet
class is equipped with a property named Rows. Therefore, to refer
to a row, you can use the Worksheets collection or the worksheet object to
access the Rows property. Another way you can refer to rows is by using the Range
object.
To identify a row, indicate its worksheet and you can pass its number to the
parentheses of the Rows collection. Here is an example that refers
to the 5th row of the second worksheet of the current workbook:
Sub Exercise()
    Workbooks.Item(1).Worksheets.Item(2).Rows(5)
End Sub
As reviewed for the columns, this code would work only
if the second worksheet of the current workbook is displaying. If you run
it while a worksheet other than the second is active, you would receive an
error. To access any row, omit the Workbooks and the Worksheets
collections.
As mentioned already, you can refer to a row using the Range
object. To do that, pass a string to the Range object. In the
parentheses, type the number of the row, followed by a colon, followed by
the number of the row. Here is an example that refers to Row 4:
Sub Exercise()
    Range("4:4")
End Sub
If you want to refer to the rows more than once, you
can declare a variable of type Range and initialize it using the Set
operator and assign it the range you want. Here is an example:
Sub Exercise()
    Dim SeriesOfRows As Range

    Set SeriesOfRows = Workbooks.Item(1).Worksheets.Item("Sheet1").Range("4:4")

    SeriesOfRows.Whatever
End Sub
|
Identifying a Group of Rows |
|
A group of rows is said to be in a range if they are
next to each other. To refer to rows in a range, in the parentheses of the
Rows collection, pass a string that is made of the number of the row from
one end, followed by a colon, followed by the row number of the other end.
Here is an example that refers to rows from 2 to 6:
Sub Exercise()
    Rows("2:6")
End Sub
The rows of a group qualify as non-adjacent if they
are or they are not positioned next to each other. To refer to
non-adjacent rows, pass a string to the Range collection. In the
parentheses, type the number of each row followed by a colon, followed by
the same number. These combinations are separated by commas. Here is an
example that refers to Rows 3, 5, and 8:
Sub Exercise()
    Range("3:3, 5:5, 8:8")
End Sub
To refer to all rows of a worksheet, use the Rows
name. Here is an example:
Sub Exercise()
    Rows
End Sub
As done with columns, you can select one row or a group of
rows. You can perform selections using
the mouse, the keyboard, or a combination of both.
To select a row using the mouse, position the mouse on a row header.
The mouse cursor would change into a right-pointing arrow. Then click:

You
can also use only the keyboard. To select a row using the keyboard, make sure a box on its right
side is selected. Press and hold Shift. While Shift is still down, press the
Space bar and release Shift
To support row selection, the Row class is
equipped with a method named Select. Therefore, to programmatically
select a row, access a row from the Rows collection using the
references we saw earlier. Then call the Select method. Here is an
example that selects Row 6:
Sub Exercise()
    Rows(6).Select
End Sub
We also saw that you could refer to a row using the
Range object. After accessing the row, call the Select method. Here is an
example that selects Row 4:
Sub Exercise()
    Range("4:4").Select
End Sub
When a row has been selected, it is stored in an object
called Selection. You can then use that object to apply an action
to the row.
|
Selecting a Group of Rows
|
|
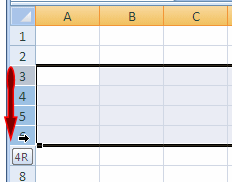
You can also select more than one row at the same time.
You can perform selections using
the mouse, the keyboard, or a combination of both. To select a range of rows using the mouse, click one row header and hold the mouse down. Then drag in the
direction of the range:

To select many rows using only the keyboard, select the starting row. Press and hold Shift, then press either
the up or the down arrow key. When the range of rows has been
selected, release Shift
You can also use a combination of the mouse and the
keyboard to select one or more rows:
- To select a range of rows using a combination of the mouse and the
keyboard, click
one row at one end of the desired range. Press and hold Shift. Then
click the row at the other end, and release the mouse.
- To
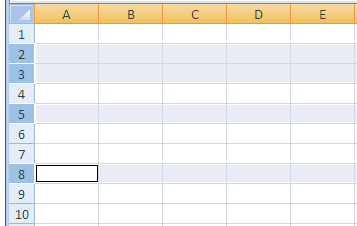
select rows at random using a combination of the mouse and the keyboard, click
one row header, press and hold Ctrl. Then click each desired row header. When you have selected the desired
rows, release the
mouse. Each row selected would be highlighted:

To programmatically select a range of rows, refer to the
range using the techniques we saw earlier, then call the Select method.
Here is an example that selects rows from 2 to 6:
Sub Exercise()
    Rows("2:6").Select
End Sub
To programmatically select non-adjacent rows, refer to
them as we saw earlier and call the Select method. Here is an
example that selects Rows 3, 5, and 8:
Sub Exercise()
    Range("3:3, 5:5, 8:8").Select
End Sub
To programmatically select all rows of a worksheet,
call the Select method on the Rows collection. Here is an example:
Sub Exercise()
    Rows.Select
End Sub
When many rows have been selected (whether adjacent or
not), their selection is stored in an object named Selection. You can
access that object to apply a common action to all selected rows.
To display the contents of boxes on its right, a row
uses a certain height. The height is the distance from the top to the lower
borders of the row.
There are various techniques you can use to change the height of a row, using
approximations or being precise.
|
Manually Heightening or Shrinking the Rows
|
|
To manually change the height of a row, position the mouse on
the lower border that separates it from the next row (unless it is the
last row). Here is
an example:

Click, then drag up or down until you get the desired
height, then release the mouse.
You can also resize a group of rows. First, select the
rows as we described above.
Then position the mouse on the bottom border of one of the selected rows. Click and drag
up or down in the direction of your choice until
you get the desired height. Then release the mouse.
To undo this action:
- On the Quick Access toolbar, click the Undo button

- Press Ctrl + Z
|
Automatically Setting the Heights of Rows
|
|
If one of the boxes on the right side of a row header is too
short or too tall, you can change the height of the row. To do this:
- Double-click the bottom border of the row
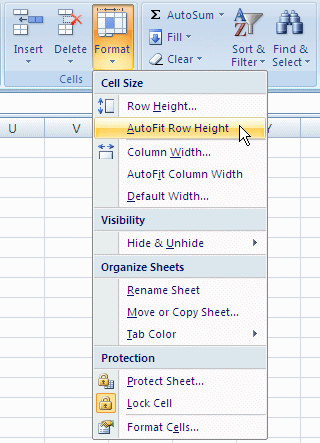
- Click the row header or a box on that row. On the Ribbon, click Home. In the Cells section, click Format and click
AutoFit Row Height:

To undo any of these actions:
- On the Quick Access toolbar, click the Undo button

- Press Ctrl + Z
|
Setting the Height Values of Rows
|
|
You can use a dialog box to set exactly the desired height of
a row or a group of rows. To specify the height of a row:
- Right-click the row header and click Row Height...
- Click a row header or any box on its right side. Then, on the Ribbon, click
Home. In the Cells section, click Format and click Row Height...
To specify the same height for many rows:
- Select a range of rows as we saw earlier. Right-click one of the rows (either one of the
row headers or inside the selection) and click Row Height...
- Randomly select a group of (non-adjacent) rows. Right-click one of the row
headers and click Row Height...
- Select the rows. On the
Ribbon, click Home. In the Cells section, click Format and click Row
Height...
This would call the Row Height dialog box where you can type the desired value
and click OK or press Enter.
To undo any of these actions:
- On the Quick Access toolbar, click the Undo button

- Press Ctrl + Z
To support the height of a row, the Row object is
equipped with a property named RowHeight. Therefore, to
programmatically specify the height of a row, access the row using a
reference as we saw earlier, access its RowHeight property and
assign the desired value to it. Here is an example that sets the height of
Row 6 to 2.50
Sub Exercise()
    Rows(6).RowHeight = 2.5
End Sub
In our introduction, we saw that Microsoft Excel creates and
makes available over a million rows you can use when working on a worksheet.
In the next lesson, we will see that you can use the boxes on the right sides of
the row headers to create the necessary values of your worksheet. One of the
result is that, at times, you will want to create a row between two existing
rows. Microsoft Excel provides all the means you need to add one or more new
rows to a list. When
you add a new row, Microsoft Excel removes the last row to keep the
count to 1,048,576.
You can only insert a new row above an existing one. To
insert a new row:
- Right-click the row header that will be below the new one you want to add, and click Insert
- Click the row header or any box on the right side. On the Ribbon, click
Home. In the Cells section, click the arrow under Insert and click Insert Sheet
Rows

To provide the ability to add a new row, the Row
class is equipped with a method named Insert. Therefore, to
programmatically add a row, refer to the row that will be positioned below
the new one and call the Insert method. Here is an example:
Sub Exercise()
    Rows(3).Insert
End Sub
To add more than one row, first select the rows,
whether in a range or randomly. Then:
- Right-click one of the rows (whether one of the row headers or a box
of one of the selected rows) that will be below the selected rows, and click Insert
- (After selecting the rows,) On the Ribbon, click Home. In the Cells
section, click the arrow button Insert and click Insert Sheet Rows
If you select rows randomly (non-adjacent), a new row would be created
below each of the selected rows.
To undo any of these actions:
- On the Quick Access toolbar, click the Undo button

- Press Ctrl + Z
To programmatically add new rows, refer to the rows
that would be below the new ones, and call the Insert method. Here is an
example that will add new rows in positions 3, 6, and 10:
Sub Exercise()
    Range("3:3, 6:6, 10:10").Insert
End Sub
If you have a row you do not need anymore, you
can delete it. To delete a row:
- Right-click the row header and click Delete
- Click the row header or any box on its right side. On the Ribbon, click
Home. In the Cells section, click Delete and click Delete Sheet Rows

To support row removal, the Row class is equipped with
a method named Delete that takes no argument. Based on this, to delete a
row, access it using a reference as we saw earlier, and call the Delete
method. Here is an example:
Sub Exercise()
    Rows(3).Delete
End Sub
Of course, you can use either the Rows collection or
the Range object to refer to the row.
To delete more than one row, first select the rows,
whether in a range or randomly. Then:
- Right-click one of the rows (whether one of the row headers or a box on the
right side of one of the selected rows) and click Delete
- (After selecting the rows,) On the Ribbon, click Home. In the Cells
section, click Delete and click Delete Sheet Rows
To undo any of these actions:
- On the Quick Access toolbar, click the Undo button

- Press Ctrl + Z
To delete a group of rows:
Sub Exercise()
    Range("3:3, 6:6, 10:10").Delete
End Sub
|

