Conditional Statements
 |
Conditional Statements |
|
Condition Checking |
When performing assignments using code, sometimes you must find out whether a given situation bears a valid value. This is done by checking a condition. To support this, Microsoft Visual Basic provides a series of words that can be combined to perform this. Checking a condition usually produces a True or a False result. Once the condition has been checked, you can use the result (as True or False) to take action. Because there are different ways to check a condition, there are also different types of keywords to check different things. To use them, you must be aware of what each does or cannot do so you would select the right one. |
Private Sub Form_Click()
    Dim IsMarried As Boolean
End Sub
When a Boolean variable has been declared, you can assign it a True or a False value.
|
|
The If...Then...Else Statement |
|
The If...Then statement offers only one alternative: to act if the condition is true. Whenever you would like to apply an alternate expression in case the condition is false, you can use the If...Then...Else statement. The formula of this statement is: If ConditionToCheck is True Then Statement1 Else Statement2 End If When this section of code executes, if the ConditionToCheck is true, then the first statement, Statement1, is executed. If the ConditionToCheck is false, the second statement, in this case Statement2, is executed. |
|
|
Private Sub txtFirstName_Change()
    Dim FirstName As String
    Dim LastName As String
    Dim FullName As String

    FirstName = txtFirstName.Text
    LastName = txtLastName.Text

    If LastName = "" Then
        FullName = FirstName
    Else
        FullName = LastName & ", " & FirstName
    End If

    txtFullName.Text = FullName
End Sub

Private Sub txtLastName_Change()
    Dim FirstName As String
    Dim LastName As String
    Dim FullName As String

    FirstName = txtFirstName.Text
    LastName = txtLastName.Text

    If FirstName = "" Then
        FullName = LastName
    Else
        FullName = LastName & ", " & FirstName
    End If

    txtFullName.Text = FullName
End Sub
|
|
The If...Then...ElseIf Statement |
|
The If...Then...ElseIf statement acts like the If...Then...Else expression, except that it offers as many choices as necessary. The formula to use is: If Condition1 is True Then Statement1 ElseIf Condition2 is True Then Statement2 ElseIf Conditionk is True Then Statementk End If The program will first examine Condition1. If Condition1 is true, the program will execute Statment1 and stop examining conditions. If Condition1 is false, the program will examine Condition2 and act accordingly. Whenever a condition is false, the program will continue examining the conditions until it finds one. Once a true condition has been found and its statement executed, the program will terminate the conditional examination at End If. There is still a possibility that none of the stated conditions is true. In this case, you should provide a "catch all" condition. This is done with a last Else section. The Else section must be the last in the list of conditions and would act if none of the primary conditions is true. The formula to use would be: If Condition1 is True Then
Statement1
ElseIf Condition2 is True Then
Statement2
ElseIf Conditionk is True Then
Statementk
Else
CatchAllStatement
End If
|
|
|
 |
||||||||||||||||||||||||||||||||||||
|
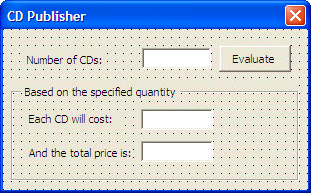
Private Sub cmdEvaluate_Click()
    Dim Quantity As Integer
    Dim UnitPrice As Currency
    Dim TotalPrice As Currency

    Quantity = CInt(txtQuantity.Text)

    ' The price of one CD will depend on the number ordered
    ' The more the customer orders, the lower value each
    If Quantity < 20 Then
        UnitPrice = 20
    ElseIf Quantity < 50 Then
        UnitPrice = 15
    ElseIf Quantity < 100 Then
        UnitPrice = 12
    ElseIf Quantity < 500 Then
        UnitPrice = 8
    Else
        UnitPrice = 5
    End If

    TotalPrice = Quantity * UnitPrice

    txtUnitPrice.Text = CStr(UnitPrice)
    txtTotalPrice.Text = CStr(TotalPrice)
End Sub
|

|
The Select Case Statement |
|
If you have a large number of conditions to examine, the If...Then...Else will go through each one of them. Microsoft Visual Basic offers the alternative of jumping to the statement that applies to the state of the condition. The formula of the Select Case is: Select Case Expression Case Expression1 Statement1 Case Expression2 Statement2 Case Expressionk Statementk End Select The Expression will be examined and evaluated once. Then Microsoft Visual Basic will compare the result of this examination with the Expression of each case. Once it finds one that matches, it would execute the corresponding Statement. If you anticipate that there could be no match between the Expression and one of the Expressions, you can use a Case Else statement at the end of the list. The formula to use would be: Select Case Expression Case Expression1 Statement1 Case Expression2 Statement2 Case Expressionk Statementk Case Else Statementk End Select |
|
|
 |
||||||||||||||||||||||||||||||||||||||||||||||||||||||||||||||||||||||||
|
Private Sub UserForm_Activate()
    cboFrequency.AddItem ("Monthly")
    cboFrequency.AddItem ("Quarterly")
    cboFrequency.AddItem ("Semiannually")
    cboFrequency.AddItem ("Annually")
End Sub
|
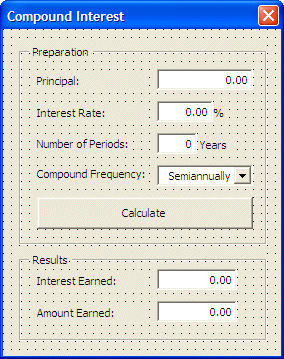
Private Sub cmdCalculate_Click()
    Dim Principal As Currency
    Dim InterestRate As Double
    Dim InterestEarned As Currency
    Dim FutureValue As Currency
    Dim RatePerPeriod As Double
    Dim Periods As Integer
    Dim CompoundType As Integer
    Dim i As Double
    Dim n As Integer

    Principal = CCur(txtPrincipal.Text)
    InterestRate = CDbl(txtInterestRate.Text) / 100

    Select Case cboFrequency.Value
        Case "Monthly"
            CompoundType = 12
        Case "Quarterly"
            CompoundType = 4
        Case "Semiannually"
            CompoundType = 2
        Case Else
            CompoundType = 1
    End Select

    Periods = CInt(txtPeriods.Text)
    i = InterestRate / CompoundType
    n = CompoundType * Periods
    RatePerPeriod = InterestRate / Periods
    FutureValue = Principal * ((1 + i) ^ n)
    InterestEarned = FutureValue - Principal

    txtInterestEarned.Text = FormatCurrency(InterestEarned)
    txtAmountEarned.Text = FormatCurrency(FutureValue)
End Sub
|

|
Loops Repeaters |
|
Introduction |
|
A loop is an expression used to repeat an action. Microsoft Visual Basic presents many variations of the loops and they combine the Do and the Loop keywords. |
|
The Do...While Loop |
|
The formula of the Do... While loop is: Do While Condition Statement(s) Loop This expression examines the Condition. If the condition is true, then it executes the Statement or statements. After executing the statement(s), it goes back to examine the Condition. AS LONG AS the Condition is true, the Statement will be executed and the Condition will be tested again. If the Condition is false or once the condition becomes false, the statement will not be executed and the the program will move on. As you may guess already, the Condition must provide a way for it to be true and to be false.
|
|
The Do...Loop...While Statement |
|
Since the Do...While statement tests the Condition first before executing the Statement, sometimes you will want the program to execute the Statement first, then go back and test the Condition. Microsoft Visual Basic offers a reverse to the formula as follows: Do Statement(s) Loop While Condition In this case, the Statement or Statements will be executed first. Then the Condition will be tested. If the Condition is true, the program will execute the Statement again. The program will continue this examination-execution as long as the Condition is true. The big difference here is that even if the Condition is false, the program will have executed the Condition at least once. |
|
The Do...Until...Loop Statement |
|
An alternative to the Do...While loop is the Do...Until loop. Its formula is: Do Until Condition This loop will first examine the Condition, instead of examining whether the Condition is true, it will test whether the Condition is false. |
|
The Do...Loop...Until Statement |
|
An alternative to the Do...Until...loop consists of executing the the Statement first. The formula used is: Do Statement(s) Loop Until Condition This expression executes the Statement first. After executing the Statement, it examines the Condition. If the Condition is False, then it goes back and executes the Statement again and re-check the Condition. Once the Condition becomes true, it would stop and move on; but as long as the Condition is False, the Statement would be executed. |
|
Loop Counters |
|
Introduction |
|
The looping statements we reviewed above are used when you don't know or can't anticipate the number of times a condition needs to be checked in order to execute a statement. If you know with certainty how many times you want to execute a statement, you can use another form of loops that use the For...Next expression. |
|
The For...To...Next Loop |
|
One of the loop counters you can use is For...To...Next. Its formula is: For Counter = Start To End Statement(s) Next Used for counting, the expression begins counting at the Start point. Then it examines whether the current value (after starting to count) is greater than End. If that's the case, it then executes the Statement(s). Next, it increments the value of Counter by 1 and examines the condition again. This process goes on until the value of Counter becomes equal to the End value. Once this condition is reached, the looping stops. |
|
Stepping the Counting Loop |
|
The formula above will increment the counting by 1 at the end of each statement. If you want to control how the incrementing processes, you can set your own, using the Step option. Here is the formula: For Counter = Start To End Step Increment Statement(s) Next Counter You can set the incrementing value to your choice. If the value of Increment is positive, the Counter will be added its value. This means that you can give it a negative value, in which case the Counter will be subtracted the set value. |
|
For Each Item In the Loop |
|
Since the For...Next loop is used to execute a group of statements based on the current result of the loop counting from Start to End, an alternative is to state various steps in the loop and execute a group of statements for each one of the elements in the group. This is mostly used when dealing with a collection of items. The formula is: For Each Element In Group Statement(s) Next Element The loop will execute the Statement(s) for each Element in the Group. |
|
|
||
| Previous | Copyright © 2004-2008 FunctionX, Inc. | Next |
|
|
||