Introduction to the Visual Basic Language
Introduction to the Visual Basic Language
Fundamentals of Visual Basic
Introduction
Microsoft Visual Basic is a programming language that can be used to create various types of computer applications, also called apps, also called computer programs, or just programs. The popularity of Visual Basic came from the "visual" aspect in its name. This consists of creating beautiful graphical applications by selecting objects, named Windows controls, and adding them to another object, a form. This approach makes application developement intuitive and fast. Of course, code is also necessary to control the behavior of the intended finished product. Behind-the-ceines, Microsoft Visual Basic is a full-blown computer language with many attractive feaures that you should be aware of before deciding to create graphical applications from it.
In our lessons, we are going to study the language that serves as a foundation to Visual Basic.
Introduction to Projects
The primary job of an application is to show its results on the computer monitor, and there are various types of applications. A console application is a program that displays its results in a black window referred to as a DOS window. In some of our lessons, we will create those types of applications. The Visual Basic language provides a rectangular object called a message box. If you create a Visual Basic application, you can display the results in a message box. That's what we will use in most of our lessons.
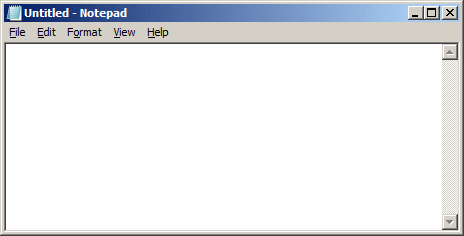
To create an application, you start with a project. There are two main ways you can create a Visual Basic project. You can use a text editor such as Notepad. In this case, to create a program, you write the necessary instructions in a text-based document. This is called a source file. A source file that contains Visual Basic instructions is a regular, simple, ASCII, text-based file. It has the extension .vb as a Windows file. After creating and saving the file, you must compile and execute it at the Command Prompt.
A better and fast way to create an application is to use a programming environment. In this case, you can use Microsoft Visual Studio. It is freely available from the Microsoft website. Simply do a search on "visual studio". Find the webpage and link to Microsoft Visual Studio Community Edition, download, and install it to your computer. For most of our lessons, we will use Microsoft Visual Studio to study the Visual Basic language.
In a Visual Basic document, you write code as we will learn throughout our lessons. The code that is conform to the Visual Basic language is included in a section known as the module. This section starts with the Module keyword followed by a name and ends with the End Module expression. Based on this, a simple file in Visual Basic would have the following:
Module module-name

End Module
Start with the keyword Module and a space. Add a name. The name must follow some rules we will review. Move to the next line(s) and write the code you judge necessary. On the last line, type the expression End Module.
Introduction to Procedures
A procedure is a section of code that takes care of a specific task. A procedure can be created in a module. In a module, the basic formula of a procedure is:
Sub procedure-name()

End Sub
Start with the Sub keyword followed by a space. Add a name. The name of a procedure must be followed by parentheses. At a minimum, you can leave the parentheses empty. Write your code in the next line(s). On the last line of the procedure, type End Sub. Because a module holds the code of a Visual Basic program, a procedure is included inside the start and the end of the module section. This would be done as follows:
Module module-name

    Sub procedure-name()

    End Sub

End Module
We will come back to procedures in another lesson. For now, the most fundamental procedure used in Visual Basic is called Main. In a program, the Main() procedure is the entry point. That is where the program starts.
Another common procedure highly used in Visual Basic is called MsgBox. As its name indicates, the MsgBox() procedure is used to display a message in a dialog box. To make this happen, you can include the message inside the parentheses of MsgBox. The message itself should be included in double-quotes. An example would be:
MsgBox("Whatever")
The MsgBox() procedure provides more details. We will come back to it in future lessons.
![]() Practical Learning: Starting a Visual Basic Project
Practical Learning: Starting a Visual Basic Project
![]() Practical Learning: Introducing Modules
Practical Learning: Introducing Modules
Module Exercise

End Module

![]() Practical
Learning: Introducing Procedures
Practical
Learning: Introducing Procedures
Module Exercise
    Sub Main()
	MsgBox("Welcome to the Wonderful World of Visual Basic.")
    End Sub
End Module
As mentioned already, you write the instructions of your project in English. But the computer doesn't understant it. The instructions must be translated in a language the computer can understand. That language is called machine language. To translate the instructions from English to machine dialect, you use a program named a compiler. In reality, a compiler is a group of sub-programs that accomplish various goals to get a functional program at the end. The end result is a program that can be executed in a computer other than the one you used to create the project. That final program is called an executable.
Ae mentioned already, a compiler is a computer program made of internal other sub-programs. One of the sub-programs, in fact probably the first, of a compiler is called a parser. A parser "scans" a file that contains (part of) the program. It checks the syntax, keywords, unknown words, and some other routines. If the parser finds a problem, which could be anything, either it stops or it continues making a list of the mistakes it found. Then it displays this list to you to fix. Sometimes it would point to the exact line where the/a problem was found. Sometimes it would point to the line where the problem showed its impact although the problem may be found somewhere else. With experience, you will know how to fix the programs or troubleshoot the problems.
If the parser doesn't find any problem, or after you have fixed the problems, it (the parser) passes its result(s) to the compiler. The compiler calls another program called a linker. If the program contains just one file, the linker considers it. If the program contains more than one file, the linker considers them. The linker gathers some of the files that the compiler shipped with (those files that your program needs in order to work), puts them together ("links" them) with your file(s) to get your instructions in a manner that can produce a suitable result. If there is no significant problem, the compiler creates the executable. This doesn't mean that everything is alright, it only means that the compiler thinks that everything is alright: it is still possible that the result may not be what you would expect. We will come back to these issues.
To make your life easier, all of the sub-programs (parser, linker, debugger, etc) that ship with Visual Basic are grouped in one large program: the compiler. Therefore, from now on, we will use the word "compiler" to refer to the program you use to translate your English instructions into a machine language.
Microsoft created and makes freely available a Visual Basic compiler you can use to create your applications. The Visual Basic compiler is named vbc. A compiler is primarily a computer program, that is an executable. As such, it uses to extension .exe. Therefore, the compiler we will use to create our program is called vbc.exe.
As mentioned already, the vbc.exe compiler is freely available. You can get it by downloading the .NET Framework from the Microsoft web site. Normally, you are likely to have the .NET Framework installed in your computer already. By default, it is installed in C:\Windows\Microsoft.NET\Framework\v4.0.21006.
You can use the vbc.exe to create programs from the Command Prompt. To do this, you can add the compiler's path to the Path of the Environment Variables. To start, use a file utility such as Windows Explorer and display the folder where vbc.exe is installed. Here is its path in Windows Explorer:
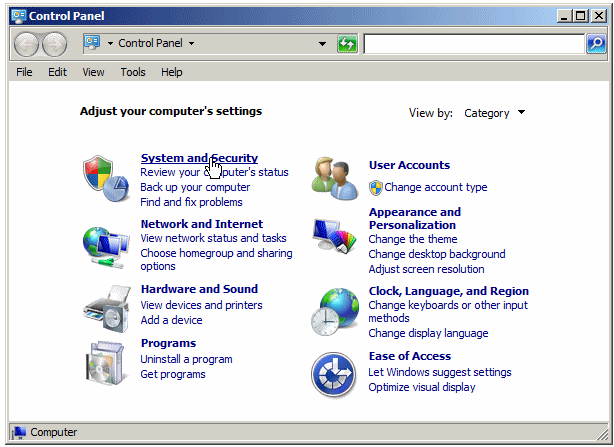
Select the path in the top combo box and copy it to the clipboard. Start the Control Panel. Click System and Security:

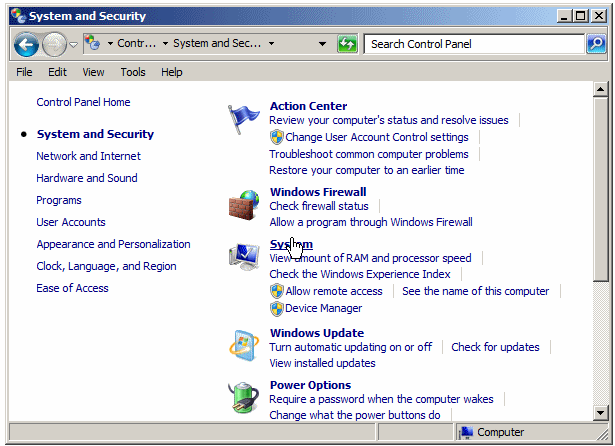
In the System and Security section, click System:

In the System window, click Change Settings. In the System Properties dialog box, click the Advanced tab. Click the Environment Variables button:

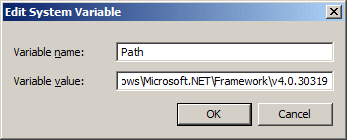
In the System Variables section, double-click Path or click it and click Edit:

Press the End key, type a semi-colon ";". Paste the value you had copied from the clipboard:

Click OK three times.
Open the Command Prompt. Type CD\ and press Enter to move to the root drive. Type CD and a space, followed by the folder (and sub-folder(s)) where the file is located, and press Enter. To compile, type vbc followed by the name of the file and its extension:

The file produced from this operation has the extension .exe. By default, it holds same name as the file you had used. If you want to get an executable using a name of your choice, after vbc, type /out: followed by the name you want, followed by a .exe extension, followed by a space, and followed by the name of the file you had created, with its extension. The formula to follow would be:
vbc /out:NameOfExecutate.exe Filename.vb
The NameOfExecutate represents the name you want the executable to have. If the name you want is in one word, you can just type it. Here is an example:
vbc /out:Welcome.exe Exercise.vb

If you want a name made of various words, you can include those words in double-quotes.
If you are creating your application using a text editor and if you create many files, when compiling the project, you must remember to reference each file. To do that, in the last section, add the name of each file with its extension:
vbc FileName1.vb FileName2.vb FileName_n.vb
The executable you get is the one you can use on other computers and that you can distribute to other people.
After building the code, you and your users can execute it. If you are working from the Command Prompt, to execute the project, type the name of the file that has the .exe extension and press Enter:

If you are working from Microsoft Visual C# 2010 Express or from Microsoft Visual Studio, to execute an application, on the main menu, you can click Debug -> Start Debugging.
Although you can creat a complete and fully functional application using a text editor, Microsoft Visual Studio and Microsoft Visual Basic 2010 Express provide a graphical environment that is more convenient. You start by creating a project. To create a project:
When you start a new application from the New Project dialog box, you are asked whether you want to create a new solution too, and you must give it a name. By default, the new project and solution would hold the same name. If you accept the suggestions, you would get a main folder with the name of the project. Inside of that folder, there would be a folder with the same name. That inside folder would represent the project. After creating a solution, its name appears on the title bar of Microsoft Visual Studio. The name of the project would appear in the Solution Explorer.
The Solution Explorer is a window that displays a list of the files that make up a project. To access the Solution Explorer:
The Solution Explorer is made of four sections. Like every regular window, the Solution Explorer is equipped with a title bar that displays its name on the left side and three buttons on the right side:
Under its title bar, the second section of the Solution
Explorer is a toolbar:
The third part of the Solution Explorer is its body. It shows the folders, files, and resources that are part of the current project. To expand a node, you can either click its button or double-click its name. To collapse a node, either click its button or double-click it. The root of the list is the name of the solution. Under the root is the name of the current project. If the solution contains more than one project, the name of each project is represented under the solution. Inside of the project are its folders, files, and resources. The first item under a project name is References. After the References node, there are the names of the classes that are part of the project. The fourth part of the Solution Explorer is its tab.
The Properties window shows the Windows operating system's details of the files or resources used in a project. To display it:
The display and rectangular behavior of the Properties window follows the description we had for the Solution Explorer. To show the operating system's characteristics of a project or a file, in the Solution Explorer, click the object:
The Properties window displays different fields depending on the item selected in the Solution Explorer. You can change some things in the Properties window. When a field is disabled, it means you cannot modify it. |
|
|
|||
| Home | Copyright © 2008-2024, FunctionX, Inc. | Monday 14 February 2016 | Next |
|
|
|||