
Form and Dialog-Based Applications
 |
Form and Dialog-Based Applications |
|
|
|
Private Sub Form1_DoubleClick(ByVal sender As Object, ByVal e As System.EventArgs) Handles MyBase.DoubleClick
        Dim Other As Form

        Other = New Second
        Other.Show()
End Sub
|
Private Sub Second_Closing(ByVal sender As Object, ByVal e As System.ComponentModel.CancelEventArgs) Handles MyBase.Closing
        ' When the user attempts to close the form, don't close it
        e.Cancel = True
        ' Only hide it
        Me.Visible = False
End Sub
|
Public Class Form1
    Inherits System.Windows.Forms.Form
    Private Other As Form

#Region " Windows Form Designer generated code "

    Public Sub New()
        MyBase.New()

        'This call is required by the Windows Form Designer.
        InitializeComponent()

        'Add any initialization after the InitializeComponent() call
        Other = New Second

    End Sub

    . . . No Change

#End Region

    Private Sub Form1_DoubleClick(ByVal sender As Object, ByVal e As System.EventArgs) Handles MyBase.DoubleClick

        Other.Visible = True
    End Sub
End Class
|
|
Inherited and Derived Forms |
|
Besides adding a form by using the previously reviewed technique, you can create a form that is based on another existing form. This is done through inheritance. All of the forms we have used so far were in fact classes derived from the .NET Framework's Form class of the System.Windows.Forms namespace. If you create a good looking or good functional form, you can create another form that is simply based on that first form. This can simplify design and functionality because the new form can use all of the functionality of the base. You can then only build on top of it. After creating a form, to derive another form from it, on the main menu, click Project -> Add Inherited Form... In the Add New Item dialog box, you can type a name for the new form and click Open. This will open the Inheritance Picker dialog box in which you can select an existing form. The Inheritance Picker dialog box displays, in a list view, the form that exist in the current application. If you have the base form in an external library, you can click the Browse button, locate the library that contains the base form and open it, then select the desired form. After selecting the base form, click OK |
|
|
Private Sub btnClose_Click(ByVal sender As System.Object, ByVal e As System.EventArgs) Handles btnClose.Click
        Close()
    End Sub
|
Private Sub btnAbout_Click(ByVal sender As System.Object, ByVal e As System.EventArgs) Handles btnAbout.Click
        Dim frmAbout As Form
        frmAbout = New About

        frmAbout.Show()
    End Sub
|
Private Sub btnValidate_Click(ByVal sender As System.Object, ByVal e As System.EventArgs) Handles btnValidate.Click
        MsgBox("This is an acknowledgement from the inheritance")
    End Sub
|
Private Sub CheckBox1_CheckedChanged(ByVal sender As System.Object, ByVal e As System.EventArgs) Handles CheckBox1.CheckedChanged
        If Me.CheckBox1.Checked Then Text = "Checked"
        If Me.CheckBox1.Checked = False Then Text = "Non Checked"
    End Sub
|
Private Sub btnHelper_Click(ByVal sender As System.Object, ByVal e As System.EventArgs) Handles btnHelper.Click
        Dim frmHelp As New Helper

        frmHelp.ShowDialog()
End Sub
|
|
Dialog Boxes |
|
Introduction |
|
A dialog box is a form defined with particular properties. Like a form, a dialog box is referred to as a container. It is the primary interface of user interaction with the computer. Like a form, a dialog box is mostly used to host child controls, insuring the role of dialog between the user and the machine. Here is an example of a dialog box: 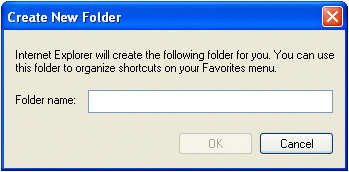 A dialog box has the following characteristics:
|
|
Dialog Box Creation |
|
There are two main actions you can perform on a form to transform it into a dialog box; but normally, these are only suggestions, not rules. Based on the Microsoft Windows design and standards, to create a dialog box:
Often the user will be presented with various options on a dialog box and may be asked to make a decision on the available controls. Most of the time, if you are creating such a dialog box, besides the OK button, it should also have a Cancel button. The OK button should be the default so that if the user presses Enter, the dialog box would be closed as if the user had clicked OK. Clicking OK or pressing Enter would indicate that, if the user had made changes on the controls of the dialog box, those changes would be acknowledged and kept when the dialog box is closed and usually the changed values of the control would be transferred to another dialog box or form. Keep in mind that you are responsible for implementing this functionality. To fulfill this functionality of the OK button, after adding it to a dialog box (or form), open the AcceptButton combo box in the Properties window for the form and select the name of the button. The Cancel button is used to allow the user to dismiss whatever changes would have been made on the controls of the dialog box. The dialog box should also be configured so that if the user presses Esc, the dialog box would be closed as if the user had clicked Cancel. To fulfill this functionality of the Cancel button, after adding it to a dialog box (or form), open the CancelButton combo box in the Properties window for the form and select the name of the button. Besides the OK and the Cancel buttons, a dialog box can be created with additional buttons such as Finish or Help, etc. It depends on its role and the decision is made by the application developer. |
|
Modal Dialog Boxes |
|
There are two types of dialog boxes: modal and modeless. A Modal dialog box is one that the user must first close in order to have access to any other framed window or dialog box of the same application. One of the scenarios in which you use a dialog box is to create an application that is centered around one. In this case, if either there is no other form or dialog box in your application or all the other forms or dialog boxes depend on this central dialog box, it must be created as modal. Such an application is referred to as dialog-based. Some applications require various dialog boxes to complete their functionality. When in case, you may need to call one dialog box from another and display it as modal. Here is an example: |
| The Date and Time dialog box of WordPad is modal: when it is displaying, the user cannot use any other part of WordPad unless he or she closes this object first |  |
|
After creating a dialog used as an addition to an existing form or an existing dialog box, to call it as modal, use the ShowDialog() method. |
|
Modeless Dialog Boxes |
|
A dialog box is referred to as modeless if the user does not have to close it in order to continue using the application that owns the dialog box. A modeless dialog box has the following characteristics
Here is an example: |
| The Find (and the Replace) dialog box of WordPad (also the Find and the Replace dialog boxes of most applications) is an example of a modeless dialog box. If it is opened, the user does not have to close it in order to use the application or the document in the background. | 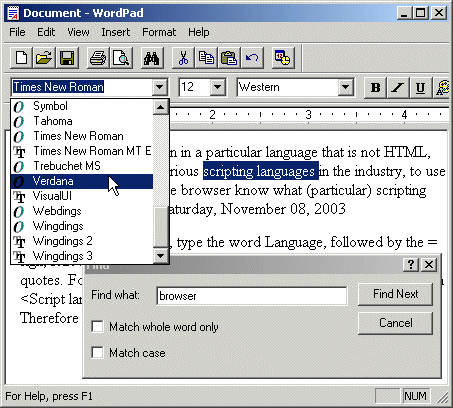 |
|
Since the modeless dialog box does not display its button on the task bar, the user should know that the dialog box is opened. To make the presence of a modeless dialog box obvious to the user, it typically displays on top of its host application until the user closes it. Just like the Modal dialog box, to create a modeless dialog box, once you have added a form to your application, to call it as a modeless dialog box, simply call the Show() method. The only thing you need to take care of is the fact that the dialog box can disappear behind the form that called it. A modeless dialog box is created from a form but it should look like a regular dialog box or a tool window. Therefore, to create a modeless dialog box, set the FormBorderStyle property to an appropriate value such as FixedSingle, FixedToolWindow, Sizable or SizableToolWindow. Also, set its ShowInTaskbar property to False. The fundamental difference between the ShowDialog() and the Show() methods is that the first displays a modal dialog box, which makes sure that the called dialog box cannot go in the background of the main application. By contrast, the Show() method only calls the dialog box every time it is requested. For this reason, it is up to you to make sure that the modeless dialog box always remains on top of the application. This is easily taken care of by setting the Boolean TopMost property of the form to True. There are two main ways a normal modeless dialog box can be dismissed:
|
|
Messages Boxes |
|
Introduction |
|
A message box is a special dialog box used to display a piece of information to the user. As opposed to a regular form, the user cannot type anything on the dialog box. There are usually two kinds of message boxes you will create: one that simply displays information and one that expects the user to make a decision. Although it displays as a dialog box, a message box is created from a built-in function. Three are three functions you can use to create a message box. |
|
The MsgBox Function |
|
Microsoft Visual Basic provides the MsgBox() function used to easily create a message box. To display a simple message with just an OK button, use the MsgBox function with the following syntax: MsgBox() In this case, the message to display must be passed as a string to the function. Here is an example: |
Private Sub Button1_Click(ByVal sender As System.Object, ByVal e As System.EventArgs) Handles Button3.Click
        MsgBox("Welcome to the Wonderful World of Visual Basic")
End Sub
|
If you use this version of the MsgBox() function to create a message box, its title bar would display the name of the application that owns the message box: 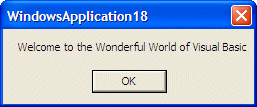 In reality, the MsgBox() function provides more arguments to create a complete message box with various options. The syntax of the MsgBox function is Public Function MsgBox(ByVal Prompt As Object, _
Optional ByVal Options As MsgBoxStyle = MsgBoxStyle.OKOnly, _
Optional ByVal Title As Object = Nothing _
) As MsgBoxResult
The Prompt argument is the string that the user will see displaying on the message box. You can pass it as a string. You can also create it from other pieces of strings. The Prompt argument can be made of up to 1024 characters. To display the Prompt on multiple lines, you can use either the constant vbCrLf or the combination Chr(10) & Chr(13) between any two strings. The Options argument specifies what button or buttons and/or small icon should display on the message box. The available options are defined in the MsgBoxStyle enumerator. The buttons available are:
To use any of these combinations of buttons, call the MsgBoxStyle enumerator and access the desired combination. Here is an example: |
Private Sub Button3_Click(ByVal sender As System.Object, ByVal e As System.EventArgs) Handles Button3.Click
        MsgBox("Your order appears to be correct" & vbCrLf & _
                     "Are you ready to provide your credit card information?", _
                     MsgBoxStyle.YesNoCancel)
End Sub
|
This would produce: 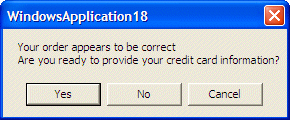 Besides displaying the button(s), you can add other options. To combine options, you use the bit manipulation operator OR. For example, after specifying the buttons on the message box, you can decide which one would be the default, that is, which button would be activated if the user presses Enter instead of clicking. You can set the default argument using the following table
Here is an example of combining styles: |
Private Sub Button3_Click(ByVal sender As System.Object, ByVal e As System.EventArgs) Handles Button3.Click
        MsgBox("Your order appears to be correct" & vbCrLf & _
                     "Are you ready to provide your credit card information?", _
                     MsgBoxStyle.YesNoCancel Or MsgBoxStyle.DefaultButton2)
End Sub
|
These additional buttons can be used to further control what the user can do:
Besides the buttons, you can display an icon on the message box. The available icons are:
Here is an example: |
|||||||||||||||||||||||||||||
Private Sub Button3_Click(ByVal sender As System.Object, ByVal e As System.EventArgs) Handles Button3.Click
        MsgBox("Your order appears to be correct" & vbCrLf & _
                     "Are you ready to provide your credit card information?", _
                     MsgBoxStyle.YesNoCancel Or MsgBoxStyle.Information Or MsgBoxStyle.SystemModal)
End Sub
|
The MessageBox Class |
|
To support its own implementation of a message box, the .NET Framework provides the MessageBox class. This class has one one method called Show() but overloaded in various versions. The Show() method is static, meaning that you don't need and must never declare a variable of type MessageBox to display a message box using this class. To create a simple message box using the MessageBox class, you can pass a single string to its Show() method. In this case, the message box would display the name of the application as its caption. If you want to display your own caption, pass it as a second argument to the method. |
|
The Win32 API's Message Box |
|
Visual Basic provides as much flexibility as needed to create a message using either its own the MsgBox() function or the .NET Framework's MessageBox class. You still have one more option. The Win32 API provides a function called MessageBox. Its syntax is: int MessageBox(HWND hWnd,
LPCTSTR lpText,
LPCTSTR lpCaption,
UINT uType);
This function provides the same options as the MsgBox() function reviewed earlier. To use this function, you must include its library using Declare Auto Function as we review already. Here is an example: |
Public Class Form1
    Inherits System.Windows.Forms.Form
    Const MB_OK = &H0
    Const MB_ICONEXCLAMATION = &H30

    Declare Auto Function FMessageBox Lib "user32.dll" _
    Alias "MessageBox" (ByVal hWnd As Integer, _
                        ByVal txt As String, ByVal caption As String, _
                        ByVal Typ As Integer) As Integer

#Region " Windows Form Designer generated code "

    Public Sub New()
        MyBase.New()

        'This call is required by the Windows Form Designer.
        InitializeComponent()

        'Add any initialization after the InitializeComponent() call

    End Sub

    . . . No Change

#End Region

    Private Sub Button1_Click(ByVal sender As System.Object, ByVal e As System.EventArgs) Handles Button1.Click
        FMessageBox(0, _
                               "The credit card information you provided is not correct", _
                               "Sales Processing", _
                               MB_OK Or MB_ICONEXCLAMATION)
    End Sub
End Class
|
This would produce: 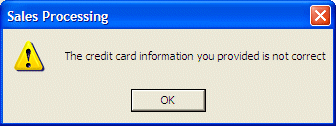 Besides displaying a message, this function can also return a value depending on the button the user would have clicked. |
|
The Input Box |
|
Introduction |
|
An input box is a specially designed dialog box that allows the programmer to request a value from the user and use that value as necessary. An input box displays a title, a message to indicate the requested value, a text box for the user, and two buttons: OK and Cancel. Here is an example: 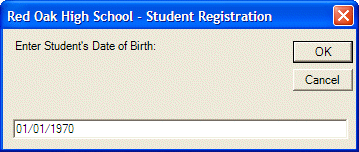 When an input box displays, it presents a request to the user who can then provide a value. After using the input box, the user can change his or her mind and press Esc or click Cancel. If the user provided a value and want to acknowledge it, he can click OK or press Enter. This would transfer the contents of the text box to the application that displayed the input box.
|
|
Creating an Input Box |
|
To create an input box, you can use the InputBox() function. Its syntax is: Public Function InputBox(ByVal Prompt As String, _
Optional ByVal Title As String = "", _
Optional ByVal DefaultResponse As String = "", _
Optional ByVal XPos As Integer = -1, _
Optional ByVal YPos As Integer = -1 _
) As String
The only required argument of this function is the message that prompts the user. Here is an example: |
Private Sub Button4_Click(ByVal sender As System.Object, ByVal e As System.EventArgs) Handles Button4.Click
        InputBox("Enter Student's Date of Birth:")
End Sub
|
This would produce
When calling the InputBox() function, if you pass only the Prompt argument, the input box would display the name of the application in the title bar. If you want, you can specify your own caption through the Title argument. Here is an example: Private Sub Button4_Click(ByVal sender As System.Object, ByVal e As System.EventArgs) Handles Button4.Click
InputBox("Enter Student's Date of Birth:", "Red Oak High School - Student Registration")
End Sub
Upon reading the message on the Input box, the user is asked to enter a piece of information. The type of information the user is supposed to provide depends on you, the programmer. Therefore, there are two important things you should always do. First you should let the user know the type of information requested. Is it a number (what type of number)? Is it a string (such as the name of a country or a customer's name)? Is it the location of a file (such as C:\Program Files\Homework)? Are you expecting a Yes/No True/False type of answer (if so how should the user provide it)? Is it a date (if it is a date, what format is the user supposed to enter)? These questions indicate that you should state a clear request to the user. For example, instead of the above simple request, you can implement the InputBox() function as follows: |
Private Sub Button4_Click(ByVal sender As System.Object, ByVal e As System.EventArgs) Handles Button4.Click
        InputBox("Enter Student's Date of Birth (mm/dd/yyyy):", _
                 "Red Oak High School - Student Registration")
End Sub
|
This would produce:
Sometimes, even if you provide an explicit prompt, the user might not provide a new value but click OK. The problem is that you would still need to get the value of the text box and you might want to involve it in an expression. You can solve this problem and that of providing an example to the user by filling the text box with a default value. This can be taken care of through the DefaultResponse argument. Here is an example: |
Private Sub Button4_Click(ByVal sender As System.Object, ByVal e As System.EventArgs) Handles Button4.Click
        InputBox("Enter Student's Date of Birth (mm/dd/yyyy):", _
                       "Red Oak High School - Student Registration", "01/01/1970")
End Sub
|
The last two arguments, XPos and YPos, allow you to specify the default position of the input box when it comes up the first time. After typing a value, the user would click one of the buttons: OK or Cancel. If the user clicks OK, you should retrieve the value the user would have typed. It is also your responsibility to find out whether the user typed a valid value or not. Because the InputBox() function returns a string, it has no mechanism of validating the user's entry. Based on this, you can retrieve the value of the Input Box when the user clicks OK. Here is an example: |
Private Sub Button4_Click(ByVal sender As System.Object, ByVal e As System.EventArgs) Handles Button4.Click
        Dim DOB As String = InputBox("Enter Student's Date of Birth:")
End Sub
|
|
||
| Previous | Copyright © 2004-2010 FunctionX, Inc. | Next |
|
|
||