Home

Application Online Help


Providing Help 


Introduction

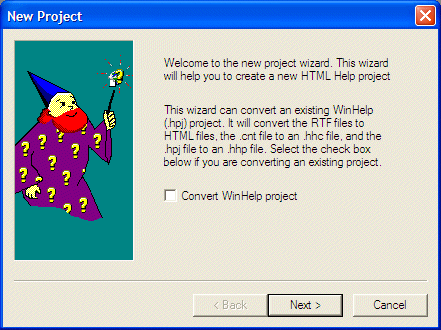
Providing help is one of the most neglected areas of development, especially for beginning programmers. There are various reasons to Me. Some programmers tend to think that help is such a small job that it should be left to non-programmers. This has never been a valid argument since the person who creates an application knows it more than anybody. This means that asking someone else to create help for an application would only slow the process because the other person would need to have new and more information about the application. Another reason is that, most programmers who want to take care of programming when creating an application think that they are working double to create a single program. This drives them to set this aspect aside and continue only with the application, thinking that they can come back to taking care of help when the application is complete. What makes this unrealistic is that, sometimes when they finish the application, they are "tired".

There are various small techniques you can use to provide help in your application.


Practical LearningPractical Learning: Introducing Help

  1. Start a Windows Application named CIC1
  2. Change the form's Text to Clarksville Ice Cream
  3. Design the form as follows:
     
    Control Name Text Additional Properties
    GroupBox      
    Label   Order Date:  
    DateTimePicker dtpOrderDate   Format: Short
    Label   Order Time:  
    DateTimePicker dtpOrderTime   Format: Time
    ShowUpDown: True
    Label   Flavor:  
    ComboBox cboFlavors   DropDownStyle: DropDownList
    Label   Container:  
    ComboBox cboContainers   DropDownStyle: DropDownList
    Label   Ingredient:  
    ComboBox cboIngedients   DropDownStyle: DropDownList
    Label   Scoops:  
    TextBox txtScoops 1 TextAlign: Right
    Label   Order Total:  
    TextBox txtOrderTotal 0.00 TextAlign: Right
    Button btnCalcTotal Calculate Total  
    Button btnNewOrder New Order  
  4. Click the combo box to the right of the Flavor label. Then, in the Properties, click the ellipsis button Ellipsis of Items property and create the list with:
     
    Vanilla
    Cream of Cocoa
    Chocolate Chip
    Cherry Coke
    Butter Pecan
    Chocolate Cookie
    Chunky Butter
    Organic Strawberry
    Chocolate Brownies
    Caramel Au Lait
  5. Click OK
  6. Click the combo box to the right of the Container label. Then, in the Properties, click the ellipsis button of Items property and create the list with:
     
    Cone
    Cup
    Bowl
  7. Click OK
  8. Click the combo box to the right of the Ingredient label. Then, in the Properties, click the ellipsis button of Items property and create the list with:
     
    None
    Peanuts
    Mixed Nuts
    M & M
    Cookies
  9. Click OK
  10. Double-click the Calculate Total button to access its Click event
  11. Implement it as follows:
     
    Private Sub btnCalcTotal_Click(ByVal sender As System.Object, ByVal e As System.EventArgs) Handles btnCalcTotal.Click
            Dim Container As String
            Dim dblPriceByContainer As Double
            Dim Ingredient As Integer
            Dim dblIngredient As Double
            Dim Scoops As Integer
            Dim dblScoops As Double
            Dim OrderTotal As Double
    
            ' First find out what container the customer requested
            Container = Me.cboContainers.Text
    
            ' The price of a container depends on which one the customer selected
            If Container = "Cone" Then
                dblPriceByContainer = 0.55
            ElseIf Container = "Cup" Then
                dblPriceByContainer = 0.75
            Else
                dblPriceByContainer = 1.15
            End If
    
            ' Find out if the customer wants any ingredient at all
            Ingredient = Me.cboIngredient.SelectedIndex
    
            ' If the customer selected an ingredient, which is not "None", add $.95
            If Ingredient > 1 Then
                dblIngredient = 0.95
            End If
    
            ' Get the number of scoops
            Scoops = CInt(Me.txtScoops.Text)
            If Scoops = 2 Then
                dblScoops = 2.55
            ElseIf Scoops = 3 Then
                dblScoops = 3.25
            Else
                dblScoops = 1.85
            End If
    
            ' Make sure the user selected a flavor, otherwise, there is no reason to process an order
            If Me.cboFlavors.SelectedIndex > 0 Then
                OrderTotal = dblScoops + dblPriceByContainer + dblIngredient
                Me.txtOrderTotal.Text = OrderTotal.ToString("C")
            End If
        End Sub
  12. Double-click the New Order button to access its Click event and implement it as follows:
     
    Private Sub btnNewOrder_Click(ByVal sender As System.Object, ByVal e As System.EventArgs) Handles btnNewOrder.Click
            ' If the user clicks New Order, we reset the form with the default values
            Me.dtpOrderDate.Value = DateTime.Today
            Me.dtpOrderTime.Value = DateTime.Now
            Me.cboFlavors.SelectedIndex = -1
            Me.cboContainers.SelectedIndex = -1
            Me.cboIngredient.SelectedIndex = 0
            Me.txtScoops.Text = "1"
            Me.txtOrderTotal.Text = "0.00"
    End Sub
  13. Test the application. Here is an example:
     
    Clarksville Ice Cream
  14. Close the form and return to Visual Studio
 

Status Bar Messages

One way you can provide simple help consists of displaying short indicative messages on a status bar. To do this, you can first create sections, called panels, on a status bar and then display the necessary messages in the section of your choice. The message can be anything but it should consist of just a few words to fit in its section without going over board.


Practical LearningPractical Learning: Helping Through a Status Bar

  1. Display the from and expand its bottom border a little bit
  2. On the Toolbox, click StatusBar and click the bottom section of the form
     
  3. In the Properties window, set the ShowPanels property to True
  4. To create the sections of the status bar, click the ellipsis button of the Panels field
  5. In the StatusBarPanel Collection Editor, click Add and change the following values:
    Width: 340
    Text: Ready
  6. Click Add and change the following value:
    Width: 60
    Text:
    Delete the text
  7. Click OK
  8. Right-click anywhere in the form and click View Code
  9. In the Class Name combo box, select dtpOrderDate. In the Method Name, click GotFocus
  10. In the same way, initiate the GotFocus event of the dtpOrderTime date time picker, the cboFlavors combo box, the cboContainers combo box, the cboIngredients combo box, the txtScoops text box, and the txtOrderTotal text box
  11. Implement the events as follows:
     
        ' Display a friendly message in the left section of the status bar
        Private Sub dtpOrderDate_GotFocus(ByVal sender As Object, ByVal e As System.EventArgs) Handles dtpOrderDate.GotFocus
            Me.StatusBar1.Panels(0).Text = "Specify the date this order was processed"
        End Sub
    
        Private Sub dtpOrderTime_GotFocus(ByVal sender As Object, ByVal e As System.EventArgs) Handles dtpOrderTime.GotFocus
            Me.StatusBar1.Panels(0).Text = "Specify the time this order was processed"
        End Sub
        
        Private Sub cboFlavors_GotFocus(ByVal sender As Object, ByVal e As System.EventArgs) Handles cboFlavors.GotFocus
            Me.StatusBar1.Panels(0).Text = "Select the customer's desired flavor"
        End Sub
    
        Private Sub cboContainers_GotFocus(ByVal sender As Object, ByVal e As System.EventArgs) Handles cboContainers.GotFocus
            Me.StatusBar1.Panels(0).Text = "Select the type of object that will contain the ice cream"
        End Sub
    
        Private Sub cboIngredient_GotFocus(ByVal sender As Object, ByVal e As System.EventArgs) Handles cboIngredient.GotFocus
            Me.StatusBar1.Panels(0).Text = "Select an ingredient to ""spice"" the ice cream"
        End Sub
    
        Private Sub txtScoops_GotFocus(ByVal sender As Object, ByVal e As System.EventArgs) Handles txtScoops.GotFocus
            Me.StatusBar1.Panels(0).Text = "Select the number of scoops to fill the container"
        End Sub
    
        Private Sub txtOrderTotal_GotFocus(ByVal sender As Object, ByVal e As System.EventArgs) Handles txtOrderTotal.GotFocus
            Me.StatusBar1.Panels(0).Text = "This displays the total of the order"
        End Sub
  12. Test the application
     
    Messages of the Status Bar
  13. After using it, close the form and return to Visual Studio
 

Tool Tips

A tool tip is a small yellow box that displays a word or a group of words when the user positions the mouse on top of a control:

To create a tool tip system in a Visual Studio application, first add a ToolTip control to a form. After adding a ToolTip control, the form and all controls on it receive a new field in the Properties window. If the new ToolTip control is called ToolTip1, the new field in the Properties window for each control is ToolTip on ToolTip1. To display a tool tip for a control, first click it on the form. Then, in the Properties window, click ToolTip on ToolTip1, and type the desired tool tip.


Practical LearningPractical Learning: Adding Tool Tips

  1. To prepare for tool tips, on the Toolbox, click ToolTip and click the form
  2. On the form, click each control and, in the Properties window, set its ToolTip On ToolTip1 property as follows:
     
    Control ToolTip On ToolTip1
    dtpOrderDate Click the arrow to select a date
    dtpOrderTime Click each section, then click one of the arrows to change its value
    cboFlavors Click the arrow to display a list, then select a flavor from the list
    cboContainers Click to display the list of containers and select one
    cboIngedients Display the list of ingredients and make the customer's choice
    txtScoops Enter the number of scoops (1, 2, or 3) to fill the container
    txtOrderTotal This displays the total amount of this order
    btnCalcTotal Click here to calculate the total of the order
    btnNewOrder Click here to reset the form
  3. Test the application
     
    Using Tool Tips
  4. Close it and return to Visual Studio
 

Online Help


Introduction

Online help is the system of providing help files with an application. Online help is usually available from the main menu through a menu group created under a Help category.

In the past, the techniques to provide or program online help were not always easy. The early implementations of help were created in a system called WinHelp. This required using a Rich Text Format (rtf) file and appropriately formatting it. It is possible that, when folks at Microsoft developed WinHelp, they had only Microsoft Word in mind. It was difficult to get the required file ready if you were using another application such as WordPad or WordPerfect... Creating the help file was not enough. Once the file was ready, it had to be added to the application, and appropriately. This back and forth gymnastic was a great motivation for neglect. As if these difficulties were not enough, or because of these difficulties, Microsoft created another system called HTML Help. This neither solved most problems nor created an easier solution. At this time, this HTML Help is widely used and many companies, such as AutoDesk (AutoCAD) and Macromedia to name just two, have adopted it . Many companies such as Borland, Jasc, just to name two, are still using WinHelp. This indicates that HTML Help didn't solve all problems and was not anonymously adopted.

Because HTML Help is the most supported help system by Microsoft, we will use it. Also, it is easier to use HTML Help in a Microsoft Visual Studio application than to use WinHelp.


Practical LearningPractical Learning: Introducing Online Help

  1. To create a new form, on the main menu, click Project -> Add Windows Form...
  2. In the Add New Item dialog box, change the name of the form to Calculation and press Enter
  3. Design the new form as follows:
     
    Clarksville Ice Scream - Difference Calculation
    Control Name Text Additional Properties
    Label   Order Total:  
    TextBox txtOrderTotal 0.00 TextAlign: Right
    Label   Amount Tended:  
    TextBox txtAmountTended 0.00 TextAlign: Right
    Button btnCalculate Calculate  
    Label   Difference:  
    TextBox txtDifference 0.00 TextAlign: Right
    Button btnClose Close  
  4. Double-click both buttons and implement their Click events as follows:
     
    Private Sub btnCalculate_Click(ByVal sender As System.Object, ByVal e As System.EventArgs) Handles btnCalculate.Click
            Dim TotalOrder As Double
            Dim AmountTended As Double
            Dim Difference As Double
    
            ' Get the value of the total order. Actually, this value will be provided by the main form
            TotalOrder = CDbl(Me.txtTotalOrder.Text)
            ' The amount tended will be entered by the user
            AmountTended = CDbl(Me.txtAmountTended.Text)
            ' Calculate the difference of both values, assuming that the amount tended is higher
            Difference = AmountTended - TotalOrder
    
            ' Display the result in the Difference text box
            Me.txtDifference.Text = Difference.ToString("C")
    End Sub
    
    Private Sub btnClose_Click(ByVal sender As System.Object, ByVal e As System.EventArgs) Handles btnClose.Click
            Close()
    End Sub
  5. Display the first form (Form1.vb (Design))
  6. Add a new button to the bottom-right side of the form
  7. Change its values in the Properties window as follows:
    Name: btnCalcDifference
    Text: Calculate Difference
    Enabled: False
    ToolTip on ToolTip1: Click to calculate the amount owed to the customer
  8. Double-click the Calculate Difference button and implement its Click event as follows:
     
    Private Sub btnCalcDifference_Click(ByVal sender As System.Object, ByVal e As System.EventArgs) Handles btnCalcDifference.Click
            ' Declare a variable for the Calculation form
            Dim dlgCalculation As New Calculation
    
            ' Transfer the current value of the Order Total text box from the main form to the other form
            dlgCalculation.txtTotalOrder.Text = Me.txtOrderTotal.Text
            ' Display the other form
            dlgCalculation.ShowDialog()
    End Sub
  9. Change the Click events of the Calculate Total  and the New Order buttons as follows:
     
    Private Sub btnCalcTotal_Click(ByVal sender As System.Object, ByVal e As System.EventArgs) Handles btnCalcTotal.Click
            
            . . . No Change
    
            ' Make sure the user selected a flavor, otherwise, there is no reason to process an order
            If Me.cboFlavors.SelectedIndex > 0 Then
                OrderTotal = 2.25 + dblPriceByContainer + dblIngredient
                Me.txtOrderTotal.Text = OrderTotal.ToString("C")
                ' Once an order has been processed, the user should be able to calculate the difference
                Me.btnCalcDifference.Enabled = True
            End If
    End Sub
    
    Private Sub btnNewOrder_Click(ByVal sender As System.Object, ByVal e As System.EventArgs) Handles btnNewOrder.Click
            ' If the user clicks New Order, we reset the form with the default values
            Me.dtpOrderDate.Value = DateTime.Today
            Me.dtpOrderTime.Value = DateTime.Now
            Me.cboFlavors.SelectedIndex = -1
            Me.cboContainers.SelectedIndex = -1
            Me.cboIngredient.SelectedIndex = 0
            Me.txtScoops.Text = "1"
            Me.txtOrderTotal.Text = "0.00"
            ' When the customer form is reset, the Calculate Difference button should be disabled
            Me.btnCalcDifference.Enabled = False
    End Sub
  10. Test the application. Here is an example:
     
  11. After using it, close it and return to Visual Studio
 

The Help Provider

Context-sensitive help allows the user to get local help on a particular control. This works by the user who can first click a control and then press Shift+F1. This displays a yellow box with a word or a group of words:

This help is easier to provide in a dialog box because a dialog has a feature not available on a form. It consists of adding a button with a question mark and then creating the words that would display eventually. When you create this type of dialog box, the user can click the question marked button and click a control. The user can also press Shift+F1. This causes the mouse pointer to be equipped with a question mark. The user can then click a control and a yellow box would appear for that control, providing help.


To make it easy to provide online help in a Visual Studio application, the .NET Framework provides the HelpProvider control. After adding this control to the application, the form and all controls on it receive a new property labeled HelpString On HelpProvider1. You can then type the desired string in the field of the Properties window for each control that would display context-sensitive help. 


Practical LearningPractical Learning: Using Context-Sensitive Help

  1. Display the Calculation form and click an area area to select the form
  2. Change the following values of the form in the Properties window (all of these properties will be explained in a future lesson on forms):
    FormBorderStyle: Fixed Dialog
    HelpButton: True
    MaximizeBox: False
    MinimizeBox: False
    ShowInTaskbar: False
  3. On the Toolbox, click HelpProvider and click the form
     
    Help Provider
  4. Using the Properties window, change the following values for the indicated controls:
     
    Control HelpString On HelpProvider1
    txtOrderTotal This is the total amount of the current order
    txtAmountTended This is the amount the customer tended
    btnCalculate Click here to calculate the difference between the amount tended and the total price of the order
    txtDifference This displays the difference between the amount tended and the total of the order
    btnClose Click here to close the dialog box
  5. Execute the application
  6. When it displays, process an order and click the Calculate Difference button
  7. In the Calculation dialog box, click the question mark button in the title bar and click on the text boxes or buttons
     
  8. After using the application, close the forms and return to Visual Studio
  9. Display the main form (Form1.vb (Design))
  10. To add a menu to the application, on the Toolbox, click MainMenu and click the form
  11. On the form, click Type Here. Type &File and press the down arrow key
  12. Type E&xit and press Enter
  13. On the right side of File (on the form), click Type Here
  14. Type &Help and press the down arrow key
  15. Type &Contents... and press the down arrow key
  16. Type &Index... and press the down arrow key
  17. Type &Search... and press Enter
     
    Application with Main Menu
  18. On the form, click File and double-click Exit
  19. Implement its event as follows:
     
    Private Sub MenuItem2_Click(ByVal sender As System.Object, ByVal e As System.EventArgs) Handles MenuItem2.Click
            End
    End Sub
  20. Test the application then close it and return to Visual Studio
 

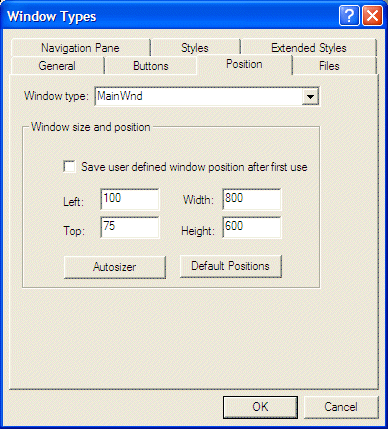
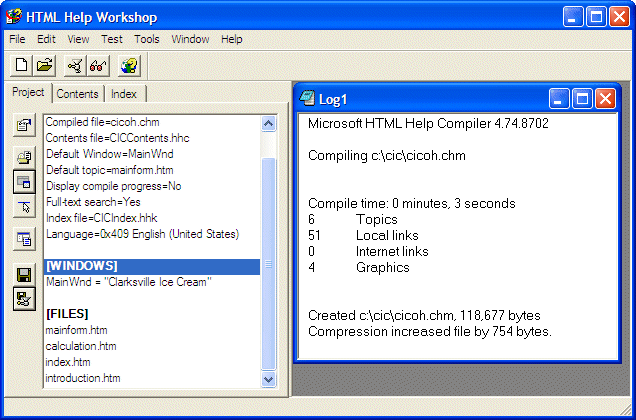
Introduction to HTML Help

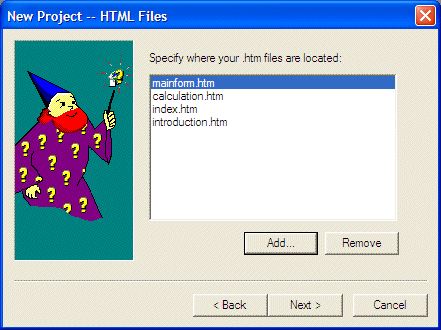
The online help we described above provides only small yellow boxes. It is called context-sensitive because it provides its assistance on only a control of the form. Another technique, in fact highly supported with any commercial program, consists of providing an external application that resembles a book. This allows the user to get more detailed information about almost any aspect of the application. To provide online help in a Visual Studio application, you can use an external system. This consists of creating a complete application whose only purpose is to describe another application. This means that, in the beginning, both applications are not related in any way. With HTML Help, you must first create HTML files. You create these files anyway you like but, in this case, they are meant to provide support for a specific application. Therefore, when creating the files, try to divide them by issues. For example, you can create a file for each form of your application and use that file to describe what the form or dialog box is used for. You still can use any approach to create the files you would need. Experience will guide you eventually into knowing what to put in those files.

After creating the HTML files, you can open HTML Help Workshop which is a complete but separate application. This application is freely available from Microsoft and you can download it from the MSDN web site.


Practical LearningPractical Learning: Creating an HTML Help File

  1. Using Windows Explorer or My Computer, create a folder named cis
  2. Inside of the cis folder, create a folder named images
  3. Save the following pictures in the cis\images folder:
     
  4. Start Notepad and create a Cascading Style Sheet file to format the body tag and the main title of the pages. Here is an example:
     
    body
    
    	font-size: 10pt;
    	color: black;
    	margin-top: 0pt;
    	margin-left: 0pt;
    	font-family: Verdana, Tahoma, Arial, Sans-Serif;
    End
    
    .maintitle
    
    	font-weight: bold;
    	font-size: 24pt;
    	color: blue;
    	font-family: Garamond, Georgia, 'Times New Roman' , Serif;
    End
  5. Save the file as cis.css in the cis folder
  6. Start another file with the following contents
     
    <html>
    
    <head>
    
    <link rel="stylesheet" type="text/css" href="cis.css">
    
    <title>Overview of Clarksville Ice Cream</title>
    </head>
    
    <body>
    
    <table border="0" width="100%" cellspacing="0" cellpadding="0">
      <tr>
        <td width="100%" align="center"><p class="maintitle">Overview of Clarksville Ice Cream</p></td>
      </tr>
      <tr>
        <td width="100%" bgcolor="#0000FF" height="2"></td>
      </tr>
    </table>
    
    <p>&nbsp;</p>
    <center><img border="0" src="images/main1.gif" alt="The main window of the application" width="424" height="295"></center>
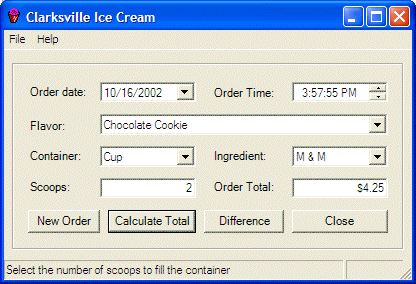
    <p>Clarksville Ice Cream is a computer application used to process customers
    orders. It allows an employee to receive requests from a customer, based on what
    is available in the menu. When the order is complete, an ice cream is
    &quot;prepared&quot; and handed to the customer. As a commercial business, the
    application calculates the total amount. The amount is read to the customer who
    hands money to the clerk to complete the transaction</p>
    
    </body>
    
    </html>
  7. Save it as introduction.htm
  8. Start another file with the following contents
     
    <html>
    
    <head>
    
    <link rel="stylesheet" type="text/css" href="cis.css">
    
    <title>Customer Order Form</title>
    </head>
    
    <body>
    
    <table border="0" width="100%" cellspacing="0" cellpadding="0">
      <tr>
        <td width="100%" align="center">
          <p class="maintitle">Customer Order Form</p>
        </td>
      </tr>
      <tr>
        <td width="100%" bgcolor="#0000FF" height="2"></td>
      </tr>
    </table>
    
    <p>&nbsp;</p>
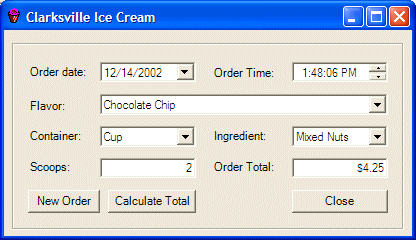
    <p>The main or opening window of this application displays a form used to
    process customers orders. The top section of the form, also called the title
    bar, is equipped with a menu called the main menu. this menu allows the user to
    start a new order or to close the application. To use this main menu, you can
    click one of the top-level words such as File. This causes the menu category of
    your choice to expand:</p>
    <center><img border="0" src="images/main2.gif" alt="The main menu" width="424" height="295"></center>
    <p>After using a menu item, you can click it or click somewhere else to collapse
    it.</p>
    
    <p>The other objects on the main form allow the user to process an order by
    selecting items from the Windows controls. Once an order is ready, the user can
    click the Calculate Total button. This evaluates the total price of the order
    and displays it in the text box on the right side of Order Total.</p>
    
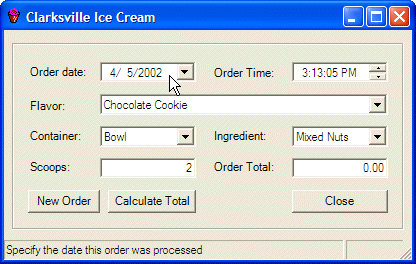
    <p>To start a new customer order, the user can click the New Order button. This
    resets all controls on the form:</p>
    
    <center><img border="0" src="images/main3.gif" alt="Customer Form Reset" width="424" height="295"></center>
    
    <p>When an order has been calculated, the user can click the Calculate
    Difference button to evaluate the diffence.</p>
    
    </body>
    
    </html>
  9. Save it as mainform.htm
  10. Start another file with the following contents
     
    <html>
    
    <head>
    
    <link rel="stylesheet" type="text/css" href="cis.css">
    
    <title>Difference Calculation</title>
    </head>
    
    <body>
    
    <table border="0" width="100%" cellspacing="0" cellpadding="0">
      <tr>
        <td width="100%" align="center">
          <p class="maintitle">Difference Calculation</p>
        </td>
      </tr>
      <tr>
        <td width="100%" bgcolor="#0000FF" height="2"></td>
      </tr>
    </table>
    
    <p>&nbsp;</p>
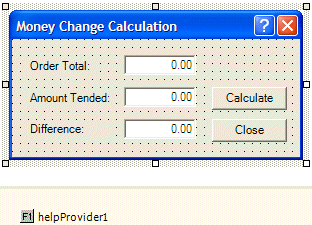
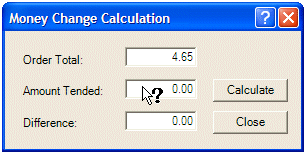
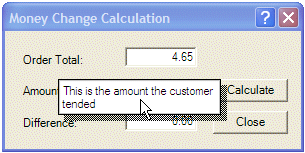
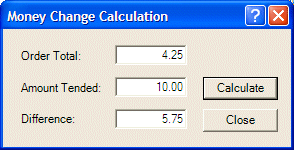
    <p>The Calculation dialog box allows a user to easily calculate the amount of
    money owed to a customer. After a customer has placed an order and given money
    to the clerk, the user can display this dialog box. When it comes up, the top
    text box of this window already displays the amount of the customer's order. The
    user can then simply enter the amount the customer gave in the Amount Tended
    text box. Then the user can click Calculate</p>
    <center><img border="0" src="images/calculation1.gif" width="304" height="152"></center>
    <p>When the user has clicked the Calculate button, it calculates the difference
    and displays it in the Difference text box. After using this dialog box, the
    user can close it by clicking Close.</p>
    <p>&nbsp;</p>
    
    </body>
    
    </html>
  11. Save it as calculation.htm
  12. Start another file with the following contents
     
    <html>
    
    <head>
    
    <title>Clarksville Ice Cream - Home</title></head>
    
    <body>
    <h1>Clarksville Ice Cream</h1>
    <p><a href="introduction.htm">Introduction</a></p>
    <p><a href="mainform.htm">The Main Form</a></p>
    <p><a href="calculation.htm">The Difference Calculation Dialog Box</a></p>
    </body>
    
    </html>
  13. Save it as index.htm
  14. Start HTML Help Workshop
  15. On the main menu of HTML Help Workshop, click File -> New
     
    HTML Help Workshop - New
  16. In the New dialog box, make sure Project is selected and click OK
     
    New Project Wizard - First Page
  17. In the first page of the New Project wizard, click Next
     
    New Project - Destination
  18. In the second page of the wizard, click Browse
  19. Locate the cic folder you created and display it in the Save In combo box
  20. Set the File Name to cicoh
     
    The Open Dialog Box
  21. Click Open
     
    New Project - Destination
  22. In the second page, click Next
     
    New Project - Existing Files
  23. In the third page, read the text. Click the HTML files (.htm) check box and click Next
  24. In the fourth page, click Add
  25. In the Open dialog box, press and hold Ctrl. Then click each htm file to select them all
     
    The Open Dialog Box - Selecting the HTML files
  26. Click Open
     
  27. In the fourth page, click Next
  28. In the last page of the wizard, click Finish
  29. In HTML Help Workshop, click the Contents tab
    In the dialog box that displays, make sure the first radio button is selected
     
    Table of Contents - Dialog Box
  30. Click OK
  31. In the Save As dialog box, change the name of the file to CISContents
     
    Save As
  32. Click Save
  33. Click the Insert a Heading button Insert a Heading
  34. In the Table Of Contents Entry dialog box, in the Entry Title text box, type Clarksville Ice Cream and click Add
  35. In the Path Or URL dialog box, select the Clarksville Ice Cream - Home and click OK

     
    Table of Contents Entry
  36. Click OK
  37. Click the Insert A Page button Insert A Page
  38. In the message box that displays, click No
  39. In the Entry Title text box, type Introduction and click Add
  40. In the Path Or URL dialog box, select the Overview of Clarksville Ice Cream and click OK
     
    Table Of Contents Entry - New File
  41. In the Table Of Contents Entry dialog box, click OK
  42. In the same way, create new pages under the Introduction heading using the following table
     
    New Page Title Page or URL
    Customer Order Form Customer Order Form
    Difference Calculation Difference Calculation
  43. In HTML Help Workshop, click the Index tab. In the dialog box that comes up, make sure the top radio button is selected
     
    Index Not Specified
  44. Click OK
  45. Set the name of the file to CISIndex and press Enter
  46. Click Insert A Keyword Insert A Keyword
  47. In the Keyword text box, type Calculation and click Add
  48. In the Path Or URL dialog box, click Difference Calculation and click OK twice
  49. In the same way, create new keywords using the following table (sometimes you may receive a message box asking whether you want to create the keyword above the other; it doesn't matter, for this exercise, whether you click Yes or No):
     
    New Keyword Page or URL
    amount Difference Calculation
    money Difference Calculation
    customer Difference Calculation
    order Difference Calculation
    clerk Difference Calculation
    window Difference Calculation
    Amount Tended Difference Calculation
    Calculate Difference Calculation
    Close Difference Calculation
    computer Overview of Clarksville Ice Cream
    Application Overview of Clarksville Ice Cream
    employee Overview of Clarksville Ice Cream
    menu Overview of Clarksville Ice Cream
    commercial Overview of Clarksville Ice Cream
    business Overview of Clarksville Ice Cream
    transaction Overview of Clarksville Ice Cream
    Main Menu Customer Order Form
    category Customer Order Form
    choice Customer Order Form
  50. Click the Sort Keywords Alphabetically button
     
  51. Click the Project tab
  52. Click the Add/Modify Window Definitions button Add/Modify Window Definitions
  53. Set the name to MainWnd and press Enter
  54. Set the Title Bar Text to Clarksville Ice Cream
  55. Click the Buttons tab then click the Home and the Locate check boxes

    Window Types - Buttons
  56. Click the Position tab
  57. Set the Width to 800 and the Height to 600
     
  58. Click the Files tab
  59. Set the Default and the Home choices to index.htm
     
  60. Click the Navigation Pane tab
  61. Click the Search Tab check box
     
  62. Click OK
     
  63. When the Resolve Window Definition wizard comes up, in the first page, make sure the window defined previously is selected in the Window Type combo box. Click the Compile Full-Text Information check box
     
    Resolve Window Definition - Finish
  64. Click Next
  65. In the second page, accept the defaults and click Next
  66. In the third page, accept the default and click Finish
  67. To create the help file, click the Save All Files And Compile button Save All Files And Compile
     
  68. When the compilation is over, close the HTML Help Workshop window
 

HTML Help and Visual Studio Applications

After creating the HTML Help application, you can use a HelpProvider control to connect it to your application. The HelpProvider control is equipped wit the HelpNamespace provider. This property allows you to specify the application that contains the help application. Besides the HelpNamespace property, the HelpProvider control provides various methods to manage help.

HTML Help can be provided to a Visual Studio application through the Help class defined as follows:

Public Class Help
    Overloads Public Shared Sub ShowHelp(ByVal parent As Control, _
                                                                   ByVal url As String)
    Overloads Public Shared Sub ShowHelp(ByVal parent As Control, _
                                                                   ByVal url As String, _
                                                                   ByVal navigator As HelpNavigator)
    Overloads Public Shared Sub ShowHelp(ByVal parent As Control, _
                                                                   ByVal url As String, _
                                                                   ByVal keyword As String)
    Overloads Public Shared Sub ShowHelp(ByVal parent As Control, _
                                                                   ByVal url As String, _
                                                                   ByVal command As HelpNavigator, _
                                                                   ByVal param As Object)
    Public Shared Sub ShowHelpIndex(ByVal parent As Control, _
                                                           ByVal url As String)
    Public Shared Sub ShowPopup(ByVal parent As Control, _
                                                     ByVal caption As String, _
                                                     ByVal location As Point)
End Class

The overloaded ShowHelp() method is used to specify the help file to display and possibly additional information. Notice that all versions take a first argument as a Control type. This is the parent control from where the online help will be provided.

The first version allows you specify the help file. It can be the help file specified in the HelpProvider.HelpNamespace property mentioned above.

The second and the fourth versions allow you to specify the tab of the HTML Help window to display when the method is called. This is done through the HelpNavigator enumerator that has a value for each tab of the HTML Help window. the fourth version can be used to open the HTML Help window from its Find tab and specify a keyword to search for.

The third version can be used to open a help file based on a keyword.

The ShowHelpIndex() method can be used to open the Index tab of the HTML Help window.


Practical LearningPractical Learning: Providing Online Help to an Application

  1. Open Windows Explorer or My Computer
  2. In the cic folder, copy the cicoh.chm file to the clipboard and paste it in the folder of the current project (CIC1)
  3. Display the main form
  4. On the Toolbox, click HelpProvider and click the form
  5. In the Properties window, change its Name to cicHelp and click HelpNamespace
  6. Click the ellipsis button of the HelpNamespace property
  7. From the CIC1 folder of the current project, select the cicoh.chm file
     
    Open Help File
  8. Click Open
  9. On the main menu of the form, click Help and double-click Contents
  10. Implement the event as follows:
     
    Private Sub MenuItem4_Click(ByVal sender As System.Object, ByVal e As System.EventArgs) Handles MenuItem4.Click
            Help.ShowHelp(Me, Me.cisHelp.HelpNamespace)
    End Sub
  11. Display the main form. On the main menu of the form, double-click Index
  12. Implement the event as follows:
     
    Private Sub MenuItem5_Click(ByVal sender As System.Object, ByVal e As System.EventArgs) Handles MenuItem5.Click
            Help.ShowHelpIndex(Me, Me.cisHelp.HelpNamespace)
    End Sub
  13. Display the main form. On the main menu of the form, double-click Search
  14. Implement the event as follows:
     
    Private Sub MenuItem6_Click(ByVal sender As System.Object, ByVal e As System.EventArgs) Handles MenuItem6.Click
            Help.ShowHelp(Me, Me.cisHelp.HelpNamespace, HelpNavigator.Find, "")
    End Sub
  15. Test the application. When it displays, click the Help menu of the form and click one of the menu items
     
    HTML Help
  16. After using it, close the online help window, close the form, and return to Visual Studio
 

Home Copyright © 2004-2010 FunctionX, Inc.