The ArrayList Class
|
|
The ArrayList Class |
The main problem of traditional arrays is that their size is fixed by the number you specify when declaring the array variable: you cannot add items beyond the specified dimension. Another limitation is that you cannot insert an item inside the list. To overcome this, you can create a linked list. Instead of working from scratch, the .NET Framework provides the ArrayList class. With the ArrayList class, you can add new items to a list, insert items inside a list, arrange items of a list, check the existence of an item in a list, remove an item from the list, inquire about the list, or destroy the list. These operations are possible through various properties and methods. The ArrayList class is defined in the System.Collections namespace. To use it, first declare a pointer to ArrayList. Here is an example: |
Private Sub Form1_Load(ByVal sender As System.Object, ByVal e As System.EventArgs) Handles MyBase.Load
        Dim lstNumbers As ArrayList = New ArrayList
End Sub
|
|
 |
||||||||||||||||||||||||||||||||||||||||||||||||||||||||||||||||
 |
||||||||||||||||||||||||||||||||||||||||||||||||||||||||||||||||
|
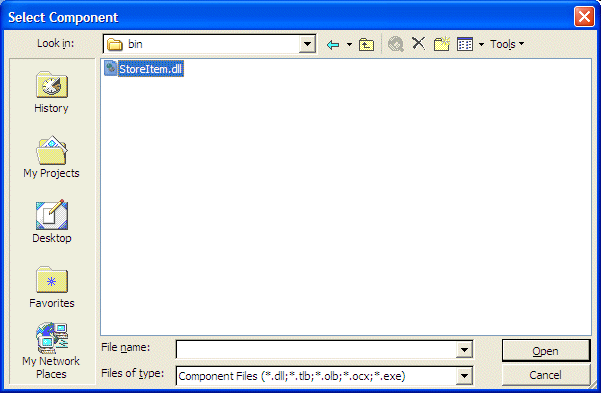
Imports StoreItem

Public Class Form1
    Inherits System.Windows.Forms.Form


    . . . No Change


    Dim StoreItems As ArrayList
    Private Sub Form1_Load(ByVal sender As System.Object, ByVal e As System.EventArgs) Handles MyBase.Load
        StoreItems = New ArrayList

        Dim tmeNow As DateTime = DateTime.Now
        Dim mls As Integer = tmeNow.Millisecond
        ' Generate two random numbers between 100 and 999
        Dim rndNumber As Random = New Random(mls)
        Dim NewNumber1 As Integer = rndNumber.Next(100, 999)
        Dim NewNumber2 As Integer = rndNumber.Next(100, 999)
        ' Create an item number from the random numbers
        Dim strItemNumber As String = NewNumber1.ToString() + "-" + NewNumber2.ToString()

        ' Display the created item number in the Item # text box
        Me.txtItemNumber.Text = strItemNumber
    End Sub
End Class
|
Private Sub btnClose_Click(ByVal sender As Object, ByVal e As System.EventArgs) Handles btnClose.Click
        Close()
End Sub
|
|
Item Addition |
|
The primary operation performed on a list is to create one. One of the biggest advantages of using a linked list is that you don't have to specify in advance the number of items of the list as done for an array. You can just start adding items. The ArrayList class makes this possible with the Add() method. Its syntax is: Public Overridable Function Add(ByVal value As Object) As Integer Implements IList.Add The argument of this method is the value to add to the list. If the method succeeds with the addition, it returns the position where the value was added in the list. This is usually the last position in the list. Here are examples: |
Private Sub Form1_Load(ByVal sender As System.Object, ByVal e As System.EventArgs) Handles MyBase.Load
        Dim lstNumbers As ArrayList = New ArrayList

        lstNumbers.Add(452.35)
        lstNumbers.Add(47.58)
        lstNumbers.Add(273.48)
        lstNumbers.Add(9672.037)
        lstNumbers.Add(248.52)
End Sub
|
If the method fails, the compiler would throw an error. One of the errors that could result from failure of this operation would be based on the fact that either a new item cannot be added to the list because the list is read-only, or the list was already full prior to adding the new item. As you can create a array list that includes any value of type object, you can also create your own class and use it to create a list based on the ArrayList class. To use your own class, when creating it, make sure it is created as a managed object. Here is an example: Public Class Employee
Public FullName As String
Public Department As String
Public DateHired As DateTime
Public Salary As Double
End Class
Once you have created a managed class, it can be used like any other. To create a list from it, you can declare its array variable in the class that would use it, such as Dim arlEmployees As ArrayList As discussed earlier, you can create the list by
adding items using the Add() method. 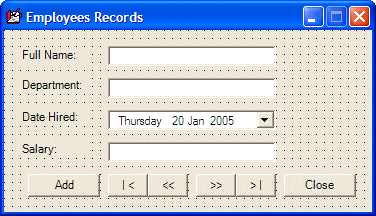
|
Dim arlEmployees As ArrayList

Private Sub btnAdd_Click(ByVal sender As System.Object, ByVal e As System.EventArgs) Handles btnAdd.Click
        If Me.btnAdd.Text = "Add" Then
            Me.txtFullName.Text = ""
            Me.txtDepartment.Text = ""
            Me.dtpDateHired.Text = DateTime.Now.ToString()
            Me.txtSalary.Text = ""
            Me.btnAdd.Text = "Update"
            Me.txtFullName.Focus()
        Else

            Dim Empl As Employee = New Employee

            Try
                Empl.FullName = Me.txtFullName.Text
                Empl.Department = Me.txtDepartment.Text
                Empl.DateHired = Me.dtpDateHired.Value
                Empl.Salary = CDbl(Me.txtSalary.Text)
                arlEmployees.Add(Empl)
            Catch ex As NotSupportedException
                MsgBox("Error: ", "The item could not be added", MessageBoxButtons.OK)
            Catch ex As Exception
                MsgBox("The item could not be added to the list")
            End Try

            Me.btnAdd.Text = "Add"
        End If
End Sub

Private Sub btnClose_Click(ByVal sender As System.Object, ByVal e As System.EventArgs) Handles btnClose.Click
        End
End Sub
|
The ArrayList.Add() method is used to add one item at a time to the list. If you have more than one item to add, you can use the ArrayList.AddRange() method. Its syntax is: Public Overridable Sub AddRange(ByVal c As ICollection) This method takes as argument a list and adds it to the current list. The Add() method adds a new item at the end of the list. If you want to insert an item anywhere inside the list, you can call the Insert() method. |
|
|
Private Sub btnAddItem_Click(ByVal sender As System.Object, ByVal e As System.EventArgs) Handles btnAddItem.Click
        ' Make sure an item is complete before adding it to the inventory
        If Me.txtItemNumber.Text = "" Then
            MsgBox("You must enter an item number to complete the record")
            Me.txtItemNumber.Focus()
            Return
        End If

        If Me.txtDescription.Text = "" Then
            MsgBox("You must provide a name for the item in order to create its record")
            Me.txtDescription.Focus()
            Return
        End If

        If Me.txtUnitPrice.Text = "" Then
            MsgBox("The price of the item is required before saving it")
            Me.txtUnitPrice.Focus()
            Return
        End If

        Dim item As CStoreItem = New CStoreItem
        item.ItemNumber = Me.txtItemNumber.Text
        item.ItemName = Me.txtDescription.Text
        item.ItemSize = Me.txtSize.Text
        item.UnitPrice = CDbl(Me.txtUnitPrice.Text)
        StoreItems.Add(item)

        Dim tmeNow As DateTime = DateTime.Now
        Dim mls As Integer = tmeNow.Millisecond
        ' Generate two random numbers between 100 and 999
        Dim rndNumber As Random = New Random(mls)
        Dim NewNumber1 As Integer = rndNumber.Next(100, 999)
        Dim NewNumber2 As Integer = rndNumber.Next(100, 999)
        ' Create an item number from the random numbers
        Dim strItemNumber As String = CStr(NewNumber1) & "-" & CStr(NewNumber2)

        ' Display the created item number in the Item # text box
        Me.txtItemNumber.Text = strItemNumber
        Me.txtDescription.Text = ""
        Me.txtSize.Text = ""
        Me.txtUnitPrice.Text = ""
        Me.txtDescription.Focus()
End Sub
|
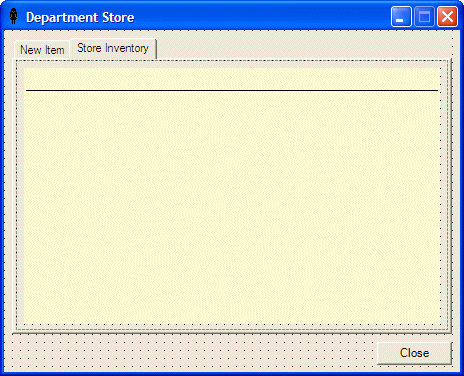
Private Sub tabDeptStore_SelectedIndexChanged(ByVal sender As Object, ByVal e As System.EventArgs) Handles tabDeptStore.SelectedIndexChanged
        Me.dataGrid1.DataSource = Nothing
        Me.dataGrid1.DataSource = StoreItems
End Sub
|
| Item Name | Size | Unit Price |
| Women Cashmere Lined Glove | 8 | 115.95 |
| Men Trendy Jacket | Medium | 45.85 |
| Women Stretch Flare Jeans | Petite | 27.75 |
| Women Belted Sweater | Large | 15.95 |
| Girls Classy Handbag | One Size | 95.95 |
| Women Casual Dress Shoes | 9.5M | 45.95 |
| Boys Hooded Sweatshirt | M (7/8) | 15.95 |
| Girls Velour Dress | 10 | 12.55 |
| Women Lace Desire Panty | Medium | 7.15 |
| Infant Girls Ballerina Dress | 12M | 22.85 |
| Men Classic Pinstripe Suit | 38 | 145.95 |

After declaring an ArrayList variable, it may be empty. As objects are added to it, the list grows. The list can grow tremendously as you wish. The number of items of the list is managed through the memory it occupies and this memory grows as needed. The number of items that the memory allocated is currently using is represented by the ArrayList.Capacity property. This will usually be the least of your concerns. If for some reason, you want to intervene and control the number of items that your ArrayList list can contain, you can manipulate the Capacity property. For example, you can assign it a constant to set the maximum value that the list can contain. Once again, you will hardly have any reason to use the Capacity property: the compiler knows what to do with it.
A list is usually meant to grow and shrink as necessary. This also lets the compiler manage the memory occupied by the list. In some cases, you may want a list to have a fixed size. To set this flag, you can call the ArrayList.FixedSize() method. It is overloaded in two versions. One of them has the following syntax: Overloads Public Shared Function FixedSize(ByVal list As ArrayList) As ArrayList If you set a fixed size on an ArrayList list, you may not be able to add a new item beyond the limit. In fact, if you attempt to do this, you may receive an error. A safe way is to check whether the list is fixed before performing a related operation. To find out whether a list is fixed, you can check the ArrayList.IsFixedSize property.
When using a list, at any time, you should be able to know the number of items that the list contains. This information is provided by the ArrayList.Count property. The Capacity and the Count have this in common: the value of each increases as the list grows and the same value decreases if the list shrinks. It is important to know that, although they look alike, there are various differences between the capacity of a list and the number of items it contains. Capacity is a read/write property. This means that, as we saw above, you can assign a value to the capacity to fix the number of items that the list can contain. You can also retrieve the value of the Capacity. The Count is read-only because it is used by the compiler to count the current number of items of the items and this counting is performed without your intervention.
|
Private Sub btnAddItem_Click(ByVal sender As System.Object, ByVal e As System.EventArgs) Handles btnAddItem.Click

        . . . No Change

        Dim item As CStoreItem = New CStoreItem
        item.ItemNumber = Me.txtItemNumber.Text
        item.ItemName = Me.txtDescription.Text
        item.ItemSize = Me.txtSize.Text
        item.UnitPrice = CDbl(Me.txtUnitPrice.Text)
        StoreItems.Add(item)

        Me.lblInventoryCount.Text = String.Format("Store Current Inventory: {0} Items", Me.StoreItems.Count.ToString())

        . . . No Change
    End Sub
|

When using the Add(), the AddRange(), or the Insert() methods to populate an ArrayList object, the item or the group of items is added to the end of the list in a consecutive manner. If you want to reverse this arrangement, you can call the Reverse() method. This method is provided in two versions. One of the versions has the following syntax: Overloads Public Overridable Sub Reverse() This method considers all items of a list and changes their positions in the exact opposite order: the first item becomes the last. The item before last becomes the second in the new list, and so on. If you want to reverse only a range of items in the list, you can use the other version of this method whose syntax is: Overloads Public Overridable Sub Reverse(ByVal index As Integer, ByVal count As Integer) In some cases, you may want the list to be arranged in an order validated by the language used on the computer. For example, if you create a list of names, you may want to display those names in alphabetical order. If you create a list of employees, you may want to display the list of employees by seniority, based on the date they were hired. The ability to arrange the list in a set order can be handled by the Sort() method. Its syntax is: Overloads Public Overridable Sub Sort() If the items in the list are made of strings, this method would arrange them in alphabetical order. If the items are numeric values, calling this method would arrange the list in incremental order. If the list is made of dates, when this method is called, the compiler would refer to the options set in the Regional Settings of the Control and arrange them accordingly in chronological order.
One of the reason for creating a list is to be able to add items to it, edit its items, retrieve an item, or delete items from it. These are the default operations. You can still limit these operations as you judge them unnecessary. For example, you may create a list and then initialize it with the items that you want the list to only have. If you don't intend to have the user adding items to it, you can create the list as read-only. To do this, you can call the ArrayList.ReadOnly() method. It is overloaded with two static versions as follows: Overloads Public Shared Function ReadOnly(ByVal list As ArrayList) As ArrayList Overloads Public Shared Function ReadOnly(ByVal list As IList) As IList These methods are static. This means that you don't need to declare an instance of ArrayList to call them. Instead, to make the list read-only, call the ArrayList.ReadOnly() method and pass your ArrayList variable to it. Some operations cannot be performed on a read-only list. To perform such operations, you can first find out whether an ArrayList list is read-only. This is done by checking its IsReadOnly property.
Once a list is ready, you can perform different types of operations on it. Besides adding items, one of the most regular operations performed on a list consists of locating and retrieving an item. You have various options. To retrieve a single item based on its position, you can use the Item property which accesses each item using square brackets. Like a normal array, an ArrayList list is zero-based. Another issue to keep in mind is that the ArrayList.Item() property produces an Object value. Therefore, you may have to cast this value to your type of value to get it right. Here are examples of using this property: |
Public Class Form1
    Inherits System.Windows.Forms.Form

#Region " Windows Form Designer generated code "

    Public Sub New()
        MyBase.New()

        'This call is required by the Windows Form Designer.
        InitializeComponent()

        'Add any initialization after the InitializeComponent() call

    End Sub

    'Form overrides dispose to clean up the component list.
    Protected Overloads Overrides Sub Dispose(ByVal disposing As Boolean)
        If disposing Then
            If Not (components Is Nothing) Then
                components.Dispose()
            End If
        End If
        MyBase.Dispose(disposing)
    End Sub

    'Required by the Windows Form Designer
    Private components As System.ComponentModel.IContainer

    'NOTE: The following procedure is required by the Windows Form Designer
    'It can be modified using the Windows Form Designer.
    'Do not modify it using the code editor.
    Friend WithEvents Label1 As System.Windows.Forms.Label
    Friend WithEvents txtFullName As System.Windows.Forms.TextBox
    Friend WithEvents txtDepartment As System.Windows.Forms.TextBox
    Friend WithEvents Label2 As System.Windows.Forms.Label
    Friend WithEvents Label3 As System.Windows.Forms.Label
    Friend WithEvents dtpDateHired As System.Windows.Forms.DateTimePicker
    Friend WithEvents txtSalary As System.Windows.Forms.TextBox
    Friend WithEvents Label4 As System.Windows.Forms.Label
    Friend WithEvents btnAdd As System.Windows.Forms.Button
    Friend WithEvents btnFirst As System.Windows.Forms.Button
    Friend WithEvents btnPrevious As System.Windows.Forms.Button
    Friend WithEvents btnLast As System.Windows.Forms.Button
    Friend WithEvents btnNext As System.Windows.Forms.Button
    Friend WithEvents btnClose As System.Windows.Forms.Button
    <System.Diagnostics.DebuggerStepThrough()> Private Sub InitializeComponent()
        Dim resources As System.Resources.ResourceManager = New System.Resources.ResourceManager(GetType(Form1))
        Me.Label1 = New System.Windows.Forms.Label
        Me.txtFullName = New System.Windows.Forms.TextBox
        Me.txtDepartment = New System.Windows.Forms.TextBox
        Me.Label2 = New System.Windows.Forms.Label
        Me.Label3 = New System.Windows.Forms.Label
        Me.dtpDateHired = New System.Windows.Forms.DateTimePicker
        Me.txtSalary = New System.Windows.Forms.TextBox
        Me.Label4 = New System.Windows.Forms.Label
        Me.btnAdd = New System.Windows.Forms.Button
        Me.btnFirst = New System.Windows.Forms.Button
        Me.btnPrevious = New System.Windows.Forms.Button
        Me.btnLast = New System.Windows.Forms.Button
        Me.btnNext = New System.Windows.Forms.Button
        Me.btnClose = New System.Windows.Forms.Button
        Me.SuspendLayout()
        '
        'Label1
        '
        Me.Label1.Location = New System.Drawing.Point(16, 16)
        Me.Label1.Name = "Label1"
        Me.Label1.Size = New System.Drawing.Size(72, 16)
        Me.Label1.TabIndex = 0
        Me.Label1.Text = "Full Name:"
        '
        'txtFullName
        '
        Me.txtFullName.Location = New System.Drawing.Point(96, 16)
        Me.txtFullName.Name = "txtFullName"
        Me.txtFullName.Size = New System.Drawing.Size(200, 20)
        Me.txtFullName.TabIndex = 1
        Me.txtFullName.Text = ""
        '
        'txtDepartment
        '
        Me.txtDepartment.Location = New System.Drawing.Point(96, 48)
        Me.txtDepartment.Name = "txtDepartment"
        Me.txtDepartment.Size = New System.Drawing.Size(200, 20)
        Me.txtDepartment.TabIndex = 3
        Me.txtDepartment.Text = ""
        '
        'Label2
        '
        Me.Label2.Location = New System.Drawing.Point(16, 50)
        Me.Label2.Name = "Label2"
        Me.Label2.Size = New System.Drawing.Size(72, 16)
        Me.Label2.TabIndex = 2
        Me.Label2.Text = "Department:"
        '
        'Label3
        '
        Me.Label3.Location = New System.Drawing.Point(16, 84)
        Me.Label3.Name = "Label3"
        Me.Label3.Size = New System.Drawing.Size(72, 16)
        Me.Label3.TabIndex = 4
        Me.Label3.Text = "Date Hired:"
        '
        'dtpDateHired
        '
        Me.dtpDateHired.Location = New System.Drawing.Point(96, 80)
        Me.dtpDateHired.Name = "dtpDateHired"
        Me.dtpDateHired.TabIndex = 5
        '
        'txtSalary
        '
        Me.txtSalary.Location = New System.Drawing.Point(96, 116)
        Me.txtSalary.Name = "txtSalary"
        Me.txtSalary.Size = New System.Drawing.Size(200, 20)
        Me.txtSalary.TabIndex = 7
        Me.txtSalary.Text = ""
        Me.txtSalary.TextAlign = System.Windows.Forms.HorizontalAlignment.Right
        '
        'Label4
        '
        Me.Label4.Location = New System.Drawing.Point(16, 117)
        Me.Label4.Name = "Label4"
        Me.Label4.Size = New System.Drawing.Size(72, 20)
        Me.Label4.TabIndex = 6
        Me.Label4.Text = "Salary:"
        '
        'btnAdd
        '
        Me.btnAdd.Location = New System.Drawing.Point(16, 152)
        Me.btnAdd.Name = "btnAdd"
        Me.btnAdd.TabIndex = 8
        Me.btnAdd.Text = "Add"
        '
        'btnFirst
        '
        Me.btnFirst.Location = New System.Drawing.Point(96, 152)
        Me.btnFirst.Name = "btnFirst"
        Me.btnFirst.Size = New System.Drawing.Size(32, 23)
        Me.btnFirst.TabIndex = 9
        Me.btnFirst.Text = "| <"
        '
        'btnPrevious
        '
        Me.btnPrevious.Location = New System.Drawing.Point(128, 152)
        Me.btnPrevious.Name = "btnPrevious"
        Me.btnPrevious.Size = New System.Drawing.Size(32, 23)
        Me.btnPrevious.TabIndex = 10
        Me.btnPrevious.Text = "<<"
        '
        'btnLast
        '
        Me.btnLast.Location = New System.Drawing.Point(192, 152)
        Me.btnLast.Name = "btnLast"
        Me.btnLast.Size = New System.Drawing.Size(32, 23)
        Me.btnLast.TabIndex = 12
        Me.btnLast.Text = "> |"
        '
        'btnNext
        '
        Me.btnNext.Location = New System.Drawing.Point(160, 152)
        Me.btnNext.Name = "btnNext"
        Me.btnNext.Size = New System.Drawing.Size(32, 23)
        Me.btnNext.TabIndex = 11
        Me.btnNext.Text = ">>"
        '
        'btnClose
        '
        Me.btnClose.Location = New System.Drawing.Point(232, 152)
        Me.btnClose.Name = "btnClose"
        Me.btnClose.Size = New System.Drawing.Size(64, 23)
        Me.btnClose.TabIndex = 13
        Me.btnClose.Text = "Close"
        '
        'Form1
        '
        Me.AutoScaleBaseSize = New System.Drawing.Size(5, 13)
        Me.ClientSize = New System.Drawing.Size(312, 190)
        Me.Controls.Add(Me.btnClose)
        Me.Controls.Add(Me.btnLast)
        Me.Controls.Add(Me.btnNext)
        Me.Controls.Add(Me.btnPrevious)
        Me.Controls.Add(Me.btnFirst)
        Me.Controls.Add(Me.btnAdd)
        Me.Controls.Add(Me.txtSalary)
        Me.Controls.Add(Me.Label4)
        Me.Controls.Add(Me.dtpDateHired)
        Me.Controls.Add(Me.Label3)
        Me.Controls.Add(Me.txtDepartment)
        Me.Controls.Add(Me.Label2)
        Me.Controls.Add(Me.txtFullName)
        Me.Controls.Add(Me.Label1)
        Me.Icon = CType(resources.GetObject("$this.Icon"), System.Drawing.Icon)
        Me.MaximizeBox = False
        Me.Name = "Form1"
        Me.StartPosition = System.Windows.Forms.FormStartPosition.CenterScreen
        Me.Text = "Employees Records"
        Me.ResumeLayout(False)

    End Sub

#End Region

    Dim arlEmployees As ArrayList
    Dim CurrentPosition As Integer

    Private Sub Form1_Load(ByVal sender As System.Object, ByVal e As System.EventArgs) Handles MyBase.Load
        arlEmployees = New ArrayList
        CurrentPosition = 0
    End Sub


    Private Sub btnAdd_Click(ByVal sender As System.Object, ByVal e As System.EventArgs) Handles btnAdd.Click
        If Me.btnAdd.Text = "Add" Then
            Me.txtFullName.Text = ""
            Me.txtDepartment.Text = ""
            Me.dtpDateHired.Value = DateTime.Now
            Me.txtSalary.Text = ""
            Me.btnAdd.Text = "Update"
            Me.txtFullName.Focus()
        Else
            Dim Empl As Employee = New Employee

            Try
                Empl.FullName = Me.txtFullName.Text
                Empl.Department = Me.txtDepartment.Text
                Empl.DateHired = Me.dtpDateHired.Value
                Empl.Salary = CDbl(Me.txtSalary.Text)
                arlEmployees.Add(Empl)
            Catch ex As NotSupportedException
                MsgBox("Error: ", "The item could not be added", MessageBoxButtons.OK)
            Catch ex As Exception
                MsgBox("The item could not be added to the list" & vbCrLf & ex.Message)
            End Try

            Me.btnAdd.Text = "Add"
        End If
    End Sub

    Private Sub btnClose_Click(ByVal sender As System.Object, ByVal e As System.EventArgs) Handles btnClose.Click
        End
    End Sub

    Private Sub btnFirst_Click(ByVal sender As Object, ByVal e As System.EventArgs) Handles btnFirst.Click
        CurrentPosition = 0
        Dim Empl As Employee = New Employee

        Try
            Empl = arlEmployees(CurrentPosition)

            Me.txtFullName.Text = Empl.FullName
            Me.txtDepartment.Text = Empl.Department
            Me.dtpDateHired.Value = Empl.DateHired
            Me.txtSalary.Text = CStr(Empl.Salary)
        Catch ex As ArgumentOutOfRangeException
            MsgBox("The item could not be retrieved")
        Catch ex As Exception
            MsgBox("There was a problem retrieving the item")
        End Try
    End Sub

    Private Sub btnPrevious_Click(ByVal sender As Object, ByVal e As System.EventArgs) Handles btnPrevious.Click

        Dim Empl As Employee = New Employee

        If CurrentPosition = 0 Then
            Exit Sub
        Else
            CurrentPosition = CurrentPosition - 1

            Try
                Empl = arlEmployees(CurrentPosition)

                Me.txtFullName.Text = Empl.FullName
                Me.txtDepartment.Text = Empl.Department
                Me.dtpDateHired.Value = Empl.DateHired
                Me.txtSalary.Text = CStr(Empl.Salary)
            Catch ex As ArgumentOutOfRangeException
                MsgBox("The item could not be retrieved")
            Catch ex As Exception
                MsgBox("There was a problem retrieving the item")
            End Try
        End If
    End Sub

    Private Sub btnNext_Click(ByVal sender As Object, ByVal e As System.EventArgs) Handles btnNext.Click
        Dim Empl As Employee = New Employee

        If CurrentPosition = (arlEmployees.Count - 1) Then
            Exit Sub
        Else
            CurrentPosition = CurrentPosition + 1

            Try
                Empl = arlEmployees(CurrentPosition)

                Me.txtFullName.Text = Empl.FullName
                Me.txtDepartment.Text = Empl.Department
                Me.dtpDateHired.Value = Empl.DateHired
                Me.txtSalary.Text = CStr(Empl.Salary)
            Catch ex As ArgumentOutOfRangeException
                MsgBox("The item could not be retrieved")
            Catch ex As Exception
                MsgBox("There was a problem retrieving the item")
            End Try
        End If
    End Sub

    Private Sub btnLast_Click(ByVal sender As Object, ByVal e As System.EventArgs) Handles btnLast.Click
        CurrentPosition = arlEmployees.Count - 1

        Dim Empl As Employee = New Employee

        Try
            Empl = arlEmployees(CurrentPosition)

            Me.txtFullName.Text = Empl.FullName
            Me.txtDepartment.Text = Empl.Department
            Me.dtpDateHired.Value = Empl.DateHired
            Me.txtSalary.Text = CStr(Empl.Salary)
        Catch ex As ArgumentOutOfRangeException
            MsgBox("The item could not be retrieved")
        Catch ex As Exception
            MsgBox("There was a problem retrieving the item")
        End Try
    End Sub
End Class
Instead of the square brackets that allow you to retrieve an item based on its position, you can look for an item based on its complete definition. You have various options. You can first "build" an item and ask the compiler to check whether any item in the list matches your definition. To perform this search, you can call the ArrayList.Contains() method. Its syntax is: Public Overridable Function Contains(ByVal item As Object) As Boolean Implements IList.Contains The item to look for is passed as argument to the method. The compiler would look for exactly the item, using its definition, in the list. If any detail of the argument fails to match any item of the ArrayList list, the method would return false. If all characteristics of the argument correspond to an item of the list, the method returns true. Another option to look for an item in a list consists of calling the ArrayList.BinarySearch() method. It is overloaded in three versions and one of them uses the following syntax: Overloads Public Overridable Function BinarySearch(ByVal value As Object) As Integer The item to look for is passed argument to the method.
As opposed to adding an item to a list, you may want to remove one. To perform this operation, you have various options. You can ask the compiler to look for an item in the list and if, or once, the compile finds it, it would delete the item. To perform this type of deletion, you can call the ArrayList.Remove() method. Its syntax is: Public Overridable Sub Remove(ByVal obj As Object) Implements IList.Remove This method accepts as argument the item that you want to delete from the list. To perform this operation, the list must not be read-only. The Remove() method allows you to specify the exact item you want to delete from a list. Another option you have consists of deleting an item based on its position. This is done using the RemoveAt() method whose syntax is: Public Overridable Sub RemoveAt(ByVal index As Integer) Implements IList.RemoveAt With this method, the position of the item is passed as argument. If the position is not valid because either it is lower or higher than the current Count, the compiler would throw an ArgumentOutOfRangeException exception. To remove all items from a list at once, you can call the ArrayList.Clear() method. Its syntax is: Public Overridable Sub Clear() Implements IList.Clear
|
|
|
||
| Home | Copyright © 2005-2016, FunctionX | |
|
|
||