GDI+: Texture Brushes
|
GDI+: Texture Brushes |
|
The hatch brushes we have used are based on already designed patterns to fill a shape. In some cases, you may want to create or design your own pattern and use it to fill an area. To do this, you must perform two main steps. First, you must design a picture and save it as a file. Then you must create an object referred to as a texture brush and pass the picture to it. A texture brush is an object that holds a picture and uses it to regularly fill the interior of a closed shape. To initialize it, you can use an existing picture designed by someone else or you can design your own picture using any normal graphics application, including Microsoft Paint that is automatically installed with Microsoft Window. You should have the picture as a file with a normal graphics file extension, which could be .bmp. Here is an example of a designed bitmap saved as Papers.bmp:  Equipped with the picture, you can then use the TextureBrush class that provides various constructors. The simplest constructor of this class takes as argument an Image object. The syntax of this constructor is: Public Sub TextureBrush(ByVal bitmap As Image) This constructor expects a bitmap as argument. After initializing the brush, you can use it to fill the interior of a closed shape. For example, you can call a Fill... method to Paint its shape. Here is an example:
If you use this constructor, the compiler would itself find out the location and dimensions of the picture in the area where it was designed. Although the location must be at (0, 0), the width and the height must be lower or equal to the intended dimensions of the bitmap. For example, if you have a picture that is 48x48 pixels, the width you can use from this picture must be <= 48 and the height must be <= 48. This allows you to use only a portion of the picture if you want. To use a portion of the picture, you can use the following constructor: Public Sub TextureBrush(ByVal bitmap As Image, ByVal destination As Rectangle) The second argument to this constructor is used to specify the width and height of the picture. If you prefer to use a rectangle whose arguments are decimal numbers, you can use the following constructor: Public Sub TextureBrush(ByVal bitmap As Image, ByVal destination As RectangleF) Here is an example:
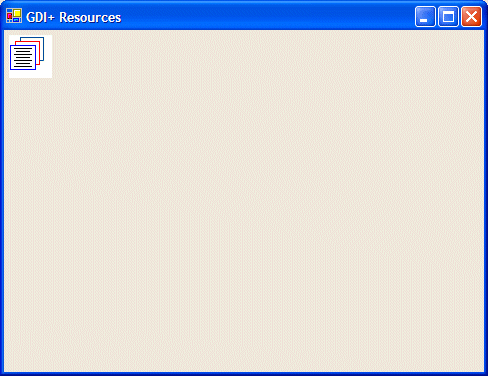
The constructors we have used so far allow you to draw the bitmap in each allocated rectangle in a tiled fashion. To make it more fun, the TextureBrush class is equipped with a factor referred to as wrap mode. This factor specifies how the tiling must be performed. To apply it, you can use one of the following constructors: Public Sub TextureBrush(ByVal bitmap As Image, ByVal wrapMode As WrapMode) Public Sub TextureBrush(ByVal bitmap As Image, ByVal wrapMode As WrapMode, ByVal destination As Rectangle) Public Sub TextureBrush(ByVal bitmap As Image, ByVal wrapMode As WrapMode, ByVal destination As RectangleF) The bitmap and the destination arguments are used in the same way we have done so far. The wrapMode argument is a member of the WrapMode enumerator. The WrapMode enumerator is defined in the System.Drawing.Drawing2D namespace. It has the following members: Clamp: Draws one picture in the allocated rectangle:
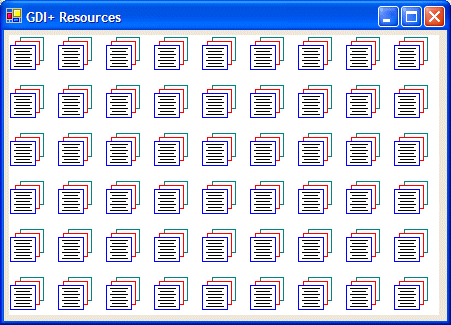
Tile: Draws the picture continuous in a tiled fashion:
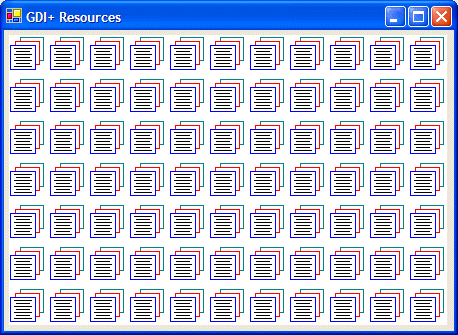
TileFlipX: Draws the picture, draws it again on its right side but flipped horizontally, and then repeats this technique continuous in a tiled fashion and in the allocated rectangle:
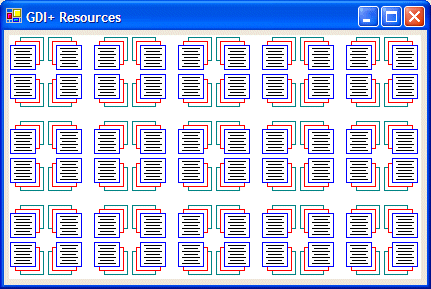
TileFlipY: Draws the picture, draws it again under it but flipped vertically, and then repeats this technique continuous in a tiled fashion and in the allocated rectangle:
TileFlipXY: Draws the picture, draws it again on its right side but flipped horizontally, then draws both the original and the right copy under each other but flipped vertically. These four pictures are redrawn in a tiled fashion and in the allocated rectangle:
|
|
|
||
| Home | Copyright © 2004-2010 FunctionX, Inc. | |
|
|
||