Operations on XML Elements
 |
Operations on XML Elements |
The easiest way to add text to an element, whether the element exists already or you want to add a new element, consists of manually opening the file and typing the text of the new element in the desired section. For example, you can click the Data button of the XML while opened in Visual Studio .NET:  If you click the empty cells and fill them up, if you save the file, the new elements would be added to the file.
To programmatically create a new element, you can declare an XmlElement variable. To add the new element to the file, the XmlDocument class provides the CreateElement() method that is overloaded with three versions. One of the versions uses the following syntax: Overloads Public Function CreateElement(ByVal name As String) As XmlElement Using this method, to create a new element, call it and pass it the name of the new element. If you want the element to have a value, the XmlDocument class is equipped with the CreateTextNode() method. This method returns an XmlText value. The syntax of this method is: Public Overridable Function CreateTextNode(ByVal text As String) As XmlText This method takes as argument the string that would constitute the value of the element. The calls to XmlDocument.CreateElement() and XmlDocument.CreateTextNode() allow you to initialize a new element. In order to actually add the new element, you must specify its position in the tree: whether it would be the first or the last node, whether you want to position it before or after a node of your choice. To support the positions of existing nodes, the XmlNode class, which is the ancestor of all XML nodes of the .NET Framework, provides various appropriate methods. One of these methods is AppendChild(), which is used to add an element as the last child of its parent. The syntax of the XmlNode.AppendChild() method is: Public Overridable Function AppendChild(ByVal newChild As XmlNode) As XmlNode Imagine you have a simple XML file that has only the root and one level of elements as follows: <?xml version="1.0" encoding="utf-8"?> <Holidays> <Holiday>New Year's Day</Holiday> <Holiday>Birthday of Martin Luther King, Jr.</Holiday> <Holiday>Washington's Birthday</Holiday> </Holidays> To add a new Holiday element to this file, based on the above discussions, you can use code as follows: |
Private Sub btnAddHoliday_Click(ByVal sender As System.Object, ByVal e As System.EventArgs) Handles btnAddHoliday.Click
        Dim docXML As XmlDocument = New XmlDocument
        docXML.Load("Holidays.xml")

        Dim elmXML As XmlElement = docXML.CreateElement("Holiday")
        Dim txtXML As XmlText = docXML.CreateTextNode("Memorial Day")
        docXML.DocumentElement.AppendChild(elmXML)
        docXML.DocumentElement.LastChild.AppendChild(txtXML)

        docXML.Save("Holidays.xml")
End Sub
|
|
 |
||||||||||||||||||||||||
|
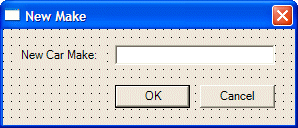
Private Sub btnNewMake_Click(ByVal sender As System.Object, ByVal e As System.EventArgs) Handles btnNewMake.Click
        Dim strNewMake As String
        Dim allMyChildren As String
        Dim docXMLFile As New XmlDocument
        Dim nodRoot As XmlElement

        ' The new car make will come from the New Make dialog box
        Dim frmMake As NewMake = New NewMake
        ' Display the New Make dialog box and find out if the user clicked OK
        If frmMake.ShowDialog() = DialogResult.OK Then
            strNewMake = frmMake.txtNewMake.Text

            ' If the New Make string is empty, don't do anything
            If strNewMake = "" Then
                Exit Sub
            End If

            ' Open the Makes.xml fill
            docXMLFile.Load("Makes.xml")

            ' Get the root node so we can explore its children
            nodRoot = docXMLFile.DocumentElement
            ' Store all the values of the elements in a string
            allMyChildren = nodRoot.InnerText
            ' Locate the new make among the values of the elements
            Dim indexLookForNewMake As Int32 = allMyChildren.IndexOf(strNewMake)

            ' If the car make exists already, don't add it
            If indexLookForNewMake >= 0 Then
                Exit Sub
            Else
                ' If the car is not in the list already, add it as a Make element
                Dim elmXML As XmlElement = docXMLFile.CreateElement("Make")
                ' Create its value using the string from the New Make dialog box
                Dim txtXML As XmlText = docXMLFile.CreateTextNode(frmMake.txtNewMake.Text)
                ' Add the new element at the end of the file
                docXMLFile.DocumentElement.AppendChild(elmXML)
                ' Specify its text
                docXMLFile.DocumentElement.LastChild.AppendChild(txtXML)

                ' Save the file
                docXMLFile.Save("Makes.xml")
            End If
        End If
End Sub
|
 |
||||||||||||||||||||||||
|
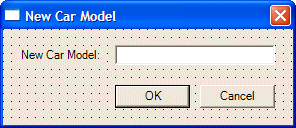
Private Sub btnNewModel_Click(ByVal sender As System.Object, ByVal e As System.EventArgs) Handles btnNewModel.Click

        ' The new car make will come from the New Make dialog box
        Dim frmModel As New NewModel

        ' Display the New Make dialog box and find out if the user clicked OK
        If frmModel.ShowDialog() = DialogResult.OK Then
            Dim strNewModel As String = frmModel.txtNewModel.Text

            ' If the New Make string is empty, don't do anything
            If strNewModel = "" Then
                Exit Sub
            End If

            ' Open the Makes.xml file
            Dim docXMLFile As New XmlDocument
            docXMLFile.Load("Models.xml")

            ' Get the root node so we can explore its children
            Dim nodRoot As XmlElement = docXMLFile.DocumentElement
            ' Store all the values of the elements in a string
            Dim allMyChildren As String = nodRoot.InnerText
            ' Locate the new make among the values of the elements
            Dim indexLookForNewModel As Int32 = allMyChildren.IndexOf(strNewModel)

            ' If the car make exists already, don't add it
            If (indexLookForNewModel >= 0) Then
                Exit Sub
            Else
                ' If the car is not in the list already, add it as a Make element
                Dim elmXML As XmlElement = docXMLFile.CreateElement("Model")
                ' Create its value using the string from the New Make dialog box
                Dim txtXML As XmlText = docXMLFile.CreateTextNode(frmModel.txtNewModel.Text)
                ' Add the new element at the end of the file
                docXMLFile.DocumentElement.AppendChild(elmXML)
                ' Specify its text
                docXMLFile.DocumentElement.LastChild.AppendChild(txtXML)
            End If
            ' Save the file
            docXMLFile.Save("Models.xml")
        End If
End Sub
|
|
Adding a Filled Child Element |
|
The above Holidays.xml file had only one level under the root and no child element of the root had children. Suppose you have a file as follows: <?xml version="1.0" encoding="utf-8"?>
<Videos>
<Video>
<Title>The Distinguished Gentleman</Title>
<Director>Jonathan Lynn</Director>
<Length>112 Minutes</Length>
<Format>DVD</Format>
<Rating>R</Rating>
</Video>
<Video>
<Title>Her Alibi</Title>
<Director>Bruce Beresford</Director>
<Length>94 Mins</Length>
<Format>DVD</Format>
<Rating>PG-13</Rating>
</Video>
</Videos>
Imagine that you want to add a Video element. You have a choice of adding one, more, or all child elements of the Video node. To perform this operation, one solution you can use is to "build" all child elements of the Video element, then add the node as a whole. To support this technique, we saw earlier that the XmlNode.InnerXml property comprises a node, its markup, its children and their markup. This means that you can create the child nodes with their markup(s) as a string and assign that string to an XmlNode.InnerXml string. To do this, you would need the set version of the InnerXml property. It is declared as follows: Public Overridable Property InnerXml As String Here is an example that adds a complete new Video node to the above XML file: |
Private Sub btnAddVideo_Click(ByVal sender As System.Object, ByVal e As System.EventArgs) Handles btnAddVideo.Click
        Dim docXML As New XmlDocument
        docXML.Load("Videos.xml")

        Dim elmXML As XmlElement = docXML.CreateElement("Video")
        Dim strNewVideo as String  = "<Title>Other People's Money</Title>" + _
		                      "<Director>Alan Brunstein</Director>" + _
			      "<Length>114 Minutes</Length>" + _
			      "<Format>VHS</Format>" + _
			      "<Rating>PG-13</Rating>"

        elmXML.InnerXml = strNewVideo
        docXML.DocumentElement.AppendChild(elmXML)

        docXML.Save("Videos.xml")
End Sub
|
If you have an XML file with different levels and you want to add an element as a new child to a particular element, you can first locate that element. One way you can do this is to call the XmlDocument.GetElementByTagName() method. This method is overloaded with two versions. One of its versions has the following syntax: Overloads Public Overridable Function GetElementsByTagName(ByVal name As String) As XmlNodeList This method takes as argument the name of the element that you want to locate. If the method finds that element, it returns a list of all child nodes of that element as an XmlNodeList object. This XmlNodeList object represents a collection of nodes where each node can be located by its index through the ItemOf indexed property. |
|
|
 |
||||||||||||||||||||||||||||||||||||||||||||||||||||||||||||||||||||||||
|
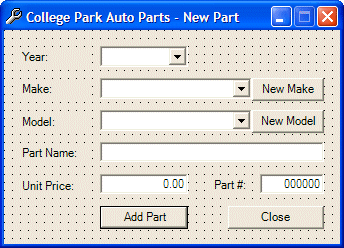
Private Sub NewPart_Load(ByVal sender As System.Object, ByVal e As System.EventArgs) Handles MyBase.Load
        ' Fill the Year combo box with years from 1960 to the coming year
        Dim i As Integer
        For i = DateTime.Now.Year + 1 To 1960 Step -1
            cboYears.Items.Add(CStr(i))
        Next

        ' We will need a reference to the XML document
        Dim docXML As New XmlDocument

        ' Open the Makes.xml file
        docXML.Load("Makes.xml")

        ' Get a reference to the root node
        Dim nodRoot As XmlElement = docXML.DocumentElement
        ' Locate all nodes whose name is Make
        Dim nodItems As XmlNodeList = nodRoot.GetElementsByTagName("Make")
        ' Retrieve the value of each Make node and put
        ' that value in the Make combo box
        For i = 0 To nodItems.Count - 1
            cboMakes.Items.Add(nodItems(i).InnerXml)
        Next i

        ' Open the Models.xml file
        docXML.Load("Models.xml")

        ' Get a reference to the root node
        nodRoot = docXML.DocumentElement
        ' Locate all nodes whose name is Make
        nodItems = nodRoot.GetElementsByTagName("Model")
        ' Retrieve the value of each Make node and put
        ' that value in the Make combo box
        For i = 0 To nodItems.Count - 1
            cboModels.Items.Add(nodItems(i).InnerXml)
        Next i

        ' We will generate a random number for the item
        ' To start, we will use the miliseconds as a seed
        Dim curTime As DateTime = DateTime.Now
        Dim ms As Int32 = curTime.Millisecond

        ' Now we can generate a random number between 100000 and 999999
        Dim rndNumber As New Random(ms)
        Dim nextNumber As Int32 = rndNumber.Next(100000, 999999)
        ' Display the new number in the Part # text box
        txtPartNumber.Text = nextNumber.ToString()

        ' Disable the OK button to indicate that the part is not ready
        btnAddPart.Enabled = False
End Sub
|
Private Sub btnNewMake_Click(ByVal sender As System.Object, ByVal e As System.EventArgs) Handles btnNewMake.Click
        ' The new car make will come from the New Make dialog box
        Dim frmMake As New NewMake

        ' Display the New Make dialog box and find out if the user clicked OK
        If frmMake.ShowDialog() = DialogResult.OK Then
            Dim strNewMake As String = frmMake.txtNewMake.Text

            ' If the New Make string is empty, don't do anything
            If strNewMake = "" Then
                Exit Sub
            End If

            ' Before adding the new make, check that it doesn't exist already
            If cboMakes.FindStringExact(strNewMake) > 0 Then
                Exit Sub
            End If

            ' Now you can add it
            cboMakes.Items.Add(strNewMake)
            ' The user likely wants this new item selected
            cboMakes.Text = strNewMake

            ' Open the Makes.xml file
            Dim docXMLFile As New XmlDocument
            docXMLFile.Load("Makes.xml")

            ' Get the root node so we can explore its children
            Dim nodRoot As XmlElement = docXMLFile.DocumentElement

            ' If the car is not in the list already, add it as a Make element
            Dim elmXML As XmlElement = docXMLFile.CreateElement("Make")
            ' Create its value using the string from the New Make dialog box
            Dim txtXML As XmlText = docXMLFile.CreateTextNode(strNewMake)
            ' Add the new element at the end of the file
            docXMLFile.DocumentElement.AppendChild(elmXML)
            ' Specify its text
            docXMLFile.DocumentElement.LastChild.AppendChild(txtXML)

            ' Save the file
            docXMLFile.Save("Makes.xml")
        End If
End Sub
|
Private Sub btnNewModel_Click(ByVal sender As System.Object, ByVal e As System.EventArgs) Handles btnNewModel.Click
        ' The new car make will come from the New Make dialog box
        Dim frmModel As New NewModel

        ' Display the New Make dialog box and find out if the user clicked OK
        If frmModel.ShowDialog() = DialogResult.OK Then
            Dim strNewModel As String = frmModel.txtNewModel.Text

            ' If the New Make string is empty, don't do anything
            If strNewModel = "" Then
                Exit Sub
            End If

            ' Before adding the new make, check that it doesn't exist already
            If cboModels.FindStringExact(strNewModel) > 0 Then
                Exit Sub
            End If

            ' Now you can add it
            cboModels.Items.Add(strNewModel)
            ' The user likely wants this new item selected
            cboModels.Text = strNewModel

            Dim docXMLFile As New XmlDocument

            ' Open the Makes.xml file
            docXMLFile = New XmlDocument
            docXMLFile.Load("Models.xml")

            ' Get the root node so we can explore its children
            Dim nodRoot As XmlElement = docXMLFile.DocumentElement

            ' If the model is not in the list already, add it as a Model element
            Dim elmXML As XmlElement = docXMLFile.CreateElement("Model")
            ' Create its value using the string from the New Make dialog box
            Dim txtXML As XmlText = docXMLFile.CreateTextNode(strNewModel)
            ' Add the new element at the end of the file
            docXMLFile.DocumentElement.AppendChild(elmXML)
            ' Specify its text
            docXMLFile.DocumentElement.LastChild.AppendChild(txtXML)

            ' Save the file
            docXMLFile.Save("Models.xml")
        End If
End Sub
|
Private Sub txtPartName_TextChanged(ByVal sender As System.Object, ByVal e As System.EventArgs) Handles txtPartName.TextChanged
        ' If there is no part name, no need to add the item to the XML file
        If txtPartName.Text = "" Then
            btnAddPart.Enabled = False
        Else
            btnAddPart.Enabled = True
        End If
End Sub
|
Private Sub txtUnitPrice_TextChanged(ByVal sender As System.Object, ByVal e As System.EventArgs) Handles txtUnitPrice.TextChanged
        ' If the price is not specified, don't add the item to the XML file
        If txtUnitPrice.Text = "" Then
            btnAddPart.Enabled = False
        Else
            btnAddPart.Enabled = True
        End If
End Sub
|
Private Sub txtPartNumber_TextChanged(ByVal sender As System.Object, ByVal e As System.EventArgs) Handles txtPartNumber.TextChanged
        ' Make sure that there is a Part Number for this item
        ' Otherwise, don't add the part to the XML file
        If (txtPartNumber.Text = "") Or _
             (CInt(txtPartNumber.Text) < 100000) Or _
             (CInt(txtPartNumber.Text) > 999999) Then
            btnAddPart.Enabled = False
        Else
            btnAddPart.Enabled = True
        End If
End Sub
|

Private Sub btnNewPart_Click(ByVal sender As System.Object, ByVal e As System.EventArgs) Handles btnNewPart.Click
        Dim frmNewPart As New NewPart

        If frmNewPart.ShowDialog() = DialogResult.OK Then
            Dim strPartNumber As String = frmNewPart.txtPartNumber.Text
            Dim strCarYear As String = frmNewPart.cboYears.Text
            Dim strMake As String = frmNewPart.cboMakes.Text
            Dim strModel As String = frmNewPart.cboModels.Text
            Dim strPartName As String = frmNewPart.txtPartName.Text
            Dim strUnitPrice As String = frmNewPart.txtUnitPrice.Text

            If strCarYear = "" Then
                Exit Sub
            End If

            If strMake = "" Then
                Exit Sub
            End If

            If strModel = "" Then
                Exit Sub
            End If

            Dim docXML As New XmlDocument

            docXML.Load("Parts.xml")

            Dim elmXML As XmlElement = docXML.CreateElement("Part")
            Dim strNewPart As String = "<PartNumber>" + strPartNumber + "</PartNumber>" + _
                            "<CarYear>" + strCarYear + "</CarYear>" + _
             "<Make>" + strMake + "</Make>" + _
             "<Model>" + strModel + "</Model>" + _
             "<PartName>" + strPartName + "</PartName>" + _
             "<UnitPrice>" + strUnitPrice + "</UnitPrice>"

            elmXML.InnerXml = strNewPart
            docXML.DocumentElement.AppendChild(elmXML)

            docXML.Save("Parts.xml")
        End If
    End Sub

    Private Sub btnClose_Click(ByVal sender As System.Object, ByVal e As System.EventArgs) Handles btnClose.Click
        End
End Sub
|
|
Element Navigation |
|
An XML tree navigation consists of visiting the various nodes of the file, for any necessary reason. One reason would be that you want to insert a new element at a specific position in the tree. Another would be that you want to check whether a certain node is already present in the tree. As always, there are various ways you can perform an operation such as navigating a tree. To "scan" a file from top to bottom, thus visiting each type of node in the XML file, you can use the XmlTextReader class. This class is equipped with all types of properties and methods you would need. If you want to navigate to a specific node in the tree, you can use the XmlDocument.GetElementByTagName() method that we used previously.
|
|
|
||
| Previous | Copyright © 2004-2010 FunctionX, Inc. | Next |
|
|
||