XML-Based Applications:
College Park Auto-Parts
|
|
XML-Based Applications: |
After our various introductions to XML, we will put it to good use with a usable application. As a meta language, XML can be used to create text-based files that can be accessed by any application that reads XML. To highly support this language, the .NET Framework provides various classes that allow you to create very effective applications without investing a lot in client/server stuff. In this lesson, we are going to create an application for a business that sells auto parts. The items sold in the store and the inventory are stored as XML files. When an employee is performing a customer order, we make the application friendly with lists that allow the user to select the necessary information using combo boxes. These include the year, the make and the model that allow to identify the specific car that a part is made for. After selecting the necessary parts, the employee can save the order. The order also is saved as an XML file. All the orders of one particular day are saved to a common file. This allows the management to review the orders for a particular day. To review such orders, they can open another form that is equipped with a Date Picker and a DataGrid controls. The employee selects a date and the grid displays the list of items sold for that day, if any. Prerequisites: To follow this lesson, you should be familiar with:
|
|
Application Design |
|
To make our application intuitive, we will create a few objects as follows:
When designing this type of application, you should keep in mind to make it as user friendly as possible, which is what we did. Still, you are free to change our design to what suits you. |
|
|
 |
||||||||||||||||||||||||
|
 |
||||||||||||||||||||||||||||||||||||
|
Private Sub btnNewMake_Click(ByVal sender As System.Object, ByVal e As System.EventArgs) Handles btnNewMake.Click
        Dim frmNewMake As NewMake = New NewMake

        frmNewMake.ShowDialog()
End Sub
|
 |
||||||||||||||||||||||||
|
 |
||||||||||||||||||||||||||||||||||||||||||||||||||||||||||||||||||||||||||||||||||||
|
Private Sub NewPart_Load(ByVal sender As System.Object, ByVal e As System.EventArgs) Handles MyBase.Load
        ' Fill the Year combo box with years from 1960 to the coming year
        Dim i As Integer
        For i = DateTime.Now.Year + 1 To 1960 Step -1
            Me.cboYears.Items.Add(i.ToString())
        Next

        ' We will generate a random number for the item
        ' To start, we will use the miliseconds as a seed
        Dim tmeNow As DateTime = DateTime.Now
        Dim ms As Integer = tmeNow.Millisecond
        Dim rndNumber As Random = New Random(ms)

        ' Generate three randomg characters
        Dim firstCharacter As Char = ChrW(rndNumber.Next(65, 90))
        Dim secondCharacter As Char = ChrW(rndNumber.Next(65, 90))
        Dim thirdCharacter As Char = ChrW(rndNumber.Next(65, 90))
        ' Generate a random number made of 4 digits
        Dim numberPart As Integer = rndNumber.Next(1000, 9999)

        ' Exclude the digits 1 and 0 because they create confusion
        If firstCharacter = "I" Or firstCharacter = "O" Then
            firstCharacter = "A"
        End If
        If secondCharacter = "I" Or secondCharacter = "O" Then
            secondCharacter = "A"
        End If
        If thirdCharacter = "I" Or thirdCharacter = "O" Then
            thirdCharacter = "A"
        End If
        ' Generate a random number from 1 to 4
        Dim rndCombination As Integer = rndNumber.Next(1, 4)
        Dim strPartNumber As String = Nothing

        ' Create a part number using some algorithm
        If rndCombination = 1 Then
            strPartNumber = CStr(firstCharacter) & CStr(secondCharacter) & _
   	CStr(numberPart) & CStr(thirdCharacter)
        ElseIf rndCombination = 2 Then
            strPartNumber = CStr(firstCharacter) & CStr(numberPart) & _
             CStr(secondCharacter) & CStr(thirdCharacter)
        ElseIf rndCombination = 3 Then
            strPartNumber = CStr(numberPart) & CStr(firstCharacter) & _
             CStr(secondCharacter) & CStr(thirdCharacter)
        Else
            strPartNumber = CStr(rndNumber.Next(100000, 999999))
        End If

        ' Display the new number in the Part # text box
        Me.txtPartNumber.Text = strPartNumber

        ' Disable the Add Part button to indicate that the part is not ready
        Me.btnAddPart.Enabled = False
End Sub
|
Private Sub btnNewMake_Click(ByVal sender As Object, ByVal e As System.EventArgs) Handles btnNewMake.Click
        Dim frmNewMake As NewMake = New NewMake

        frmNewMake.ShowDialog()
End Sub
|
Private Sub btnNewModel_Click(ByVal sender As Object, ByVal e As System.EventArgs) Handles btnNewModel.Click
        Dim frmNewModel As NewModel = New NewModel

        frmNewModel.ShowDialog()
End Sub
|
Private Sub btnNewCategory_Click(ByVal sender As Object, ByVal e As System.EventArgs) Handles btnNewCategory.Click
        Dim frmCat As NewPartCategory = New NewPartCategory

        frmCat.ShowDialog()
End Sub
|
Private Sub btnClose_Click(ByVal sender As Object, ByVal e As System.EventArgs) Handles btnClose.Click
        Close()
End Sub
|
 |
||||||||||||||||||||||||||||||||||||||||||||||||||||||||||||||||||||||||||||||||||||||||||||||||||||||||||||||||||||||||||||||||||||||||||||||||||||||||||||||||||||||||||||||||||||||||||||||||||||||||||||||||||||||||||||||||||||||||||||||||||||||||||||||||||||||||||||
|
Private Sub OrderProcessing_Load(ByVal sender As System.Object, ByVal e As System.EventArgs) Handles MyBase.Load
        ' Fill the Year combo box with years from 1960 to the coming year
        Dim i As Integer
        For i = DateTime.Now.Year + 1 To 1960 Step -1
            Me.cboYears.Items.Add(i.ToString())
        Next
End Sub
|
Imports System.IO Imports System.Xml Public Class OrderProcessing |
Private Sub btnNewPart_Click(ByVal sender As Object, ByVal e As System.EventArgs) Handles btnNewPart.Click
        Dim frmPart As NewPart = New NewPart

        frmPart.ShowDialog()
End Sub
|
Private Sub btnClose_Click(ByVal sender As Object, ByVal e As System.EventArgs) Handles btnClose.Click
        Close()
End Sub
|
 |
||||||||||||
|
Private Sub btnOrderProcessing_Click(ByVal sender As System.Object, ByVal e As System.EventArgs) Handles btnOrderProcessing.Click
        Dim frmOrder As OrderProcessing = New OrderProcessing

        frmOrder.ShowDialog()
End Sub
|
Private Sub btnNewPart_Click(ByVal sender As Object, ByVal e As System.EventArgs) Handles btnNewPart.Click
        Dim frmPart As NewPart = New NewPart

        frmPart.ShowDialog()
End Sub
|
Private Sub btnClose_Click(ByVal sender As Object, ByVal e As System.EventArgs) Handles btnClose.Click
        End
End Sub
|
|
Using the Document Object Model (DOM) |
|
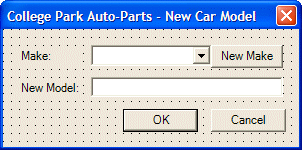
The main purpose of this application is to take advantage of XML and the Document Object Model (DOM) as it is implemented in the .NET Framework through the XmlDocument class. As mentioned in our lessons on XML, the XmlDocument class provides the necessary methods to create an element, to locate one, and to managed. To perform some of these operations, it gets assisted by the XmlNode and its derived classes. Based on this, we will use those classes to create parts and items sold in the store. Before creating a part, the application must have a list of cars. To start, we created a sample XML file that contained a few cars. Here, we will all the user to add new model and add them to the file. We will create new models from the New Model dialog box. When designing the New Part form, we equipped it with a few combo boxes. When the New Part form displays, we will make sure that those combo boxes are filled with the information that is already stored in the corresponding XML files. |
|
|
Private Sub NewModel_Load(ByVal sender As System.Object, ByVal e As System.EventArgs) Handles MyBase.Load
        ' We will need a reference to the XML document
        Dim docXML As XmlDocument = New XmlDocument

        ' We will start with the Make combo box
        ' Open the Cars.xml file
        docXML.Load("Cars.xml")
        ' Get a reference to the root node
        Dim nodRoot As XmlElement = docXML.DocumentElement
        ' Locate all nodes whose name is Make
        Dim nodItems As XmlNodeList = nodRoot.GetElementsByTagName("Make")
        ' Retrieve the value of each Make node and put
        ' that value in the Make combo box
        Dim i As Integer
        For i = 0 To nodItems.Count - 1 Step 1
            Me.cboMakes.Items.Add(nodItems.ItemOf(i).Attributes.ItemOf("MakeName").InnerText)
        Next
End Sub
|
Private Sub NewPart_Load(ByVal sender As System.Object, ByVal e As System.EventArgs) Handles MyBase.Load
        ' Fill the Year combo box with years from 1960 to the coming year
        Dim i As Integer
        For i = DateTime.Now.Year + 1 To 1960 Step -1
            Me.cboYears.Items.Add(i.ToString())
        Next

        ' We will need a reference to the XML document
        Dim docXML As XmlDocument = New XmlDocument

        ' Open the Cars.xml file
        docXML.Load("Cars.xml")

        ' Get a reference to the root node
        Dim nodRoot As XmlElement = docXML.DocumentElement
        ' Locate all nodes whose name is Make
        Dim nodItems As XmlNodeList = nodRoot.GetElementsByTagName("Make")
        ' Retrieve the value of each Make node and put
        ' that value in the Make combo box
        For i = 0 To nodItems.Count - 1 Step 1
            Me.cboMakes.Items.Add(nodItems.ItemOf(i).Attributes.ItemOf("MakeName").InnerText)
        Next

        ' Open the Makes.xml file
        docXML.Load("PartCategories.xml")

        ' Get a reference to the root node
        nodRoot = docXML.DocumentElement
        ' Locate all nodes whose name is Make
        nodItems = nodRoot.GetElementsByTagName("PartCategory")
        ' Retrieve the value of each Make node and put
        ' that value in the Make combo box
        For i = 0 To nodItems.Count - 1 Step 1
            Me.cboPartCategories.Items.Add(nodItems.ItemOf(i).InnerText)
        Next

        Me.cboPartCategories.Text = "Miscellaneous"
        ' We will generate a random number for the item
        ' To start, we will use the miliseconds as a seed
        Dim tmeNow As DateTime = DateTime.Now
        Dim ms As Integer = tmeNow.Millisecond

        ' Now we can generate a random number between 100000 and 999999
        Dim rndNumber As Random = New Random(ms)

        ' Generate three randomg characters
        Dim firstCharacter As Char = ChrW(rndNumber.Next(65, 90))
        Dim secondCharacter As Char = ChrW(rndNumber.Next(65, 90))
        Dim thirdCharacter As Char = ChrW(rndNumber.Next(65, 90))
        ' Generate a random number made of 4 digits
        Dim numberPart As Integer = rndNumber.Next(1000, 9999)

        ' Exclude the digits 1 and 0 because they create confusion
        If firstCharacter = "I" Or firstCharacter = "O" Then
            firstCharacter = "A"
        End If
        If secondCharacter = "I" Or secondCharacter = "O" Then
            secondCharacter = "A"
        End If
        If thirdCharacter = "I" Or thirdCharacter = "O" Then
            thirdCharacter = "A"
        End If
        ' Generate a random number between 1 and 3
        Dim rndCombination As Integer = rndNumber.Next(1, 4)
        Dim strPartNumber As String = 0

        ' Create a part number using some algorithm
        If rndCombination = 1 Then
            strPartNumber = CStr(firstCharacter) & CStr(secondCharacter) & _
   CStr(numberPart) & CStr(thirdCharacter)
        ElseIf rndCombination = 2 Then
            strPartNumber = CStr(firstCharacter) & CStr(numberPart) & _
             CStr(secondCharacter) & CStr(thirdCharacter)
        ElseIf rndCombination = 3 Then
            strPartNumber = CStr(numberPart) & CStr(firstCharacter) & _
             CStr(secondCharacter) & CStr(thirdCharacter)
        Else
            strPartNumber = CStr(rndNumber.Next(100000, 999999))
        End If

        ' Display the new number in the Part # text box
        Me.txtPartNumber.Text = strPartNumber

        ' Disable the OK button to indicate that the part is not ready
        Me.btnAddPart.Enabled = False
End Sub
|
<?xml version="1.0" encoding="utf-8" ?> <Cars> <!-- Each car model is organized as follows: 1. The first part identifies the make of the car. We use a MakeName attribute of the Make element to identify a make 2. The second part identifies the name of the model. --> <Make MakeName="Acura"> <Model>Integra GS 1.8L L4</Model> <Model>MDX 3.5L V6</Model> <Model>NSX 3.0L V6</Model> <Model>NSX 3.2L V6</Model> <Model>TL 3.2L V6</Model> </Make> <Make MakeName="Audi"> <Model>A4 Quattro 1.8L Turbo</Model> <Model>A4 Quattro 3.0L V6</Model> <Model>S4 2.7L V6</Model> </Make> <Make MakeName="BMW"> <Model>325I 2.5L L6</Model> <Model>325XI 2.5L L6</Model> <Model>745I 4.4L V8</Model> <Model>Z3 Coupe 3.0L L6</Model> </Make> </Cars> |
|
Inventory Creation |
|
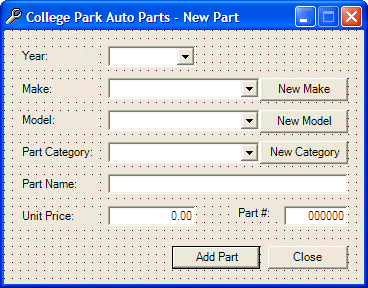
The inventory of our store is created by adding items to an XML file. To do this, once again, we take advantage of the XmlDocument, the XmlNode, and its derived classes. This inventory is done using the New Part form. We need to apply some rules in order to create an item. Early rules can make the application easier to use and maintain. For example, we must create an item only if it can be clearly identified. This makes it easy to locate it when processing an order. We explain through the comments in the code. |
|
|
Private Sub btnNewMake_Click(ByVal sender As System.Object, ByVal e As System.EventArgs) Handles btnNewMake.Click
        ' The new car make will come from the New Make dialog box
        Dim frmMake As NewMake = New NewMake

        ' Display the New Make dialog box and find out if the user clicked OK
        If frmMake.ShowDialog() = DialogResult.OK Then

            Dim strNewMake As String = frmMake.txtNewMake.Text

            ' If the user didn"t create a new Make, don"t do anything
            If strNewMake = "" Then
                Exit Sub
            End If

            ' Before adding the new make, check that it doesn"t exist already
            If Me.cboMakes.FindStringExact(strNewMake) > 0 Then
                Exit Sub
            End If

            ' Now you can add it
            Me.cboMakes.Items.Add(strNewMake)
            ' The user likely wants this new item selected
            Me.cboMakes.Text = strNewMake

            ' Open the Cars.xml file
            Dim docXMLFile As XmlDocument = New XmlDocument
            docXMLFile.Load("Cars.xml")

            ' Get the root node so we can explore its children
            Dim nodRoot As XmlNode = docXMLFile.DocumentElement

            ' If the car is not in the list already, create its Make node
            Dim nodNewMake As XmlNode = docXMLFile.CreateNode(XmlNodeType.Element, "Make", "")
            ' Create an attribute for the node
            CType(nodNewMake, XmlElement).SetAttribute("MakeName", strNewMake)

            ' Add the new node to the XML file
            docXMLFile.DocumentElement.AppendChild(nodNewMake)

            ' Save the file
            docXMLFile.Save("Cars.xml")
        End If
End Sub
|
Private Sub btnNewMake_Click(ByVal sender As Object, ByVal e As System.EventArgs) Handles btnNewMake.Click
        ' The new car make will come from the New Make dialog box
        Dim frmMake As NewMake = New NewMake

        ' Display the New Make dialog box and find out if the user clicked OK
        If frmMake.ShowDialog() = DialogResult.OK Then

            Dim strNewMake As String = frmMake.txtNewMake.Text

            ' If the user didn"t create a new Make, don"t do anything
            If strNewMake = "" Then
                Exit Sub
            End If

            ' Before adding the new make, check that it doesn"t exist already
            If Me.cboMakes.FindStringExact(strNewMake) > 0 Then
                Exit Sub
            End If

            ' Now you can add it
            Me.cboMakes.Items.Add(strNewMake)
            ' The user likely wants this new item selected
            Me.cboMakes.Text = strNewMake

            ' Open the Cars.xml file
            Dim docXMLFile As XmlDocument = New XmlDocument
            docXMLFile.Load("Cars.xml")

            ' Get the root node so we can explore its children
            Dim nodRoot As XmlNode = docXMLFile.DocumentElement

            ' If the car is not in the list already, create its Make node
            Dim nodNewMake As XmlNode = docXMLFile.CreateNode(XmlNodeType.Element, "Make", "")
            ' Create an attribute for the node
            CType(nodNewMake, XmlElement).SetAttribute("MakeName", strNewMake)

            ' Add the new node to the XML file
            docXMLFile.DocumentElement.AppendChild(nodNewMake)

            ' Save the file
            docXMLFile.Save("Cars.xml")
        End If
End Sub
|
Private Sub btnNewModel_Click(ByVal sender As Object, ByVal e As System.EventArgs) Handles btnNewModel.Click
        ' The new car model will come from the New Model dialog box
        Dim frmModel As NewModel = New NewModel

        ' Display the New Model dialog box and find out if the user clicked OK
        If frmModel.ShowDialog() = DialogResult.OK Then

            ' Retrieve the values that the user specified
            Dim strMake As String = frmModel.cboMakes.Text
            Dim strNewModel As String = frmModel.txtNewModel.Text

            ' If the new didn"t select a Make, don"t do anything
            If strMake = "" Then
                Exit Sub
            End If
            ' If the New Model string is empty, don"t do anything
            If strNewModel = "" Then
                Exit Sub
            End If

            ' Open the Cars.xml file
            Dim docXMLFile As XmlDocument = New XmlDocument
            docXMLFile.Load("Cars.xml")

            ' Get the root node so we can explore its children
            Dim nodRoot As XmlNode = docXMLFile.DocumentElement

            ' Create a list of all Make nodes
            Dim lstMakes As XmlNodeList = docXMLFile.GetElementsByTagName("Make")

            ' Visit each Make
            Dim i As Integer
            For i = 0 To lstMakes.Count - 1 Step 1

                ' Get a reference to the current node
                Dim curMake As XmlNode = lstMakes.ItemOf(i)

                ' If, or when you find the Make
                If curMake.Attributes.ItemOf("MakeName").InnerText = strMake Then

                    ' Since we found the Make, find out if the model exists
                    Dim lstCurrentModels As XmlNodeList = curMake.ChildNodes

                    ' Check each model if the list already contains the model
                    Dim j As Integer
                    For j = 0 To lstCurrentModels.Count - 1 Step 1

                        If lstCurrentModels.ItemOf(j).InnerText = strNewModel Then

                            MsgBox("That model exists already in the database")
                            Exit Sub
                        End If
                    Next

                    ' create a child node to it
                    Dim nodModel As XmlNode = docXMLFile.CreateNode(XmlNodeType.Element, "Model", "")
                    ' Create its value using the string from the New Make dialog box
                    nodModel.InnerText = strNewModel
                    ' Add the new element at the end of the file
                    curMake.AppendChild(nodModel)

                    ' Save the file
                    docXMLFile.Save("Cars.xml")
                End If
            Next
        End If
End Sub
|
Private Sub cboMakes_SelectedIndexChanged(ByVal sender As Object, ByVal e As System.EventArgs) Handles cboMakes.SelectedIndexChanged
        ' Empty the Models combo box
        Me.cboModels.Items.Clear()

        ' Find out if the user had selected a Make
        Dim strSelectedMake As String = Me.cboMakes.Text
        ' Open the Cars.xml file
        Dim docXML As XmlDocument = New XmlDocument
        docXML.Load("Cars.xml")

        ' Get a reference to the root node
        Dim nodRoot As XmlElement = docXML.DocumentElement
        ' Locate all nodes whose name is Make
        Dim nodMakes As XmlNodeList = nodRoot.GetElementsByTagName("Make")
        ' Look for the Make that is the same the user selected
        Dim i As Integer
        For i = 0 To nodMakes.Count - 1 Step 1

            ' Retrieve the value of each Make node and put
            Dim strMakeName As String = nodMakes.ItemOf(i).Attributes.ItemOf("MakeName").InnerText
            ' If you find it...
            If strMakeName = strSelectedMake Then

                ' If you find it, make a list of its models...
                Dim nodAvailableModels As XmlNodeList = nodMakes.ItemOf(i).ChildNodes
                ' ... then add each of its models to the Model combo box
                Dim j As Integer
                For j = 0 To nodAvailableModels.Count - 1 Step 1
                    Me.cboModels.Items.Add(nodAvailableModels.ItemOf(j).InnerText)
                Next
            End If
        Next

End Sub
|
Private Sub btnNewCategory_Click(ByVal sender As Object, ByVal e As System.EventArgs) Handles btnNewCategory.Click
        ' Get a reference to the New Part Category form
        Dim frmCategory As NewPartCategory = New NewPartCategory

        ' Display the New Part Category dialog box and find out if the user clicked OK
        If frmCategory.ShowDialog() = DialogResult.OK Then

            Dim strCategory As String = frmCategory.txtNewCategory.Text

            ' If the user didn"t create a new category, don't do anything
            If strCategory = "" Then
                Exit Sub
            End If

            ' Before adding the new category, check that it doesn't exist already
            If Me.cboPartCategories.FindStringExact(strCategory) > 0 Then
                Exit Sub
            End If

            ' Now you can add it
            Me.cboPartCategories.Items.Add(strCategory)
            ' The user likely wants this new item selected
            Me.cboPartCategories.Text = strCategory

            ' Open the PartCategories.xml file
            Dim docXMLFile As XmlDocument = New XmlDocument
            docXMLFile.Load("PartCategories.xml")

            ' Get the root node so we can explore its children
            Dim nodRoot As XmlNode = docXMLFile.DocumentElement

            ' If the new part is not in the list already, create its node
            Dim nodNewCategory As XmlNode = docXMLFile.CreateNode(XmlNodeType.Element, "PartCategory", "")
            ' Create text for the node
            nodNewCategory.InnerText = strCategory

            ' Add the new node to the XML file
            docXMLFile.DocumentElement.AppendChild(nodNewCategory)

            ' Save the file
            docXMLFile.Save("PartCategories.xml")
        End If
End Sub
|
Private Sub txtPartName_TextChanged(ByVal sender As Object, ByVal e As System.EventArgs) Handles txtPartName.TextChanged
        ' If there is no part name, no need to add the item to the XML file
        If Me.txtPartName.Text = "" Then
            Me.btnAddPart.Enabled = False
        Else
            Me.btnAddPart.Enabled = True
        End If
End Sub
|
Private Sub txtUnitPrice_TextChanged(ByVal sender As Object, ByVal e As System.EventArgs) Handles txtUnitPrice.TextChanged
        ' If the price is not specified, don"t add the item to the XML file
        If Me.txtUnitPrice.Text = "" Then
            Me.btnAddPart.Enabled = False
        Else
            Me.btnAddPart.Enabled = True
        End If
End Sub
|
Private Sub txtPartNumber_TextChanged(ByVal sender As Object, ByVal e As System.EventArgs) Handles txtPartNumber.TextChanged
        ' Make sure that there is a Part Number for this item
        ' Otherwise, don't add the part to the XML file
        If Me.txtPartNumber.Text = "" Then
            Me.btnAddPart.Enabled = False
        Else
            Me.btnAddPart.Enabled = True
        End If
End Sub
|
Private Sub btnAddPart_Click(ByVal sender As Object, ByVal e As System.EventArgs) Handles btnAddPart.Click
        ' Open the Parts.xml file
        Dim docXML As XmlDocument = New XmlDocument
        docXML.Load("Parts.xml")

        ' Before adding the new part, make sure all components are ready
        ' Otherwise, don"t add it
        If Me.cboYears.SelectedIndex < 0 Then
            MsgBox("You must specify the year. " & _
             "This will help to locate the part")
            Me.cboYears.Focus()
            Exit Sub
        End If
        If Me.cboMakes.SelectedIndex < 0 Then
            MsgBox("Please select the car make for this part.")
            Me.cboMakes.Focus()
            Exit Sub
        End If
        If Me.cboModels.SelectedIndex < 0 Then
            MsgBox("The car model is required. " & _
             "It helps to know the specific car this part is made for.")
            Me.cboModels.Focus()
            Exit Sub
        End If
        If Me.txtPartName.Text = "" Then
            MsgBox("You must specify the part name or a (very) short description.")
            Me.txtPartName.Focus()
            Exit Sub
        End If
        If Me.txtUnitPrice.Text = "" Then
            MsgBox("You must enter the price of each unit of this part.")
            Me.txtUnitPrice.Focus()
            Exit Sub
        End If
        If Me.txtPartNumber.Text = "" Then
            MsgBox("Every item of this database must have a number. " & _
             "The number is just a combination of letters and digits." & _
             "Please make up a number and enter it in the Part # box.")
            Me.txtPartNumber.Focus()
            Return
        End If

        ' The part seems to be ready
        ' Get a reference to the root node
        Dim nodNewPart As XmlElement = docXML.CreateElement("Part")
        ' Create a new part as a child of the root (this is a simple node addition
        Dim strNewPart As String = "<PartNumber>" & Me.txtPartNumber.Text & "</PartNumber>" & _
           "<CarYear>" & Me.cboYears.Text & "</CarYear>" & _
           "<Make>" & Me.cboMakes.Text & "</Make>" & _
           "<Model>" & Me.cboModels.Text & "</Model>" & _
           "<PartName Category=""" & Me.cboPartCategories.Text & """>" & _
           Me.txtPartName.Text & "</PartName>" & _
           "<UnitPrice>" & Me.txtUnitPrice.Text & "</UnitPrice>"
        nodNewPart.InnerXml = strNewPart
        docXML.DocumentElement.AppendChild(nodNewPart)
        docXML.Save("Parts.xml")

        ' Reset the form in case the user wants to add another part
        Me.cboYears.SelectedIndex = -1
        Me.cboMakes.SelectedIndex = -1
        Me.cboModels.SelectedIndex = -1
        Me.cboPartCategories.Text = "Miscellaneous"
        Me.txtPartName.Text = ""
        Me.txtUnitPrice.Text = ""

        ' We will generate a random number for the item
        ' To start, we will use the miliseconds as a seed
        Dim tmeNow As DateTime = DateTime.Now
        Dim ms As Integer = tmeNow.Millisecond

        ' Now we can generate a random number between 100000 and 999999
        Dim rndNumber As Random = New Random(ms)

        ' Generate three randomg characters
        Dim firstCharacter As Char = ChrW(rndNumber.Next(65, 90))
        Dim secondCharacter As Char = ChrW(rndNumber.Next(65, 90))
        Dim thirdCharacter As Char = ChrW(rndNumber.Next(65, 90))
        ' Generate a random number made of 4 digits
        Dim numberPart As Integer = rndNumber.Next(1000, 9999)

        ' Exclude the digits 1 and 0 because they create confusion
        If firstCharacter = "I" Or firstCharacter = "O" Then firstCharacter = "A"
        If secondCharacter = "I" Or secondCharacter = "O" Then secondCharacter = "A"
        If thirdCharacter = "I" Or thirdCharacter = "O" Then thirdCharacter = "A"
        ' Generate a random number between 1 and 3
        Dim rndCombination As Integer = rndNumber.Next(1, 4)
        Dim strPartNumber As String = Nothing

        ' Create a part number using some algorithm
        If rndCombination = 1 Then
            strPartNumber = AscW(firstCharacter) & AscW(secondCharacter) & _
             AscW(numberPart) & AscW(thirdCharacter)
        ElseIf rndCombination = 2 Then
            strPartNumber = AscW(firstCharacter) & AscW(numberPart) & _
             AscW(secondCharacter) & AscW(thirdCharacter)
        ElseIf rndCombination = 3 Then
            strPartNumber = AscW(numberPart) & AscW(firstCharacter) & _
             AscW(secondCharacter) & AscW(thirdCharacter)
        Else
            strPartNumber = AscW(rndNumber.Next(100000, 999999))
        End If

        ' Display the new number in the Part # text box
        Me.txtPartNumber.Text = strPartNumber
        Me.cboYears.Focus()

End Sub
|
| Year | Make | Model | Part Category | Part Name | Unit Price |
| 2002 | Audi | A4 Quattro 1.8L Turbo | Exhaust | Exhaust Gasket | 1.55 |
| 2004 | Dodge | Neon SE 2.0L L4 | Cooling System | Radiator Fan Assembly | 125.95 |
| 2002 | Audi | A4 Quattro 1.8L Turbo | Drivetrain | Axle Differential Bearing - Left | 10.25 |
| 2000 | Ford | Escort 2.0L L4 | Ignition | Crankshaft Position Sensor | 18.65 |
| 2002 | Chevrolet | Silverado 2500 5.3L V8 | Ignition | Spark Plugs | 1.55 |
| 2004 | Dodge | Neon SE 2.0L L4 | Engine | Oil Pump | 112.85 |
| 2004 | Dodge | Neon SE 2.0L L4 | Engine | Exhaust Valve | 5.85 |
| 1986 | Acura | Integra LS 1.8L L4 | Electrical | Alternator | 110.75 |
| 1998 | Toyota | Corolla 1.8L L4 | Cooling System | Radiator | 95.95 |
| 2002 | Dodge | Dakota 3.9L V6 | Electrical | Starter Motor | 145.95 |
| 2004 | Honda | Civic EX 1.7L L4 | Emission | Oxygen Sensor | 90.55 |
| 2002 | Audi | A4 Quattro 1.8L Turbo | Electrical | Alternator | 305.50 |
| 2002 | Acura | NSX 3.0L V6 | Engine | Oil Filter | 7.05 |
| 1998 | Jeep | Wrangler 2.5L L4 | Transfer Case | Input Shaft Seal Transfer Case | 6.45 |
| 1986 | Acura | Integra LS 1.8L L4 | Fuel/Air | Fuel Cap (Regular) | 4.15 |
| 2000 | Ford | Escort 2.0L L4 | Brake System | Right Caliper Assembly Front | 32.85 |
| 2004 | Dodge | Neon SE 2.0L L4 | Clutch | Clutch Release Bearing | 25.75 |
| 1998 | BMW | 325I 2.5L L6 | Steering | Rack and Pinion Bellow Kit | 19.25 |
| 2001 | Acura | Integra GS 1.8L L4 | Electrical | Voltage Regulator | 215.75 |
| 2001 | Audi | S4 2.7L V6 | Engine | Timing Belt | 35.95 |
| 2002 | Audi | A4 Quattro 1.8L Turbo | Exhaust | Muffler Hanger | 3.35 |
| 2002 | Chevrolet | Silverado 2500 5.3L V8 | Cooling System | Radiator w/Air Tube - w/TOC | 215.75 |
| 2002 | Acura | NSX 3.0L V6 | Engine | Oil Drain Plug | 1.35 |
| 2002 | Dodge | Dakota 3.9L V6 | Electrical | Circuit Breaker | 3.25 |
| 2004 | Dodge | Neon SE 2.0L L4 | Brake System | Brake Pad | 20.55 |
| 2004 | Honda | Civic EX 1.7L L4 | Electrical | Fusible Link | 3.35 |
| 2002 | Dodge | Dakota 3.9L V6 | Electrical | Circuit Breaker | 3.45 |
| 2004 | Honda | Civic EX 1.7L L4 | Transmission-Manual | Differential Bearing | 36.75 |
| 1998 | Toyota | Corolla 1.8L L4 | Cooling System | Thermostat Standard Temperature | 9.35 |
| 2002 | Audi | A4 Quattro 1.8L Turbo | Electrical | Cooling Fan Sensor | 8.65 |
| 2002 | Acura | NSX 3.0L V6 | Engine | Oil Pump Seal | 12.55 |
| 2004 | Dodge | Neon SE 2.0L L4 | Brake System | Master Cylinder w/o ABS w/2 Wheel | 102.95 |
| 2002 | Acura | NSX 3.0L V6 | Engine | Valve Stem Oil Seal | 1.75 |
| 2002 | Dodge | Dakota 3.9L V6 | Electrical | Fuse | 0.40 |
| 1998 | Toyota | Corolla 1.8L L4 | Cooling System | Regular Thermostat | 11.15 |
|
Order Processing |
|
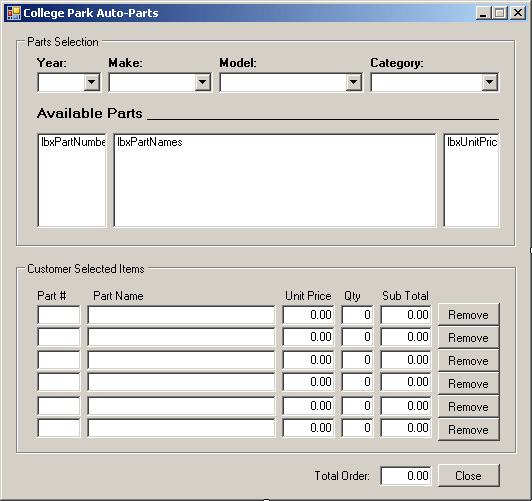
Order processing consists of receiving requests from a customer and finding the items that the customer wants. To make this easy, as mentioned already, we created a form that allows the user to select the year, the make, the model, and the item"s category. Once these selections are made, a list view displays the items that are available based on these criteria. To select an item and make it part of the order, the user can double-click it in the list view. This action copies the item by its item number, its name, and its unit price. It also sets its quantity to 1. The user can also change the quantity. The calculations are made automatically so the user doesn"t have to click a button or use a calculator. |
|
|
Private Sub cboYears_SelectedIndexChanged(ByVal sender As System.Object, ByVal e As System.EventArgs) Handles cboYears.SelectedIndexChanged
        Dim strYearSelected As String = Me.cboYears.Text
        Dim strMake As String = Nothing
        Dim docXML As XmlDocument = New XmlDocument

        Text = strYearSelected
        ' Open the Parts.xml file
        docXML.Load("Parts.xml")

        ' We will empty the Make combo box to add a new list
        Me.cboMakes.Items.Clear()
        ' We will empty the Model combo box because the car is about to be changed
        Me.cboModels.Items.Clear()
        ' Also empty the list of available parts
        Me.lvwAvailableParts.Items.Clear()

        ' Create a list of the nodes whose names are CarYear
        Dim nodYears As XmlNodeList = docXML.GetElementsByTagName("CarYear")
        ' Create a list of the nodes whose names are Make
        Dim nodMakes As XmlNodeList = docXML.GetElementsByTagName("Make")

        ' Check every CarYear node to see if its
        ' value matches the selected year
        Dim i As Integer
        For i = 0 To nodYears.Count - 1 Step 1

            ' If the CarYear of the current node is the same as the
            ' selected year, add its corresponding make to the Make combo box
            If nodYears.ItemOf(i).InnerXml = strYearSelected Then
                strMake = nodMakes.ItemOf(i).InnerText
                ' Before adding the Make to the list, make sure that it doesn"t
                ' exist already in the combo box
                If Not Me.cboMakes.Items.Contains(strMake) Then
                    Me.cboMakes.Items.Add(strMake)
                End If
            End If
        Next
End Sub
|
Private Sub cboMakes_SelectedIndexChanged(ByVal sender As Object, ByVal e As System.EventArgs) Handles cboMakes.SelectedIndexChanged
        ' Get the year that was selected
        Dim strYearSelected As String = Me.cboYears.Text
        ' Get the make that is selected
        Dim strMakeSelected As String = Me.cboMakes.Text
        ' We will need a model string
        Dim strModel As String = Nothing
        ' We will use a reference to the XML document
        Dim docXML As XmlDocument = New XmlDocument

        ' Open the Parts.xml file
        docXML.Load("Parts.xml")

        ' We will empty the Model combo box to add a new list
        Me.cboModels.Items.Clear()
        ' Also empty the list of available parts
        Me.lvwAvailableParts.Items.Clear()

        ' Create a list of the nodes we will need to locate
        Dim nodYears As XmlNodeList = docXML.GetElementsByTagName("CarYear")
        Dim nodMakes As XmlNodeList = docXML.GetElementsByTagName("Make")
        Dim nodModels As XmlNodeList = docXML.GetElementsByTagName("Model")

        ' Check every CarYear node to see if its
        ' value matches the selected year
        Dim i As Integer
        For i = 0 To nodYears.Count - 1 Step 1
            ' If the CarYear of the current node is the same as the
            ' selected year, check its corresponding make to see whether
            ' it matches the selected Make
            ' If both the year and the make selected match, then add the
            ' corresponding model to the Model combo box
            If (nodYears.ItemOf(i).InnerXml = strYearSelected) And _
             (nodMakes.ItemOf(i).InnerXml = strMakeSelected) Then
                strModel = nodModels.ItemOf(i).InnerText
                ' Before adding the model to the Model combo box, make sure
                ' that it doesn"t exist already in the list
                If Me.cboModels.Items.Contains(strModel) Then
                    Exit Sub
                Else ' If it doesn't, then add it
                    Me.cboModels.Items.Add(strModel)
                End If
            End If
        Next
End Sub
|
Private Sub cboModels_SelectedIndexChanged(ByVal sender As Object, ByVal e As System.EventArgs) Handles cboModels.SelectedIndexChanged
        ' Get the year that was selected
        Dim strYearSelected As String = Me.cboYears.Text
        ' Get the make that is selected
        Dim strMakeSelected As String = Me.cboMakes.Text
        ' We will need a model string
        Dim strModelSelected As String = Me.cboModels.Text

        ' We will use a reference to the XML document
        Dim docXML As XmlDocument = New XmlDocument
        ' Open the Parts.xml file
        docXML.Load("Parts.xml")

        ' Empty the Category combo box
        Me.cboCategories.Items.Clear()
        ' Empty the list of available parts
        Me.lvwAvailableParts.Items.Clear()

        ' Create a list of the nodes we will need to locate
        Dim nodYears As XmlNodeList = docXML.GetElementsByTagName("CarYear")
        Dim nodMakes As XmlNodeList = docXML.GetElementsByTagName("Make")
        Dim nodModels As XmlNodeList = docXML.GetElementsByTagName("Model")
        Dim nodPartNames As XmlNodeList = docXML.GetElementsByTagName("PartName")

        ' Check every CarYear node to see if its
        ' value matches the selected year
        Dim i As Integer
        For i = 0 To nodYears.Count - 1 Step 1
            ' If the CarYear of the current node is the same as the
            ' selected year, check its corresponding make and model to see whether
            ' they match the selected Make and Model
            If (nodYears.ItemOf(i).InnerXml = strYearSelected) And _
             (nodMakes.ItemOf(i).InnerXml = strMakeSelected) And _
             (nodModels.ItemOf(i).InnerXml = strModelSelected) Then
                ' If you find a part that match the year, the make and the model selected,
                ' then retrieve the (first/only) attribute of the Part Name element
                Dim nodCategory As XmlAttribute = nodPartNames.ItemOf(i).Attributes("Category")
                ' Add the category to the Categories combo box
                Dim strCategory As String = nodCategory.InnerText
                ' Before adding the model to the Model combo box, make sure
                ' that it doesn"t exist already in the list
                If Me.cboCategories.Items.Contains(strCategory) Then
                    Exit Sub
                Else ' If it doesn't, then add it
                    Me.cboCategories.Items.Add(strCategory)
                End If
            End If
        Next
End Sub
|
Private Sub cboCategories_SelectedIndexChanged(ByVal sender As Object, ByVal e As System.EventArgs) Handles cboCategories.SelectedIndexChanged
        ' Get the values the user has selected
        Dim strYearSelected As String = Me.cboYears.Text
        Dim strMakeSelected As String = Me.cboMakes.Text
        Dim strModelSelected As String = Me.cboModels.Text
        Dim strCategorySelected As String = Me.cboCategories.Text

        ' Open the Parts.xml file
        Dim docXML As XmlDocument = New XmlDocument
        docXML.Load("Parts.xml")

        ' Empty the list of available parts
        Me.lvwAvailableParts.Items.Clear()

        ' Create a list of the nodes we will need to locate
        Dim nodYears As XmlNodeList = docXML.GetElementsByTagName("CarYear")
        Dim nodMakes As XmlNodeList = docXML.GetElementsByTagName("Make")
        Dim nodModels As XmlNodeList = docXML.GetElementsByTagName("Model")
        Dim nodPartNbr As XmlNodeList = docXML.GetElementsByTagName("PartNumber")
        Dim nodPartNames As XmlNodeList = docXML.GetElementsByTagName("PartName")
        Dim nodPrices As XmlNodeList = docXML.GetElementsByTagName("UnitPrice")

        ' Check every CarYear node to see if its
        ' value matches the selected year
        Dim i As Integer
        For i = 0 To nodYears.Count - 1 Step 1
            Dim nodCategory As XmlAttribute = nodPartNames.ItemOf(i).Attributes.ItemOf("Category")
            ' Find the year, make, model, and category that match the selected
            If (nodYears.ItemOf(i).InnerXml = strYearSelected) And _
             (nodMakes.ItemOf(i).InnerXml = strMakeSelected) And _
             (nodModels.ItemOf(i).InnerXml = strModelSelected) And _
             (nodCategory.InnerText = strCategorySelected) Then
                ' Create a list view item of the part of the current model
                Dim itmPart As ListViewItem = New ListViewItem(nodPartNbr.ItemOf(i).InnerText, 0)
                itmPart.SubItems.Add(nodPartNames.ItemOf(i).InnerText)
                itmPart.SubItems.Add(nodPrices.ItemOf(i).InnerText)
                ' And display that list to the list view control
                Me.lvwAvailableParts.Items.Add(itmPart)
            End If
        Next
End Sub
|
Private Sub CalculateTotalOrder()
        Dim subTotal1 As Double
        Dim subTotal2 As Double
        Dim subTotal3 As Double
        Dim subTotal4 As Double
        Dim subTotal5 As Double
        Dim subTotal6 As Double
        Dim orderTotal As Double

        ' Retrieve the value of each sub total
        subTotal1 = CDbl(Me.txtSubTotal1.Text)
        subTotal2 = CDbl(Me.txtSubTotal2.Text)
        subTotal3 = CDbl(Me.txtSubTotal3.Text)
        subTotal4 = CDbl(Me.txtSubTotal4.Text)
        subTotal5 = CDbl(Me.txtSubTotal5.Text)
        subTotal6 = CDbl(Me.txtSubTotal6.Text)

        ' Calculate the total value of the sub totals
        orderTotal = subTotal1 + subTotal2 + subTotal3 + _
               subTotal4 + subTotal5 + subTotal6

        ' Display the total order in the appropriate text box
        Me.txtTotalOrder.Text = orderTotal.ToString("F")
End Sub
|
Private Sub lvwAvailableParts_DoubleClick(ByVal sender As Object, ByVal e As System.EventArgs) Handles lvwAvailableParts.DoubleClick
        Dim itmSelectedPart As ListViewItem = Me.lvwAvailableParts.SelectedItems.Item(0)

        ' Check if the first empty row in the Order Processing section
        ' and fill it up with the newly selected item
        If Me.txtPartNumber1.Text = "" Then
            Me.txtPartNumber1.Text = itmSelectedPart.Text
            Me.txtPartName1.Text = itmSelectedPart.SubItems(1).Text
            Me.txtUnitPrice1.Text = itmSelectedPart.SubItems(2).Text
            Me.txtQuantity1.Text = "1"
            Me.txtSubTotal1.Text = itmSelectedPart.SubItems(2).Text
            Me.chkKeepRemove1.Enabled = True
            Me.chkKeepRemove1.Checked = True
            Me.txtQuantity1.Focus()
        ElseIf Me.txtPartNumber2.Text = "" Then
            Me.txtPartNumber2.Text = itmSelectedPart.Text
            Me.txtPartName2.Text = itmSelectedPart.SubItems(1).Text
            Me.txtUnitPrice2.Text = itmSelectedPart.SubItems(2).Text
            Me.txtQuantity2.Text = "1"
            Me.txtSubTotal2.Text = itmSelectedPart.SubItems(2).Text
            Me.chkKeepRemove2.Enabled = True
            Me.chkKeepRemove2.Checked = True
            Me.txtQuantity2.Focus()
        ElseIf Me.txtPartNumber3.Text = "" Then
            Me.txtPartNumber3.Text = itmSelectedPart.Text
            Me.txtPartName3.Text = itmSelectedPart.SubItems(1).Text
            Me.txtUnitPrice3.Text = itmSelectedPart.SubItems(2).Text
            Me.txtQuantity3.Text = "1"
            Me.txtSubTotal3.Text = itmSelectedPart.SubItems(2).Text
            Me.chkKeepRemove3.Enabled = True
            Me.chkKeepRemove3.Checked = True
            Me.txtQuantity3.Focus()
        ElseIf Me.txtPartNumber4.Text = "" Then
            Me.txtPartNumber4.Text = itmSelectedPart.Text
            Me.txtPartName4.Text = itmSelectedPart.SubItems(1).Text
            Me.txtUnitPrice4.Text = itmSelectedPart.SubItems(2).Text
            Me.txtQuantity4.Text = "1"
            Me.txtSubTotal4.Text = itmSelectedPart.SubItems(2).Text
            Me.chkKeepRemove4.Enabled = True
            Me.chkKeepRemove4.Checked = True
            Me.txtQuantity4.Focus()
        ElseIf Me.txtPartNumber5.Text = "" Then
            Me.txtPartNumber5.Text = itmSelectedPart.Text
            Me.txtPartName5.Text = itmSelectedPart.SubItems(1).Text
            Me.txtUnitPrice5.Text = itmSelectedPart.SubItems(2).Text
            Me.txtQuantity5.Text = "1"
            Me.txtSubTotal5.Text = itmSelectedPart.SubItems(2).Text
            Me.chkKeepRemove5.Enabled = True
            Me.chkKeepRemove5.Checked = True
            Me.txtQuantity5.Focus()
        ElseIf Me.txtPartNumber6.Text = "" Then
            Me.txtPartNumber6.Text = itmSelectedPart.Text
            Me.txtPartName6.Text = itmSelectedPart.SubItems(1).Text
            Me.txtUnitPrice6.Text = itmSelectedPart.SubItems(2).Text
            Me.txtQuantity6.Text = "1"
            Me.txtSubTotal6.Text = itmSelectedPart.SubItems(2).Text
            Me.chkKeepRemove6.Enabled = True
            Me.chkKeepRemove6.Checked = True
            Me.txtQuantity6.Focus()
        Else
            Exit Sub
        End If

        ' Calculate the current total order and update the order
        CalculateTotalOrder()
End Sub
|
Private Sub txtQuantity1_Leave(ByVal sender As Object, ByVal e As System.EventArgs) Handles txtQuantity1.Leave
        Dim qty As Integer = 0
        Dim unitPrice As Double = 0.0
        Dim subTotal As Double = 0.0

        Try
            ' Get the quantity of the current item
            qty = CInt(Me.txtQuantity1.Text)
        Catch ex As FormatException
            MsgBox("The value you provided for the quantity of the item is invalid" & _
            vbCrLf & "Please try again")
        End Try

        Try
            ' Get the unit price of the current item
            unitPrice = CDbl(Me.txtUnitPrice1.Text)
        Catch ex As FormatException
            MsgBox("The unit price you provided for item is invalid" & _
            vbCrLf & "Please try again")
        End Try

        ' Calculate the current sub total
        subTotal = qty * unitPrice

        ' Display the new sub total in the corresponding text box
        Me.txtSubTotal1.Text = subTotal.ToString("F")
        ' Update the order
        CalculateTotalOrder()
End Sub
|
Private Sub txtQuantity2_Leave(ByVal sender As Object, ByVal e As System.EventArgs) Handles txtQuantity2.Leave
        Dim qty As Integer = 0
        Dim unitPrice As Double = 0.0
        Dim subTotal As Double = 0.0

        Try
            qty = CInt(Me.txtQuantity2.Text)
        Catch ex As FormatException
            MsgBox("The value you provided for the quantity of the item is invalid" & _
             vbCrLf & "Please try again")
        End Try

        Try
            unitPrice = CDbl(Me.txtUnitPrice2.Text)
        Catch ex As FormatException
            MsgBox("The unit price you provided for item is invalid" & _
            vbCrLf & "Please try again")
        End Try
        subTotal = qty * unitPrice

        Me.txtSubTotal2.Text = subTotal.ToString("F")
        CalculateTotalOrder()
    End Sub
|
Private Sub txtQuantity3_Leave(ByVal sender As Object, ByVal e As System.EventArgs) Handles txtQuantity3.Leave
        Dim qty As Integer = 0
        Dim unitPrice As Double = 0.0
        Dim subTotal As Double = 0.0

        Try
            qty = CInt(Me.txtQuantity3.Text)
        Catch ex As FormatException
            MsgBox("The value you provided for the quantity of the item is invalid" & _
             vbCrLf & "Please try again")
        End Try

        Try
            unitPrice = CDbl(Me.txtUnitPrice3.Text)
        Catch ex As FormatException
            MsgBox("The unit price you provided for item is invalid" & _
             vbCrLf & "Please try again")
        End Try

        subTotal = qty * unitPrice

        Me.txtSubTotal3.Text = subTotal.ToString("F")
        CalculateTotalOrder()
    End Sub
|
Private Sub txtQuantity4_Leave(ByVal sender As Object, ByVal e As System.EventArgs) Handles txtQuantity4.Leave
        Dim qty As Integer = 0
        Dim unitPrice As Decimal = 0.0
        Dim subTotal As Double = 0.0

        Try
            qty = CInt(Me.txtQuantity4.Text)
        Catch ex As FormatException
            MsgBox("The value you provided for the quantity of the item is invalid" & _
             vbCrLf & "Please try again")
        End Try

        Try
            unitPrice = CDbl(Me.txtUnitPrice4.Text)
        Catch ex As FormatException

            MsgBox("The unit price you provided for item is invalid" & _
             vbCrLf & "Please try again")
        End Try

        subTotal = qty * unitPrice

        Me.txtSubTotal4.Text = subTotal.ToString("F")
        CalculateTotalOrder()
    End Sub
|
Private Sub txtQuantity5_Leave(ByVal sender As Object, ByVal e As System.EventArgs) Handles txtQuantity5.Leave
        Dim qty As Integer = 0
        Dim unitPrice As Decimal = 0.0
        Dim subTotal As Double = 0.0

        Try
            qty = CInt(Me.txtQuantity5.Text)
        Catch ex As FormatException
            MsgBox("The value you provided for the quantity of the item is invalid" & _
             vbCrLf & "Please try again")
        End Try

        Try
            unitPrice = CDbl(Me.txtUnitPrice5.Text)
        Catch ex As FormatException
            MsgBox("The unit price you provided for item is invalid" & _
             vbCrLf & "Please try again")
        End Try

        subTotal = qty * unitPrice

        Me.txtSubTotal5.Text = subTotal.ToString("F")
        CalculateTotalOrder()
    End Sub
|
Private Sub txtQuantity6_Leave(ByVal sender As Object, ByVal e As System.EventArgs) Handles txtQuantity6.Leave
        Dim qty As Integer = 0
        Dim unitPrice As Decimal = 0.0
        Dim subTotal As Double = 0.0

        Try
            qty = CInt(Me.txtQuantity6.Text)
        Catch ex As FormatException

            MsgBox("The value you provided for the quantity of the item is invalid" & _
              vbCrLf & "Please try again")
        End Try

        Try
            unitPrice = CDbl(Me.txtUnitPrice6.Text)
        Catch ex As FormatException
            MsgBox("The unit price you provided for item is invalid" & _
             vbCrLf & "Please try again")
        End Try

        subTotal = qty * unitPrice

        Me.txtSubTotal6.Text = subTotal.ToString("F")
        CalculateTotalOrder()
End Sub
|
Private Sub chkKeepRemove1_CheckedChanged(ByVal sender As Object, ByVal e As System.EventArgs) Handles chkKeepRemove1.CheckedChanged
        ' If the check box was unchecked
        If Me.chkKeepRemove1.Checked = False Then
            ' Reset the controls of the current item
            Me.txtPartNumber1.Text = ""
            Me.txtPartName1.Text = ""
            Me.txtUnitPrice1.Text = ""
            Me.txtQuantity1.Text = "0"
            Me.txtSubTotal1.Text = "0.00"
            Me.chkKeepRemove1.Checked = False
            Me.chkKeepRemove1.Enabled = False
            ' Re-calculate the total order to update it
            CalculateTotalOrder()
        End If
    End Sub
|
Private Sub chkKeepRemove2_CheckedChanged(ByVal sender As Object, ByVal e As System.EventArgs) Handles chkKeepRemove2.CheckedChanged
        ' If the check box was unchecked
        If Me.chkKeepRemove2.Checked = False Then
            ' Reset the controls of the current item
            Me.txtPartNumber2.Text = ""
            Me.txtPartName2.Text = ""
            Me.txtUnitPrice2.Text = ""
            Me.txtQuantity2.Text = "0"
            Me.txtSubTotal2.Text = "0.00"
            Me.chkKeepRemove2.Checked = False
            Me.chkKeepRemove2.Enabled = False
            ' Re-calculate the total order to update it
            CalculateTotalOrder()
        End If
End Sub
|
Private Sub chkKeepRemove3_CheckedChanged(ByVal sender As Object, ByVal e As System.EventArgs) Handles chkKeepRemove3.CheckedChanged
        ' If the check box was unchecked
        If Me.chkKeepRemove3.Checked = False Then
            ' Reset the controls of the current item
            Me.txtPartNumber3.Text = ""
            Me.txtPartName3.Text = ""
            Me.txtUnitPrice3.Text = ""
            Me.txtQuantity3.Text = "0"
            Me.txtSubTotal3.Text = "0.00"
            Me.chkKeepRemove3.Checked = False
            Me.chkKeepRemove3.Enabled = False
            ' Re-calculate the total order to update it
            CalculateTotalOrder()
        End If
End Sub
|
Private Sub chkKeepRemove4_CheckedChanged(ByVal sender As Object, ByVal e As System.EventArgs) Handles chkKeepRemove4.CheckedChanged
        ' If the check box was unchecked
        If Me.chkKeepRemove4.Checked = False Then
            ' Reset the controls of the current item
            Me.txtPartNumber4.Text = ""
            Me.txtPartName4.Text = ""
            Me.txtUnitPrice4.Text = ""
            Me.txtQuantity4.Text = "0"
            Me.txtSubTotal4.Text = "0.00"
            Me.chkKeepRemove4.Checked = False
            Me.chkKeepRemove4.Enabled = False
            ' Re-calculate the total order to update it
            CalculateTotalOrder()
        End If
End Sub
|
Private Sub chkKeepRemove5_CheckedChanged(ByVal sender As Object, ByVal e As System.EventArgs) Handles chkKeepRemove5.CheckedChanged
        ' If the check box was unchecked
        If Me.chkKeepRemove5.Checked = False Then
            ' Reset the controls of the current item
            Me.txtPartNumber5.Text = ""
            Me.txtPartName5.Text = ""
            Me.txtUnitPrice5.Text = ""
            Me.txtQuantity5.Text = "0"
            Me.txtSubTotal5.Text = "0.00"
            Me.chkKeepRemove5.Checked = False
            Me.chkKeepRemove5.Enabled = False
            ' Re-calculate the total order to update it
            CalculateTotalOrder()
        End If
End Sub
|
Private Sub chkKeepRemove6_CheckedChanged(ByVal sender As Object, ByVal e As System.EventArgs) Handles chkKeepRemove6.CheckedChanged
        ' If the check box was unchecked
        If Me.chkKeepRemove6.Checked = False Then
            ' Reset the controls of the current item
            Me.txtPartNumber6.Text = ""
            Me.txtPartName6.Text = ""
            Me.txtUnitPrice6.Text = ""
            Me.txtQuantity6.Text = "0"
            Me.txtSubTotal6.Text = "0.00"
            Me.chkKeepRemove6.Checked = False
            Me.chkKeepRemove6.Enabled = False
            ' Re-calculate the total order to update it
            CalculateTotalOrder()
        End If
End Sub
|
|
Saving an Order |
|
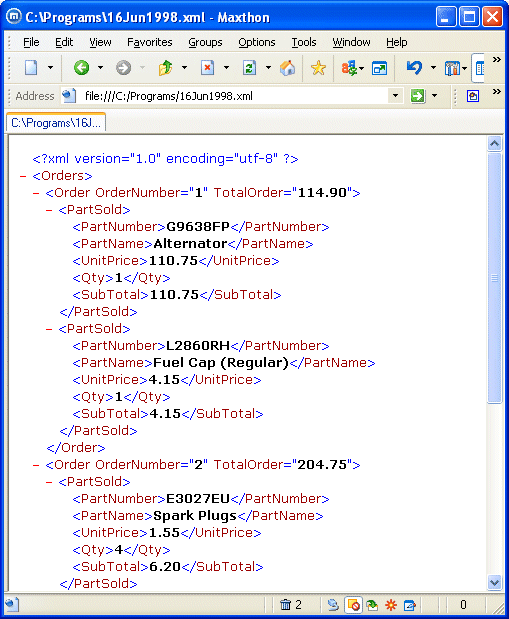
When a order has been placed and it is ready, the user can save it to a file. The orders for each day are stored in their own file so the management can review daily sales. This can be done automatically. If not, the user can save each order in its own file or in any existing file. |
|
|
Private Sub btnSave_Click(ByVal sender As Object, ByVal e As System.EventArgs) Handles btnSave.Click
        Dim strFilename As String = Me.dtpFilename.Text & ".xml"
        Dim docXML As XmlDocument = New XmlDocument
        Dim strContent As String = Nothing
        Dim strTotalOrder As String = Me.txtTotalOrder.Text
        Dim strParentOrder As String = Nothing

        If Me.chkKeepRemove1.Checked = True Then
            strContent = strContent & _
             "<PartSold><PartNumber>" & Me.txtPartNumber1.Text & "</PartNumber>" & _
             "<PartName>" & Me.txtPartName1.Text & "</PartName>" & _
             "<UnitPrice>" & Me.txtUnitPrice1.Text & "</UnitPrice>" & _
             "<Qty>" & Me.txtQuantity1.Text & "</Qty>" & _
             "<SubTotal>" & Me.txtSubTotal1.Text & "</SubTotal></PartSold>"
        End If

        If Me.chkKeepRemove2.Checked = True Then
            strContent = strContent & _
             "<PartSold><PartNumber>" & Me.txtPartNumber2.Text & "</PartNumber>" & _
             "<PartName>" & Me.txtPartName2.Text & "</PartName>" & _
             "<UnitPrice>" & Me.txtUnitPrice2.Text & "</UnitPrice>" & _
             "<Qty>" & Me.txtQuantity2.Text & "</Qty>" & _
             "<SubTotal>" & Me.txtSubTotal2.Text & "</SubTotal></PartSold>"
        End If

        If Me.chkKeepRemove3.Checked = True Then
            strContent = strContent & _
             "<PartSold><PartNumber>" & Me.txtPartNumber3.Text & "</PartNumber>" & _
             "<PartName>" & Me.txtPartName3.Text & "</PartName>" & _
             "<UnitPrice>" & Me.txtUnitPrice3.Text & "</UnitPrice>" & _
             "<Qty>" & Me.txtQuantity3.Text & "</Qty>" & _
             "<SubTotal>" & Me.txtSubTotal3.Text & "</SubTotal></PartSold>"
        End If

        If Me.chkKeepRemove4.Checked = True Then
            strContent = strContent & _
             "<PartSold><PartNumber>" & Me.txtPartNumber4.Text & "</PartNumber>" & _
             "<PartName>" & Me.txtPartName4.Text & "</PartName>" & _
             "<UnitPrice>" & Me.txtUnitPrice4.Text & "</UnitPrice>" & _
             "<Qty>" & Me.txtQuantity4.Text & "</Qty>" & _
             "<SubTotal>" & Me.txtSubTotal4.Text & "</SubTotal></PartSold>"
        End If

        If Me.chkKeepRemove5.Checked = True Then
            strContent = strContent & _
             "<PartSold><PartNumber>" & Me.txtPartNumber5.Text & "</PartNumber>" & _
             "<PartName>" & Me.txtPartName5.Text & "</PartName>" & _
             "<UnitPrice>" & Me.txtUnitPrice5.Text & "</UnitPrice>" & _
             "<Qty>" & Me.txtQuantity5.Text & "</Qty>" & _
             "<SubTotal>" & Me.txtSubTotal5.Text & "</SubTotal></PartSold>"
        End If

        If Me.chkKeepRemove6.Checked = True Then
            strContent = strContent & _
             "<PartSold><PartNumber>" & Me.txtPartNumber6.Text & "</PartNumber>" & _
             "<PartName>" & Me.txtPartName6.Text & "</PartName>" & _
             "<UnitPrice>" & Me.txtUnitPrice6.Text & "</UnitPrice>" & _
             "<Qty>" & Me.txtQuantity6.Text & "</Qty>" & _
             "<SubTotal>" & Me.txtSubTotal6.Text & "</SubTotal></PartSold>"
        End If

        If File.Exists(strFilename) Then
            ' If the file exists already, open it
            docXML.Load(strFilename)
            ' Get a reference to the root element
            Dim elmRoot As XmlElement = docXML.DocumentElement
            ' Get a reference to the last child of the root
            Dim nodLastOrder As XmlNode = elmRoot.LastChild
            ' Get the OrderNumber attribute of the last order and increment it by 1
            Dim NewOrderNumber As Integer = CInt(nodLastOrder.Attributes.ItemOf("OrderNumber").InnerText) + 1

            ' Create a new order as an element
            Dim elmNewOrder As XmlElement = docXML.CreateElement("Order")
            ' Add its attributes
            elmNewOrder.SetAttribute("OrderNumber", CStr(NewOrderNumber.ToString()))
            elmNewOrder.SetAttribute("TotalOrder", strTotalOrder)
            elmNewOrder.InnerXml = strContent
            docXML.DocumentElement.AppendChild(elmNewOrder)
            docXML.Save(strFilename)
        Else

            ' If the file doesn"t exist, get ready to create it
            strParentOrder = "<Order OrderNumber=""1"" TotalOrder=""" & strTotalOrder & "" > ")"

            ' If the file doesn"t exist, create it
            docXML.LoadXml("<?xml version=""1.0"" encoding=""utf-8""?>" + _
             "<Orders>" & _
             strParentOrder & strContent & "</Order></Orders>")
            docXML.Save(strFilename)
        End If

        ' Reset the Order Processing form
        Me.lvwAvailableParts.Items.Clear()
        Me.cboCategories.SelectedIndex = -1
        Me.cboModels.SelectedIndex = -1
        Me.cboMakes.SelectedIndex = -1
        Me.cboYears.SelectedIndex = -1
        Me.chkKeepRemove1.Checked = False
        Me.chkKeepRemove2.Checked = False
        Me.chkKeepRemove3.Checked = False
        Me.chkKeepRemove4.Checked = False
        Me.chkKeepRemove5.Checked = False
        Me.chkKeepRemove6.Checked = False
        Me.CalculateTotalOrder()
End Sub
|
| First Order - Date Saved: 16 June 1998 | |||||
| Year | Make | Model | Category | Item Name | Qty |
| 1986 | Acura | Integra LS 1.8L L4 | Electrical | Alternator | 1 |
| 1986 | Acura | Integra LS 1.8L L4 | Fuel/Air | Fuel Cap (Regular) | 4 |
| Second Order - Date Saved: 24 August 2000 | |||||
| 1998 | Toyota | Corolla 1.8L L4 | Cooling System | Radiator | 2 |
| 1998 | Jeep | Wrangler 2.5L L4 | Transfer Case | Input Shaft Seal Transfer Case | 4 |
| Third Order - Date Saved: 16 June 1998 | |||||
| 2002 | Chevrolet | Silverado 2500 5.3L V8 | Ignition | Spark Plugs | 4 |
| 2002 | Dodge | Dakota 3.9L V6 | Electrical | Starter Motor | 1 |
| 2002 | Acura | NSX 3.0L V6 | Engine | Oil Filter | 2 |
| 1998 | BMW | 325I 2.5L L6 | Steering | Rack and Pinion Bellow Kit | 2 |
| Fourth Order - Date Saved: 24 August 2000 | |||||
| 2000 | Ford | Escort 2.0L L4 | Ignition | Crankshaft Position Sensor | 2 |
| 2000 | Ford | Escort 2.0L L4 | Brake System | Right Caliper Assembly Front | 1 |
| Fifth Order - Date Saved: 21 January 2005 | |||||
| 2004 | Dodge | Neon SE 2.0L L4 | Engine | Oil Pump | 1 |
| 2004 | Dodge | Neon SE 2.0L L4 | Clutch | Clutch Release Bearing | 2 |
| 2004 | Dodge | Neon SE 2.0L L4 | Cooling System | Radiator Fan Assembly | 1 |
|
|
|
| Home | Copyright © 2004-2010 FunctionX, Inc. |
|
|
|