
The Types of Relationships
 |
The Types of Relationships |
Creating and Using Relationships
A One-to-Many Relationship: A Re-Introduction to Relationships
In a typical database, you can create, among other things, two tables that each has a primary key and one of them has a foreign key. As seen previously, the foreign key allows a child table to get records from a parent table.
Normally, each record in the child table gets 0 or only one value from the parent table and a record in the parent table can provide one of its values to many records of the child table. An example would be a list of employees where each employee belongs to a department. Obviously, each employee can belong to only one department but many employees can belong to the same department. This can be illustrated as follows:

This type of relationship is referred to as one-to-many. This is the most regular type of relationship used in a relational database and that's the type we have used so far.
|
|
using System;
using System.Collections.Generic;
using System.ComponentModel;
using System.Data;
using System.Drawing;
using System.Linq;
using System.Text;
using System.Threading.Tasks;
using System.Windows.Forms;
using System.Data.SqlClient;

namespace ComputerTrainingCenter1
{
    public partial class ComputerTrainingCenter : Form
    {
        public FunDS()
        {
            InitializeComponent();
        }

        private void CreateDatabase()
        {
            // Here We Go
        }

        private void FunDS_Load(object sender, EventArgs e)
        {
            CreateDatabase();
        }
    }
}
|
|
|||||||||||||
|
|||||||||||||
using System;
using System.Collections.Generic;
using System.ComponentModel;
using System.Data;
using System.Drawing;
using System.Linq;
using System.Text;
using System.Threading.Tasks;
using System.Windows.Forms;
using System.Data.SqlClient;

namespace ComputerTrainingCenter10
{
    public partial class CoursesSchedules : Form
    {
        public CoursesSchedules()
        {
            InitializeComponent();
        }

        private void ShowCoursesSchedules()
        {
            using (SqlConnection scComputerTrainingCenter =
                    new SqlConnection("Data Source=(local);" +
                                  "Database='ComputerTrainingCenter1';" +
                                  "Integrated Security=Yes"))
            {
                SqlCommand cmdSchedules =
                    new SqlCommand("SELECT ScheduleID    [Schd ID], " +
                                   "       CourseCode    Code, " +
                                   "       TeacherNumber [Teacher #], " +
                                   "       DaysTaught    [Days Taught], " +
                                   "       TimeTaught    [Time Taught], " +
                                   "       StartDate     [Start Date], " +
                                   "       EndDate       [End Date], " +
                                   "       RoomNumber    [Room #] " +
                                   "FROM Academics.CoursesSchedules;",
                                   scComputerTrainingCenter);
                scComputerTrainingCenter.Open();

                SqlDataAdapter sdaSchedules = new SqlDataAdapter(cmdSchedules);
                DataSet dsSchedules = new DataSet("CoursesSet");

                sdaSchedules.Fill(dsSchedules);
                dgvCoursesSchedules.DataSource = dsSchedules.Tables[0];

            }
        }

        private void CoursesSchedules_Load(object sender, EventArgs e)
        {
            ShowCoursesSchedules();
        }

        private void btnClose_Click(object sender, EventArgs e)
        {
            Close();
        }
    }
}
using System;
using System.Collections.Generic;
using System.ComponentModel;
using System.Data;
using System.Drawing;
using System.Linq;
using System.Text;
using System.Threading.Tasks;
using System.Windows.Forms;
using System.Data.SqlClient;

namespace ComputerTrainingCenter10
{
    public partial class CourseLevels : Form
    {
        public CourseLevels()
        {
            InitializeComponent();
        }

        private void ShowCourseLevels()
        {
            using (SqlConnection scComputerTrainingCenter =
                    new SqlConnection("Data Source=(local);" +
                                  "Database='ComputerTrainingCenter1';" +
                                  "Integrated Security=Yes"))
            {
                SqlCommand cmdCourseLevels =
                    new SqlCommand("SELECT ALL * FROM Academics.CourseLevels;",
                                   scComputerTrainingCenter);
                scComputerTrainingCenter.Open();

                SqlDataAdapter sdaCourseLevels = new SqlDataAdapter(cmdCourseLevels);
                DataSet dsCourseLevels = new DataSet("CourseLevelsSet");

                sdaCourseLevels.Fill(dsCourseLevels);
                dgvCourseLevels.DataSource = dsCourseLevels.Tables[0];

            }
        }

        private void CourseLevels_Load(object sender, EventArgs e)
        {
            ShowCourseLevels();
        }

        private void btnClose_Click(object sender, EventArgs e)
        {
            Close();
        }
    }
}
|
|
|||||||||||||||||||||||||||||||||||||||||||||||||||
|
|||||||||||||||||||||||||||||||||||||||||||||||||||
private void btnAdd_Click(object sender, EventArgs e)
{
    if (!(string.IsNullOrEmpty(txtNewCourseLevel.Text)))
    {
        using (SqlConnection scComputerTrainingCenter =
                new SqlConnection("Data Source=(local);" +
                              "Database='ComputerTrainingCenter1';" +
                              "Integrated Security=Yes"))
        {
            SqlCommand cmdEmployee =
                new SqlCommand("INSERT INTO Academics.CourseLevels(CourseLevel, Notes) " +
                               "VALUES(N'" + txtNewCourseLevel.Text + "', N'" +
                               txtNewDescription.Text + "');",
                               scComputerTrainingCenter);
            scComputerTrainingCenter.Open();
            cmdEmployee.ExecuteNonQuery();

            txtNewCourseLevel.Text = "";
            txtNewDescription.Text = "";
            ShowCourseLevels();
        }
    }
}
 |
|||||||||||||||||||||||||||||||||||||||||
|
|||||||||||||||||||||||||||||||||||||||||
private void btnFindEditCourseLevel_Click(object sender, EventArgs e)
{
    if (!(string.IsNullOrEmpty(txtEditCourseLevel.Text)))
    {
        using (SqlConnection scComputerTrainingCenter =
                new SqlConnection("Data Source=(local);" +
                                  "Database='ComputerTrainingCenter1';" +
                                  "Integrated Security=Yes"))
        {
            SqlCommand cmdCourseLevels =
                new SqlCommand("SELECT [Description] " +
                               "FROM Academics.CourseLevels " +
                               "WHERE CourseLevel = N'" + txtEditCourseLevel.Text + "';",
                               scComputerTrainingCenter);
            scComputerTrainingCenter.Open();

            SqlDataReader sdrCourseLevels = cmdCourseLevels.ExecuteReader();

            while (sdrCourseLevels.Read())
            {
                txtEditDescription.Text = sdrCourseLevels[0].ToString();
            }
        }
    }
}
private void btnUpdateCourseLevel_Click(object sender, EventArgs e)
{
    using (SqlConnection scComputerTrainingCenter =
            new SqlConnection("Data Source=(local);" +
                              "Database='ComputerTrainingCenter1';" +
                              "Integrated Security=Yes"))
    {
        SqlCommand cmdEmployee =
                new SqlCommand("UPDATE Academics.CourseLevels " +
                               "SET [Description] = N'" + txtEditDescription.Text + "' " +
                               "WHERE CourseLevel = N'" + txtEditCourseLevel.Text + "';",
                               scComputerTrainingCenter);
        scComputerTrainingCenter.Open();
        cmdEmployee.ExecuteNonQuery();

        MessageBox.Show("The course level has been updated.",
                        "Computer Training Center",
                        MessageBoxButtons.OK, MessageBoxIcon.Information);
    }

    txtEditCourseLevel.Text = "";
    txtEditDescription.Text = "";
    ShowCourseLevels();
}
 |
||||||||||||||||||||||||||||||||||||||||
|
||||||||||||||||||||||||||||||||||||||||
private void btnFindDeleteCourseLevel_Click(object sender, EventArgs e)
{
    if (!(string.IsNullOrEmpty(txtDeleteCourseLevel.Text)))
    {
        using (SqlConnection scComputerTrainingCenter =
                new SqlConnection("Data Source=(local);" +
                                  "Database='ComputerTrainingCenter1';" +
                                  "Integrated Security=Yes"))
        {
            SqlCommand cmdCourseLevels =
                new SqlCommand("SELECT [Description] " +
                               "FROM Academics.CourseLevels " +
                               "WHERE CourseLevel = N'" + txtDeleteCourseLevel.Text + "';",
                               scComputerTrainingCenter);
            scComputerTrainingCenter.Open();

            SqlDataReader sdrCourseLevels = cmdCourseLevels.ExecuteReader();

            while (sdrCourseLevels.Read())
            {
                txtDeleteDescription.Text = sdrCourseLevels[0].ToString();
            }
        }
    }
}
private void btnDeleteCourseLevel_Click(object sender, EventArgs e)
{
    using (SqlConnection scComputerTrainingCenter =
            new SqlConnection("Data Source=(local);" +
                              "Database='ComputerTrainingCenter1';" +
                              "Integrated Security=Yes"))
    {
        SqlCommand cmdEmployee =
                new SqlCommand("DELETE FROM Academics.CourseLevels " +
                               "WHERE CourseLevel = N'" + txtDeleteCourseLevel.Text + "';",
                               scComputerTrainingCenter);
        scComputerTrainingCenter.Open();
        cmdEmployee.ExecuteNonQuery();

        MessageBox.Show("The course level has been deleted.",
                        "Computer Training Center",
                        MessageBoxButtons.OK, MessageBoxIcon.Information);
    }

    txtEditCourseLevel.Text = "";
    txtEditDescription.Text = "";
    ShowCourseLevels();
}
 |
|||||||||||||||||||||||||||||||||||||||||||||||||||||||
|
|||||||||||||||||||||||||||||||||||||||||||||||||||||||
using System;
using System.Collections.Generic;
using System.ComponentModel;
using System.Data;
using System.Drawing;
using System.Linq;
using System.Text;
using System.Threading.Tasks;
using System.Windows.Forms;
using System.Data.SqlClient;

namespace ComputerTrainingCenter10
{
    public partial class CourseNew : Form
    {
        public CourseNew()
        {
            InitializeComponent();
        }

        private void ResetForm()
        {
            txtCourseCode.Text = "";
            txtCourseName.Text = "";

            using (SqlConnection scComputerTrainingCenter =
                    new SqlConnection("Data Source=(local);" +
                                       "Database='ComputerTrainingCenter1';" +
                                       "Integrated Security=Yes"))
            {
                SqlCommand cmdCourseLevels =
                    new SqlCommand("SELECT ALL * FROM Academics.CourseLevels;",
                                   scComputerTrainingCenter);
                scComputerTrainingCenter.Open();

                SqlDataReader sdrCourseLevels = cmdCourseLevels.ExecuteReader();

                while (sdrCourseLevels.Read())
                {
                    cbxCoursesLevels.Items.Add(sdrCourseLevels[0].ToString());
                }
            }

            txtDescription.Text = "";
        }

        private void CourseNew_Load(object sender, EventArgs e)
        {
            ResetForm();
        }
    }
}
 |
||||||||||||||||||||||||||||||||||||||||||||||||||||||||||||
|
||||||||||||||||||||||||||||||||||||||||||||||||||||||||||||
using System;
using System.Collections.Generic;
using System.ComponentModel;
using System.Data;
using System.Drawing;
using System.Linq;
using System.Text;
using System.Threading.Tasks;
using System.Windows.Forms;
using System.Data.SqlClient;

namespace ComputerTrainingCenter1
{
    public partial class CourseEditor : Form
    {
        public CourseEditor()
        {
            InitializeComponent();
        }

        private void ResetForm()
        {
            txtCourseCode.Text = "";
            txtCourseName.Text = "";

            using (SqlConnection scComputerTrainingCenter =
                    new SqlConnection("Data Source=(local);" +
                                  "Database='ComputerTrainingCenter1';" +
                                  "Integrated Security=Yes"))
            {
                SqlCommand cmdCourseLevels =
                    new SqlCommand("SELECT ALL * FROM Academics.CourseLevels;",
                                   scComputerTrainingCenter);
                scComputerTrainingCenter.Open();

                SqlDataReader sdrCourseLevels = cmdCourseLevels.ExecuteReader();

                while (sdrCourseLevels.Read())
                {
                    cbxCoursesLevels.Items.Add(sdrCourseLevels[0].ToString());
                }
            }

            txtDescription.Text = "";
        }

        private void CourseEditor_Load(object sender, EventArgs e)
        {
            ResetForm();
        }
    }
}
private void btnFind_Click(object sender, EventArgs e)
{
    if (!(string.IsNullOrEmpty(txtCourseCode.Text)))
    {
        using (SqlConnection scComputerTrainingCenter =
                new SqlConnection("Data Source=(local);" +
                              "Database='ComputerTrainingCenter1';" +
                              "Integrated Security=Yes"))
        {
            SqlCommand cmdCourseLevels =
            new SqlCommand("SELECT CourseName, CourseLevel, Notes " +
                           "FROM Academics.Courses " +
                           "WHERE CourseCode = N'" + txtCourseCode.Text + "';",
                           scComputerTrainingCenter);
            scComputerTrainingCenter.Open();

            SqlDataReader sdrCourseLevels = cmdCourseLevels.ExecuteReader();

            while (sdrCourseLevels.Read())
            {
                txtCourseName.Text = sdrCourseLevels[0].ToString();
                cbxCoursesLevels.Text = sdrCourseLevels[1].ToString();
                txtDescription.Text = sdrCourseLevels[2].ToString();
            }
        }
    }
}
private void btnSubmit_Click(object sender, EventArgs e)
{
    if (!(string.IsNullOrEmpty(txtCourseCode.Text)))
    {
        using (SqlConnection scComputerTrainingCenter =
                new SqlConnection("Data Source=(local);" +
                              "Database='ComputerTrainingCenter1';" +
                              "Integrated Security=Yes"))
        {
            SqlCommand cmdCourseLevels =
            new SqlCommand("UPDATE Academics.Courses " +
                           "SET CourseName = N'" + txtCourseName.Text + "', " +
                           "    CourseLevel = N'" + cbxCoursesLevels.Text + "', " +
                           "    [Description] = N'" + txtDescription.Text + "' " +
                           "WHERE CourseCode = N'" + txtCourseCode.Text + "';",
                           scComputerTrainingCenter);
            scComputerTrainingCenter.Open();
            cmdCourseLevels.ExecuteNonQuery();

            MessageBox.Show("The course record has been updated.",
                            "Computer Training Center",
                            MessageBoxButtons.OK, MessageBoxIcon.Information);
        }
    }

    Close();
}
private void btnClose_Click(object sender, EventArgs e)
{
    Close();
}
 |
||||||||||||||||||||||||||||||||||||||||||||||||||||||||||||
|
||||||||||||||||||||||||||||||||||||||||||||||||||||||||||||
using System;
using System.Collections.Generic;
using System.ComponentModel;
using System.Data;
using System.Drawing;
using System.Linq;
using System.Text;
using System.Threading.Tasks;
using System.Windows.Forms;
using System.Data.SqlClient;

namespace ComputerTrainingCenter10
{
    public partial class CourseDelete : Form
    {
        public CourseDelete()
        {
            InitializeComponent();
        }

        private void ResetForm()
        {
            txtCourseCode.Text = "";
            txtCourseName.Text = "";

            using (SqlConnection scComputerTrainingCenter =
                    new SqlConnection("Data Source=(local);" +
                                  "Database='ComputerTrainingCenter1';" +
                                  "Integrated Security=Yes"))
            {
                SqlCommand cmdCourseLevels =
                    new SqlCommand("SELECT ALL * FROM Academics.CourseLevels;",
                                   scComputerTrainingCenter);
                scComputerTrainingCenter.Open();

                SqlDataReader sdrCourseLevels = cmdCourseLevels.ExecuteReader();

                while (sdrCourseLevels.Read())
                {
                    cbxCoursesLevels.Items.Add(sdrCourseLevels[0].ToString());
                }
            }

            txtDescription.Text = "";
        }

        private void CourseDelete_Load(object sender, EventArgs e)
        {
            ResetForm();
        }
    }
}
private void btnDeleteCourse_Click(object sender, EventArgs e)
{
    if (!(string.IsNullOrEmpty(txtCourseCode.Text)))
    {
        using (SqlConnection scComputerTrainingCenter =
                new SqlConnection("Data Source=(local);" +
                                  "Database='ComputerTrainingCenter1';" +
                                  "Integrated Security=Yes"))
        {
            SqlCommand cmdEmployee =
                new SqlCommand("DELETE FROM Academics.Courses " +
                               "WHERE CourseCode = N'" + txtCourseCode.Text + "';",
                               scComputerTrainingCenter);
            scComputerTrainingCenter.Open();
            cmdEmployee.ExecuteNonQuery();

            txtCourseCode.Text = "";
            txtCourseName.Text = "";
            cbxCoursesLevels.Text = "";
            txtDescription.Text = "";
        }
    }
}
private void btnClose_Click(object sender, EventArgs e)
{
    Close();
}
|
|
|||||||||||||||||||||||||||||||||||
|
|||||||||||||||||||||||||||||||||||
using System;
using System.Collections.Generic;
using System.ComponentModel;
using System.Data;
using System.Drawing;
using System.Linq;
using System.Text;
using System.Threading.Tasks;
using System.Windows.Forms;
using System.Data.SqlClient;

namespace ComputerTrainingCenter10
{
    public partial class Courses : Form
    {
        public Courses()
        {
            InitializeComponent();
        }

        private void ShowCourses()
        {
            using (SqlConnection scComputerTrainingCenter =
                    new SqlConnection("Data Source=(local);" +
                                  "Database='ComputerTrainingCenter1';" +
                                  "Integrated Security=Yes"))
            {
                SqlCommand cmdCourses =
                    new SqlCommand("SELECT CourseCode Code, " +
                                   "       CourseName Name, " +
                                   "       CourseLevel Level, " +
                                   "       Notes " +
                                   "FROM Academics.Courses;",
                                   scComputerTrainingCenter);
                scComputerTrainingCenter.Open();

                SqlDataAdapter sdaCourses = new SqlDataAdapter(cmdCourses);
                DataSet dsCourses = new DataSet("CoursesSet");

                sdaCourses.Fill(dsCourses);
                dgvCourses.DataSource = dsCourses.Tables[0];

            }
        }

        private void Courses_Load(object sender, EventArgs e)
        {
            ShowCourses();
        }
    }
}
private void btnNewCourse_Click(object sender, EventArgs e)
{
    CourseNew cn = new CourseNew();

    using (SqlConnection scComputerTrainingCenter =
            new SqlConnection("Data Source=(local);" +
                              "Database='ComputerTrainingCenter1';" +
                              "Integrated Security=Yes"))
    {
        SqlCommand cmdCourseLevels =
            new SqlCommand("SELECT ALL * FROM Academics.CourseLevels;",
                           scComputerTrainingCenter);
        scComputerTrainingCenter.Open();

        SqlDataReader sdrCourseLevels = cmdCourseLevels.ExecuteReader();

        while (sdrCourseLevels.Read())
        {
            cn.cbxCoursesLevels.Items.Add(sdrCourseLevels[0].ToString());
        }
    }

    if (cn.ShowDialog() == System.Windows.Forms.DialogResult.OK)
    {
        if (!(string.IsNullOrEmpty(cn.txtCourseCode.Text)))
        {
            using (SqlConnection scComputerTrainingCenter =
                new SqlConnection("Data Source=(local);" +
                                  "Database='ComputerTrainingCenter1';" +
                                  "Integrated Security=Yes"))
            {
                SqlCommand cmdEmployee =
                    new SqlCommand("INSERT INTO Academics.Courses " +
                                   "VALUES(N'" + cn.txtCourseCode.Text + "', N'" +
                                   cn.txtCourseName.Text + "', N'" +
                                   cn.cbxCoursesLevels.Text + "', N'" +
                                   cn.txtDescription.Text + "');",
                                   scComputerTrainingCenter);
                scComputerTrainingCenter.Open();
                cmdEmployee.ExecuteNonQuery();

                MessageBox.Show("The course has been created.",
                                "Computer Training Center",
                              MessageBoxButtons.OK, MessageBoxIcon.Information);
            }

            ShowCourses();
        }
    }
}
private void btnEditCourse_Click(object sender, EventArgs e)
{
    CourseEditor ce = new CourseEditor();
    ce.ShowDialog();
    ShowCourses();
}
private void btnDeleteCourse_Click(object sender, EventArgs e)
{
    CourseDelete cd = new CourseDelete();
    cd.ShowDialog();
    ShowCourses();
}
private void btnCourseLevels_Click(object sender, EventArgs e)
{
    CourseLevels cls = new CourseLevels();
    cls.ShowDialog();
}
private void btnClose_Click(object sender, EventArgs e)
{
    Close();
}
|
|
|||||||||||||||
|
|||||||||||||||
using System;
using System.Collections.Generic;
using System.ComponentModel;
using System.Data;
using System.Drawing;
using System.Linq;
using System.Text;
using System.Threading.Tasks;
using System.Windows.Forms;
using System.Data.SqlClient;

namespace ComputerTrainingCenter10
{
    public partial class Students : Form
    {
        public Students()
        {
            InitializeComponent();
        }

        private void ShowStudents()
        {
            using (SqlConnection scComputerTrainingCenter =
                    new SqlConnection("Data Source=(local);" +
                                  "Database='ComputerTrainingCenter1';" +
                                  "Integrated Security=Yes"))
            {
                SqlCommand cmdStudents =
                    new SqlCommand("SELECT std.StudentID     [Std ID], " +
                                   "       std.StudentNumber [Std #], " +
                                   "       std.FirstName     [First Name], " +
                                   "       std.MiddleName    [Middle Name], " +
                                   "       std.LastName      [Last Name], " +
                                   "       std.StudentName   [Student Name], " +
                                   "       std.PhoneNumber   [Phone #], " +
                                   "       std.EmailAddress  [Email Address] " +
                                   "FROM   Administration.Students std;",
                                   scComputerTrainingCenter);
                scComputerTrainingCenter.Open();

                SqlDataAdapter sdaStudents = new SqlDataAdapter(cmdStudents);
                DataSet dsStudents = new DataSet("StudentsSet");

                sdaStudents.Fill(dsStudents);
                dgvStudents.DataSource = dsStudents.Tables[0];
            }
        }

        private void Students_Load(object sender, EventArgs e)
        {
            ShowStudents();
        }
    }
}
private void btnClose_Click(object sender, EventArgs e)
{
    Close();
}
|
|
||||||||||||||||
|
||||||||||||||||
using System;
using System.Collections.Generic;
using System.ComponentModel;
using System.Data;
using System.Drawing;
using System.Linq;
using System.Text;
using System.Threading.Tasks;
using System.Windows.Forms;
using System.Data.SqlClient;

namespace ComputerTrainingCenter10
{
    public partial class Teachers : Form
    {
        public Teachers()
        {
            InitializeComponent();
        }

        private void ShowTeachers()
        {
            using (SqlConnection scComputerTrainingCenter =
                    new SqlConnection("Data Source=(local);" +
                                  "Database='ComputerTrainingCenter1';" +
                                  "Integrated Security=Yes"))
            {
                SqlCommand cmdTeachers =
                    new SqlCommand("SELECT teach.TeacherID     [Teacher #], " +
                                   "       teach.TeacherNumber [Teacher #], " +
                                   "       teach.StartDate     [Start Date], " +
                                   "       teach.FirstName     [First Name], " +
                                   "       teach.MiddleName    [Middle Name], " +
                                   "       teach.LastName      [Last Name], " +
                                   "       teach.TeacherName   [Teacher Name], " +
                                   "       teach.PhoneNumber   [Phone #], " +
                                   "       teach.EmailAddress  [Email Address] " +
                                   "FROM   Administration.Teachers teach;",
                                   scComputerTrainingCenter);
                scComputerTrainingCenter.Open();

                SqlDataAdapter sdaTeachers = new SqlDataAdapter(cmdTeachers);
                DataSet dsTeachers = new DataSet("TeachersSet");

                sdaTeachers.Fill(dsTeachers);
                dgvTeachers.DataSource = dsTeachers.Tables[0];
            }
        }

        private void Teachers_Load(object sender, EventArgs e)
        {
            ShowTeachers();
        }
    }
}
private void btnClose_Click(object sender, EventArgs e)
{
    Close();
}
|
Mutual Reference: A Variance to a One-To-Many Relationship |
Mutual reference is a scenario in which each of two tables references the other. As a variant to a one-to-many relationship, some records of a table A may get their foreign value from a table B, then some records of table B may get their foreign value from a table C, and finally some records of table C would get their foreign value from table A.
Another variant is where some records of a table A would get their foreign value from a table B but also some records of the table B would get their foreign value from table A. To illustrate, once again imagine you have a table of employees and each employee is recorded as belonging to a certain department. Obviously, an employee can (should) belong to only one department. This can be illustrated as follows:
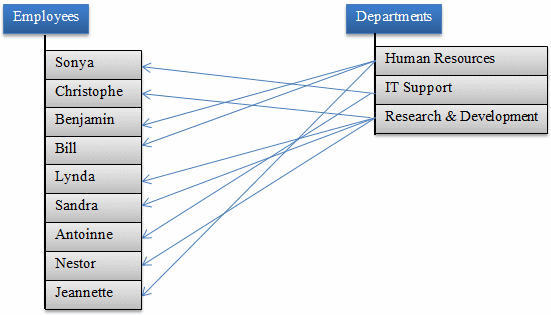
For each department, you may want to specify who the manager is. Obviously, the manager must be an employee, from the table of employees. This can be illustrated as follows:
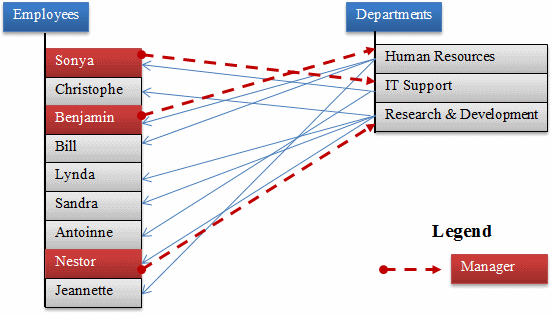
Here is an example of creating the tables and their constraints:
using System;
using System.Collections.Generic;
using System.ComponentModel;
using System.Data;
using System.Drawing;
using System.Linq;
using System.Text;
using System.Windows.Forms;
using System.Data.SqlClient;

namespace TopicsOnDataRelationships
{
    public partial class Exercise : Form
    {
        public Exercise()
        {
            InitializeComponent();
        }

        private void btnCreateDatabase_Click(object sender, EventArgs e)
        {
            using (SqlConnection cntExercise =
                new SqlConnection("Data Source=(local);" +
                                  "Database='Exercise1';" +
                                  "Integrated Security=SSPI;"))
            {
                SqlCommand cmdExercise =
                    new SqlCommand("CREATE SCHEMA Management;",
                                   cntExercise);
                cntExercise.Open();
                cmdExercise.ExecuteNonQuery();
            }

            using (SqlConnection cntExercise =
                new SqlConnection("Data Source=(local);" +
                                  "Database='Exercise1';" +
                                  "Integrated Security=SSPI;"))
            {
                SqlCommand cmdExercise =
                    new SqlCommand("CREATE SCHEMA Personnel;",
                    		   cntExercise);
                cntExercise.Open();
                cmdExercise.ExecuteNonQuery();
            }

            using (SqlConnection cntMonsonUniversity =
                new SqlConnection("Data Source=(local);" +
                                  "Database='Exercise1';" +
                                  "Integrated Security=Yes"))
            {
                SqlCommand cmdMonsonUniversity =
                    new SqlCommand("CREATE TABLE Management.Departments( " +
                                   "DepartmentCode nchar(4) not null, " +
                                   "DepartmentName nvarchar(50) not null, " +
                                   "EmployeeNumber nchar(6), " +
                                   "Constraint PK_Departments Primary Key(DepartmentCode));",
                                   cntMonsonUniversity);
                cntMonsonUniversity.Open();
                cmdMonsonUniversity.ExecuteNonQuery();
            }

            using (SqlConnection cntMonsonUniversity =
                new SqlConnection("Data Source=(local);" +
                                  "Database='Exercise1';" +
                                  "Integrated Security=Yes"))
            {
                SqlCommand cmdMonsonUniversity =
                    new SqlCommand("CREATE TABLE Personnel.Employees(" +
                                   "EmployeeNumber nchar(6) not null, " +
                                   "FirstName nvarchar(20), " +
                                   "LastName nvarchar(20) not null, " +
                                   "Title nvarchar(50), " +
                                   "HourlySalary money, " +
                                   "DepartmentCode nchar(4) " +
                                   "    Constraint FK_Departments References " +
                                   "Management.Departments(DepartmentCode), " +
                                   "Constraint PK_Employees Primary Key(EmployeeNumber));",
                                   cntMonsonUniversity);
                cntMonsonUniversity.Open();
                cmdMonsonUniversity.ExecuteNonQuery();

                MessageBox.Show("The databas has been created.",
                                "Exercise",
                                MessageBoxButtons.OK, MessageBoxIcon.Information);
            }
        }
    }
}
If you decide to create a diagram (especially if you didn't create the primary and foreign keys), you should have a link going from each table to the other, using the appropriate fields. Here is an example:

When creating the records, you can proceed as done so far. Here are examples:
private void btnCreateRecords_Click(object sender, EventArgs e)
{
    using (SqlConnection cntExercise =
        new SqlConnection("Data Source=(local);" +
                          "Database='Exercise1';" +
                          "Integrated Security=Yes"))
    {
        SqlCommand cmdExercise =
            new SqlCommand("INSERT Management.Departments(DepartmentCode, DepartmentName)" +
                           "VALUES(N'HRMN', N'Human Resources')," +
                           "      (N'ITEC', N'Information Technology')," +
                           "      (N'PRSN', N'Personnel');",
                           cntExercise);
        cntExercise.Open();
        cmdExercise.ExecuteNonQuery();
    }

    using (SqlConnection cntExercise =
        new SqlConnection("Data Source=(local);" +
                          "Database='Exercise1';" +
                          "Integrated Security=Yes"))
    {
        SqlCommand cmdExercise =
            new SqlCommand("INSERT Personnel.Employees " + // (EmployeeNumber, FirstName, LastName, Title, HourlySalary, DepartmentCode)
                    "VALUES (N'792702', N'Frank', N'Cassini', N'General Manager', 30.25, N'HRMN')," +
                    "       (N'249441', N'Patrick', N'Levine', N'Regional Manager', 28.46, N'HRMN')," +
                    "       (N'302484', N'Catherine', N'Borrow', N'Shift Supervisor', 25.72, N'PRSN')," +
                    "       (N'485052', N'Jerry', N'Fesman', N'Head Cashier', 18.64, N'PRSN')," +
                    "       (N'279475', N'Alex', N'Simkins', N'Intern', 12.48, N'PRSN')," +
                    "       (N'908047', N'Grace', N'McDermott', N'Cashier', 14.72, N'PRSN')," +
                    "       (N'395822', N'Craig', N'Newman', N'IT Support', 20.26, N'ITEC')," +
                    "       (N'381848', N'John', N'Hough', N'Cashier', 13.52, N'PRSN')," +
                    "       (N'300724', N'Matt', N'Kern', N'Accountant', 24.58, N'HRMN')," +
                    "       (N'974115', N'Elsa', N'Steinberg', N'Webmaster', 16.94, N'ITEC')," +
                    "       (N'974005', N'David', N'Miller', N'Intern', 10.48, N'ITEC')," +
                    "       (N'273941', N'Jessica', N'Redding', N'Cashier', 12.63, N'PRSN');",
                           cntExercise);
        cntExercise.Open();
        cmdExercise.ExecuteNonQuery();
    }

    using (SqlConnection cntExercise =
        new SqlConnection("Data Source=(local);" +
                          "Database='Exercise1';" +
                          "Integrated Security=Yes"))
    {
        SqlCommand cmdExercise =
            new SqlCommand("UPDATE Management.Departments " +
                           "SET EmployeeNumber = N'792702' WHERE DepartmentCode = N'HRMN';",
                           cntExercise);
        cntExercise.Open();
        cmdExercise.ExecuteNonQuery();
    }

    using (SqlConnection cntExercise =
        new SqlConnection("Data Source=(local);" +
                          "Database='Exercise1';" +
                          "Integrated Security=Yes"))
    {
        SqlCommand cmdExercise =
            new SqlCommand("UPDATE Management.Departments " +
                           "SET EmployeeNumber = N'249441' WHERE DepartmentCode = N'ITEC';",
                           cntExercise);
        cntExercise.Open();
        cmdExercise.ExecuteNonQuery();
    }

    using (SqlConnection cntExercise =
        new SqlConnection("Data Source=(local);" +
                          "Database='Exercise1';" +
                          "Integrated Security=Yes"))
    {
        SqlCommand cmdExercise =
            new SqlCommand("UPDATE Management.Departments " +
                           "SET EmployeeNumber = N'302484'  WHERE DepartmentCode = N'PRSN';",
                           cntExercise);
        cntExercise.Open();
        cmdExercise.ExecuteNonQuery();

        MessageBox.Show("The records have been created.",
                        "Exercise",
                        MessageBoxButtons.OK, MessageBoxIcon.Information);
    }
}

private void btnShowRecords_Click(object sender, EventArgs e)
{
    using (SqlConnection cntEmployees =
        new SqlConnection("Data Source=(local);" +
                          "Database='Exercise1';" +
                          "Integrated Security=Yes"))
    {
        SqlCommand cmdEmployees =
                    new SqlCommand("SELECT * FROM Personnel.Employees; ",
                                   cntEmployees);
        SqlDataAdapter sdaEmployees = new SqlDataAdapter(cmdEmployees);
        DataSet dsEmployees = new DataSet("EmployeesSet");

        cntEmployees.Open();
        sdaEmployees.Fill(dsEmployees);

        dgvEmployees.DataSource = dsEmployees.Tables[0];
    }

    using (SqlConnection cntDepartments =
        new SqlConnection("Data Source=(local);" +
                          "Database='Exercise1';" +
                          "Integrated Security=Yes"))
    {
        SqlCommand cmdDepartments =
                    new SqlCommand("SELECT * FROM Management.Departments; ",
                                   cntDepartments);
        SqlDataAdapter sdaDepartments = new SqlDataAdapter(cmdDepartments);
        DataSet dsDepartments = new DataSet("EmployeesSet");

        cntDepartments.Open();
        sdaDepartments.Fill(dsDepartments);

        dgvDepartments.DataSource = dsDepartments.Tables[0];
    }
}

private void btnClose_Click(object sender, EventArgs e)
{
    Close();
}

Using joins, you can create a statement that would show the actual values of the fields. Here is an example:
private void btnShowRecords_Click(object sender, EventArgs e)
{
    using (SqlConnection cntEmployees =
        new SqlConnection("Data Source=(local);" +
                          "Database='Exercise1';" +
                          "Integrated Security=Yes"))
    {
        SqlCommand cmdEmployees =
                    new SqlCommand("SELECT Personnel.Employees.EmployeeNumber, " +
                                   "Personnel.Employees.FirstName, " +
                                   "Personnel.Employees.LastName, " +
                                   "Personnel.Employees.Title, " +
                                   "Personnel.Employees.HourlySalary, " +
                                   "Management.Departments.Name " +
                                   "FROM Personnel.Employees " +
                                   "INNER JOIN Management.Departments " +
                                   "ON Personnel.Employees.DepartmentCode = Management.Departments.DepartmentCode; ",
                                   cntEmployees);
        SqlDataAdapter sdaEmployees = new SqlDataAdapter(cmdEmployees);
        DataSet dsEmployees = new DataSet("EmployeesSet");

        cntEmployees.Open();
        sdaEmployees.Fill(dsEmployees);

        dgvEmployees.DataSource = dsEmployees.Tables[0];
    }
}

![]() Practical
Learning: Introducing Referencial Relationships
Practical
Learning: Introducing Referencial Relationships
private void ComputerTrainingCenter_Load(object sender, EventArgs e)
{
    // CreateDatabase();

    using (SqlConnection cntComputerTrainingCenter =
        new SqlConnection("Data Source=(local);" +
                           "Database='ComputerTrainingCenter10';Integrated Security=True;"))
    {
        SqlCommand cmdDatabase = new SqlCommand("CREATE TABLE Administration.Departments " +
                                                "( " +
                                                "	DeptCode   nchar(5) not null, " +
                                                "	Department nvarchar(50), " +
                                                "   	Manager    nchar(7), " +
                                                "	Constraint PK_Departments Primary Key(DeptCode) " +
                                                "); " +
                                                "CREATE TABLE Administration.Employees " +
                                                "( " +
                                                "	EmployeeNumber nchar(7) not null, " +
                                                "	FirstName nvarchar(25), " +
                                                "	LastName nvarchar(25), " +
                                                "	EmployeeName AS CONCAT(LastName, N', ', FirstName), " +
                                                "	Title nvarchar(50), " +
                                                "	Supervisor nchar(7) null, " +
                                                "	DeptCode nchar(5), " +
                                                "	Constraint PK_Employees Primary Key(EmployeeNumber), " +
                                                "	Constraint FK_Departments Foreign Key(DeptCode) " +
                                                "		References Administration.Departments(DeptCode) " +
                                                ");", cntComputerTrainingCenter);

        cntComputerTrainingCenter.Open();
        cmdDatabase.ExecuteNonQuery();

        MessageBox.Show("The Departments and the Employees tables have been added to the ComputerTrainingCenter1 database.",
                        "Computer Training Center",
                        MessageBoxButtons.OK, MessageBoxIcon.Information);
    }
}
using System;
using System.Collections.Generic;
using System.ComponentModel;
using System.Data;
using System.Drawing;
using System.Linq;
using System.Text;
using System.Threading.Tasks;
using System.Windows.Forms;
using System.Data.SqlClient;

namespace ComputerTrainingCenter10
{
    public partial class Departments : Form
    {
        public Departments()
        {
            InitializeComponent();
        }

        private void ShowDepartments()
        {
            using (SqlConnection scComputerTrainingCenter =
                    new SqlConnection("Data Source=(local);" +
                                  "Database='ComputerTrainingCenter1';" +
                                  "Integrated Security=Yes"))
            {
                SqlCommand cmdDepartments =
                    new SqlCommand("SELECT DeptCode   [Code], " +
                                   "       Department [Name], " +
                                   "       Manager " +
                                   "FROM Administration.Departments;",
                                   scComputerTrainingCenter);
                scComputerTrainingCenter.Open();

                SqlDataAdapter sdaDepartments = new SqlDataAdapter(cmdDepartments);
                DataSet dsDepartments = new DataSet("DepartmentsSet");

                sdaDepartments.Fill(dsDepartments);
                dgvDepartments.DataSource = dsDepartments.Tables[0];

            }
        }

        private void Departments_Load(object sender, EventArgs e)
        {
            ShowDepartments();
        }
    }
}
|
|
||||||||||||||||||||||||||||||||||||||||||||||||||||||||||||||||||
|
||||||||||||||||||||||||||||||||||||||||||||||||||||||||||||||||||
private void mtbNewManagerNumber_Leave(object sender, EventArgs e)
{
    using (SqlConnection scComputerTrainingCenter =
                    new SqlConnection("Data Source=(local);" +
                                  "Database='ComputerTrainingCenter1';" +
                                  "Integrated Security=Yes"))
    {
        SqlCommand cmdManagers =
            new SqlCommand("SELECT ALL * FROM Administration.Employees " +
                           "WHERE EmployeeNumber = N'" + mtbNewManagerNumber.Text + "';",
                           scComputerTrainingCenter);
        scComputerTrainingCenter.Open();

        SqlDataReader sdrManagers = cmdManagers.ExecuteReader();

        while (sdrManagers.Read())
        {
            txtNewManagerName.Text = sdrManagers[3].ToString();
        }
    }
}
private void btnAdd_Click(object sender, EventArgs e)
{
    string strStatement = "";
    string strNoSpaceOrDash = "";

    strNoSpaceOrDash = mtbNewManagerNumber.Text.Replace(" ", "");
    strNoSpaceOrDash = strNoSpaceOrDash.Replace("-", "");

    if (string.IsNullOrEmpty(strNoSpaceOrDash))
        strStatement = "INSERT INTO Administration.Departments(DeptCode, Department) " +
                       "VALUES(N'" + txtNewDepartmentCode.Text + "', N'" + txtNewDepartmentName.Text + "');";
    else
        strStatement = "INSERT INTO Administration.Departments(DeptCode, Department, Manager) " +
                       "VALUES(N'" + txtNewDepartmentCode.Text + "', N'" +
                       txtNewDepartmentName.Text + "', N'" + mtbNewManagerNumber.Text + "');";

    using (SqlConnection scComputerTrainingCenter =
            new SqlConnection("Data Source=(local);" +
                          "Database='ComputerTrainingCenter1';" +
                          "Integrated Security=Yes"))
    {
        SqlCommand cmdEmployee =
            new SqlCommand(strStatement, scComputerTrainingCenter);
        scComputerTrainingCenter.Open();
        cmdEmployee.ExecuteNonQuery();

        txtNewDepartmentCode.Text = "";
        txtNewDepartmentName.Text = "";
        mtbNewManagerNumber.Text = "";
        ShowDepartments();
    }
}
 |
||||||||||||||||||||||||||||||||||||||||||||||||||||||||
|
||||||||||||||||||||||||||||||||||||||||||||||||||||||||
private void mtbEditManagerNumber_Leave(object sender, EventArgs e)
{
    using (SqlConnection scComputerTrainingCenter =
                    new SqlConnection("Data Source=(local);" +
                                  "Database='ComputerTrainingCenter1';" +
                                  "Integrated Security=Yes"))
    {
        SqlCommand cmdManagers =
            new SqlCommand("SELECT ALL * FROM Administration.Employees " +
                "WHERE EmployeeNumber = N'" + mtbEditManagerNumber.Text + "';",
                           scComputerTrainingCenter);
        scComputerTrainingCenter.Open();

        SqlDataReader sdrManagers = cmdManagers.ExecuteReader();

        while (sdrManagers.Read())
        {
            txtEditManagerName.Text = sdrManagers[3].ToString();
        }
    }
}
private void btnFindEditDepartment_Click(object sender, EventArgs e)
{
    if (!(string.IsNullOrEmpty(txtEditDepartmentCode.Text)))
    {
        using (SqlConnection scComputerTrainingCenter =
                new SqlConnection("Data Source=(local);" +
                                  "Database='ComputerTrainingCenter1';" +
                                  "Integrated Security=Yes"))
        {
            SqlCommand cmdDepartments =
                new SqlCommand("SELECT Department, Manager " +
                               "FROM Administration.Departments " +
                     "WHERE DeptCode = N'" + txtEditDepartmentCode.Text + "';",
                               scComputerTrainingCenter);
            scComputerTrainingCenter.Open();

            SqlDataReader sdrDepartments = cmdDepartments.ExecuteReader();

            while (sdrDepartments.Read())
            {
                txtEditDepartmentName.Text = sdrDepartments[0].ToString();
                mtbEditManagerNumber.Text = sdrDepartments[1].ToString();
            }
        }

        mtbEditManagerNumber_Leave(sender, e);
    }
}
private void btnUpdateDepartment_Click(object sender, EventArgs e)
{
    EmployeeEditor empl = new EmployeeEditor();

    using (SqlConnection scComputerTrainingCenter =
            new SqlConnection("Data Source=(local);" +
                              "Database='ComputerTrainingCenter1';" +
                              "Integrated Security=Yes"))
    {
        SqlCommand cmdEmployee =
                new SqlCommand("UPDATE Administration.Departments " +
                               "SET Department = N'" + txtEditDepartmentName.Text + "', " +
                               "    Manager    = N'" + mtbEditManagerNumber.Text + "' " +
                               "WHERE DeptCode = N'" + txtEditDepartmentCode.Text + "';",
                               scComputerTrainingCenter);
        scComputerTrainingCenter.Open();
        cmdEmployee.ExecuteNonQuery();

        MessageBox.Show("The department's record has been updated.",
                        "Computer Training Center",
                        MessageBoxButtons.OK, MessageBoxIcon.Information);
    }

    txtEditDepartmentCode.Text = "";
    txtEditDepartmentName.Text = "";
    mtbEditManagerNumber.Text = "";
    txtEditManagerName.Text = "";
    ShowDepartments();
}
 |
||||||||||||||||||||||||||||||||||||||||||||||||||||||||
|
||||||||||||||||||||||||||||||||||||||||||||||||||||||||
private void mtbDeleteManagerNumber_Leave(object sender, EventArgs e)
{
    using (SqlConnection scComputerTrainingCenter =
                    new SqlConnection("Data Source=(local);" +
                                  "Database='ComputerTrainingCenter1';" +
                                  "Integrated Security=Yes"))
    {
        SqlCommand cmdManagers =
            new SqlCommand("SELECT ALL * FROM Administration.Employees " +
                           "WHERE EmployeeNumber = N'" + mtbDeleteManagerNumber.Text + "';",
                           scComputerTrainingCenter);
        scComputerTrainingCenter.Open();

        SqlDataReader sdrManagers = cmdManagers.ExecuteReader();

        while (sdrManagers.Read())
        {
            txtDeleteManagerName.Text = sdrManagers[3].ToString();
        }
    }
}
private void btnFindDeleteDepartment_Click(object sender, EventArgs e)
{
    if (!(string.IsNullOrEmpty(txtDeleteDepartmentCode.Text)))
    {
        using (SqlConnection scComputerTrainingCenter =
                new SqlConnection("Data Source=(local);" +
                                  "Database='ComputerTrainingCenter1';" +
                                  "Integrated Security=Yes"))
        {
            SqlCommand cmdDepartments =
                new SqlCommand("SELECT Department, Manager " +
                               "FROM Administration.Departments " +
                     "WHERE DeptCode = N'" + txtDeleteDepartmentCode.Text + "';",
                               scComputerTrainingCenter);
            scComputerTrainingCenter.Open();

            SqlDataReader sdrDepartments = cmdDepartments.ExecuteReader();

            while (sdrDepartments.Read())
            {
                txtDeleteDepartmentName.Text = sdrDepartments[0].ToString();
                mtbDeleteManagerNumber.Text = sdrDepartments[1].ToString();
            }
        }

        mtbDeleteManagerNumber_Leave(sender, e);
    }
}
private void btnDeleteDepartment_Click(object sender, EventArgs e)
{
    if (!(string.IsNullOrEmpty(txtDeleteDepartmentCode.Text)))
    {
        using (SqlConnection scComputerTrainingCenter =
               new SqlConnection("Data Source=(local);" +
                                 "Database='ComputerTrainingCenter1';" +
                                 "Integrated Security=Yes"))
        {
            SqlCommand cmdEmployee =
                    new SqlCommand("DELETE FROM Administration.Departments " +
                                   "WHERE DeptCode = N'" + txtDeleteDepartmentCode.Text + "';",
                                   scComputerTrainingCenter);
            scComputerTrainingCenter.Open();
            cmdEmployee.ExecuteNonQuery();

            MessageBox.Show("The department's record has been deleted.",
                            "Computer Training Center",
                            MessageBoxButtons.OK, MessageBoxIcon.Information);
        }

        txtDeleteDepartmentCode.Text = "";
        txtDeleteDepartmentName.Text = "";
        mtbDeleteManagerNumber.Text = "";
        txtDeleteManagerName.Text = "";
        ShowDepartments();
    }
}
|
A One-to-One Relationship: A Self-Referencing Table |
|
Imagine you have two lists where a value from one list can provide 0 or 1 value to a record of the other list, and only one record of a child list can get its foreign value from the other list. This can be illustrated as follows:

This type of relationship is referred to as one-to-one. To give you an example, imagine you have a list of employees and you want to specify the supervisor or manager of each employee. This can be illustrated as follows:

By definition, a manager is primarily an employee like any other. This means that the primary information of a manager is the same as that of any other employee. This also implies that if you had to use separate tables, one for managers and another for employees, you would have two similar tables, and there is a chance that information would be duplicated in both tables. As a result, a one-to-one relationship is usually created using only one table, in which case the table would reference itself. In other words, some records would reference (be linked to) other records of the same table. This can be illustrated as follows:

Here is an example that implements this snenario:
using System;
using System.Collections.Generic;
using System.ComponentModel;
using System.Data;
using System.Drawing;
using System.Linq;
using System.Text;
using System.Windows.Forms;
using System.Data.SqlClient;

namespace TopicsOnDataRelationships
{
    public partial class Exercise : Form
    {
        public Exercise()
        {
            InitializeComponent();
        }

        private void btnCreateDatabase_Click(object sender, EventArgs e)
        {
            using (SqlConnection cntExercise =
                new SqlConnection("Data Source=(local);Database='Exercise2';" +
                                  "Integrated Security=SSPI;"))
            {
                SqlCommand cmdExercise =
                    new SqlCommand("CREATE SCHEMA Personnel;", cntExercise);
                cntExercise.Open();
                cmdExercise.ExecuteNonQuery();
            }

            using (SqlConnection cntExercise =
                new SqlConnection("Data Source=(local);" +
                                  "Database='Exercise2';" +
                                  "Integrated Security=Yes"))
            {
                SqlCommand cmdExercise =
                    new SqlCommand("CREATE TABLE Personnel.Employees(" +
                                   "EmployeeNumber nvarchar(10) not null," +
                                   "FirstName nvarchar(20)," +
                                   "LastName nvarchar(20) not null," +
                                   "Title nvarchar(50)," +
                                   "Supervisor nvarchar(10) null," +
                                   "HourlySalary money);",
                                   cntExercise);
                cntExercise.Open();
                cmdExercise.ExecuteNonQuery();
            }

            using (SqlConnection cntExercise =
                new SqlConnection("Data Source=(local);" +
                                  "Database='Exercise1';" +
                                  "Integrated Security=Yes"))
            {
                SqlCommand cmdExercise =
                    new SqlCommand("INSERT Personnel.Employees(EmployeeNumber, FirstName, " +
                                   "LastName, Title, HourlySalary) VALUES" +
                                   "(N'792702', N'Frank', N'Cassini', N'General Manager', 30.25)," +
                                   "(N'249441', N'Patrick', N'Levine', N'Regional Manager', 28.46)," +
                                   "(N'302484', N'Catherine', N'Borrow', N'Shift Supervisor', 25.72);",
                                   cntExercise);
                cntExercise.Open();
                cmdExercise.ExecuteNonQuery();
            }

            using (SqlConnection cntExercise =
                new SqlConnection("Data Source=(local);" +
                                  "Database='Exercise2';" +
                                  "Integrated Security=Yes"))
            {
                SqlCommand cmdExercise =
                    new SqlCommand("INSERT Personnel.Employees VALUES" +
                                   "(N'485052', N'Jerry', N'Fesman', N'Head Cashier', N'792702', 18.64)," +
                                   "(N'279475', N'Alex',  N'Simkins', N'Intern', N'302484', 12.48)," +
                                   "(N'908047', N'Grace', N'McDermott', N'Cashier', N'302484', 14.72)," +
                                   "(N'395822', N'Craig', N'Newman', N'IT Support', N'249441', 20.26)," +
                                   "(N'381848', N'John',  N'Hough', N'Cashier', N'302484', 13.52)," +
                                   "(N'300724', N'Matt',  N'Kern', N'Accountant', N'792702', 24.58)," +
                                   "(N'974115', N'Elsa',  N'Steinberg', N'Webmaster', N'302484', 16.94)," +
                                   "(N'974005', N'David', N'Miller', N'Intern', N'249441', 10.48)," +
                                   "(N'273941', N'Jessica', N'Redding', N'Cashier', N'302484', 12.63);",
                                   cntExercise);
                cntExercise.Open();
                cmdExercise.ExecuteNonQuery();

                MessageBox.Show("The Employees table and its records have been created.",
                                "Exercise",
                                MessageBoxButtons.OK, MessageBoxIcon.Information);
            }
        }

        private void btnShowRecords_Click(object sender, EventArgs e)
        {
            using (SqlConnection cntEmployees =
                new SqlConnection("Data Source=(local);" +
                                  "Database='Exercise1';" +
                                  "Integrated Security=Yes"))
            {
                SqlCommand cmdEmployees =
                            new SqlCommand("SELECT ALL * FROM Personnel.Employees; ",
                                           cntEmployees);
                SqlDataAdapter sdaEmployees = new SqlDataAdapter(cmdEmployees);
                DataSet dsEmployees = new DataSet("EmployeesSet");

                cntEmployees.Open();
                sdaEmployees.Fill(dsEmployees);

                dgvEmployees.DataSource = dsEmployees.Tables[0];
            }
        }

        private void btnClose_Click(object sender, EventArgs e)
        {
            Close();
        }
    }
}
The regular SELECT * statement of this table only shows the list of employees and the supervisor of each employee appears only as a number, which can make it difficult to actually identify the supervisor:

By using a join, you can create a SELECT statement where the JOIN is ON itself. When formulating the statement, you must use the table twice, in which case you should (must) create an alias for each. Here is an example:
private void btnShowRecords_Click(object sender, EventArgs e)
{
    using (SqlConnection cntEmployees =
        new SqlConnection("Data Source=(local);" +
                          "Database='Exercise1';" +
                          "Integrated Security=Yes"))
    {
        SqlCommand cmdEmployees =
                    new SqlCommand("SELECT staff.FirstName, staff.LastName, staff.Title, " +
                                   "staff.HourlySalary, staff.EmployeeNumber, " +
                                   "managers.LastName + N', ' + managers.FirstName AS Manager " +
                                   "FROM Personnel.Employees staff JOIN Personnel.Employees managers " +
                                   "    ON staff.Supervisor = managers.EmployeeNumber;",
                                   cntEmployees);
        SqlDataAdapter sdaEmployees = new SqlDataAdapter(cmdEmployees);
        DataSet dsEmployees = new DataSet("EmployeesSet");

        cntEmployees.Open();
        sdaEmployees.Fill(dsEmployees);

        dgvEmployees.DataSource = dsEmployees.Tables[0];
    }
}
This would produce:

Just as done for many tables in a database, you can create a table that relates to itself. To start, the table must have a primary key. Since you are creating an actual relationship, the table must have a foreign key and that key must reference the primary key of the same table. Of course, the name of the column that represents the foreign key must have a different name than that of the primary key column. Here is an example:
CREATE DATABASE Exercise;
GO
USE Exercise;
GO
CREATE TABLE Employees
(
	EmployeeID int identity(1, 1) not null,
	EmployeeNumber nchar(10) not null,
	FirstName nvarchar(20),
	LastName nvarchar(20) not null,
	Title nvarchar(50),
	ManagerID int
		CONSTRAINT FK_Employees References Employees(EmployeeID),
	HourlySalary money,
	CONSTRAINT PK_Employees Primary Key(EmployeeID)
);
GO
INSERT Employees(EmployeeNumber, FirstName, LastName, Title, HourlySalary)
VALUES(N'792702', N'Frank', N'Cassini', N'General Manager', 30.25);
INSERT Employees(EmployeeNumber, FirstName, LastName, Title, HourlySalary)
VALUES(N'249441', N'Patrick', N'Levine', N'Regional Manager', 28.46);
INSERT Employees(EmployeeNumber, FirstName, LastName, Title, HourlySalary)
VALUES(N'302484', N'Catherine', N'Borrow', N'Shift Supervisor', 25.72);
INSERT Employees(EmployeeNumber, FirstName, LastName, Title, ManagerID, HourlySalary)
VALUES(N'485052', N'Jerry', N'Fesman', N'Head Cashier', 1, 18.64),
      (N'279475', N'Alex', N'Simkins', N'Intern', 3, 12.48),
      (N'908047', N'Grace', N'McDermott', N'Cashier', 3, 14.72),
      (N'395822', N'Craig', N'Newman', N'IT Support', 2, 20.26),
      (N'381848', N'John', N'Hough', N'Cashier', 3, 13.52),
      (N'300724', N'Matt', N'Kern', N'Accountant', 1, 24.58),
      (N'974115', N'Elsa', N'Steinberg', N'Webmaster', 3, 16.94),
      (N'974005', N'David', N'Miller', N'Intern', 2, 10.48),
      (N'273941', N'Jessica', N'Redding', N'Cashier', 3, 12.63);
GO
If you create a diagram for the table, it would have a curb that goes from and lands on itself. Here is an example:

As seen previously, you can then create a join that gets the records from the table. Here is an example:
SELECT staff.EmployeeID AS [Empl ID], staff.EmployeeNumber As [Empl #],
       staff.FirstName AS [First Name],
       staff.LastName AS [Last Name], staff.Title,
       staff.HourlySalary AS Salary,
       managers.LastName + N', ' + managers.FirstName AS Manager
FROM Employees staff JOIN Employees managers
ON staff.ManagerID = managers.EmployeeID;
GO
|
|
|
|
|||||||||||||
|
|||||||||||||
using System;
using System.Collections.Generic;
using System.ComponentModel;
using System.Data;
using System.Drawing;
using System.Linq;
using System.Text;
using System.Threading.Tasks;
using System.Windows.Forms;
using System.Data.SqlClient;

namespace ComputerTrainingCenter10
{
    public partial class Employees : Form
    {
        public Employees()
        {
            InitializeComponent();
        }

        private void ShowEmployees()
        {
            using (SqlConnection scComputerTrainingCenter =
                    new SqlConnection("Data Source=(local);" +
                                  "Database='ComputerTrainingCenter1';" +
                                  "Integrated Security=Yes"))
            {
                // Sorry for this situation. We are going to use a sub-query although we haven't studied them.
                SqlCommand cmdEmployees =
                    new SqlCommand("SELECT empls.EmployeeNumber [Empl #], " +
                                   "       empls.FirstName [First Name], " +
                                   "       empls.LastName [Last Name], " +
                                   "       empls.Title, " +
                                   "       (SELECT CONCAT(managers.EmployeeNumber, N' - ', managers.EmployeeName) " +
                                   "        FROM Administration.Employees managers " +
                                   "       WHERE managers.EmployeeNumber = empls.Supervisor) Manager, " +
                                   "       depts.Department " +
                                   "FROM Administration.Employees empls " +
                                   "	 INNER JOIN Administration.Departments depts " +
                                   "    	ON empls.DeptCode = depts.DeptCode;",
                                   scComputerTrainingCenter);
                scComputerTrainingCenter.Open();

                SqlDataAdapter sdaEmployees = new SqlDataAdapter(cmdEmployees);
                DataSet dsEmployees = new DataSet("DepartmentsSet");

                sdaEmployees.Fill(dsEmployees);
                dgvEmployees.DataSource = dsEmployees.Tables[0];

            }
        }

        private void Employees_Load(object sender, EventArgs e)
        {
            ShowEmployees();
        }

        private void btnClose_Click(object sender, EventArgs e)
        {
            Close();
        }
    }
}
|
A Many-To-Many Relationship: Junction Tables |
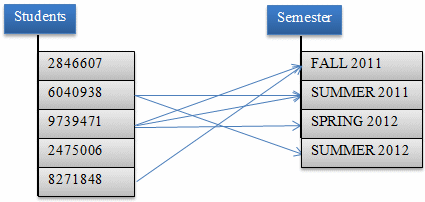
Consider a database for a university with its tables of students and courses:
CREATE DATABASE MonsonUniversity1;
GO
USE MonsonUniversity1;
GO
CREATE SCHEMA Studies;
GO
CREATE SCHEMA Admissions;
GO
CREATE TABLE Studies.Courses
(
	CourseCode nchar(10) not null,
	CourseName nvarchar(100),
	Credits smallint not null,
	CourseDescription nvarchar(max),
	CONSTRAINT PK_Courses PRIMARY KEY(CourseCode)
);
GO

INSERT INTO Studies.Courses(CourseCode, CourseName, Credits)
VALUES(N'CMIS 101', N'Introduction to Problem Solving and Algorithm Design', 3),
      (N'CMIS 170', N'Introduction to XML', 3),
      (N'CMIS 320', N'Relational Databases', 3),
      (N'CMIS 420', N'Advanced Relational Databases', 3),
      (N'CMST 306', N'Introduction to Visual Basic Programming', 3),
      (N'CMST 385', N'Internet and Web Design', 3);
GO

CREATE TABLE Admissions.Students
(
	StudentNumber nchar(20) not null,
	FirstName nvarchar(20),
	MiddleName nvarchar(20),
	LastName nvarchar(20),
	CONSTRAINT PK_Students PRIMARY KEY(StudentNumber)
);
GO
INSERT INTO Admissions.Students
VALUES(N'8130480', N'Frank', N'Daniel', N'Bigg'),
      (N'2946681', N'Marianne', NULL, N'Roberts'),
      (N'7113159', N'Angele', N'Cecilia', N'Douala'),
      (N'2049220', N'James', NULL, N'Davidson'),
      (N'7927413', N'Larry', N'Herbert', N'Bibang'),
      (N'2048800', N'Ann', NULL, N'Roberts'),
      (N'9701328', N'Celia', N'Gabriela', N'Edison'),
      (N'9720048', N'Hermine', NULL, N'Nkolo');
GO
Imagine you have a list of students who are registering for courses in a new semester:
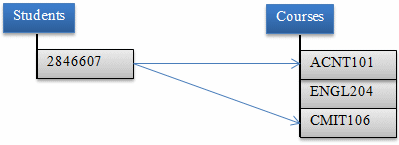

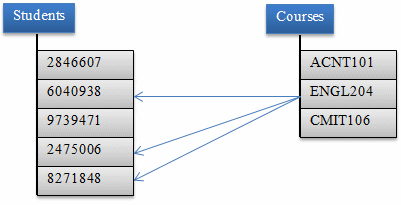
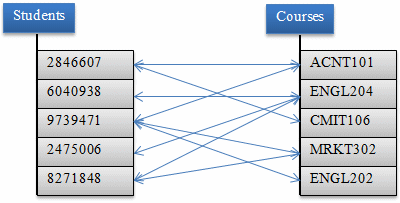
This type of relationship is referred to as many-to-many.
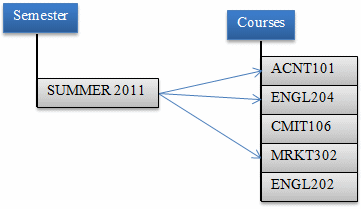
Most of the time, to implement a many-to-many relationship, besides the two tables that hold the normal records, you would create one more table referred to as a junction table. The job of the junction table is to get a value from one table, associate it to the desired value of another table, repeat this step as many times as necessary, and produce the necessary list. This can be illustrated as follows:
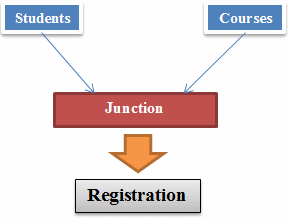
Obviously, the junction table should (must) have a foreign key for each of the concerned tables. Here is an example of such a table:
CREATE TABLE Admissions.Registrations
(
    StudentNumber nchar(20),
    CourseCode nchar(10),
);
In reality, you can add as many fields as you judge necessary. Here is an example:
CREATE TABLE Admissions.Registrations
(
    RegistrationID int identity(1, 1) not null,
    StudentNumber nchar(20),
    CourseCode nchar(10),
    CONSTRAINT PK_Registrations PRIMARY KEY(RegistrationID)
);
As mentioned already, when creating the records, you get a value from one table and another value from the other table. Here are examples:
INSERT INTO Admissions.Registrations(StudentNumber, CourseCode)
VALUES(N'8130480', N'CMIS 101'),
      (N'2946681', N'CMIS 170'),
      (N'7113159', N'CMST 385'),
      (N'2049220', N'CMIS 320'),
      (N'7927413', N'CMIS 320'),
      (N'2946681', N'CMST 306'),
      (N'2048800', N'CMIS 420'),
      (N'2049220', N'CMST 306'),
      (N'7113159', N'CMST 306'),
      (N'9701328', N'CMIS 170'),
      (N'9720048', N'CMIS 420'),
      (N'9701328', N'CMST 306');
|
|
private void ComputerTrainingCenter_Load(object sender, EventArgs e)
{
    //CreateDatabase();
    /*
    using (SqlConnection cntComputerTrainingCenter =
            new SqlConnection("Data Source=(local);" +
                               "Database='ComputerTrainingCenter10';Integrated Security=True;"))
        {
            SqlCommand cmdDatabase = new SqlCommand("CREATE TABLE Administration.Departments " +
                                                    "( " +
                                                    "	DeptCode   nchar(5) not null, " +
                                                    "	Department nvarchar(50), " +
                                                    "   Manager    nchar(7), " +
                                                    "	Constraint PK_Departments Primary Key(DeptCode) " +
                                                    "); " +
                                                    "CREATE TABLE Administration.Employees " +
                                                    "( " +
                                                    "	EmployeeNumber nchar(7) not null, " +
                                                    "	FirstName nvarchar(25), " +
                                                    "	LastName nvarchar(25), " +
                                                    "	EmployeeName AS CONCAT(LastName, N', ', FirstName), " +
                                                    "	Title nvarchar(50), " +
                                                    "	Supervisor nchar(7) null, " +
                                                    "	DeptCode nchar(5), " +
                                                    "	Constraint PK_Employees Primary Key(EmployeeNumber), " +
                                                    "	Constraint FK_Departments Foreign Key(DeptCode) " +
                                                    "		References Administration.Departments(DeptCode) " +
                                                    ");",
                                                    cntComputerTrainingCenter);

            cntComputerTrainingCenter.Open();
            cmdDatabase.ExecuteNonQuery();

            MessageBox.Show("The Departments and the Employees tables have been added to the ComputerTrainingCenter1 database.",
                            "Computer Training Center",
                            MessageBoxButtons.OK, MessageBoxIcon.Information);
    }*/

    using (SqlConnection cntComputerTrainingCenter =
        new SqlConnection("Data Source=(local);" +
                           "Database='ComputerTrainingCenter1';Integrated Security=True;"))
    {
        SqlCommand cmdDatabase = new SqlCommand("CREATE TABLE Academics.Enrollments " +
                                                "( " +
                                                "	EnrollmentID  int identity(1, 1), " +
                                                "	StudentNumber nvarchar(10), " +
                                                "	ScheduleID	  int, " +
                                                "	Constraint PK_Enrollments Primary Key(EnrollmentID), " +
                                                "	Constraint FK_StudentsEnrolled Foreign Key(StudentNumber) References Administration.Students(StudentNumber), " +
                                                "	Constraint FK_SchedulesEnrollments Foreign Key(ScheduleID) References Academics.CoursesSchedules(ScheduleID) " +
                                                ");",
                                                cntComputerTrainingCenter);

        cntComputerTrainingCenter.Open();
        cmdDatabase.ExecuteNonQuery();
    }

    using (SqlConnection cntComputerTrainingCenter =
               new SqlConnection("Data Source=(local);" +
                                  "Database='ComputerTrainingCenter1';Integrated Security=True;"))
    {
        SqlCommand cmdDatabase = new SqlCommand("INSERT INTO Academics.Enrollments(StudentNumber, ScheduleID) " +
                                                "VALUES(N'104-46-624',  9), (N'108-96-156',  2), (N'280-14-513',  1), (N'284-95-006',  9), (N'290-80-249',  1), " +
                                                "      (N'481-85-913',  1), (N'606-39-722',  1), (N'681-07-049',  3), (N'695-88-473',  4), (N'805-15-691',  2), " +
                                                "      (N'920-92-270',  4), (N'574-36-379',  1), (N'208-58-050',  2), (N'402-48-885',  2), (N'296-61-805',  4), " +
                                                "      (N'293-74-635',  3), (N'530-47-225',  3), (N'842-50-960',  4), (N'927-40-351',  3), (N'574-36-379',  5), " +
                                                "      (N'280-14-513',  5), (N'104-46-624',  5), (N'280-14-513', 10), (N'290-80-249', 10), (N'481-85-913', 10), " +
                                                "      (N'606-39-722', 10), (N'574-36-379', 10), (N'485-05-940',  7), (N'606-39-722',  9), (N'290-80-249',  5), " +
                                                "      (N'280-14-513',  9), (N'949-29-204',  6), (N'393-46-377',  6), (N'186-04-379',  6), (N'183-04-202',  6), " +
                                                "      (N'104-46-624', 18), (N'284-95-006', 18), (N'280-14-513', 18), (N'606-39-722', 18), (N'357-96-927',  7), " +
                                                "      (N'273-04-775',  7), (N'294-80-275',  7), (N'279-97-405',  7), (N'695-88-473', 13), (N'290-80-249',  8), " +
                                                "      (N'481-85-913',  8), (N'606-39-722',  8), (N'574-36-379',  8), (N'179-38-027',  8), (N'108-96-156', 11), " +
                                                "      (N'805-15-691', 11), (N'208-58-050', 11), (N'402-48-885', 11), (N'681-07-049', 12), (N'293-74-635', 12), " +
                                                "      (N'530-47-225', 12), (N'927-40-351', 12), (N'179-38-027', 17), (N'920-92-270', 13), (N'296-61-805', 13), " +
                                                "      (N'842-50-960', 13), (N'104-46-624', 14), (N'280-14-513', 14), (N'290-80-249', 14), (N'574-36-379', 14), " +
                                                "      (N'949-29-204', 16), (N'393-46-377', 16), (N'186-04-379', 16), (N'183-04-202', 16), (N'290-80-249', 17), " +
                                                "      (N'481-85-913', 17), (N'606-39-722', 17), (N'574-36-379', 17), (N'108-24-972',  4), (N'108-24-972', 6);",
                                                cntComputerTrainingCenter);

        cntComputerTrainingCenter.Open();
        cmdDatabase.ExecuteNonQuery();

        MessageBox.Show("The Enrollments table has been added to the ComputerTrainingCenter1 database.",
                "Computer Training Center",
                MessageBoxButtons.OK, MessageBoxIcon.Information);
    }
}
|
|
||||||||||||||||||||||||||||||||||||
|
||||||||||||||||||||||||||||||||||||
private void ComputerTrainingCenter_Load(object sender, EventArgs e)
{
    // CreateDatabase();
}

private void btnStudents_Click(object sender, EventArgs e)
{
    Students stds = new Students();
    stds.Show();
}
private void ComputerTrainingCenter_Load(object sender, EventArgs e)
{
    //CreateDatabase();
/*
    using (SqlConnection cntComputerTrainingCenter =

        . . .

        MessageBox.Show("The Departments and the Employees tables have been added to the ComputerTrainingCenter1 database.",
                        "Computer Training Center",
                        MessageBoxButtons.OK, MessageBoxIcon.Information);
    }*/
}
using System;
using System.Collections.Generic;
using System.ComponentModel;
using System.Data;
using System.Drawing;
using System.Linq;
using System.Text;
using System.Threading.Tasks;
using System.Windows.Forms;
using System.Data.SqlClient;

namespace ComputerTrainingCenter10
{
    public partial class Departments : Form
    {
        public Departments()
        {
            InitializeComponent();
        }

        private void ShowDepartments()
        {
            using (SqlConnection scComputerTrainingCenter =
                    new SqlConnection("Data Source=(local);" +
                                  "Database='ComputerTrainingCenter1';" +
                                  "Integrated Security=Yes"))
            {
                SqlCommand cmdDepartments =
                    new SqlCommand("SELECT DeptCode   [Code], " +
                                   "       Department [Name], " +
                                   "       Manager " +
                                   "FROM Administration.Departments;",
                                   scComputerTrainingCenter);
                scComputerTrainingCenter.Open();

                SqlDataAdapter sdaDepartments = new SqlDataAdapter(cmdDepartments);
                DataSet dsDepartments = new DataSet("DepartmentsSet");

                sdaDepartments.Fill(dsDepartments);
                dgvDepartments.DataSource = dsDepartments.Tables[0];

            }
        }

        private void Departments_Load(object sender, EventArgs e)
        {
            ShowDepartments();
        }
    }
}
|
A Variance to a Many-To-Many Relationship |
As a variance of a many-to-many relationship, instead of just two tables, you can create a junction table that unites three or more tables. Once again, consider the example of students registering for courses:


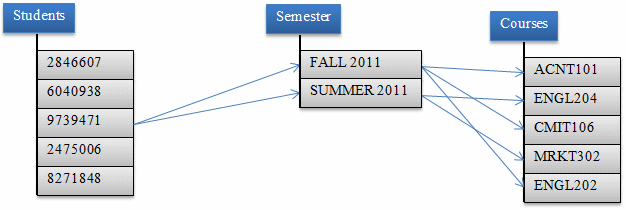
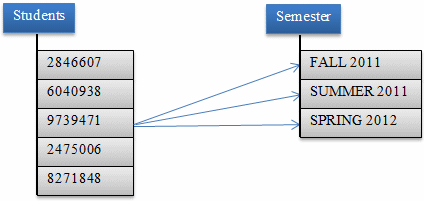

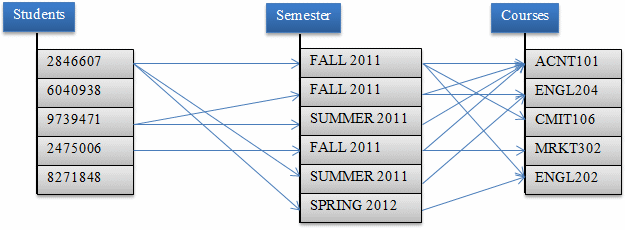
You create the junction table the same way you do for two tables: Add a foreign key for each of the tables. During data entry:
The beauty of this variant of a many-to-many relationship would be revealed during data analysis when you want to find out
|
Options on Joins |
|
Joining More Than Two Tables |
So far, our join statements involved only two tables. Actually, you can use more than that. The basic formula to join three tables is:
SELECT WhatColumn(s) FROM FirstTable

FirstJoinType SecondTable ON Condition1
SecondJoinType ThirdTable ON Condition2
You start the expression by joining the first to the second table, which means that both tables should share a column in a primary key-foreign key type of relationship. In the same way, you can create the second join. of course, the second and the third table should have a common column. In most cases, there should be a column that all three tables share. Most of the time, the relationship starts with a primary column from the first table. That column is then represented as a foreign key in the other two tables.
|
|
private void ShowCoursesSchedules()
{
    using (SqlConnection scComputerTrainingCenter =
            new SqlConnection("Data Source=(local);" +
                          "Database='ComputerTrainingCenter1';" +
                          "Integrated Security=Yes"))
    {
        SqlCommand cmdSchedules =
            new SqlCommand("SELECT schds.ScheduleID    AS [Schd ID], " +
                           "       crss.CourseName     AS Course, " +
                           "       CONCAT(tchs.LastName, N', ', tchs.FirstName, N' ', tchs.MiddleName) AS Teacher, " +
                           "       schds.DaysTaught    AS [Days Taught], " +
                           "       schds.TimeTaught    AS [Time Taught], " +
                           "       schds.StartDate     AS [Start Date], " +
                           "       schds.EndDate       AS [End Date], " +
                           "       schds.RoomNumber    AS [Room #] " +
                           "FROM Academics.CoursesSchedules schds " +
                           "INNER JOIN Academics.Courses crss ON crss.CourseCode = schds.CourseCode " +
                           "INNER JOIN Administration.Teachers tchs ON tchs.TeacherNumber = schds.TeacherNumber;",
                           scComputerTrainingCenter);
        scComputerTrainingCenter.Open();

        SqlDataAdapter sdaSchedules = new SqlDataAdapter(cmdSchedules);
        DataSet dsSchedules = new DataSet("CoursesSet");

        sdaSchedules.Fill(dsSchedules);
        dgvCoursesSchedules.DataSource = dsSchedules.Tables[0];

    }
}
|
|
|||||||||||||
|
|||||||||||||
using System;
using System.Collections.Generic;
using System.ComponentModel;
using System.Data;
using System.Drawing;
using System.Linq;
using System.Text;
using System.Threading.Tasks;
using System.Windows.Forms;
using System.Data.SqlClient;

namespace ComputerTrainingCenter10
{
    public partial class Enrollments : Form
    {
        public Enrollments()
        {
            InitializeComponent();
        }

        private void ShowEnrollments()
        {
            using (SqlConnection scComputerTrainingCenter =
                    new SqlConnection("Data Source=(local);" +
                                  "Database='ComputerTrainingCenter1';" +
                                  "Integrated Security=Yes"))
            {
                SqlCommand cmdEnrollments =
                    new SqlCommand("SELECT nrl.EnrollmentID [Enroll ID], " +
                                   "       CONCAT(stds.StudentNumber, N': ', stds.StudentName) AS Student, " +
                                   "       CONCAT(crs.CourseLevel, N': ', crs.CourseCode, N' - ', crs.CourseName) AS Course, " +
                                   "       CONCAT(tch.TeacherNumber, N': ', tch.TeacherName) AS Teacher, " +
                                   "       css.DaysTaught Days, " +
                                   "       css.TimeTaught [Time], " +
                                   "       css.StartDate [Start Date], " +
                                   "       css.EndDate [End Date], " +
                                   "       css.RoomNumber [Rm #]" +
                                   "FROM   Academics.Enrollments nrl " +
                                   "INNER JOIN Academics.CoursesSchedules css " +
                                   "       ON nrl.ScheduleID = css.ScheduleID " +
                                   "INNER JOIN Administration.Students stds " +
                                   "       ON nrl.StudentNumber = stds.StudentNumber " +
                                   "INNER JOIN Academics.Courses crs " +
                                   "       ON css.CourseCode = crs.CourseCode " +
                                   "INNER JOIN Administration.Teachers tch " +
                                   "       ON css.TeacherNumber = tch.TeacherNumber;",
                                   scComputerTrainingCenter);
                scComputerTrainingCenter.Open();

                SqlDataAdapter sdaEnrollments = new SqlDataAdapter(cmdEnrollments);
                DataSet dsEnrollments = new DataSet("CoursesSet");

                sdaEnrollments.Fill(dsEnrollments);
                dgvEnrollments.DataSource = dsEnrollments.Tables[0];
            }
        }

        private void Enrollments_Load(object sender, EventArgs e)
        {
            ShowEnrollments();
        }

        private void btnClose_Click(object sender, EventArgs e)
        {
            Close();
        }
    }
}
private void btnCoursesSchedules_Click(object sender, EventArgs e)
{
    CoursesSchedules crss = new CoursesSchedules();
    crss.Show();
}
private void btnEnrollments_Click(object sender, EventArgs e)
{
    Enrollments nrls = new Enrollments();
    nrls.Show();
}
private void btnEmployees_Click(object sender, EventArgs e)
{
    Employees empls = new Employees();
    empls.Show();
}
private void btnTeachers_Click(object sender, EventArgs e)
{
    Teachers tchs = new Teachers();
    tchs.Show();
}
private void btnDepartments_Click(object sender, EventArgs e)
{
    Departments depts = new Departments();
    depts.Show();
}
private void btnClose_Click(object sender, EventArgs e)
{
    Close();
}
|
Using a Criterion |
To create a criterion in a query you create from the SQL Server Management Studio, first select a column to display it in the Grid section. When creating the query, to specify a criterion, in the Criteria box corresponding to the column, type the condition using any of the operators we reviewed in previous lessons. Here is an example:
using System;
using System.Data;
using System.Drawing;
using System.Windows.Forms;
using System.Data.SqlClient;

public class Exercise : System.Windows.Forms.Form
{
    DataGridView dgvPersons;

    public Exercise()
    {
        InitializeComponent();
    }

    void InitializeComponent()
    {
        dgvPersons = new DataGridView();
        dgvPersons.Location = new Point(12, 12);
        dgvPersons.Size = new System.Drawing.Size(450, 160);

        Controls.Add(dgvPersons);
        Text = "Record Selection";
        Load += new EventHandler(SelectRecords);
    }

    void SelectRecords(object sender, EventArgs e)
    {
        using (SqlConnection connection =
            new SqlConnection("Data Source=(local);" +
                              "Database='People';" +
                              "Integrated Security=yes;"))
        {
            SqlCommand command =
                new SqlCommand("SELECT Persons.PersonID, Persons.FirstName, Persons.LastName, " +
                               "       Genders.GenderID, Genders.Gender " +
                               "FROM   Persons LEFT OUTER JOIN " +
                               "       Genders ON Persons.GenderID = Genders.GenderID " +
                               "WHERE  Genders.Gender = N'female';",
                connection);

            connection.Open();
            SqlDataAdapter sdaPeople = new SqlDataAdapter(command);
            DataSet dsPersons = new DataSet("PersonsSet");

            sdaPeople.Fill(dsPersons);
            dgvPersons.DataSource = dsPersons.Tables[0];
        }
    }

    public static int Main()
    {
        System.Windows.Forms.Application.Run(new Exercise());
        return 0;
    }
}

|
A Parameterized Query |
|
Introduction |
A query is referred to as parameterized if it would expect an external value to perform its comparison. The statement starts like a normal SELECT operation with a WHERE clause. Here is an example:
SELECT * FROM Students WHERE Sex = N'male';
Instead of specifying the value of the column(s) in the WHERE clause, you can wait for the user to do so.
|
Creating a Parameterized Query |
To visually create a parameterized statement, in the Object Explorer, right-click the table and click Edit Top 200 Rows. In the Criteria pane, click the box at the intersection of the column and Filter. Type @ followed by a variable name.
To create a parameterized query with code, open a Query window. Start a normal SELECT expression that contains a condition. In the WHERE expression, replace the value with the name of a variable starting with @. Here is an example:
SELECT StudentNumber, LastName, FirstName, City, State
FROM Students
WHERE StudentNumber = @StdNbr;
|
Executing a Parameterized Statement |
After creating a parameterized statement, you can test and/or use it. When you run the query, the SQL interpreter would request a value for the column. When you execute the statement, a dialog box would come up, asking you to enter a value for the filtered field. You can then type the appropriate value and click OK (or press Enter).