Microsoft Visual C# File Processing: File Information
 |
Microsoft Visual C# File Processing: File Information |
Introduction
In its high level of support for file processing, the .NET Framework provides a class named FileInfo. This class is equipped to handle all types of file-related operations including creating, copying, moving, renaming, or deleting a file. FileInfo is based on the FileSystemInfo class that provides information on characteristics of a file.
![]() Practical Learning:
Introducing File Information
Practical Learning:
Introducing File Information

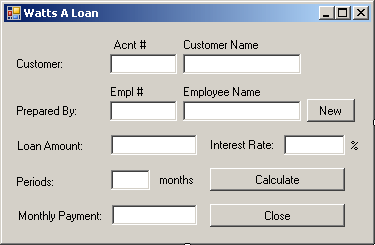
| Control | Name | Text |
| Label | Acnt #: | |
| Label | Customer Name: | |
| Label | Customer: | |
| TextBox | txtAccountNumber | |
| TextBox | txtCustomerName | |
| Label | Empl #: | |
| Label | Employee Name: | |
| Label | Prepared By: | |
| TextBox | txtEmployeeNumber | |
| TextBox | txtEmployeeName | |
| Button | btnNewEmployee | |
| Label | Loan Amount: | |
| TextBox | txtLoanAmount | |
| Label | Interest Rate: | |
| TextBox | txtInterestRate | |
| Label | % | |
| Label | Periods | |
| TextBox | txtPeriods | |
| Button | btnCalculate | Calculate |
| Label | Monthly Payment: | |
| TextBox | txtMonthlyPayment | |
| Button | btnClose | Close |
private void btnCalculate_Click(object sender, EventArgs e)
{
    double LoanAmount = 0.00D,
           InterestRate = 0.00D,
           Periods = 0.00D,
           MonthlyPayment = 0.00D;

    try
    {
        LoanAmount = double.Parse(txtLoanAmount.Text);
    }
    catch (FormatException)
    {
        MessageBox.Show("Invalid Loan Amount");
    }

    try
    {
        InterestRate = double.Parse(txtInterestRate.Text);
    }
    catch (FormatException)
    {
        MessageBox.Show("Invalid Interest Rate");
    }

    try
    {
        Periods = double.Parse(txtPeriods.Text);
    }
    catch (FormatException)
    {
        MessageBox.Show("Invalid Periods Value");
    }

    try
    {
        MonthlyPayment =
              Microsoft.VisualBasic.Financial.Pmt(InterestRate/12/100,
                                                   Periods,
                                   -LoanAmount,
                                   0,
                       Microsoft.VisualBasic.DueDate.BegOfPeriod);
        txtMonthlyPayment.Text = MonthlyPayment.ToString("F");
    }
    catch (FormatException)
    {
        MessageBox.Show("Invalid Periods Value");
    }
}
private void btnClose_Click(object sender, EventArgs e)
{
    Close();
}The FileInfo class is equipped with one constructor whose syntax is:
public FileInfo(String fileName);
This constructor takes as argument the name of a file or its complete path. If you provide only the name of the file, the compiler would consider the same directory of its project. Here is an example:
public partial class Exercise : Form
{
    private void btnSave_Click(object sender, EventArgs e)
    {
        FileInfo flePeople = new FileInfo("People.txt");
    }
}
Alternatively, if you want, you can provide any valid directory you have access to. In this case, you should provide the complete path.
![]() Practical Learning: Initializing a File
Practical Learning: Initializing a File
private void Form1_Load(object sender, EventArgs e)
{
    string  strFilename = "Employees.wal";
    FileInfo  fiEmployees = new FileInfo(strFilename);
}
Writing Text to a File
After creating a file, you can write one or more values to it. An example of a value is text. If you want to create a file that contains text, the FileInfo class provides a method named CreateText . Its syntax is:
public StreamWriter CreateText();
This method returns a StreamWriter object. You can use this returned object to write text to the file.
![]() Practical Learning: Creating a Text File
Practical Learning: Creating a Text File
private void Form1_Load(object sender, EventArgs e)
{
    string  strFilename = "Employees.wal";
    FileInfo fiEmployees = new FileInfo(strFilename);

    StreamWriter stwEmployees = fiEmployees.CreateText();
}To write normal text to a file, you can first call the FileInfo.CreateText() method. This method returns a StreamWriter object. The StreamWriter class is based on the TextWriter class that is equipped with the Write() and the WriteLine() methods used to write values to a file. The Write() method writes text on a line and keeps the caret on the same line. The WriteLine() method writes a line of text and moves the caret to the next line.
After writing to a file, you should close the StreamWriter object to free the resources it was using during its operation(s). Here is an example:

private void btnSave_Click(object sender, EventArgs e)
{
    FileInfo flePeople = new FileInfo("People.txt");
    StreamWriter stwPeople = flePeople.CreateText();

    try
    {
        stwPeople.WriteLine(txtPerson1.Text);
        stwPeople.WriteLine(txtPerson2.Text);
        stwPeople.WriteLine(txtPerson3.Text);
        stwPeople.WriteLine(txtPerson4.Text);
    }
    finally
    {
        stwPeople.Close();

        txtPerson1.Text = "";
        txtPerson2.Text = "";
        txtPerson3.Text = "";
        txtPerson4.Text = "";
    }
}
![]() Practical Learning: Writing to a Text File
Practical Learning: Writing to a Text File
private void Form1_Load(object sender, EventArgs e)
{
    string  strFilename = "Employees.wal";
    FileInfo fiEmployees = new FileInfo(strFilename);

    StreamWriter stwEmployees = fiEmployees.CreateText();

    // And create a John Doe employee
    try {
	    stwEmployees.WriteLine("00-000");
	    stwEmployees.WriteLine("John Doe");
    }
    finally
    {
		stwEmployees.Close();
    }
}You may have created a text-based file and written to it. If you open such a file and find out that a piece of information is missing, you can add that information to the end of the file. To do this, you can call the FileInfo.AppenText() method. Its syntax is:
public StreamWriter AppendText();
When calling this method, you can retrieve the StreamWriter object that it returns, then use that object to add new information to the file.
![]() Practical Learning: Writing to a Text File
Practical Learning: Writing to a Text File

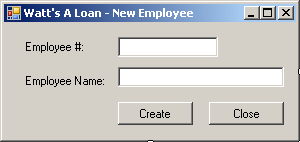
| Control | Text | Name |
| Label | Employee #: | |
| TextBox | txtEmployeeNumber | |
| Label | Employee Name: | |
| TextBox | txtEmployeeName | |
| Button | Create | btnCreate |
| Button | Close | btnClose |
private void btnCreate_Click(object sender, EventArgs e)
{
    string  strFilename = "Employees.wal";
    FileInfo  fiEmployees = new FileInfo(strFilename);
    StreamWriter  stwEmployees = null;

    stwEmployees= fiEmployees.AppendText();

    try {
	 stwEmployees.WriteLine(txtEmployeeNumber.Text);
	 stwEmployees.WriteLine(txtEmployeeName.Text);
    }
    finally
    {
	 stwEmployees.Close();
    }

    txtEmployeeNumber.Text = "";
    txtEmployeeName.Text = "";
    txtEmployeeNumber.Focus();
}
private void btnClose_Click(object sender, EventArgs e)
{
    Close();
}
private void btnNewEmployee_Click(object sender, EventArgs e)
{
    NewEmployee  frmNewEmployee = new NewEmployee();

    frmNewEmployee.ShowDialog();
}
private void txtEmployeeNumber_Leave(object sender, EventArgs e)
{
    string strFilename = "Employees.wal";
    FileInfo fiEmployees = new FileInfo(strFilename);

    if (txtEmployeeNumber.Text == "")
    {
        txtEmployeeName.Text = "";
        return;
    }
    else
    {
        StreamReader strEmployees = fiEmployees.OpenText();
        string strEmployeeNumber, strEmployeeName;
        bool found = false;

        try
        {
            using (strEmployees = new StreamReader(strFilename))
            {
                while (strEmployees.Peek() >= 0)
                {
                    strEmployeeNumber = strEmployees.ReadLine();

                    if (strEmployeeNumber == txtEmployeeNumber.Text)
                    {
                        strEmployeeName = strEmployees.ReadLine();
                        txtEmployeeName.Text = strEmployeeName;
                        found = true;
                    }
                }
            }

            // When the application has finished checking the file
            // if there was no employee with that number, let the user know
            if (found == false)
            {
                MessageBox.Show("No employee with that number was found");
                txtEmployeeName.Text = "";
                txtEmployeeNumber.Focus();
            }
        }
        finally
        {
            strEmployees.Close();
        }
    }
}
| Employee # | Employee Name |
| 42-806 | Patricia Katts |
| 75-148 | Helene Mukoko |
| 36-222 | Frank Leandro |
| 42-808 | Gertrude Monay |

Reading from a File
As opposed to writing to a file, you can read from it. To support this, the FileInfo class is equipped with a method named OpenText(). Its syntax is:
public StreamReader OpenText();
This method returns a StreamReader object. You can then use this object to read the lines of a text file. Here is an example:
using System;
using System.Collections.Generic;
using System.ComponentModel;
using System.Data;
using System.Drawing;
using System.Linq;
using System.Text;
using System.Windows.Forms;

namespace FileProcessing2
{
    public partial class Exercise : Form
    {
        public Exercise()
        {
            InitializeComponent();
        }

        private void btnSave_Click(object sender, EventArgs e)
        {
            FileInfo flePeople = new FileInfo("People.txt");
            StreamWriter stwPeople = flePeople.CreateText();

            try
            {
                stwPeople.WriteLine(txtPerson1.Text);
                stwPeople.WriteLine(txtPerson2.Text);
                stwPeople.WriteLine(txtPerson3.Text);
                stwPeople.WriteLine(txtPerson4.Text);
            }
            finally
            {
                stwPeople.Close();

                txtPerson1.Text = "";
                txtPerson2.Text = "";
                txtPerson3.Text = "";
                txtPerson4.Text = "";
            }
        }

        private void btnOpen_Click(object sender, EventArgs e)
        {
            string Filename = "People.txt";
            FileInfo flePeople = new FileInfo(Filename);
            StreamReader strPeople = flePeople.OpenText();

            try
            {
                txtPerson1.Text = strPeople.ReadLine();
                txtPerson2.Text = strPeople.ReadLine();
                txtPerson3.Text = strPeople.ReadLine();
                txtPerson4.Text = strPeople.ReadLine();
            }
            finally
            {
                strPeople.Close();
            }
        }
    }
}
|
|
||
| Home | Copyright © 2010-2020, FunctionX | |
|
|
||