GDI+ Tools: The Pen
 |
GDI+ Tools: The Pen |
Pens
Introduction
The most basic tool you can use is the pen. The GDI+ library provides a pen through the Pen class.
Creating a Pen
To obtain a pen, you can declare a variable of type Pen using one of the constructors of its class.
Characteristics of a Pen
The Color of a Pen
The primary piece of information you must specify about a pen is its color. To do this, you can use the following constructor:
public Pen(Color color);
Here is an example:
using System;
using System.Drawing;
using System.Windows.Forms;

public class Exercise : Form
{
    public Exercise()
    {
        InitializeComponent();
    }

    void InitializeComponent()
    {
        Paint += new PaintEventHandler(Exercise_Paint);
    }

    private void Exercise_Paint(object sender, PaintEventArgs e)
    {
        Pen pnBorder;
        Color clr = Color.Violet;
        pnBorder = new Pen(clr);
    }
}

public class Program
{
    public static int Main()
    {
        Application.Run(new Exercise());

        return 0;
    }
}
Instead of first declaring a Color variable, you can directly define the color in the constructor.
If you just want to create a regular pen whose only known characteristic would be its color, the System.Drawing namespace provides the Pens class. The primary, and in fact only, role of the Pens class is to define a simple pen and only specify its color. To make this possible, the Pens class is equipped with only static properties that each represents the name of a color. The names are those of common colors (such as Red, Green, Blue, Yellow, Violet, et), the colors used on web pages (such as LightBlue or DarkGreen), the colors defined in Microsoft Windows (such as ActiveBorder, AppWorkspace, or ButtonFace, etc), and many others. When accessing a Pens property, it produces a Pen object. This means that you can access a pen to initialize a Pen variable. Here is an example:
private void Exercise_Paint(object sender, PaintEventArgs e)
{
        pnBorder = Pens.Lavender;
}
If you have already created a pen, to change its color, you can assign the desired color name or color value to the Pen.Color property.
The Width of a Pen
The simplest pen is meant to draw a tinny line. Here is an example of a line drawn with a simple pen:

Such a simple pen is said to have a width of 1 pixel. To give you the ability to support or modify the width of a pen, the Pen class is equipped with a Width property.
When creating a pen, to specify is width, you can use the following constructor:
public Pen(Color color, float width);
While the first argument represents the color as we saw in the previous section, the second argument specifies the width, which must be a floating-point value. Here is an example:
private void Exercise_Paint(object sender, PaintEventArgs e)
{
        Pen pnBorder = new Pen(Color.Tomato, 5.0F);
}
If you have already defined a pen and you want to change its width, the Pen class provides the Width property. Using this property, to modify the width of a pen, assign a floating-point number to its Width property. Here is an example:
private void Exercise_Paint(object sender, PaintEventArgs e)
{
        Pen pnBorder = new Pen(Color.Brown);
        // Do something, if necessary
        pnBorder.Width = 3.00F;
        // Do something, if necessary
}
In the same way, you can change, increase, or decrease the width of a pen as often as you want. Here are examples:
private void Exercise_Paint(object sender, PaintEventArgs e)
{
        Pen pnBorder = new Pen(Color.Brown);
        // Do something, if necessary
        pnBorder.Width = 3.00F;
        // Do something, if necessary
        pnBorder.Width = 6.00F;
        // Do something, if necessary
        pnBorder.Width = 12.00F;
        // Do something, if necessary
        pnBorder.Width = 26.00F;
        // Do something, if necessary
        pnBorder.Width = 44.00F;
        // Do something, if necessary
}
We may get the following result:

If a pen has already been defined and you want to know its width, get the value of its Width property.
The Start and End Caps
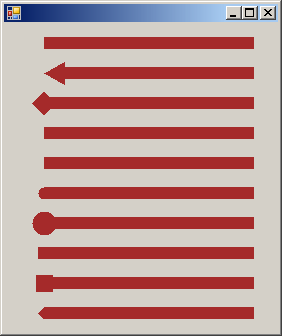
If you use a pen with a small width, such as 1 pixel, you may not notice how a line drawn with it starts but with a significantly wide pen, you would notice that it starts with a flat shape. An alternative is to have round, square, or triangle start. This is referred to as the start cap.
To support the starting shape of a line, the Pen class is equipped with a property named StartCap. The Pen.StartCap property is of based on the LineCap enumeration whose members are: AnchorMask, ArrowAnchor, Custom, DiamondAnchor, Flat, NoAnchor, Round, RoundAnchor, Square, SquareAnchor, and Triangle. To specify the start cap, assign the desired LineCap member to the StartCap property of the pen. Here are examples:
private void Exercise_Paint(object sender, PaintEventArgs e)
{
        Pen pnBorder = new Pen(Color.Brown);
        pnBorder.Width = 12.00F;
        pnBorder.StartCap = System.Drawing.Drawing2D.LineCap.AnchorMask;
        // Do something, if necessary
        pnBorder.StartCap = System.Drawing.Drawing2D.LineCap.ArrowAnchor;
        // Do something, if necessary
        pnBorder.StartCap = System.Drawing.Drawing2D.LineCap.DiamondAnchor;
        // Do something, if necessary
        pnBorder.StartCap = System.Drawing.Drawing2D.LineCap.Flat;
        // Do something, if necessary
        pnBorder.StartCap = System.Drawing.Drawing2D.LineCap.NoAnchor;
        // Do something, if necessary
        pnBorder.StartCap = System.Drawing.Drawing2D.LineCap.Round;
        // Do something, if necessary
        pnBorder.StartCap = System.Drawing.Drawing2D.LineCap.RoundAnchor;
        // Do something, if necessary
        pnBorder.StartCap = System.Drawing.Drawing2D.LineCap.Square;
        // Do something, if necessary
        pnBorder.StartCap = System.Drawing.Drawing2D.LineCap.SquareAnchor;
        // Do something, if necessary
        pnBorder.StartCap = System.Drawing.Drawing2D.LineCap.Triangle;
        // Do something, if necessary
}
These may produce the following results:

If none of the available members of the LineCap enumeration suits you, you can define a custom cap using the CustomStartCap class.
You can also control the end cap of a line. To support this, the Pen class is equipped with a property named EndCap that also is based on the LineCap enumeration with the same value. Using a combination of the start and end caps, you can control how a line starts and how it ends. If none of the available members of the LineCap enumeration suits you, you can define a custom cap using the CustomEndCap class.
|
|
||
| Home | Copyright © 2010-2021, FunctionX | |
|
|
||