By default, the Toolbox is positioned on the left side of the IDE. To change that position, you can drag its title bar away and dock it to another side of the IDE. The Toolbox also uses a default width to show the items on it. If the width is too narrow or too wide, you can change it. To do this, position the mouse to its right border and drag left or right.
When Microsoft Visual Studio is set up, it installs in the Toolbox the most regularly used controls. If you are working in an environment that creates only a particular group of applications and there are controls you hardly use, if you want, you can remove them from the list. To remove a control, right-click it and click Delete. Besides the objects in the Common Controls section, other controls are left out but are still available. Some of the left out controls were created with the .NET Framework but are not installed by default because they are judged hardly used. To add one or more of these left out controls, right-click anywhere in the Toolbox and click Choose Items... In the Choose Toolbox Items dialog box, click the .NET Framework Components tab, then click the check box of the desired control before clicking OK:
In addition to custom .NET controls, some other objects called ActiveX controls were used in previous versions of Visual Basic or Visual Studio and are available. To take care of compatibility issues, most previous ActiveX controls were reconfigured and adapted to be used in a .NET application. To add some of these left out controls, right-click anywhere in the Toolbox and click Choose Items... In the Choose Toolbox Items dialog box, click the COM Components tab, select the desired control before clicking OK
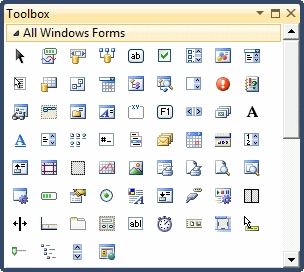
When you start a Windows Forms Application, it provides various controls on the Toolbox so you can choose which ones are appropriate for your particular application. Controls can be set by categories based on their function or role. A container is a control whose main purpose is to host other controls. To design it, you pick up objects from the Toolbox and drop them where desired. The Toolbox organizes its items in categories and each category is represented by a button: 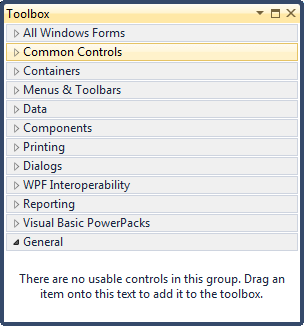 If the available list of categories is not enough, you can add a new section of your choice. By default, Microsoft Visual Studio hides some categories because they are judged hardly used. To display these additional sections, you can right-click anywhere in the Toolbox and click Show All: 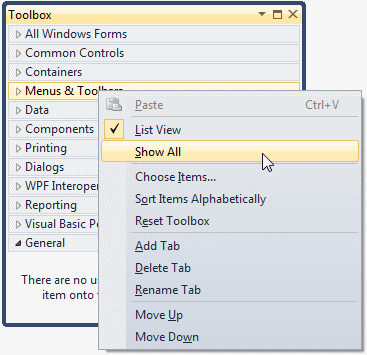 If you still want an additional section not included in the list, you can add one (or more). To do that, right-click anywhere in the Toolbox and click Add Tab. You would be prompted to provide a name. After typing the new name, press Enter. To use an object of a particular category, you can first click its button. After selecting a category, it displays its items. In each category, a particular button called Pointer is selected by default. This simply indicates that no item in the group is currently selected. By default, the items in each category are organized as horizontal wide buttons: Alternatively, you can list the items of a category as buttons of a list view. To do that, you can right-click anywhere in the category and click List View to remove its check box:
When Microsoft Visual Studio is installed, it adds the buttons in a somewhat random order. In the beginning, this can make it difficult to find a particular control when you need it. If you find it more convenient, you can arrange the list of controls in any order of your choice. You have two main options. To change the position of an item in the list, right-click it and click either Move Up or Move Down. Alternatively, you can arrange the items in alphabetic order. To do that, right-click anywhere in the Windows Forms section and click Sort Items Alphabetically: 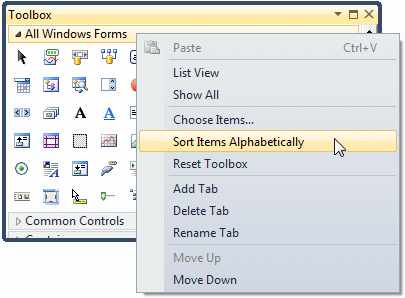 Once you have rearranged items alphabetically, the Toolbox forgets the previous arrangement and you cannot restore it. Alternatively, you can right-click the button of a control and click either Move Up or Move Down.
|
|||||||||||||||||||||||||||