Home

Multiple-Choice Question: Multiple Answers


Introduction

A multiple-choice exercise usually consists of single answers. This can done using radio buttons. Another type of multiple-choice application can be made of single and multiple answers. In such a program, the user can  be presented with two types of questions, some requiring one answer out of many options, and some others allowing the user to select more than one answer. When creating the application, you must find a way to alternate the questions. Furthermore, you may want to randomly present the questions. There are different ways you can do this.

Practical Learning Practical Learning: Creating a Multiple-Choice Test 

  1. Start Microsoft Visual C# and create a Windows Application named CSharpKnowledge1
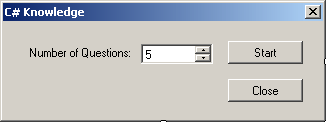
  2. Design the form as follows:
     
    Control Text Name Additional Properties
    Label Number of Questions:    
    NumericUpDown   nudQuestions Maximum: 20
    Value: 5
    Button Start btnStart  
    Button Close btnClose  
  3. Save all

Single and Multi-Answer Questions

If you want to create a multiple-choice application, you must find a way to alternate questions. There are various ways you can do this. You can create a series of radio buttons and check boxes. Then, when asking a question that expects a single answer, you can present only the radio buttons. When a question expects more than one answer, you can present the check boxes. Because of the way controls are built, you can use group boxes to group controls so that, when a series of controls is needed, you can display its corresponding group of questions and hide the other group box.


Practical Learning Practical Learning: Creating the Questions 

  1. To add a new form, on the main menu, click Project -> Add Windows Form...
  2. In the Add New Item dialog box, set the Name QuestionAnswer
  3. Click Add
  4. Design the form as follows:
     
    Control Caption Name Additional Properties
    Label Question lblQuestion  
    TextBox   txtQuestion Multiline: True
    ScrollBars: Vertical
    Group Box   grpSingleAnswers  
    Radio Button   rdoAnswer1 AutoSize: False
    CheckAlign: TopLeft
    TextAlign: TopLeft
    Radio Button   rdoAnswer2 AutoSize: False
    CheckAlign: TopLeft
    TextAlign: TopLeft
    Radio Button   rdoAnswer3 AutoSize: False
    CheckAlign: TopLeft
    TextAlign: TopLeft
    Radio Button   rdoAnswer4 AutoSize: False
    CheckAlign: TopLeft
    TextAlign: TopLeft
    Button Quit btnQuit  
    Button Check Answer btnCheckAnswer  
    Form     ShowInTaskbar: false
  5. On the Toolbox, click the RadioButton
  6. On the form, click checkBox1
  7. Set the properties of the new radioButton1 control as follows:
    Name: rdoAnswer1
    AutoSize: False
    CheckAlign: TopLeft
    TextAlign: TopLeft
  8. On the Toolbox, click the RadioButton
  9. On the form, click checkBox2
  10. Set the properties of the new radioButton1 control as follows:
    Name: rdoAnswer2
    AutoSize: False
    CheckAlign: TopLeft
    TextAlign: TopLeft
  11. On the Toolbox, click the RadioButton
  12. On the form, click checkBox3
  13. Set the properties of the new radioButton1 control as follows:
    Name: rdoAnswer3
    AutoSize: False
    CheckAlign: TopLeft
    TextAlign: TopLeft
  14. On the Toolbox, click the RadioButton
  15. On the form, click checkBox4
  16. Set the properties of the new radioButton1 control as follows:
    Name: rdoAnswer4
    AutoSize: False
    CheckAlign: TopLeft
    TextAlign: TopLeft
  17. On the Toolbox, click the RadioButton
  18. On the form, click checkBox5
  19. Set the properties of the new radioButton1 control as follows:
    Name: rdoAnswer5
    AutoSize: False
    CheckAlign: TopLeft
    TextAlign: TopLeft
  20. In the Add New Item dialog box, set the Name Experiment and press Enter
  21. Enlarge the form enough and, on the main menu, click Edit -> Paste
  22. Design the form as follows:
     
    Control Caption Name Additional Properties
    Group Box   grpMultipleAnswers  
    CheckBox   chkAnswer1 AutoSize: False
    CheckAlign: TopLeft
    TextAlign: TopLeft
    CheckBox   chkAnswer2 AutoSize: False
    CheckAlign: TopLeft
    TextAlign: TopLeft
    CheckBox   chkAnswer3 AutoSize: False
    CheckAlign: TopLeft
    TextAlign: TopLeft
    CheckBox   chkAnswer4 AutoSize: False
    CheckAlign: TopLeft
    TextAlign: TopLeft
  23. On the Experiment form, click the group box to select it
  24. On the main menu, click Edit -> Copy
  25. Display the QuestionAnswer form
  26. Click an unoccupied area of the form to make sure no control (especially not the group box) is select
  27. On the main menu, click Edit -> Paste
  28. Move the new group box to place it exactly on top of the other group box
     
  29. On the form, double-click the Quit button
  30. Make the following changes:


  31. Return to the form
  32. Double-click the Check Answer button and implement its event as follows:


  33. Return to the form and double-click an unoccupied area of its body
  34. Implement the event as follows:


  35. Display the first form
  36. Double-click the Start button and implement its event as follows:


  37. Display the first form again
  38. Double-click the Close button and implement its event as follows:


  39. Execute the application to see the result
 

Home Copyright © 2006-2016, FunctionX, Inc.