
.NET Controls: The Form
 |
.NET Controls: The Form |
|
|
|
The Startup Position of a Form |
|
At design time, the X and Y values of the Location property allow you to specify a precise position for the form. At run time, the Left and Top properties accomplish the same purpose. The Form class provides an alternative position to specify the location of the form relative to its parent. This is the role of the StartPosition property, which is a variable of the FormStartPosition enumerator. It provides the following five values: |
| Value | Result |
| CenterParent | The form will be positioned in the center of its parent. If the application is made of only this form, the form would be positioned in the middle of the desktop |
| CenterScreen | The form will be positioned in the middle of the desktop even if this form is part of an application that is made of various forms. |
| Manual | The form will use the values of the X, Y, Left, or Top properties of the Location |
| WindowsDefaultLocation | The operating system will specify the form's position using a value known in Win32 as CW_USEDEFAULT |
|
Based on this, to set the default relative location of a form when it comes up, change the value of its StartPosition combo box in the Properties window. To change this property at run time, call the FormStartPosition enumeration to select the desired value and assign it to the StartPosition property of the form. Here is an example: |
private void Form1_Load(object sender, System.EventArgs e)
		{
			this.StartPosition = FormStartPosition.WindowsDefaultLocation;
		}
|
The StartPosition property provides another value that is related to the size. Therefore, we will mention it when we review the size of a form. |
|
|
|
|
The Title Bar |
|
A form is made of various sections that allow its control as a Windows object and other aspects that play a valuable part as a host of other objects. The top section of a form is made of a long portion called the title bar. On the left part of the title bar, the form displays a small
picture called an icon or the system icon. Microsoft Visual Studio provides a
default icon for all forms. If you want to use a different icon, while the form
is selected, on the Properties window, you can click the Icon field and then
click its ellipsis button To change the icon programmatically, declare a variable of the Icon class of the System.Drawing namespace and initialize it with the name of an icon file using the new operator. After initializing the icon, assign it to the form's Icon property. Here is an example: |
private void Form1_Load(object sender, System.EventArgs e)
{
	System.Drawing.Icon CustomIcon = new System.Drawing.Icon("C:\\Programs\\SomeIcon.ico");
	this.Icon = CustomIcon;
}
|
|
|
|
The Form's Caption |
|
On the right side of the system icon, there is a word or a group of words called the caption. By default, the caption displays the name of the form. If you want to change the caption, while the form is selected, in the Properties window, click the Text field and type anything you want. After typing the text, press Enter to display it on the form. At design time, the caption is made of text that you type "as is". At run time, you can change the caption to display a more complex text that could be a changing time, the result of a calculation, etc. In the following example, the name of the current user displays in the title bar when the user clicks a button named Button1: |
private void button1_Click(object sender, System.EventArgs e)
{
	this.Text = "Current User: " + Environment.UserName;
}
|
|
|
|
The System Buttons |
|
On the right side of the caption, there are three
small buttons called the system buttons, made of the Minimize 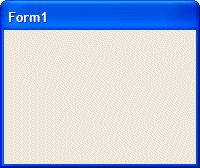 In this case, the user would not be able to close the form using the system buttons. Therefore, if you create this type of control, make sure you provide the user with a way to close the form. The Minimize
To change a system button programmatically, call the desired button's property and assign it a true or false value. Here is an example that makes sure the user cannot maximize the form: |
private void Form1_Load(object sender, System.EventArgs e)
		{
			this.MinimizeBox = true;
			this.MaximizeBox = false;
		}
|
|
|
|
The Form's Real Estate |
|
The Form's Dimensions |
|
A form's size is the amount of space it is occupying on the screen. It is expressed as its width and its height. The width of a form is the distance from its left to its right borders. The height is the distance from the top to the bottom borders of a form: 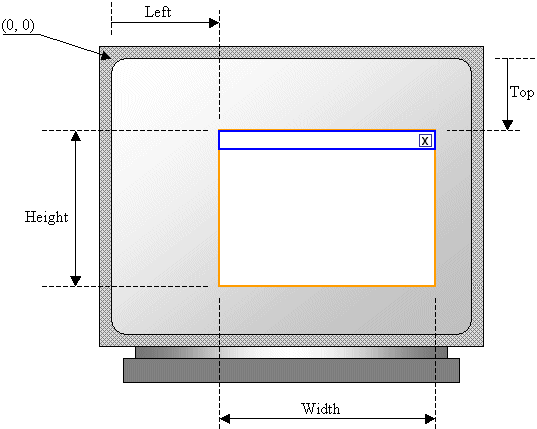 When you create a form, it assumes a default size. To set or change the size of a form, at design time, first click it to select it. Then, position the mouse on its right, bottom, bottom-right handles. This changes the mouse cursor in one of three shapes: 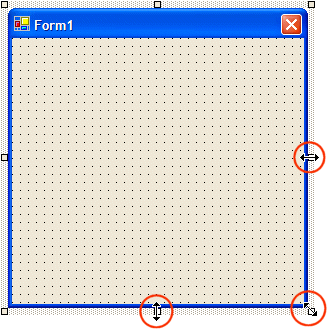 With the mouse positioned, drag in the desired direction. If you don't want to be able to resize a form and you want to prevent this by accident, set the form's Locked property to True. If you do this, the form would be surrounded by a rectangle with a black border and the sizing handles of the form would disappear: 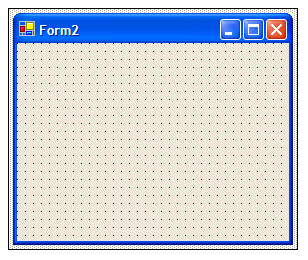 Besides resizing the form by dragging one of its handles, to change the size of a form, select it and, in the Properties window, click the + button of the Size field. Then type the desired value for the Width and the desired value for the Height. The values must be natural numbers (Short) To programmatically change the size of a form, assign the desired values of either or both its Width and Height properties. Alternatively, you can call the constructor of the Size structure to initialize it and assign it to the Size property of the form. Here is an example: |
private void Form1_Load(object sender, System.EventArgs e)
		{
			 this.Size = new System.Drawing.Size(450, 320);
		}
|
To find out the size of a control, declare a Size variable and assign it the Size property of the control. If you want the operating system to specify the size of the form, set its StartPosition property to WindowsDefaultBounds. In this case, a value called CW_USEDEFAULT would be assigned to both the Width and the Height properties. |
|
|
|
|
The Form Borders |
|
A form can be made to look like a regular rectangular control host made of a system icon and the system buttons. Depending on your goals, you can also make a form appear as a dialog box or a dockable window. The borders of a form are controlled by the FormBorderStyle property. If you set both the MinimizeBox and the MaximizeBox properties to False, we saw that the form would have only the system Close button, but the form can still be resized. If you want the form to display only the system Close button and to prevent the user from resizing it, set its FormBorderStyle property to FixedDialog. Here is an example: |
private void Form1_Load(object sender, System.EventArgs e)
		{
			this.Size = new System.Drawing.Size(450, 320);
			this.FormBorderStyle = FormBorderStyle.FixedDialog;
		}
|
A tool window is a form equipped with a short title bar, no icon, and only a small system Close button. There are two types of tool windows. A tool window is referred to as fixed if the user cannot resize it. In this case, the FormBorderStyle property of the form is set to FixedToolWindow:
A tool window is referred to as sizable if it allows the user to resize it. To get such a form, set its FormBorderStyle property to SizableToolWindow:
You can also create a form with no borders by assigning None to the FormBorderStyle property. If you do this, make sure you provide the user with a way to close the form; otherwise... |
 |
|
The Form's Client Area |
|
When a form has been created, you can add Windows controls to it. These controls can be positioned only in a specific area, the body of the form. The body spans from the left border, excluding the border, of the form to the right border, excluding the border, of the form. It also spans from the top side, just under the title bar, to the bottom border, excluding the border, of the form. The area that the form makes available to the controls added to it is called the client area:  If a control is positioned on a form, its location uses a coordinate system whose origin is positioned on the top-left section of the client area (just under the title bar). The x axis moves from the origin to the left. The y axes moves from the origin down: 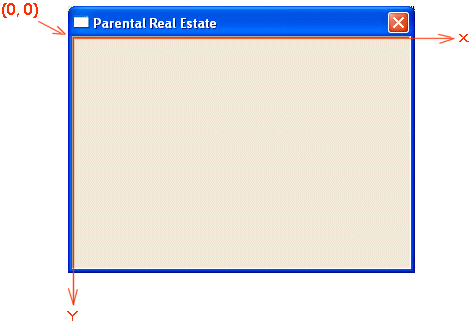 The distance from the left border of the client area to the left border of the control is the Left property. The distance from the top border of the client area to the top border of the control is the Top property. These can be illustrated as follows:
To know the amount of space that a form is making available to its child control, you can access the form's ClientSize property. |
|
Aesthetic of the Client Area of a Form |
|
The client area of a form is painted with a color specified by the operating system. To change the color to anything you like, you can use the BackColor field of the Properties window. If you click the arrow of its combo box, it displays a property sheet with three tabs that divide the color in categories:
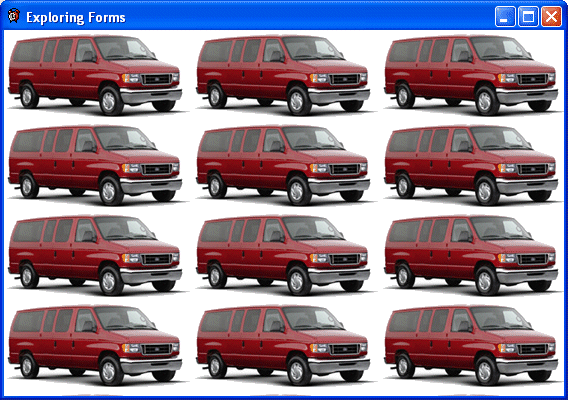
To programmatically change its color, assign a color from the Color structure to the BackColor property. Here is an example: this.BackColor = Color.AliceBlue; If you prefer to cover the client area with a picture, use the BackgroundImage property instead. If using the Properties window, you can easily locate and select a picture. To programmatically specify or change the picture used as background, declare and initialize a pointer to the Bitmap class. Then assign it to the BackgroundImage property. Here is an example: |
private void Form1_Load(object sender, System.EventArgs e)
		{
			Bitmap BG = new Bitmap("C:\\Programs\\car.gif");
			this.BackgroundImage = BG;
		}
 |
|
The Formís Transparency |
|
An object is referred to as transparent when you can see through it. If you are working under Windows 2000 or later running on a Pentium or equivalent, you can make your form transparent. To create a transparent form, change its Opacity property. The default value is 100%, which means that the form would be completely visible. If you set it to 0, the form would not appear at all. Any value between 0 excluded and 100 excluded would specify how much transparency the form would allow. |
|
The Window State of a Form |
|
When creating your application, you can configure its
(main) form to be minimized or maximized when the application is launched. This ability is controlled by the
WindowState property. The default value of this property is Normal which means the form would appear in
the same dimensions it was designed. If you want the form to be minimized or maximized at startup, in the
Properties window, change the desired value for the WindowState
property as Maximized or
Minimized. this.WindowState = FormWindowState.Maximized; If you want to check the state of a window before taking action, simply use a conditional statement to compare its WindowState property with the Normal, the Maximized, or the Minimized values. |
|
The Form's Taskbar Presence |
|
When an application displays on the screen along with other applications, its form can be positioned on top of, or behind, forms of other applications. This is allowed by multitasking assignments. When a form is hidden, the taskbar allows you to access it because the form would be represented by a button. This aspect of forms is controlled by the ShowInTaskbar Boolean property. Its default value is True, which indicates that the form would be represented on the taskbar by a button. If you create an application made of various forms, you may not want to show all of its forms on the taskbar. Usually the first or main form would be enough. To prevent a button for a form to display on the taskbar, set its ShowInTaskbar property to False. |
|
Methods and Events to Manage a Form |
|
Form Creation |
|
The form is implemented by the Form class from the System.Windows.Forms namespace. The Form class is equipped with a constructor that allows you to dynamically create it. After a form has been created, it must be loaded to display on the screen. When a form is being loaded, it fires the Load() event. Its syntax is: public event EventHandler Load; This event is fired when a form is about to be displayed for the first time. Therefore, it can be used to perform last minute initializations. |
|
Form Activation |
|
When two or more forms are running on the computer, only one can receive input from the user; that is, only one form can actually be directly used at one particular time. Such a window has a title bar with the color identified in Control Panel as Active Window. The other window(s), if any, display(s) its/their title bar with a color called Inactive Window. To manage this setting, the windows are organized in a 3-dimensional coordinate system and they are incrementally positioned on the Z coordinate, which defines the (0, 0, 0) origin on the screen (on the top-left corner of your monitor) with Z coordinate coming from the screen towards you. public event EventHandler Activated; When a form is activated, it fires the Activated event, which is an EventArgs type of event. |
|
Form Deactivation |
|
If there is more than one form or application on the screen, only one can be in front of the others and be able to receive input from the others. If a form is not active and you want to bring it to the top, you must activate it, which fires the Activated() event. When a form is being activated, the one that was on top would become deactivated. The form that was on top, as it looses focus, would fire the Deactivate() event which is an EventArgs type. |
|
Form Closure |
|
When the user has finished using a form, he or she must be able to close it. Closing a form is made possible by a simple call to the Close() method. Its syntax is: public void Close(); When this method is called, the process of closing a form starts. At this time, the Closing() event is fired. This is initiated as follows: |
private void Form1_Closing(object sender, System.ComponentModel.CancelEventArgs e)
		{

		}
|
This event is carried by a CancelEventArgs class through the CancelEventHandler delegate declared as follows: [Serializable] public delegate void CancelEventHandler(object sender, CancelEventArgs e); The Cancel property is probably the most important member of this class. It allows you do decide to dismiss the event or not. If you set it to true, the event will be ignored as if it were not fired. If you want the event to continue closing the form, you can set this property to false. This event occurs before the form is actually closed, giving you time to let the form be closed, prevent the form being closed, or take any other necessary action. After a form has been closed, a Closed() event is fired. Although this method can be used to close any form of an application, if it is called by the main form, it also closes the application. |
|
|
||
| Home | Copyright © 2004-2010 FunctionX, Inc. | |
|
|
||