|
Although data entry
can be performed on a data grid, Microsoft Windows provides more
professional objects to create new records. Because the Microsoft .NET
Framework is so huge as a library and so powerful, there are various
techniques you can use to perform data entry.
|
|
 Practical
Learning: Performing Data Entry Practical
Learning: Performing Data Entry
|
|
- Open SQL Query Analyzer
- To create a new database, type the following
IF EXISTS (SELECT *
	   FROM   master..sysdatabases
	   WHERE  name = N'Familia')
	DROP DATABASE Familia
GO
CREATE DATABASE Familia
GO
|
- Press F5 to execute the statement
- To create a new table in the above database, delete the above code and
type the following:
USE Familia
GO
IF EXISTS(SELECT name
	  FROM 	 sysobjects
	  WHERE  name = N'Genders'
	  AND 	 type = 'Genders')
    DROP TABLE Genders
GO

CREATE TABLE Genders (
GenderID int NOT NULL PRIMARY KEY Identity(1, 1),
Gender Varchar(20) NOT NULL)
GO
INSERT INTO Genders (Gender) VALUES ('Unknown');
INSERT INTO Genders (Gender) VALUES ('Female');
INSERT INTO Genders (Gender) VALUES ('Male');
GO
|
- Press F5 to execute the statement
- To create a new table in the above database, delete the above code and
type the following:
IF EXISTS(SELECT name
	  FROM 	 sysobjects
	  WHERE  name = N'Persons'
	  AND 	 type = 'Persons')
    DROP TABLE Persons
GO

CREATE TABLE Persons (
PersonID int Primary Key NOT NULL Identity(1, 1),
FirstName Varchar(20) NULL,
LastName Varchar(20) NOT NULL,
GenderID int DEFAULT 1 REFERENCES Genders(GenderID),
Notes Text)
GO
INSERT INTO Persons (FirstName, LastName, GenderID, Notes)
VALUES('Massimo', 'Leandro', 2, 'One of the most hard working employees');
INSERT INTO Persons (FirstName, LastName, GenderID, Notes)
VALUES('Christina', 'Cassine', 1, 'Wonderful employees, always on time');
INSERT INTO Persons (FirstName, LastName, GenderID, Notes)
VALUES('Helene', 'Knowles', 1, 'Has been in the company for a while');
INSERT INTO Persons (FirstName, LastName, GenderID, Notes)
VALUES('Alan', 'Holmes', 3, '');
GO
|
- Press F5 to execute the statement
- Open Visual C# and create a new Windows Application named DataEntry2
- From Server Explorer, open the server that holds the above database then
expand the Familia database followed by the Tables node
- Click the Persons table to select. Press and hold Shift. Then click the Genders
table and release Shift
- As both tables are selected, drag one of them and drop it
on the form
- On the main menu, click Data -> Generate Dataset...
- While the New radio button is selected, change the name of the dataset to dsPersons
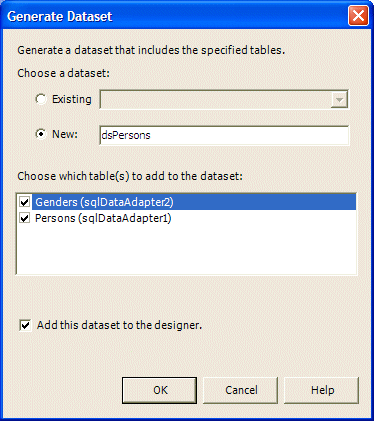
- Click OK
- Using the controls on the Toolbox, design the form as follows:
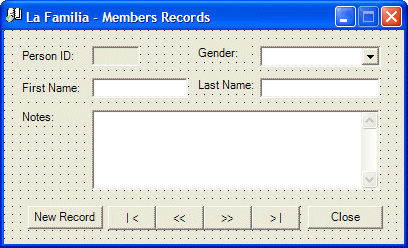 |
| Control |
Text |
Name |
Additional Properties |
| Label |
Person ID: |
|
|
| TextBox |
|
txtPersonID |
TextAlign: Right
ReadOnly: True |
| Label |
First Name: |
|
|
| TextBox |
|
txtFirstName |
|
| Label |
Last Name: |
|
|
| TextBox |
|
txtLastName |
|
| Label |
Gender: |
|
|
| ComboBox |
|
cboGenderID |
DropDownStyle: DropDownList |
| Label |
Notes: |
|
|
| TextBox |
|
txtNotes |
Multiline: True
ScrollBars: Vertical |
| Button |
New Record |
btnNewRecord |
|
| Button |
| < |
btnFirst |
|
| Button |
<< |
btnPrevious |
|
| Button |
>> |
btnNext |
|
| Button |
> | |
btnLast |
|
| Button |
Close |
btnClose |
|
|
- Using the DataBindings and other fields of the Properties window, bind the
controls as follows:
| Control Name |
DataBindings |
Other |
| Type |
Value |
| txtPersonID |
Text |
dsPersons1 - Persons.PersonID |
|
| txtFirstName |
Text |
dsPersons1 - Persons.FirstName |
|
| txtLastName |
Text |
dsPersons1 - Persons.LastName |
|
| cboGenderID |
SelectedValue |
dsPersons1 - Persons.GenderID |
DataSource: dsPersons1.Genders
DisplayMember: Gender
ValueMember: GenderID |
| chkIsMarried |
Checked |
dsPersons1 - Persons.IsMarried |
|
| txtNotes |
Text |
dsPersons1 - Persons.Notes |
|
- Double-click an empty area of the form and change the Load event as
follows:
private void Form1_Load(object sender, System.EventArgs e)
		{
			this.sqlDataAdapter1.Fill(this.dsPersons1);
			this.sqlDataAdapter2.Fill(this.dsPersons1);
		}
|
- Press Ctrl + F5 to test the application
- After viewing the first record, close the form
- To allow the user to navigate through records, double-click the | <,
<<, >>, and > | buttons
- Implement their events as
follows:
private void btnFirst_Click(object sender, System.EventArgs e)
		{
			this.BindingContext[this.dsPersons1, "Persons"].Position = 0;
		}

		private void btnPrevious_Click(object sender, System.EventArgs e)
		{
			this.BindingContext[this.dsPersons1, "Persons"].Position =
				this.BindingContext[this.dsPersons1, "Persons"].Position - 1;
		}

		private void btnNext_Click(object sender, System.EventArgs e)
		{
			this.BindingContext[this.dsPersons1, "Persons"].Position =
				this.BindingContext[this.dsPersons1, "Persons"].Position + 1;
		}

		private void btnLast_Click(object sender, System.EventArgs e)
		{
			this.BindingContext[this.dsPersons1, "Persons"].Position =
				this.BindingContext[this.dsPersons1, "Persons"].Count - 1;
		}
|
- Test the application and navigate through records
back and forth
- Close the form
- To allow the user to create a new record, double-click the New
Record button
- On the form, double the Close button
- Implement both events as follows:
using System;
using System.Drawing;
using System.Collections;
using System.ComponentModel;
using System.Windows.Forms;
using System.Data;

namespace DataEntry2
{
	/// <summary>
	/// Summary description for Form1.
	/// </summary>
	public class Form1 : System.Windows.Forms.Form
	{
		. . .

		/// <summary>
		/// The main entry point for the application.
		/// </summary>
		[STAThread]
		static void Main()
		{
			Application.Run(new Form1());
		}

		private void Form1_Load(object sender, System.EventArgs e)
		{
			this.sqlDataAdapter1.Fill(this.dsPersons1);
			this.sqlDataAdapter2.Fill(this.dsPersons1);
		}

		private void btnFirst_Click(object sender, System.EventArgs e)
		{
			this.BindingContext[this.dsPersons1, "Persons"].Position = 0;
			this.sqlDataAdapter1.Update(this.dsPersons1);
		}

		private void btnPrevious_Click(object sender, System.EventArgs e)
		{
			this.BindingContext[this.dsPersons1, "Persons"].Position =
				this.BindingContext[this.dsPersons1, "Persons"].Position - 1;
			this.sqlDataAdapter1.Update(this.dsPersons1);
		}

		private void btnNext_Click(object sender, System.EventArgs e)
		{
			this.BindingContext[this.dsPersons1, "Persons"].Position =
				this.BindingContext[this.dsPersons1, "Persons"].Position + 1;
			this.sqlDataAdapter1.Update(this.dsPersons1);
		}

		private void btnLast_Click(object sender, System.EventArgs e)
		{
			this.BindingContext[this.dsPersons1, "Persons"].Position =
				this.BindingContext[this.dsPersons1, "Persons"].Count - 1;
			this.sqlDataAdapter1.Update(this.dsPersons1);
		}

		private void btnNewRecord_Click(object sender, System.EventArgs e)
		{
		// We will use the same button to create a new record and update it
		// Find out what is the current state of the button
		if( this.btnNewRecord.Text.Equals("New Record") )
		{
			// Since the user clicked the New Record button, prepare to create a new record
			// We are using exception handling in case something goes wrong
			try
			{
				this.BindingContext[this.dsPersons1, "Persons"].EndCurrentEdit();
				this.BindingContext[this.dsPersons1, "Persons"].AddNew();

			// Since the fields are now empty, give focus to the first control that can be edited
				this.cboGenderID.Focus();

		// Since the user is currently creating a new record, change the caption of the button
				this.btnNewRecord.Text = "Update";
			}// Did something go wrong?
			catch(System.Exception eEdit)
			{
				MessageBox.Show(eEdit.Message);
			}
		}
		else // Since the user is ready with a new record, acknowledge it
		{
			// Update the whole data set
			this.sqlDataAdapter1.Update(this.dsPersons1);
			// Behave as if we were moving to the last record
			btnLast_Click(sender, e);
		// Since the new record has been added, change the caption of the New Record button
			this.btnNewRecord.Text = "New Record";
		}
	}

	private void btnClose_Click(object sender, System.EventArgs e)
		{
			Close();
		}
	}
}
|
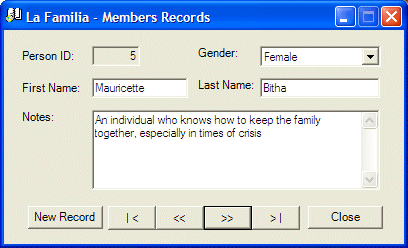
- Execute the application and click the New Record button
- Enter a new record and click Update
- Close the form
|
|