
Databases Fundamentals: Data Records
 |
Databases Fundamentals: Data Records |
In our description of tables, we saw that a table was made of one or various columns that represented categories of data. After creating such a table and its columns that represent the categories, you (actually the user) can enter values in the table to make it a valuable list. Filling up a table with values is referred to as data entry. Data entry is performed by entering a value under the column headers. The group of values that correspond to the same entry or the same line under the columns is called a record. This also means that the records are entered one line, also called a row, at a time. Here is a table filled with various records:  A record on a table is represented as a row (horizontal) of data. To support the various records that belong to a table, the DataTable class is equipped with a property called Rows. The DataTable.Rows property is in fact an object of the DataRowCollection class. The DataRowCollection class provides the necessary properties and methods you can use to create and manage records of a table. A row itself is an object based on the DataRow class.
|

|
Introduction to Data Entry |
|
To allow the user to perform data entry, you must create an appropriate object meant for this task. You have various options. You can use various controls on the same view or provide a data sheet type of view such as the one available from the DataGrid control. In all cases, when the user performs data entry, by default, it is by entering one record at a time. Any time while the user is performing an operation on a record, the record has a status that can be identify by the DataRow.RowState property which is a value based on the DataRowState enumerator. A record on a table is represented as a row of data. To support the various records that belong to a table, the DataTable class is equipped with the Rows property which is an object of type DataRowCollection with each record an object of type DataRow. Before adding a new record to a table, you must let the table know. This is done by calling the DataTable.NewRow() method. Its syntax is: public DataRow NewRow(); The DataTable.NewRow() method returns a DataRow object. Here is an example: |
private void btnCreate_Click(object sender, System.EventArgs e)
{
	dtDirectors = new DataTable();
	DataRow rowDirector = this.dtDirectors.NewRow();
}
|
|
| Text | (Name) | Shortcut |
| New Person | mnuNewPerson | CtrlN |
| Edit Details | mnuEditDetails | CtrlE |
| Delete Person | mnuDelete | Del |
| Remove all People | mnuRemoveAll | ShiftDel |
 |
||||||||||||||||||||||||||||||||||||||||||||||||||||||||||||||||||||||||||||
|
internal void RefreshPeople()
{
	if( File.Exists(strFilename) )
	{
		this.lvwPeople.Items.Clear();
		XmlDocument xmlPeople = new XmlDocument();
		xmlPeople .Load(strFilename);

		XmlElement nodRoot = xmlPeople.DocumentElement;
		XmlNodeList nodFullNames = nodRoot.GetElementsByTagName("FullName");
		XmlNodeList nodFriendlyNames = nodRoot.GetElementsByTagName("FriendlyName");
		XmlNodeList nodGenders = nodRoot.GetElementsByTagName("Gender");
		XmlNodeList nodRelationships  = nodRoot.GetElementsByTagName("TypeOfRelationship");
		XmlNodeList nodKnownDates  = nodRoot.GetElementsByTagName("KnownSince");
		XmlNodeList nodResidences = nodRoot.GetElementsByTagName("CurrentResidence");
		XmlNodeList nodPhoneNumbers = nodRoot.GetElementsByTagName("PhoneNumber");
		XmlNodeList nodLastUpdates = nodRoot.GetElementsByTagName("LastUpdate");
		XmlNodeList nodNotifications = nodRoot.GetElementsByTagName("NotifyIfEmergency");

		for(int i = 0; i < nodFullNames.Count; i++)
		{
			ListViewItem lviPeople = new ListViewItem(nodFullNames[i].InnerText);
			lviPeople.SubItems.Add(nodFriendlyNames[i].InnerText);
			lviPeople.SubItems.Add(nodGenders[i].InnerText);
			lviPeople.SubItems.Add(nodRelationships[i].InnerText);
			lviPeople.SubItems.Add(nodKnownDates[i].InnerText);
			lviPeople.SubItems.Add(nodResidences[i].InnerText);
			lviPeople.SubItems.Add(nodPhoneNumbers[i].InnerText);
			lviPeople.SubItems.Add(nodLastUpdates[i].InnerText);
			lviPeople.SubItems.Add(nodNotifications[i].InnerText);
			this.lvwPeople.Items.Add(lviPeople);
		}
	}
}
|
private void Form1_Load(object sender, System.EventArgs e)
{
	// This is the file that will hold the records
	strFilename = "PeopleInMyLife.xml";

	// If that file exists already, open it
	if( File.Exists(strFilename) )
	{
		this.dsAddressBook.ReadXml(strFilename);
		RefreshPeople();
	}
	else // If it doesn't exist already, then create it
		this.dsAddressBook.WriteXml(strFilename);
}
|
|
Data Entry |
|
Adding a Value Based on the Column Index |
When you call the DataTable.NewRow() method, the record's status is DataRowState.Detached. After calling the DataTable.NewRow() method, you can specify the value that the column would carry. To do this, you must specify the table's column whose value you want to provide. You can locate a column based on an index as we mentioned already that the columns of a table are stored in the DataTable.Columns property which is based on the DataColumnCollection class. Each column can be identified by its index. Using this index, to assign a new value to the column, you can use the following version of the DataRow property: public object this[int columnIndex] {get; set;}
Here is an example: private void btnCreate_Click(object sender, System.EventArgs e)
{
dtDirectors = new DataTable();
DataRow rowDirector = this.dtDirectors.NewRow();
rowDirector[0] = "Jonathan Demme";
}
When the record has been added to the table, the record has a status of DataRowState.Added. The above version of the DataRowCollection.Add() method allows you to add a value for one column. To complete a record, you would have to create a value for each column. |
|
|
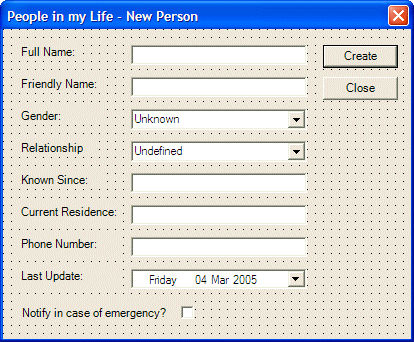
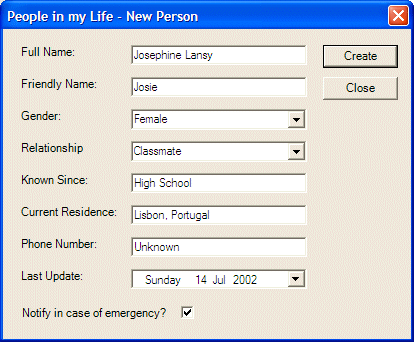
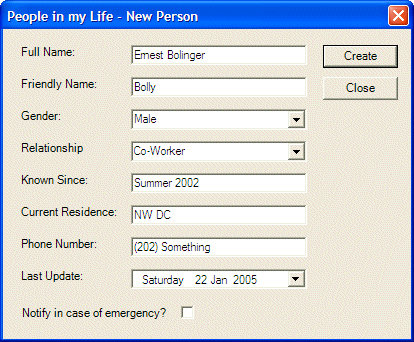
private void mnuNewPerson_Click(object sender, System.EventArgs e)
{
	NewPerson dlgPerson = new NewPerson();

	if( dlgPerson.ShowDialog() == DialogResult.OK )
	{
		DataRow rowPerson = this.tblPersons.NewRow();
		rowPerson[0] = dlgPerson.txtFullName.Text;
		rowPerson[1] = dlgPerson.txtFriendlyName.Text;
		rowPerson[2] = dlgPerson.cboGenders.Text;
		rowPerson[3] = dlgPerson.cboRelationships.Text;
		rowPerson[4] = dlgPerson.txtKnownSince.Text;
		rowPerson[5] = dlgPerson.txtResidence.Text;
		rowPerson[6] = dlgPerson.txtPhoneNumber.Text;
		rowPerson[7] = dlgPerson.dtpLastUpdate.Value.ToString("d");
		rowPerson[8] = dlgPerson.chkNotify.Checked.ToString();
		this.tblPersons.Rows.Add(rowPerson);

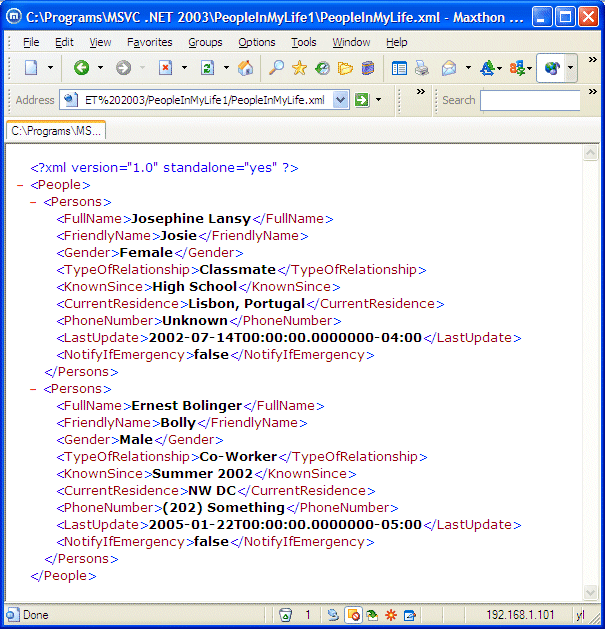
		this.dsAddressBook.WriteXml("PeopleInMyLife.xml");
		RefreshPeople();
	}
}
|
 |
 |
|
Adding a Value Based on the Column Variable Name |
If you prefer to use the variable name of a column when adding the value, you can use the following version of the property:
public object this[DataColumn column] {get; set;}
Here is an example of using this version of the property:
private void btnCreate_Click(object sender, System.EventArgs e)
{
	dtDirectors = new DataTable();
	DataRow rowDirector = this.dtDirectors.NewRow();

	rowDirector[0] = "Jonathan Demme";
	DataRow rowCategory = this.dtVideoCategories.NewRow();

	rowCategory[this.colCategory] = "Documentary";
}
|
|
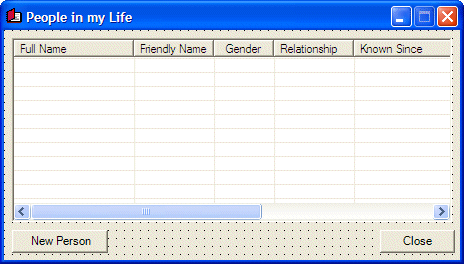
private void btnNewPerson_Click(object sender, System.EventArgs e)
{
	NewPerson dlgPerson = new NewPerson();

	if( dlgPerson.ShowDialog() == DialogResult.OK )
	{
		DataRow rowPerson = this.tblPersons.NewRow();
		rowPerson[colFullName] = dlgPerson.txtFullName.Text;
		rowPerson[colFriendlyName] = dlgPerson.txtFriendlyName.Text;
		rowPerson[colPersonGender] = dlgPerson.cboGenders.Text;
		rowPerson[colRelationshipType] = dlgPerson.cboRelationships.Text;
		rowPerson[colKnownSince] = dlgPerson.txtKnownSince.Text;
		rowPerson[colCurrentResidence] = dlgPerson.txtResidence.Text;
		rowPerson[colPhoneNumber] = dlgPerson.txtPhoneNumber.Text;
		rowPerson[colLastUpdate] = dlgPerson.dtpLastUpdate.Value.ToString("d");
		rowPerson[colNotifyIfEmergency] = dlgPerson.chkNotify.Checked.ToString();
		this.tblPersons.Rows.Add(rowPerson);

		this.dsAddressBook.WriteXml("PeopleInMyLife.xml");
		RefreshPeople();
	}
}
|
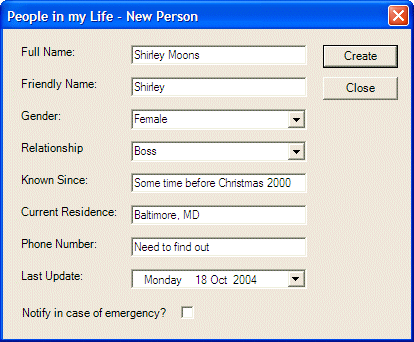
|
Adding a Value Based on the Column Object Name |
To specify the name of the column, the DataRow class is equipped with an Item property that allows you to identify a column by its object name, by its variable name, or by its index. Based on this, the DataRow property is overloaded with three versions. One of the versions uses the following syntax: public object this[string columnName] {get; set;}
This property expects the object name of the column passed in its square brackets. When calling this property, you can assign it the desired value for the column. Here is an example: private void btnCreate_Click(object sender, System.EventArgs e)
{
DataRow rowDirector = this.dtDirectors.NewRow();
rowDirector["Director"] = "John Landi";
}
After assigning the desired value to the row, to add the new value to a table, the DataRowCollection class provides the Add() method that is overloaded with two versions. The first version of this method uses the following syntax: public void Add(DataRow row); This method simply expects you to pass the DataRow object you previously defined. Here is an example: private void btnCreate_Click(object sender, System.EventArgs e)
{
DataRow rowDirector = this.dtDirectors.NewRow();
rowDirector["Director"] = "John Landi";
this.dtDirectors.Rows.Add(rowDirector);
}
In the same way, you can identify each column of a table by its object name and assign it the appropriate value. Once the record is complete, you can add it to the table. Here is an example: |
private void btnCreate_Click(object sender, System.EventArgs e)
{
	 DataRow rowVideo = this.dtVideos.NewRow();

	 rowVideo["Title"] = "A Few Good Men";
	 rowVideo["Director"] = "Rob Reiner";
	 rowVideo["YearReleased"] = 1993;
	 rowVideo["Length"] = "138 Minute";
	 rowVideo["Rating"] = "R";
	 rowVideo["Format"] = "VH";
	 rowVideo["Category"] = "Drama";
	 this.dtVideos.Rows.Add(rowVideo);
}
|
|
private void lvwPeople_KeyDown(object sender, System.Windows.Forms.KeyEventArgs e)
{
	// If the user pressed F4...
	if( e.KeyCode == Keys.F4 )
	{
		// ... Get ready to create a new record
		NewPerson dlgPerson = new NewPerson();

		if( dlgPerson.ShowDialog() == DialogResult.OK )
		{
			DataRow rowPerson = this.tblPersons.NewRow();
			rowPerson["FullName"] = dlgPerson.txtFullName.Text;
			rowPerson["FriendlyName"] = dlgPerson.txtFriendlyName.Text;
			rowPerson["Gender"] = dlgPerson.cboGenders.Text;
			rowPerson["TypeOfRelationship"] = dlgPerson.cboRelationships.Text;
			rowPerson["KnownSince"] = dlgPerson.txtKnownSince.Text;
			rowPerson["CurrentResidence"] = dlgPerson.txtResidence.Text;
			rowPerson["PhoneNumber"] = dlgPerson.txtPhoneNumber.Text;
			rowPerson["LastUpdate"] = dlgPerson.dtpLastUpdate.Value.ToString("d");
			rowPerson["NotifyIfEmergency"] = dlgPerson.chkNotify.Checked.ToString();
			this.tblPersons.Rows.Add(rowPerson);

			this.dsAddressBook.WriteXml("PeopleInMyLife.xml");
			RefreshPeople();
		}
	}
}
|
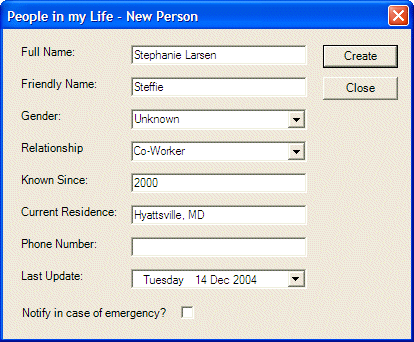
|
Adding an Array of Records |
|
The above version of the DataRowCollection.Add() method means that you must identify each column before assigning a value to it. If you already know the sequence of columns and don't need to explicitly identify them, you can store all values in an array and simply add the array as a complete record. To do this, you can use the second version of the DataRowCollection.Add() method whose syntax is: public virtual DataRow Add(object[] values); Here is an example: private void btnCreate_Click(object sender, System.EventArgs e)
{
string[] vdoRecord = { "Fatal Attraction", "Adrian Lyne", "1987",
"120 Minute", "R", "DVD", "Drama" };
this.dtVideos.Rows.Add(vdoRecord);
}
There is an alternative to this second version of the DataRowCollection.Add() method. As opposed to passing an array of values to the Add() method, you can first define an array, assign that array to a DataRow variable, then pass that DataRow object to the Add() method. To support this technique, the DataRow class is equipped with an ItemArray property that expects an array. Here is an example private void btnCreate_Click(object sender, System.EventArgs e)
{
string[] vdoNewVideo = { "Her Alibi", "Bruce Beresford", "1989",
"94 Minute", "PG-13", "DVD", "Comedy" };
DataRow rowNewVideo = this.dtVideos.NewRow();
rowNewVideoArray = vdoNewVideo;
this.dtVideos.Rows.Add(rowNewVideo);
}
After creating the records of a table, if a record contains invalid values, the DataRow.HasErrors property can help you identify them. |
|
Locating Records and Their Values |
|
Locating a Record |
|
Before performing any operation on a record, you must be able to locate it. That is, you must be able to identify a record among the various records of a table. To locate a record in the DataTable.Rows collection, the DataRowCollection class provides the Item property that is defined as follows: public object this[int columnIndex] {get; set;}
The records of a table are stored in a list (called the DataRowCollection). The first record, which in the example above has the title as "A Few Good Men" and the Director as "Rob Reiner", has an index of 0. The second record has an index of 1, and so on. Here is an example of using it to retrieve the information stored in a record: private void btnCreate_Click(object sender, System.EventArgs e)
{
DataRow row = this.dtVideos.Rows[2];
}
When you pass an index to this property, the compiler would check whether the record exists. If a record with that index exists, its DataRow value is produced. If you specify an index that is either less than 0 or beyond the number of records in the table, the compiler would throw an IndexOutOfRangeException exception. To get the number of records that a table contains, access the Count property of its DataRowCollection. The Count property is inherited from the InternalDataCollectionBase class, which is the parent of many collection classes. When the records of a DataTable object have been created, you can get their list as an array using its List property that is inherited from the InternalDataCollectionBase class. This property returns an ArrayList type of list. |
|
|
private void lvwPeople_DoubleClick(object sender, System.EventArgs e)
{
	ListViewItem selPerson = this.lvwPeople.SelectedItems[0];
	int indexOfPersonSelected = selPerson.Index;
	DataRow rowPerson = this.tblPersons.Rows[indexOfPersonSelected];
}
|
|
Locating a Value |
|
As mentioned already, a record is in fact one value or a group of values from each of the columns of the table. Consider the following table:  The "A Few Good Men" string is a value of the Title column. In the same way, "VH" is a value of the Format column. In some circumstances, you will need to locate a particular value in order to perform an operation on it. As seen above, you can start by locating the record you need and return its DataRow object. To know the table that the record belongs to, access its DataRow.Table property. This property is declared as follows: public DataTable Table {get;}
To locate the value that a record holds under a particular column, the DataRow class provides the Item property that is overloaded with three versions (actually six, but we are interested in the first three only). One of the versions of this property uses the following syntax: public object this[string columnName {get; set;}
To use this property, pass the object name of the column in the square brackets. The following example is based on the above table. It retrieves the title of the third video and displays it in the caption of the form: private void btnCreate_Click(object sender, System.EventArgs e)
{
DataRow row = this.dtVideos.Rows[2];
string strVideoTitle = (string )(row["Title"]);
Text = strVideoTitle;
}
Instead of using the index of a column, you can also locate a value using the variable name of its column. To do this, you can use the following syntax of the DataRow indexed property: public object this[DataColumn column] {get; set;}
This property expects the object name of the column passed in its square brackets. The third option you have is to identify the column by its index. To do this, use the following syntax of the DataRow indexed property: public object this[int columnIndex] {get; set;}
This property expects the index of the column. |
|
|
private void lvwPeople_DoubleClick(object sender, System.EventArgs e)
{
	ListViewItem selPerson = this.lvwPeople.SelectedItems[0];
	int indexOfPersonSelected = selPerson.Index;
DataRow rowPerson = this.tblPersons.Rows[indexOfPersonSelected];NewPerson dlgPerson = new NewPerson();

	dlgPerson.txtFullName.Text = (string)(rowPerson["FullName"]);
	dlgPerson.txtFriendlyName.Text = (string)(rowPerson["FriendlyName"]);
	dlgPerson.cboGenders.Text = (string)(rowPerson["Gender"]);
	dlgPerson.cboRelationships.Text = (string)(rowPerson["TypeOfRelationship"]);
	dlgPerson.txtKnownSince.Text = (string)(rowPerson["KnownSince"]);
	dlgPerson.txtResidence.Text = (string)(rowPerson["CurrentResidence"]);
	dlgPerson.txtPhoneNumber.Text = (string)(rowPerson["PhoneNumber"]);
	dlgPerson.dtpLastUpdate.Text = (string)(rowPerson["LastUpdate"]);

	string strNotify = (string)(rowPerson["NotifyIfEmergency"]);
	bool bNotity = false;

	if( strNotify == "true" )
		bNotity = true;

	dlgPerson.chkNotify.Checked = bNotity;
	dlgPerson.btnCreate.Text = "Update";

	if( dlgPerson.ShowDialog() == DialogResult.OK )
	{
		rowPerson["FullName"] = dlgPerson.txtFullName.Text;
		rowPerson["FriendlyName"] = dlgPerson.txtFriendlyName.Text;
		rowPerson["Gender"] = dlgPerson.cboGenders.Text;
		rowPerson["TypeOfRelationship"] = dlgPerson.cboRelationships.Text;
		rowPerson["KnownSince"] = dlgPerson.txtKnownSince.Text;
		rowPerson["CurrentResidence"] = dlgPerson.txtResidence.Text;
		rowPerson["PhoneNumber"] = dlgPerson.txtPhoneNumber.Text;
		rowPerson["LastUpdate"] = dlgPerson.dtpLastUpdate.Value.ToString("d");
		rowPerson["NotifyIfEmergency"] = dlgPerson.chkNotify.Checked.ToString();

		this.dsAddressBook.WriteXml("PeopleInMyLife.xml");
		RefreshPeople();
	}
}
|
|
Record Maintenance |
|
Once a table has been filled with records, you can perform maintenance operations on it such as changing some records or removing others. To remove a record from a table, you can call the DataRowCollection.Remove() method. Its syntax is: public void Remove(DataRow row); This method takes as argument a DataRow object and checks whether the table contains it. If that record exists, it gets deleted, including all of its entries for each column. When calling this method, you must pass an exact identification of the record. If you don't have that identification, you can delete a record based on its index. To do this, you would call the DataRowCollection.RemoveAt() method. Its syntax is: public void RemoveAt(int index); This method takes as argument the index of the record you want to delete. If a record with that index exists, it would be deleted. To delete all records of a table, call the DataRowCollection.Clear() method. Its syntax is: public void Clear(); This method is used to clear the table of all records. |
|
|
private void mnuDeletePerson_Click(object sender, System.EventArgs e)
{
	ListViewItem selPerson = this.lvwPeople.SelectedItems[0];
	int indexOfPersonSelected = selPerson.Index;

	if( indexOfPersonSelected >= 0 )
	{
		DataRow rowPerson = this.tblPersons.Rows[indexOfPersonSelected];
		System.Windows.Forms.DialogResult answer =
			MessageBox.Show("Are you sure you want to delete this record?",
			"Deleting a Record",
			MessageBoxButtons.YesNo,
			MessageBoxIcon.Information);
		if( answer == DialogResult.Yes )
		{
			this.tblPersons.Rows.Remove(rowPerson);
			this.dsAddressBook.WriteXml(this.strFilename);
		}
		RefreshPeople();
	}
}
|
private void mnuRemoveAll_Click(object sender, System.EventArgs e)
{
	System.Windows.Forms.DialogResult answer =
		MessageBox.Show("Are you sure you want to delete all records?",
		"Deleting all Record",
		MessageBoxButtons.YesNo,
		MessageBoxIcon.Information);
	if( answer == DialogResult.Yes )
	{
		this.tblPersons.Rows.Clear();
		this.dsAddressBook.WriteXml(this.strFilename);
	}
	RefreshPeople();
}
|
|
|
||
| Previous | Copyright © 2004-2010 FunctionX, Inc. | Next |
|
|
||