Home

File Information


File Information Fundamentals


Introduction

In its high level of support for file processing, the .NET Framework provides the FileInfo class. This class is equipped to handle all types of file-related operations including creating, copying, moving, renaming, or deleting a file. FileInfo is based on the FileSystemInfo class that provides information on characteristics of a file.


Practical Learning Practical Learning: Introducing File Information

  1. Start Microsoft Visual C# or Visual Studio .NET if necessary and create a Windows Application named CarLoans1
  2. Design the form as follows:
     
    Control Text Name Other Properties
    GroupBox Loan Preparer    
    Label Prepared By:    
    TextBox 00-000 txtEmployeeNumber  
    TextBox   txtEmployeeName  
    Button New txtNewEmployee  
    GroupBox Applicant Information    
    Label Full Name:    
    TextBox   txtFullName  
    Label Employer Name:    
    TextBox   txtEmployerName  
    Label Home Phone:    
    TextBox   txtHomePhone  
    Label Work Phone:    
    TextBox   txtWorkPhone  
    GroupBox Loan Estimation    
    Label Loan Amount:    
    TextBox 0.00 txtLoanAmount TextAlign: Right
    Label Interest Rate:    
    TextBox   txtInterestRate TextAlign: Right
    Label %    
    Label Number of Months:    
    TextBox 60 txtPeriods TextAlign: Right
    Label Monthly Payment:    
    TextBox 0.00 txtPayment TextAlign: Right
  3. Save all
  4. In the Windows Forms section of the Toolbox, click Main Menu and click the form
  5. Design the menu as follows:
     
    Text Name Shortcut
    &File mnuFile  
    &Save mnuFileSave CtrlS
    &Open... mnuFileOpen CtrlO
    E&xit mnuFileExit  
  6. In the Solution Explorer, right-click References and click Add Reference...
  7. In the Add Reference dialog box, click the .NET tab.
    In the Component Name column, double-click Microsoft Visual Basic .NET Runtime
     
  8. Click OK
  9. In the Class View, expand CarLoan1 and CarLoan1
  10. Right-click Form1 -> Add -> Add Method...
  11. Set the Method Access to internal and access the Return Type as void
  12. Set the Method Name to CalculateLoan and click Finish
  13. Implement the method as follows:
     
    internal void CalculateLoan()
    {
    	double loanAmount, interestRate, monthlyPayment, periods;
    
    	loanAmount = Microsoft.VisualBasic.Conversion.Val(txtLoanAmount.Text);
    	interestRate = Microsoft.VisualBasic.Conversion.Val(txtInterestRate.Text) / 100;
    	periods = Microsoft.VisualBasic.Conversion.Val(txtPeriods.Text);
    
    	monthlyPayment = Microsoft.VisualBasic.Financial.Pmt(
    		interestRate/12, periods, -loanAmount, 0, 
    		Microsoft.VisualBasic.DueDate.BegOfPeriod);
    	txtPayment.Text = monthlyPayment.ToString("C");
    }
  14. Return to the form and click the LoanAmount text box
  15. In the Properties window, click the Events button and double-click Leave
  16. Implement its event as follows:
     
    private void txtLoanAmount_Leave(object sender, System.EventArgs e)
    {
    	CalculateLoan();
    }
  17. Return to the form and click the Interest Rate text box
  18. In the Events section of the Properties window, double-click Leave and implement its event as follows:
     
    private void txtInterestRate_Leave(object sender, System.EventArgs e)
    {
    	CalculateLoan();
    }
  19. Return to the form and click the Number of Months text box
  20. In the Events section of the Properties window, double-click Leave and implement its event as follows:
     
    private void txtPeriods_Leave(object sender, System.EventArgs e)
    {
    	CalculateLoan();
    }
  21. Save all (you can also execute the application and test the calculation of a loan)
 

File Initialization

The FileInfo class is equipped with one constructor whose syntax is:

public FileInfo(string fileName);

This constructor takes as argument the name of a file or its complete path. If you provide only the name of the file, the compiler would consider the same directory of its project. Here is an example:

private void btnSave_Click(object sender, System.EventArgs e)
{
	FileInfo fleMembers = new FileInfo("First.txt");
}

Alternatively, if you want, you can provide any valid directory you have access to. In this case, you should provide the complete path.


File Creation

The FileInfo constructor is mostly meant only to indicate that you want to use a file, whether it exists already or it would be created. Based on this, if you execute an application that has only a FileInfo object created using the constructor as done above, nothing would happen.

To create a file, you have various alternatives. If you want to create one without writing anything in it, which implies creating an empty file, you can call the FileInfo.Create() method. Its syntax is:

public FileStream Create();

This method simply creates an empty file. Here is an example of calling it:

private void btnSave_Click(object sender, System.EventArgs e)
{
	FileInfo fleMembers = new FileInfo("First.txt");
	fleMembers.Create();
}

The FileInfo.Create() method returns a FileStream object. You can use this returned value to write any type of value into the file, including text. If you want to create a file that contains text, an alternative is to call the FileInfo.CreateText() method. Its syntax is:

public StreamWriter CreateText();

This time, this method directly returns a StreamWriter object. You can use this returned object to write text to the file.


File Existence

When you call the FileInfo.Create() or the FileInfo.CreateText() method, if the file passed as argument or as the file in the path of the argument exists already, it would be deleted and a new one would be created with the same name. This can cause the right file to be deleted. Therefore, before creating a file, you may need to check whether it exists already. To do this, you can check the value of the Boolean FileInfo.Exists property. This property holds a true value if the file exists already and it holds a false value if the file doesn't exist or it doesn't exist in the path.

Here is an example of checking the existence of a file:

private void btnSave_Click(object sender, System.EventArgs e)
{
	FileInfo fleMembers = new FileInfo("First.txt");
	fleMembers.Create();

	if( fleMembers.Exists == true )
		return;
}
 

Writing to a File

As mentioned earlier, the FileInfo.Create() method returns a FileStream object. You can use this to specify the type of operation that would be allowed on the file.

To write normal text to a file, you can first call the FileInfo.CreateText() method. This method returns a StreamWriter object. The StreamWriter class is based on the TextWriter class that is equipped with Write() and WriteLine() methods used to write values to a file. The Write() method writes text on a line and keeps the caret on the same line. The WriteLine() method writes a line of text and moves the caret to the next line.

After writing to a file, you should close the StreamWriter object to free the resources it was using during its operation(s).

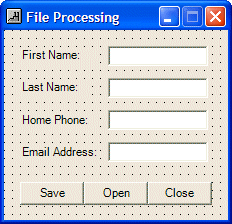
Here is an example:

private: System.Void btnSave_Click(System.Object *  sender, System.EventArgs *  e)
{
	 FileInfo *fleMembers = new FileInfo("Second.txt");
	 fleMembers.Create();

	 if( fleMembers.Exists == true )
		 return;

	 StreamWriter *swrMembers = fleMembers.CreateText();
	 try {
		 swrMembers.WriteLine(txtFirstName.Text);
		 swrMembers.WriteLine(txtLastName.Text);
		 swrMembers.WriteLine(txtHomePhone.Text);
		 swrMembers.WriteLine(txtEmailAddress.Text);

		 txtFirstName.Text      = "";
		 txtLastName.Text      = "";
		 txtHomePhone.Text   = "";
		 txtEmailAddress.Text = "";
		 txtFirstName.Focus();
	 }
	 finally
	 {
		 swrMembers.Flush();
		 swrMembers.Close();
	 }
}
 

Practical Learning Practical Learning: Writing to a File

  1. To add a new form to the project, on the main menu, click Project -> Add Window Form...
  2. Set the Name to Employees and press Enter
  3. Design the form as follows:
     
    Control Text Name
    Label Full Name:  
    TextBox   txtFullName
    Label Employee #:  
    TextBox 00-000 txtEmployeeNumber
  4. Double-click the Create button
  5. In the top section of the file, under the other using namespace lines, type

    using System.IO;
  6. Implement its event as follows:
     
    private void btnCreate_Click(object sender, System.EventArgs e)
    {
    	FileInfo fleEmployees = new FileInfo("Employees.txt");
    	StreamWriter swrEmployees = fleEmployees.CreateText();
    
    	try 
    	{
    		swrEmployees.WriteLine(txtEmployeeNumber.Text);
    		swrEmployees.WriteLine(txtEmployeeName.Text);
    
    		txtEmployeeName.Text   = "";
    		txtEmployeeNumber.Text = "00-000";
    		txtEmployeeName.Focus();
    	}
    	finally
    	{
    		swrEmployees.Flush();
    		swrEmployees.Close();
    	}
    }
  7. Return to the Employees form and double-click its Close button
  8. Implement it as follows:
     
    private void btnClose_Click(object sender, System.EventArgs e)
    {
    	Close();
    }
  9. Display the first form and double-click the New button
  10. Implement its event as follows:
     
    private void btnNewEmployee_Click(object sender, System.EventArgs e)
    {
    	Employees frmEmpl = new Employees();
    	frmEmpl.ShowDialog();
    }
  11. Execute the application
  12. Display the Employees form and create one employee with a full name and an employee number (remember the employee number)
  13. Close the forms and return to your programming environment
 

Appending to a File

You may have created a text-based file and written to it. If you open such a file and find out that a piece of information is missing, you can add that information to the end of the file. To do this, you can call the FileInfo.AppenText() method. Its syntax is:

public StreamWriter AppendText();

When calling this method, you can retrieve the StreamWriter object that it returns, then use that object to add new information to the file.


Practical Learning Practical Learning: Appending to a File

  1. Display the Employees form and double-click its Create button
  2. Change its event as follows:
     
    private void btnCreate_Click(object sender, System.EventArgs e)
    {
    	FileInfo fleEmployees = new FileInfo("Employees.txt");
    	StreamWriter swrEmployees;
    
    	// If the file exists already, then add the new employee to it
    	if( fleEmployees.Exists == true )
    		swrEmployees = fleEmployees.AppendText();
    	else // Otherwise, create a new file
    		swrEmployees = fleEmployees.CreateText();
    
    	try 
    	{
    		swrEmployees.WriteLine(txtEmployeeNumber.Text);
    		swrEmployees.WriteLine(txtEmployeeName.Text);
    
    		txtEmployeeName.Text   = "";
    		txtEmployeeNumber.Text = "00-000";
    		txtEmployeeName.Focus();
    	}
    	finally
    	{
    		swrEmployees.Flush();
    		swrEmployees.Close();
    	}
    }
  3. Execute the application
  4. Display the Employees form and create additional employees, each with a full name and an employee number
  5. Close the forms and return to your programming environment


Home Copyright © 2005-2016, FunctionX Next