|
Fundamentals of Table Data Entry |
|
Data entry consists of populating a table with the necessary
values it is supposed to hold. In the previous lessons, we saw that, to organize
its data, a table is divided in sections called columns. The values common to an
entry under each column constitute a row or record and a row is made of cells:
as you may realize, everything we reviewed about the organization of a table,
when studying data sets, is also valid here.
Data entry consists of filling the cells under the columns
of a table.
|
 Practical Learning: Introducing Data Entry
|
|
- Start a new Windows Forms Application named Countries3
- Right click the form and click View Code
- In the top section of the file, under the other using lines,
type:
using System.Data.SqlClient;
- Design the form as follows:
 |
| Control |
Name |
Text |
| TabControl |
tabCountries |
|
| TabPage |
pgeMaintenance |
Maintenance |
| Button |
btnCreateDB |
Create Statistics Database |
| Button |
btnCreateContinents |
Create Continents |
| Button |
btnCreateCountries |
Create Countries |
| TabPage |
pgeContinents |
Continents |
| TabPage |
pgeCountries |
Countries |
| Button |
btnClose |
Close |
|
- Double-click the Create Statistics Database button and implement its code as follows:
private void btnCreateDB_Click(object sender, System.EventArgs e)
{
	string strConnection = "IF EXISTS (SELECT * " +
			"FROM   master..sysdatabases " +
			"WHERE  name = N'CountriesStats')" +
			"DROP DATABASE CountriesStats;" +
			"CREATE DATABASE CountriesStats;";
	SqlConnection conDatabase = new
		SqlConnection("Data Source=(local);Integrated Security=sspi");
	SqlCommand    cmdDatabase = new SqlCommand(strConnection, conDatabase);

	conDatabase.Open();

	cmdDatabase.ExecuteNonQuery();
	conDatabase.Close();
}
|
- Return to the form and double-click the Create Continents button
- Implement its Click event as follows:
private void btnCreateContinents_Click(object sender, System.EventArgs e)
{
	string strCreate = "IF EXISTS(SELECT name FROM sysobjects " +
			"WHERE  name = N'Continents' AND type = 'U')" +
			"DROP TABLE Continents;" +
			"CREATE TABLE Continents (" +
			"ContinentName varchar(100)," +
			"Area varchar(30), " +
			"Population varchar(30));";

	SqlConnection conDatabase = new SqlConnection(
	"Data Source=(local);Database='CountriesStats';Integrated Security=yes");
	SqlCommand    cmdDatabase = new SqlCommand(strCreate, conDatabase);

	conDatabase.Open();

	cmdDatabase.ExecuteNonQuery();
	conDatabase.Close();
}
|
- Return to the form and double-click the Create Countries button
- Implement its Click event as follows:
private void btnCreateCountries_Click(object sender, System.EventArgs e)
{
	string strCreate = "IF EXISTS(SELECT name FROM sysobjects " +
			"WHERE  name = N'Countries' AND type = 'U')" +
			"DROP TABLE Countries;" +
			"CREATE TABLE Countries (" +
			"CountryName varchar(120)," +
			"Area varchar(30)," +
			"Population varchar(30)," +
			"Capital varchar(80)," +
			"Code char(2));";

  SqlConnection conDatabase = new SqlConnection(
	"Data Source=(local);Database='CountriesStats';Integrated Security=yes");
	SqlCommand    cmdDatabase = new SqlCommand(strCreate, conDatabase);

	conDatabase.Open();

	cmdDatabase.ExecuteNonQuery();
	conDatabase.Close();
}
|
- Return to the form and double-click the Close button
- Implement its event as follows:
private void btnClose_Click(object sender, System.EventArgs e)
{
	Close();
}
|
- Execute the application
- Click the top button and wait a few seconds
- Click the middle button and wait a few seconds
- Click the bottom button and wait a few seconds
- Close the form and return to your programming environment
|
Displaying the Table For Data Entry |
|
|
Before performing data entry from the SQL Server
Enterprise Manager, you must first open it in a view that display its
records. To do this, you can locate the database it belongs to and click
the Tables node. In the right frame, click the table's name to select it.
Then, on the main menu, click Action . Open Table . Return all
rows. Alternatively, you can right-click the table in the right frame,
position the mouse on Open Table, and click Return all rows.
If you are working in Server Explorer, expand the name
of the server under the Servers node, then expand SQL Servers, followed by
the name of the server, followed by the database, and followed by the
Tables node. Finally, double-click the desired table.
If this is the first time you open the table for data
entry, it would display the label of each column on top and empty cells
under it:

If the table already contains some records, they would
display under the column headers. |
|
Techniques of Performing Data Entry |
|
|
Data Entry Using the Enterprise Manager or Server
Explorer |
|
After displaying the table in the SQL Server Enterprise
Manager or the Server Explorer, to enter new data, click an empty cell and type
the necessary value. After finishing with one cell, you can press Enter, Tab or
click another cell. You can start this operation on the most left cell and
continue with the cells on its right. When you finish with a row of cells and
move to another row, the interpreter creates (or updates) a record. Therefore,
entering data also self-creates a record. This also means that, when using the
table in the SQL Server Enterprise Manager or the Server Explorer, you will not
have to formally create a record of a table: it is automatically created when
you enter data.
While performing data entry, the user may skip some fields
if the information is not available. The user can skip only columns that allow
NULL values. If a column was configured as NOT accepting NULL
values, the user must enter something in the field, otherwise he would receive
an error and the table would not allow going further.
|
Data Entry Using the SQL Query Analyzer |
|
|
In the SQL, data entry is performed using the INSERT
combined with the VALUES keywords. The primary statement uses the
following formula:
INSERT TableName VALUES(Column1, Column2, Column_n)
Alternatively, or to be more precise, you can specify
that you are entering data in the table using the INTO keyword
between the INSERT keyword and the TableName factor. This is
done with the following syntax:
INSERT INTO TableName VALUES(Column1, Column2, Column_n)
The TableName factor must be a valid name of an
existing table in the database you are using. If the name is wrong, the
SQL would simply consider that the table you are referring to doesn't
exist. Consequently, you would receive an error.
The VALUES keyword indicates that you are ready
to list the values of the columns. The values of the columns must be
included in parentheses. The most common technique of performing data entry
requires that you know the sequence of columns of the table in which you
want to enter data. With this subsequent list in mind, enter the value of
each field in its correct order in the parentheses of the above formula.
|
|
If the column is a BIT data type, you must
specify one of its values as 0 or 1.
If the column is a numeric type, you should pay
attention to the number you type. If the column was configured to receive
an integer (int, bigint, smallint), you should
provide a valid natural number without the decimal separator.
If the column is for a decimal number (float, real,
decimal, numeric), you can type the value with its character
separator (the period for US English).
If the column was created for a date data type, make
sure you provide a valid date.
If the data type of a column is a string type, you
should include its entry between single quotes. For example, a shelf
number can be specified as 'HHR-604' and a middle initial can be given as
'D'.
Here is an example |
INSERT Countries VALUES('Sweden',449964,8875053,'Stockholm','se')
GO
The list of values doesn't have to be typed on the same
line. You can use one for each value. Here is example:
INSERT Country
VALUES
(
  'Angola',
  1246700,
  10593171,
  'Luanda',
  'ao'
)
GO
|
In the same way, the parentheses can be written on their own
lines:
INSERT INTO Country VALUES
(
'Mongolia', 1565000, 2694432, 'Ulaanbaator','mn'
)
GO
|
|
The adjacent data entry we have used above requires that you know the
order of columns of the table. If you don't know or don't want to follow
the exact order of the columns, you can perform data entry with an order
of your choice. This allows you to provide the values of
fields in any order of your choice. We have just seen a few examples where the
values of some of the fields are not available during data entry. Instead
of remembering to type 0 or NULL for such fields or leaving empty quotes
for a field you can use their names to specify the fields whose data you
want to provide.
To perform data entry at random, you must provide a
list of the fields of the table in the order of your choice. You can
either use all columns or provide a list of the same columns but in your
own order. In the same way, you don't have to provide data for all
columns, just those you want, in the order you want. Here is an example:
|
INSERT Country(CountryName, Capital,InternetCode,Population,Area)
VALUES('Taiwan', 'Taipei', 'tw', 22548009, 35980)
GO
|
Here is another example:
INSERT
Country(InternetCode, CountryName, Capital,    Area)
VALUES(	'mx',	        'Mexico',       'Mexico', 1972550)
GO
|
Instead of first creating a table and then performing data
entry, you can create a table and add records at once as long as you separate
the statements with GO. To proceed, in your code, you must first create
the table, which would save it, use GO to end the statement that creates
the table, start the statement or each statement used to add a record, and it or
each with GO. Consider the following example:
-- =============================================
-- Database: VideoCollection
-- Table:    Videos
-- =============================================
IF EXISTS(SELECT name
	  FROM 	 sysobjects
	  WHERE  name = N'Videos'
	  AND 	 type = 'U')
    DROP TABLE Videos
GO

USE VideoCollection
GO

CREATE TABLE Videos (
VideoTitle varchar(100),
Director varchar(80),
YearReleased int,
VideoLength varchar(30),
Rating varchar(20))
GO

INSERT INTO Videos VALUES('A Few Good Men', 'Rob Reiner', 1992, '138 Minutes', 'R')
GO
INSERT INTO Videos(Director, VideoLength, VideoTitle, YearReleased)
VALUES('Jonathan Dame', '118 Minutes', 'The Silence of the Lambs', 1991)
GO
INSERT INTO Videos(VideoLength, Rating, Director, VideoTitle)
VALUES('112 Minutes', 'R', 'Jonathan Line', 'The Distinguished Gentleman')
GO
INSERT INTO Videos(Rating, VideoTitle, Director, VideoLength)
VALUES('R', 'The Lady Killers', 'Joel Coen & Ethan Coen', '104 Minutes')
GO
INSERT INTO Videos VALUES('Ghosts of Mississipi', 'Rob Reiner', 1996, '130 Minutes', '')
GO
To programmatically perform data entry using a SQL
statement, create an INSERT statement exactly following the descriptions made
for SQL Query Analyzer. Once the statement is ready, pass it as string to a SqlCommand
object and execute it with a call to SqlCommand.ExecuteNonQuery().
|
 Practical Learning: Performing Data Entry With a SqlCommand Object
|
|
- Change the design of the form as follows:
 |
| Control |
Name |
Text |
| GroupBox |
|
New Continent |
| Label |
|
Name: |
| TextBox |
txtContinentName |
|
| Label |
|
Area: |
| TextBox |
txtContinentArea |
|
| Label |
|
Population |
| TextBox |
txtContinentPopulation |
|
| Button |
btnNewContinent |
Create New Continent |
|
- Double-click the Create New Continent button and implement its code as follows:
private void btnNewContinent_Click(object sender, System.EventArgs e)
{
	string strContinentName = this.txtContinentName.Text;

	if( strContinentName == "" )
	{
		MessageBox.Show("You must provide a name for the continent");
		return;
	}

	string strInsert = "INSERT INTO Continents VALUES('" +
					strContinentName +
				                "', '" + this.txtContinentArea.Text +
                                "', '" + this.txtContinentPopulation.Text +
				                "');";
	SqlConnection conDatabase = new
SqlConnection("Data Source=(local);Database='CountriesStats';Integrated Security=yes");
	SqlCommand    cmdDatabase = new SqlCommand(strInsert, conDatabase);

	conDatabase.Open();

	cmdDatabase.ExecuteNonQuery();
	conDatabase.Close();

	this.txtContinentName.Text = "";
	this.txtContinentArea.Text = "";
	this.txtContinentPopulation.Text = "";
	this.txtContinentName.Focus();
}
|
- Execute the application and fill out the form as follows:
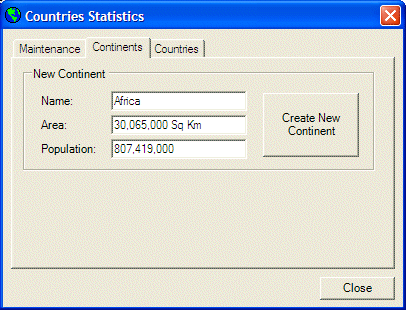
- Click Create New Continent
- Close the form and return to your programming environment
|
Data Maintenance: Deleting Records |
|
Like databases, tables, and columns, records need
maintenance too. Some of the operations you can perform include deleting a whole
record, changing the value of a record under a particular column (which is
equivalent to editing a record), etc. Just as done for a column, before changing
anything on a record, you must locate it first. This operation is somehow
different than the maintenance performed on databases, tables, and columns. The
reason is that, although you always know the name of a database, the name of a table, or
the name of a column, when it comes to records, you cannot know in advance the
information it holds. For this reason, you must use additional operators to help
you locate a record. Fortunately, as always, you have various options.
|
Deleting Records: the Server Explorer or the
Enterprise Manager |
|
Deleting a record consists of removing it from a table, this
includes all entries, if any, under each column for a particular row.
If you are working from SQL Server Enterprise Manager,
before removing a record, first display the table in a view that shows its
record. You can do this by right-click the table, positioning the mouse on Open
Table, and clicking Return All Rows. If you are working in the Server Explorer,
to display the table and show all records, double-click the table. In both
cases, once in the Data window, to remove a record, right-click the gray box on
the left side of the record and click Delete:
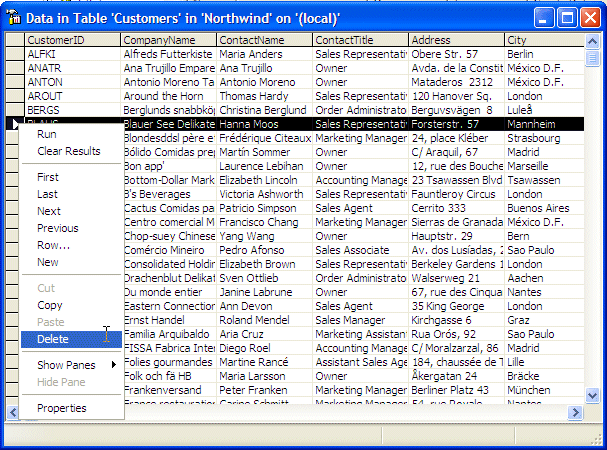
After clicking Delete, you would receive a warning message
box:

If you still want to continue, you can click Yes and that
record would disappear. If you want to change your mind, click No.
To remove a range of records from a table, you can click and
drag from one gray box at one end of the range to the gray box at the other end
of the range. As an alternative, you can click a gray box at one end of the
range, press and hold Shift, then click the gray box at the other other end of
the desired range. Once the selection is made, right-click anywhere in the
selection and click Delete:
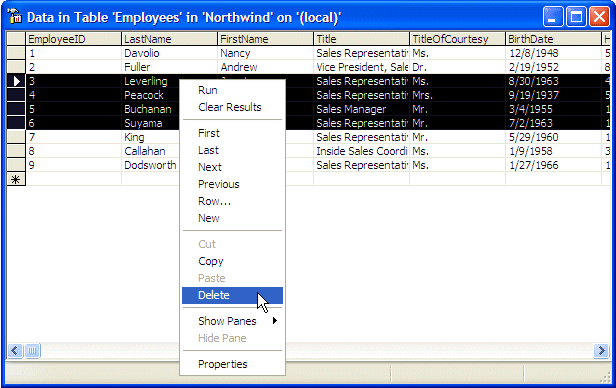
If you click Delete, you would receive a warning that lets
you know the number of records that would be deleted. If you still want to
delete them, you can click Yes. To change your mind, click No.
To remove all records from a table, you must first select
all of them. To do this, you can click the gray box on the left of the first (or
the last) record, press and hold Shift, then click the gray box of the last (or
first) record:

Once the selection is made, right-click anywhere in the
table and click Delete. You would receive the same type of warning for a range
of records and you can proceed the same way.
|
Deleting Records in SQL Query Analyzer |
|
The SQL code that deletes all records from a table uses the
following formula:
DELETE TableName
When you create this statement, provide the name of the
table as TableName. When you execute this statement, all records of the
table would be removed.
To remove one particular record from a table, use the
following formula:
DELETE TableName
WHERE CriteriaToFindTheRecord
The DELETE and the WHERE keywords are
required. The TableName factor allows you to specify the name of the
table that the record belongs to. In order to delete the record, you must
provide a way to locate it. Consider the following table named Videos from a
database named VideoCollection:
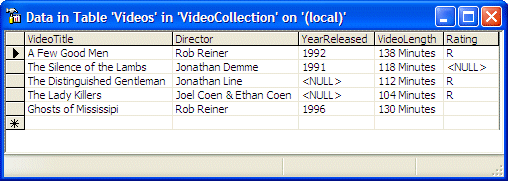
Imagine that you want to remove the record whose video title
is "The Silence of the Lambs". In this case, the TableName is
Videos. The criterion to find the correct record is that the VideoTitle value of
that record = The Silence of the Lambs. To remove it, you would use code as
follows:
USE VideoCollection
GO
/* Code used to remove the video titled
   The Silence of the Lambs */
DELETE Videos
WHERE VideoTitle = 'The Silence of the Lambs'
GO
If you use the DELETE formula to remove a record,
notice that, as always in SQL Query Analyzer, you would not be warned.
|
Deleting a Record on Command |
|
To programmatically delete a record, create a DELETE
statement using the same rules we reviewed for SQL Query Analyzer, pass it to a SqlCommand
object, and execute the statement by calling the SqlCommand.ExecuteNonQuery()
method.
|
Data Maintenance: Updating Records |
|
|
Updating a Record in the Enterprise Manager |
|
To change a record in SQL Server Enterprise Manager, first
open the table with the view that displays records (Right-click the table . Open Table
. Return All Rows). In the Data window, locate the value you want
to change, click it, edit it, and then click somewhere else:
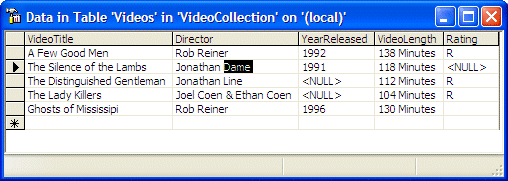
Once the cell loses
focus, the new value is automatically saved:

|
Updating a Record in the SQL Query Analyzer |
|
The SQL statement used to change the value of a record uses
the following formula:
UPDATE TableName
	SET ColumnName = NewValue
	WHERE CriteriaToLocateRecord
The UPDATE keyword allows you to specify the name of
the table whose record you want to change. The table is identified with the TableName
factor of our formula.
The SET keyword allows you to identify the column
under which exists the value you want to change. The column is identified as ColumnName
in our formula. On the right side of the column name, type the assignment
operator, followed by the value you want the cell to hold. If the update is
successful, the value stored under that column would be replaced.
The WHERE clause allows you to specify the criterion
used to locate the particular record that the existing value belongs to.
Consider you have the above table, imagine that, on the
video titled "The Distinguished Gentleman", you want to change the
name of the director from "Jonathan Line" to "Jonathan Lynn. The
table name is Videos. The column that owns the value is named Director. The
criterion to use is to identify the record whose VideoTitle is "The
Distinguished Gentleman". The code to perform this update would be:
USE VideoCollection
GO
-- Code used to change the name of a director
UPDATE Videos
SET Director = 'Jonathan Lynn'
WHERE VideoTitle = 'The Distinguished Gentleman'
GO
|
 |
Once again, remember that when performing an operation in
the SQL Query Analyzer, you would not be warned.
|
Updating a Record on Command |
|
To update a record in a Windows Forms Application, create an
UPDATE statement using the same rules we reviewed for SQL Query Analyzer, pass it to a SqlCommand
object before executing the statement with a call to the SqlCommand.ExecuteNonQuery()
method.
|
Assistance With Data Entry |
|
Microsoft SQL Server and the SQL provide various ways to
assist you with data entry. For example, if you have a table in a Microsoft SQL
Server database, a Microsoft Access database, or another system, such as a text
file, you can import the values of that table. Another type of assistance you
can get with data entry is to copy records from one table to another.
|
Another technique used to perform data entry consists
of importing already existing data from another database or from any other
recognizable data file. Microsoft SQL Server provides various techniques
and means of importing data into Microsoft SQL Server.
The easiest type of data that can be imported into SQL
Server, and which is available on almost all database environments is the
text file. Almost any database application you can think of can be imported
as a
text file but data from that file must be formatted in an acceptable
format. For example, the information stored in the file must define the
columns as distinguishable by a character that serves as a separator. This
separator can be the single-quote, the double-quote, or any valid
character. SQL Server is able to recognize the double-quote as a valid
separator of columns. Data between the quotes is considered as belonging
to a distinct field. Besides this information, the database would need to
separate information from two different columns. Again, a valid character
must be used. Most databases, including SQL Server, recognize the comma as
such a character. The last piece of information the file must provide is
to distinguish each record from another. This is easily taken car of by
the end of line of a record. This is also recognized as the carriage
return.
These directives can help you manually create a text
file that can be imported into SQL Server. In practicality, if you want to
import data that resides on another database, you can ask that application
to create the source of data. Most applications can do that and format
it so another application can easily use such data. That is the case for
the data we will use in the next exercise: it is data that resided on a
Microsoft Access database and was prepared to be imported in SQL Server.
After importing data, you should verify and possibly
format it to customize its fields. |
|
 Practical
Learning: Importing Data From an External Source Practical
Learning: Importing Data From an External Source
|
|
- Download the Students text file and save
it to your hard drive
- In the SQL Server Enterprise Manager, right-click the Databases node and click
New Database...
- Type ROSH and press Enter
- In the left frame, right-click ROSH, position the mouse on All
Tasks and click Import Data
- On the first page of the wizard, click Next
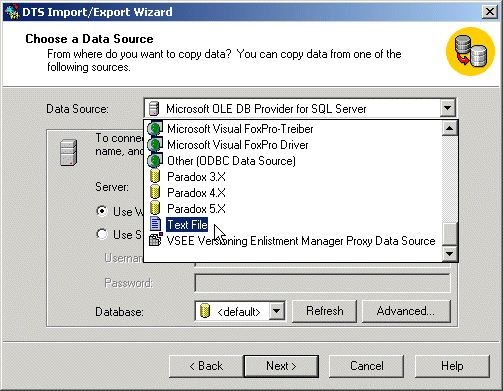
- On the second page, click the arrow of the Data Source combo box and
select Text File:
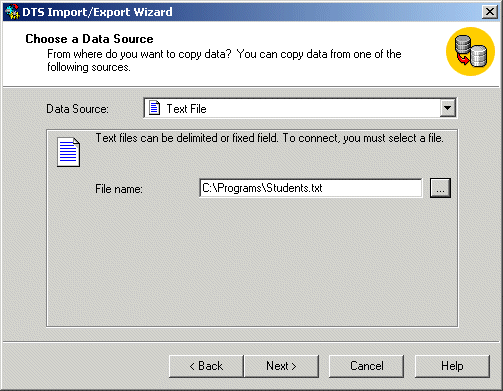
- Click the button on the right side of the File Name edit box

- Locate the folder where you saved the Students text file. Select the
file and press Enter:
- Click Next
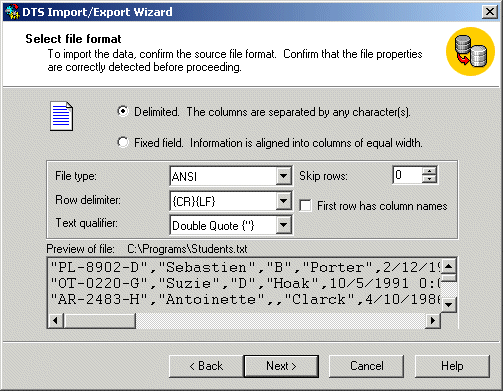
- On the third page, make sure the file is type ANSI and the Row
Delimiter is the Carriage Return-Line Feed ({CR}{LF}) and accept all
other defaults. Click Next

- On the fourth page, accept all defaults and click Next.
- On the fifth page, make sure that the Destination is SQL Server and
the destination Database is HighSchool. Then click Next
- Accept all defaults from the sixth and the seventh pages. Then click
Next.
- On the eighth page, click Finish
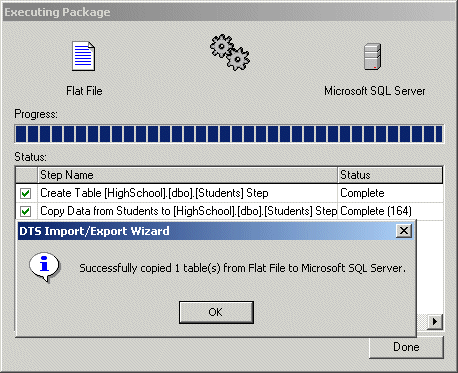
- When you receive a confirmation of "Successfully Copied, click
OK
- On the Executing Package page, click Close
- Position the mouse on Server Explorer to display it. In the Server
Explorer, expand the server, followed by the SQL Servers node,
followed by the name of the server
- In the Server Explorer, right-click the name of the server and click
Refresh.
Expand the Tables node under the ROSH database
- Right-click Students and click Design Table
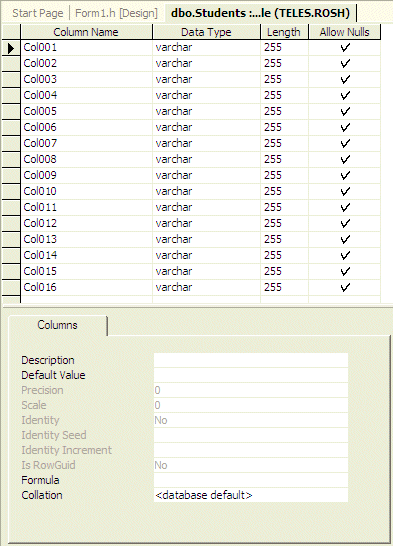
- As the first field is selected, type StudentNbr and change its
Length to 10
- Change the other columns as follows:
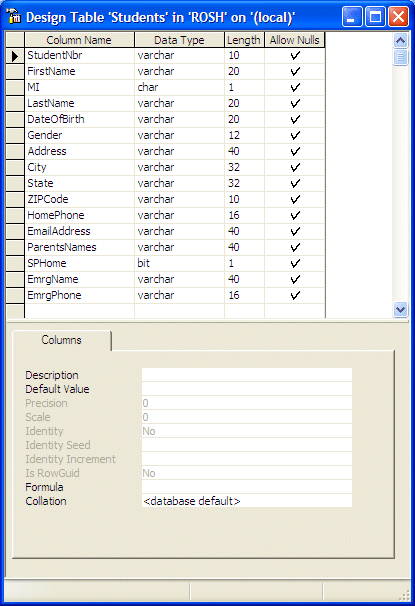
- To save the table, click the Save button on the toolbar:

- When a Validation Warnings dialog box presents a few warnings, click
Yes
- Close the table
- To view data stored on the table, in the Server Explorer,
double-click Students
- Close the table
|
When performing data entry, the records under a certain
column usually have the same value. For example, for a local database with a
table that includes an address, most employees would live in the same state and
the same country. When creating a column with a value that occurs regularly, you
can specify that value as default.
To specify the default value in the SQL Server Enterprise
Manager or the Server Explorer, display the table is design view. To proceed,
first click the column in the top section of the table. Then, in the lower
section, click Default Value and type the desired value in single-quotes. Here
is an example:

To specify the default value in a SQL statement, when
creating the column, before the semi-colon or the closing parenthesis of the
last column, assign the desired value to the DEFAULT keyword. Here are
examples:
-- =============================================
-- Database: Sydney University
-- Table:    StaffMembers
-- =============================================
IF EXISTS(SELECT name
	  FROM 	 sysobjects
	  WHERE  name = N'StaffMembers'
	  AND 	 type = 'U')
    DROP TABLE StaffMembers
GO

CREATE TABLE StaffMembers (
FullName VARCHAR(50),
Address VARCHAR(80),
City VARCHAR(40),
State VARCHAR(40) DEFAULT = 'NSW',
PostalCode VARCHAR(4) DEFAULT = '2000',
Country VARCHAR(20) DEFAULT = 'Australia')
GO
If you are creating the table in a Windows Forms
Application, use the same rules of the SQL statement and create the table as we
have done already.
After creating the table, the user doesn't have to provide a
value for a column that has a default. If the user doesn't provide the value,
the default would be used when the record is saved.
 |
If the user provides a value for a column that has a
default value and then deletes the value, the default value rule would not
apply anymore: The field would simply become empty |
 |
If you create a Windows Forms Application and provide
a form that allows the user to perform data entry for a table using a
form, the default values for columns would not display in the Windows
control. When writing your code, you can omit passing the values for the
columns that have default values. In this case, the SQL interpreter, not
the C++ compiler would use the default values for the columns you omit. |
|
 Practical
Learning: Setting Default Values Practical
Learning: Setting Default Values
|
|
- In the design view of the table and in the top section, click Gender
- In the lower section, click Default Value and type 'Unknown'
- In the top section, click State
- In the lower section, click Default Value and type 'MD'
- Save the table
|
Constraints in Data Entry |
|
A constraint in a database is a rule used to apply
restrictions on what is allowed and what is not allowed in the application. To
assist you in creating
an effective database, the
SQL provides various types of constraints you can apply to your table(s).
|
During data entry, users of your database will face
fields that expect data. Sometimes, for one reason or another, data will
not be available for a particular field. An example would be an MI (middle
initial) field: some people have a middle initial, some others either
don't have it or would not provide it to the user. This aspect can occur
for any field of your table. Therefore, you should think of a way to deal
with it.
A field is referred to as null when no data entry has
been made to it:
- Saying that a field is null doesn't mean that it contains 0 because
0 is a value.
- Saying that a field is null doesn't mean that it is empty. A field
being empty could mean that the user had deleted its content or that
the field itself would not accept what the user was trying to enter
into that field, but an empty field can have a value.
A field is referred to as null if there is no way of
determining its value or its value is simply unknown. As you can see, it is
not a good idea to have a null field in your table. As a database
developer, it is your responsibility to always know with certainty the
value held by each field of your table. Remember that even if a field is
empty, you should know what value it is holding because being empty could
certainly mean that the field has a value.
To solve the problem of null values, the SQL
proposes one of two options: allow or not allow null values on a field.
For a typical table, there are pieces of information that the user should
make sure to enter; otherwise, her data entry would not be validated. To
make sure the user always fills out a certain field before moving to the
next field, you must make sure the field doesn't allow null values; this
will ensure that you know that the field is holding a value and,
eventually, you can
find out what that value is.
To apply nullity rules in SQL Server Enterprise
Manager or Server Explorer, first display the table in the design view. To
get it, in the SQL Server Enterprise Manager, you can right-click the
table and click Design Table. In the Server Explorer of Microsoft Visual
Studio .NET, you can right-click the table and click Design Table.
Once in the Design Table window, you can click or
clear the Allow Nulls
check box that corresponds to the column. On the other hand, if the value of a field is not
particularly important, for example if you don't intend to involve that
value in an algebraic operation, you can allow the user to leave it null.
This is done by checking the Allow Nulls check box for the field.
Here is an example of a table in which the CategoryID
and the Picture columns would not Allow Nulls but the the CategoryName and
the Description columns would:

To control the nullity of a column with a SQL
statement, you can use NULL, NOT NULL, or omit it. |
|
 Practical
Learning: Controlling Nullity Practical
Learning: Controlling Nullity
|
|
- In the Server Explorer, right-click Students and click Design Table
- Under the Allow Nulls column, remove the check boxes the correspond to the
StudentNbr and the LastName columns
- Save the table
When updating a record and changing a value, just
like the user can make a mistake and change the wrong value, you too can.
Consider the following table:
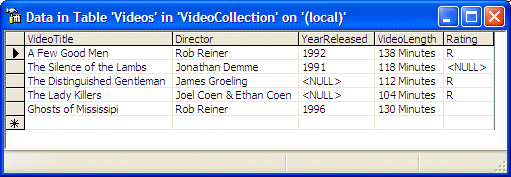
Imagine you ask the user to open this table and, for the video that is rated R,
to change the name of the director to Jonathan Lynn. The user would be confused because there is more than
one video that is rated R. This means that you should use the most restrictive
criterion to locate the record. In future lessons, when we study data analysis,
we will review other operators you can use, such as asking the user to locate
the video whose title is "The Distinguished Gentleman" AND whose
director is Jonathan Lynn.
To be able to uniquely identify each record, you can create
a special column and make sure that each value under that column is unique. You
have two main options. You can put the responsibility on the user to always
provide a unique value. For example, if the table includes records of students
of a school, since each student must have a student number and that number must
be unique from one student to another, you can ask the user to make sure of this
during data entry. What if the user forgets? What if the user cannot get that
number at the time of data entry? What if that number can only be generated by
the administration but only after the student has been registered? Based on
this, an alternative is to ask the SQL interpreter to automatically generate a
new and unique number for each record.
A column whose values are automatically generated by the
database engine is referred to as an identity column. An identity column can
have only a numeric-based data type: bigint, decimal, int, numeric,
smallint, or tinyint.
To create an identity column, if you are working the SQL
Server Enterprise Manager or the Server Explorer, in the Design Table window, in
the top section of the table, create the column by specifying its name and data
type as one of the above. Then, in the lower section, set the Identify field to
Yes from its default No. Here is an example:
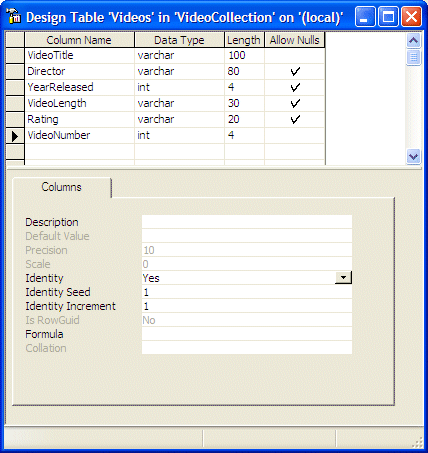
If you are working from a SQL statement, to create an
identity column, when creating the table, after the name of the column and
before the semi-colon or the closing parenthesis of the last column, enter IDENTITY(),.
After setting the Identity to Yes, you must
then specify where the numeric counting would start. By default, this number is
set to 1, meaning the first record would have a number of 1, the second would
have a number of 2, and so on. If you want, you can ask the interpreter to start
with a different number.
To specify the starting value of the identity column, if you
are working in the Design Table window, in the lower section of the table, enter
the desired value in the Identity Seed field. Here is an example:
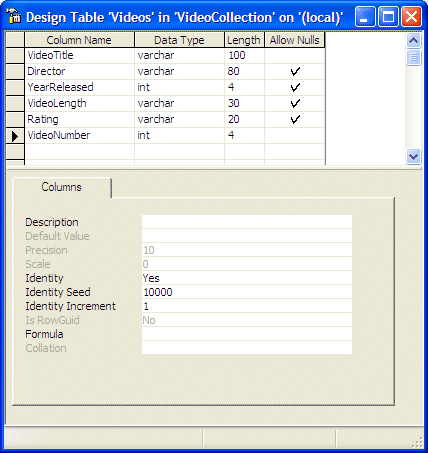
If you are working with a SQL statement, to specify the
starting value of the identity column, enter the desired number in the
parentheses of the IDENTITY keyword.
After the starting value of the identity column has been
set, you can specify how much value would be added to the values of the column
with each new record. By default, each previous number would be incremented by
1. If you want a different value, you can change it from 1.
To specify the incrementing value of an identity column, if
you are working a Design Table window, in the lower portion of the table, enter
the desired value in the Identity Increment field. If you are working with a SQL
statement, to specify the incrementing value, enter it as the second argument of
the IDENTITY keyword. Here is an example:
-- =============================================
-- Database: Sydney University
-- Table:    StaffMembers
-- =============================================
IF EXISTS(SELECT name
	  FROM 	 sysobjects
	  WHERE  name = N'StaffMembers'
	  AND 	 type = 'U')
    DROP TABLE StaffMembers
GO

CREATE TABLE StaffMembers (
StaffNumber int IDENTITY(1,1),
FullName VARCHAR(50) NOT NULL,
Address VARCHAR(80),
City VARCHAR(40),
State VARCHAR(40) NULL DEFAULT = 'NSW',
PostalCode VARCHAR(4) DEFAULT = '2000',
Country VARCHAR(20) DEFAULT = 'Australia')
GO
|
 Practical
Learning: Adding an Auto-Incrementing Column Practical
Learning: Adding an Auto-Incrementing Column
|
|
- Right-click anywhere in the StudentNbr line and click Insert Column
- In the new empty column, set the name to StudentNumber
- Set the Data Type to int
- In the lower section of the table, double-click the No value of Identifier
to change it to Yes.
Notice that the Identity Seed and the Identity Increment have been set to 1
- Close the table
- When asked whether you want to save, click Yes
We have seen that an identity column is used to make sure
that a table has a certain column that holds a unique value for each record. In
some cases, you can use more than one column to uniquely identify each record. For
example, on a table that holds the list of employees of a company, you can use
both the employee number and the social security number to uniquely identity
each record.
In our description of the identity column, we saw that it
applied only to one column; but we also mentioned that a more that one column
could be used to uniquely identity each record. The column or the combination of
columns used to uniquely identity each column is called a primary key.
If you are creating a table in the Design Table window of
the SQL Server Enterprise Manager or from the Server Explorer of Microsoft
Visual Studio .NET, to indicate the column that would be used as the primary
key, first click the name of the column. Then, on the toolbar, click the Primary
Key button  . You
can also right-click the desired column and click Primary Key. The button on the
left side of the name of the column would become equipped with a key icon. By tradition, which is not a rule, the name of
the column used as the primary key of a table ends with ID. For example, instead
of the column being named StaffNumber, it would be named
StaffMemberID or something like that. . You
can also right-click the desired column and click Primary Key. The button on the
left side of the name of the column would become equipped with a key icon. By tradition, which is not a rule, the name of
the column used as the primary key of a table ends with ID. For example, instead
of the column being named StaffNumber, it would be named
StaffMemberID or something like that.
To specify that more than one column would be used as the
primary key, first select them. To do this, you can click the left gray button
of one of the column, press Ctrl, and click the left gray button of each of the
other columns that would be involved. After selecting the column, on the
toolbar, click the Primary button  .
You can also right-click one of the selected columns and click Primary Key. .
You can also right-click one of the selected columns and click Primary Key.
|
 Practical
Learning: Indicating the Primary Key of a Table Practical
Learning: Indicating the Primary Key of a Table
|
|
- Change the name of the first column from StudentNumber to StudentID
- Right-click it and click Primary Key
- Save and close the table
When performing data entry, in some columns, even
after indicating the types of values you expect the user to provide for a
certain column, you may want to restrict a range of values that are allowed.
This is done using the CHECK constraint.
|
|

