|
It used to be an arduous process to create a database using
Microsoft ActiveX Data Objects (ADO). You had to know a great deal of the ADOX
and ADO libraries. When Microsoft developed the .NET Framework and the new
process of creating a database through the ADO.NET technique, database
development was significantly simplified but you were still required to write
some code to perform some of the routine operations.
As implemented in Microsoft Visual Studio 2005, ADO.NET has
become even easier, so easy that you can create a complete functional graphical
database with little or no code. To illustrate this, we will create an
application that would help a company that rents cars.
We will start our database with the list of employees of the
company, who are people who process daily rental transactions.
|
 Practical Learning: Introducing the Application
|
|
- To start the database, click Start -> All Programs -> Microsoft SQL
Server 2005 -> SQL Server Management Studio
- Select or accept the Server Type, the Server Name, and the Authentication
- Click Connect
- Expand the Databases node
- To create a new database, right-click the Databases node and click New
Database...
- Set the database name to bcr (which stands for Bethesda Car Rental)
and accept the default owner or change it
- Click OK
- Expand the bcr node and the Tables node under it
- To create a new table, right the Tables node under bcr and click New
Table...
- Set the first column name to EmployeeID
- Set its Data Type to int
- In the lower section, expand Identity Specification and set the (Is
Identify) field to Yes
- On the Table Designer toolbar, click the Set Primary Key button
- Complete the table with the following columns
| Column Name |
Data Type |
Allow Nulls |
| EmployeeID |
int |
|
| FirstName |
varchar(30) |
|
| LastName |
varchar(30) |
Uncheck |
| Title |
varchar(50) |
|
| HourlySalary |
decimal(8,2) |
|
- Save the table as Employees and close it
- In the Object Explorer, right-click dbo.Employees and click Open Table
- Create the following records:
| EmployeeID |
FirstName |
LastName |
Title |
HourlySalary |
| 1 |
Patricia
|
Katts
|
Regional Manager
|
28.45
|
| 2 |
Julienne
|
Mukoko
|
Sales Manager
|
26.65
|
| 3 |
Bertrand
|
Yamaguchi
|
Sales Representative
|
12.85
|
| 4 |
Hermine
|
Calhoun
|
Sales Representative
|
11.95
|
- Close the table
- Microsoft Visual C++ 2005 or Microsoft Visual Studio
- Create a Windows Application named bcr1
- To change the name of the form, in the Solution Explorer, right-click
Form1.cs and click Rename
- Type Central.cs and press Enter
- To create a new form, on the main menu, click Project -> Add Windows
Form...
- Set the name to Employees and click Add
- On the main menu, click Data -> Show Data Sources
- Click Add New Data Source...
- In the
first page of the Data Source Configuration Wizard, make sure that Database
is selected and click Next
- If a bcr connection appears in the combo box,
fine; if not, click New Connection and create a connection to the bcr
database. Click Next
- Change the name of the connection string to strBCRConnection and
click Next
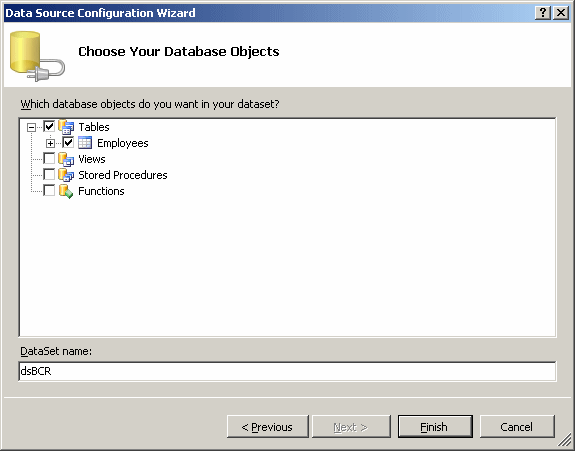
- Expand the Tables node and click the check box of Employees
- Change the DataSet Name to dsBCR

- Click Finish
- In the Data Sources window, click Employees and click the arrow of its
combo box to select DataGridView (it should be selected already as the
default).
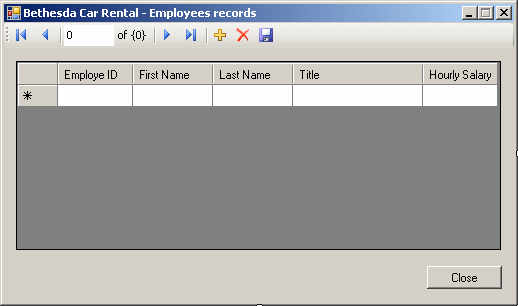
Drag the Employees node and drop it on the form
- While the DataGridView control is still selected on the form, in the
Properties window, click the ellipsis of the Columns field and make the
following changes:
| Selected Columns |
HeaderText |
Width |
| EmployeeID |
Employee ID |
75 |
| FirstName |
First Name |
80 |
| LastName |
Last Name |
80 |
| Title |
|
130 |
| HourlySalary |
Hourly Salary |
75 |
- Click OK
- Set DataGridView's Anchor property to Top, Bottom, Left, Right
- Under the DataGridView control, add a button and set its properties as
follows:
Text: Close
(Name): btnClose
Anchor: Bottom, Right

- Double-click the Close button and implement its even as follows:
private void btnClose_Click(object sender, EventArgs e)
{
     Close();
}
- Access the Central form
- Add a button to it and set its properties as follows:
Text: Employees
(Name): btnEmployees
- Double-click the Employees button and implement its even as follows:
private void btnEmployees_Click(object sender, EventArgs e)
{
    Employees frmEmployees = new Employees();
    frmEmployees.ShowDialog();
}
- Execute the application to test it
- Access the Employees form
- Using the + button, add the following employees:
| EmployeeID |
FirstName |
LastName |
Title |
HourlySalary |
| 5 |
Olivier |
Perez |
Personnel Manager |
24.05 |
| 6 |
Henry |
James |
Sales Representative |
12.05 |
| 7 |
Emile |
Bemba |
Sales Representative |
14.15 |

- Close the forms
|
|

