|
Although a control is usually positioned on a form, there various other
control containers that can hold a button. These include the toolbar or the
status bar, and the other containers we have used so far.
To indicate what it is used for, a button displays some text as its caption.
A button can also display a picture instead. Another button can display both a
string and a picture. When you create a button, you will decide what it should
display and how it should behave.
|
 Practical Learning: Introducing Buttons
|
|
- Start Microsoft Visual C# and create a Windows Application named Algebra2
- On the main menu, click Project -> Add Class...
- In the Templates list, make sure Class is selected.
Change the Name to Algebra and click Add
- Change the file as follows:
using System;

namespace Algebra2
{
    public class Algebra
    {
        public static long Factorial(long x)
        {
            if (x <= 1)
                return 1;
            else
                return x * Factorial(x - 1);
        }

        public static long Permutation(long n, long r)
        {
            if (r == 0)
                return 0;
            if (n == 0)
                return 0;
            if ((r >= 0) && (r <= n))
                return Factorial(n) / Factorial(n - r);
            else
                return 0;
        }

        public static long Combinatorial(long a, long b)
        {
            if (a <= 1)
                return 1;

            return Factorial(a) / (Factorial(b) * Factorial(a - b));
        }
    }
}
|
- In the Solution Explorer, right-click Form1.cs and click Rename
- Type Exercise.cs and press Enter twice (to save and to open the
form)
- Click the body of the form to make sure it is selected.
In the Properties window, change the following characteristics
FormBorderStyle: FixedDialog
Text: Factorial, Permutation, and Combination
Size: 304, 208
StartPosition: CenterScreen
MaximizeBox: False
MinimizeBox: False
- In the Containers section of the Toolbox, click TabControl and click the
form
- On the form, right-click the right side of tabPage2 and click Add Page
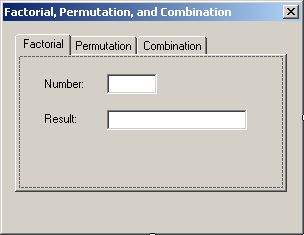
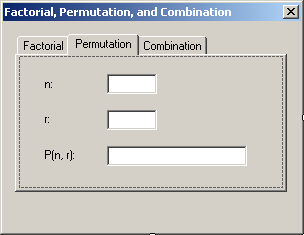
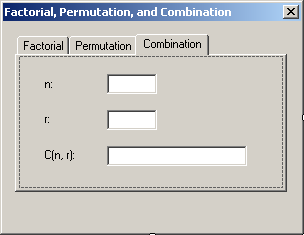
- Based on what we learned in Lesson 24, design
the form as follows:
 |
| Control |
Text |
Name |
Additional Properties |
| TabControl |
|
tclAlgebra |
HotTrack: True
Location: 12, 12
Size: 304, 235 |
| TabPage |
Factorial |
tabFactorial |
|
| Label |
Number: |
|
Location: 22, 21 |
| TextBox |
|
txtNumber |
TextAlign: Right
Location: 88, 18
Size: 50, 20 |
| Label |
Result: |
|
Location: 22, 56 |
| TextBox |
|
txtFactorial |
TextAlign: Right
Location: 88, 54
Size: 140, 20 |
|

|
| Control |
Text |
Name |
Location |
Size |
| TabPage |
Permutation |
tabPermutation |
|
|
| Label |
n: |
|
22, 21 |
|
| TextBox |
|
txtPermutationN |
88, 18 |
50, 20 |
| Label |
r: |
|
22, 56 |
|
| TextBox |
|
txtPermutationR |
88, 54 |
50, 20 |
| Label |
P(n, r): |
|
22, 92 |
|
| TextBox |
|
txtPermutation |
88, 90 |
140, 20 |
|

|
| Control |
Text |
Name |
Location |
Size |
| TabPage |
Combination |
tabCombination |
|
|
| Label |
n: |
|
22, 21 |
|
| TextBox |
|
txtCombinationN |
88, 18 |
50, 20 |
| Label |
r: |
|
22, 56 |
|
| TextBox |
|
txtCombinationR |
88, 54 |
50, 20 |
| Label |
C(n, r): |
|
22, 92 |
|
| TextBox |
|
txtCombination |
88, 90 |
140, 20 |
|
- Save the form
To support the buttons of an application, the .NET Framework provides an
abstract class named ButtonBase. The regular button of Microsoft Windows
is implemented by the Button class. At design time, to add a button to
your project, from the Common Controls section of the Toolbox, you can click the
Button and click the form or another container.
To programmatically create a button, you can declare a variable of type Button
and use the new operator to allocate memory for it. Here is an example:
using System;
using System.Drawing;
using System.Windows.Forms;

public class Exercise : System.Windows.Forms.Form
{
    Button btnResume;

    public Exercise()
    {
        InitializeComponent();
    }

    private void InitializeComponent()
    {
        btnResume = new Button();
        btnResume.Location = new Point(32, 20);

        this.Controls.Add(btnResume);
    }
}

public class Program
{
    static int Main()
    {
        System.Windows.Forms.Application.Run(new Exercise());
        return 0;
    }
}
|
 Practical Learning: Creating Buttons
|
|
- In the combo box on top of the Properties window, select tabFactorial
- From the Common Controls section of the Toolbox, click Button and click on
the right side of the top text box
|
|

