 |
Database Programming: The Foreign Key Constraint |
|
|
|
Continuing with our car rental database, imagine a
customer comes to rent a car. We already established that it would be
redundant to create new car information every time you process a new
customer order. Instead, you would get the car's information from the table
that holds data for the cars, and provide that information to the table used
to process orders. As we described earlier, the car table should be able to
provide its data to the other tables that would need that data. To make this
flow of information possible from one table to another, you must create a
relationship between them.
|
To make it possible for a table B to receive data from a
table A, the table B must have a column that represents the table A. This
columns acts as an "ambassador" or a link. As a pseudo-ambassador, the
column in the table B almost does not belong to that table: it primarily
allows both tables to communicate. For this reason, the column in the table
B is called a foreign key.
A foreign key is a column on a table whose data is
coming from another table.
|
Creating a Foreign Key in the Table Design View
|
|
To create a foreign key in the Table Design window, in
the table that will receive the key, simply create a column with the
following rules:
- The column should have the same name as the primary column of the
table it represents (but this is not a requirement)
- The column must (this is required) have the same data type as the
primary column of the table it represents
Here is an example of a column named GenderID that is a
foreign key:

Obviously in order to have information flowing from one
table to another, the table that holds the primary information must be
created. You can create it before or after creating the other table, as long
as you have not established any link between both tables, it does not matter
what sequence you use to create them.
The table that contains a primary key and that holds the
information that another table would use is called the primary table or the
parent table. The table that will receive the information from the other
table is called the foreign table or the child table.
|
Creating a
Foreign Key in the Relationships Dialog Box
|
|
To create a foreign key in a table:
- From the Object Explorer or the Server Explorer, open the child
table in Design View
- Right-click anywhere in the table and click Relationships...

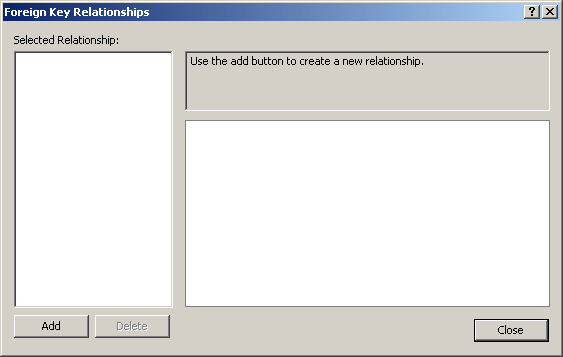
- In the Foreign Key Relationships dialog box, click Add
- A default name would be suggested to you. You can accept or change
it. To change the name of the foreign key, on the right side, expand
Identity and edit the string in the (Name) field:

- If necessary, in the same way, you can create other foreign keys by
clicking Add. To delete an existing foreign key, first select it under
Selected Relationships and click Delete.
Once you are ready, click
Close
|
Creating a
Foreign Key in SQL
|
|
You can also create a foreign key in the SQL. The basic
formula to use is:
FOREIGN KEY REFERENCES ParentTableName(ForeignKeyCcolumn)
The FOREIGN KEY expression and the REFERENCES
keyword are required. In the ParentTableName placeholder, enter the
name of the primary table that holds the information that will be accessed
in the current table. In the parentheses of ParentTableName, enter
the name of the primary column of the parent table. Here is an example:
CREATE TABLE Persons
(
    PersonID int identity(1,1) PRIMARY KEY NOT NULL,
    FirstName varchar(20),
    LastName varchar(20) NOT NULL,
    GenderID int NULL FOREIGN KEY REFERENCES Genders(GenderID)
);
|
The Foreign Key Constraint
|
|
Notice that the foreign key does not have an object name
as we saw for the primary key. If you do not specify a name for the foreign
key, the SQL interpreter would automatically create a default name for you.
Otherwise, to create a name, after creating the column, enter the
CONSTRAINT keyword followed by the desired name and continue the
rest as we saw above. Her is an example:
CREATE TABLE Persons
(
    PersonID int identity(1,1) PRIMARY KEY NOT NULL,
    FirstName varchar(20),
    LastName varchar(20) NOT NULL,
    GenderID int NULL CONSTRAINT FKGenders
                       FOREIGN KEY REFERENCES Genders(GenderID)
);
|
Establishing a Relationship
|
|
As mentioned already, a relational database is one in
which information flows from one table to another. To prepare the tables for
this, you create primary and foreign keys, which we have done so far. Once
the tables are ready, you can link them, which is referred to as creating a
relationship between two tables. If you did not create a foreign key with
SQL code, you can create it when establishing a relationship between two
tables.
To create a relationship between two tables
- Open the child table in the design view
- Right-click (anywhere in) the table and click Relationships...
If
the (necessary) foreign key does not exist, click Add and specify its
name under Identity) on the right side
- Under Selected Relationships, click the foreign key that will hold
the relationship
- On the right side, expand Tables And Columns Specification
- Click its ellipsis button

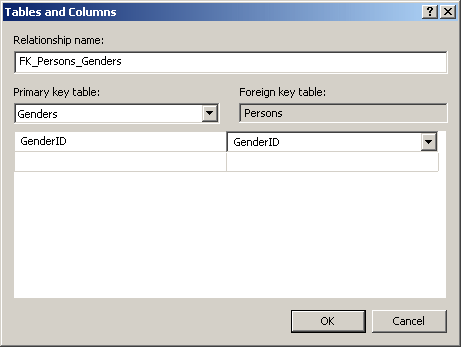
- In the Primary Key Table combo box, select the parent table that
holds the primary data
- Under the parent table, click and select its primary key column
- Under Foreign Key Table, make sure the
name of the current table is set.
Under the name of the child table,
click and select the name of the foreign key column. Here is an example:

- Click OK.
When a relationship has been created, it would show in
the Tables And Column Specification section:

- In the same way, you can create other relationships by clicking Add
and configuring the link.
Once you have finished, click Close
A diagram is a window that visually displays the
relationships among the tables of a database. To create a diagram:
- In the Object Explorer in Microsoft SQL Server Management Studio or
in the Server Explorer in Microsoft Visual Studio, in the database node,
you can click Database Diagrams
- A dialog box will inform you that this database does not have a
diagram. Read the message and click Yes
- Right-click Database Diagrams and click New Database Diagram
- In the Add Table dialog box, click each table and click the Add.
Alternatively, you can double-click a table to add it
- In the Add Table dialog box, you can click Close.
On the toolbar,
you can click the Zoom button and select a larger or smaller value.
To move a table, you can drag its title bar. Here is an example:

- To establish a relationship, you can click the gray box on the left
of any column from the parent table and drop it on any column in the
child table. A better way is to click gray box of the primary key column
from the parent table, drag that box then drop it on the foreign key
column of the child table. Here is an example:

- A Tables and Columns dialog box would come up. It would display the
column that was dragged and the column on which you dropped.
If you
had selected just any column, it would show but it may not be the one
you wanted to drag; that is, it may not be the actual column that is
supposed to manage the relationship.
Regardless, under Primary Key
Table, you should select the parent table
- Under the parent table, select its primary column
- Under Foreign Table, select the foreign key column. Here is an
example:

- Once you are ready, click OK. A link would be created between the
tables

- In the same way, you can create other relationships.
When you
have finished, you can save and close the database
Just as you add a primary key to an already created
table, you can also add a new column that is a foreign key. Consider the
following table named Persons:
CREATE TABLE Genders
(
    GenderID int identity(1, 1) not null PRIMARY KEY,
    Gender nvarchar(20)
);

CREATE TABLE Persons
(
    PersonID int identity(1,1) PRIMARY KEY NOT NULL,
    FirstName nvarchar(20),
    LastName nvarchar(20) NOT NULL
);
The formula to add a foreign key to an existing table
is:
ALTER TABLE TableName
ADD NewColumnName DataType Options
    FOREIGN KEY REFERENCES ParentTableName(ColumnNameOfOtherTable);
Here is an example of adding a foreign key to the above
Persons table:
ALTER TABLE Persons
ADD GenderID int NULL FOREIGN KEY REFERENCES Genders(GenderID);
|
|


