 |
Microsoft Visual C#: ADO.NET and the Table Adapters |
|
|
|
As its name indicates, a table adapter is an object that
gives access to a database's table. As we have seen in previous lessons, to
create a table adapter, you can use the Data Source Configuration Wizard.
|
|
 Practical
Learning: Introducing Data Sets Practical
Learning: Introducing Data Sets
|
|
- Open the Fun
Department Store 1 file (FunDS2.txt)
- Select its content and copy it
- Start Microsoft SQL Server and connect to the server
- Create a Query window and paste the code in it
- To create the database, press F5
- Start Microsoft Visual Studio
- To create a new application, on the main menu, click File -> New
Project...
- In the middle list, click Windows Forms Application
- Change the Name to FunDepartmentStore1
- Click OK
- In the Solution Explorer, right-click Form1.cs and click Rename
- Type FunDepartmentStore.cs and press Enter
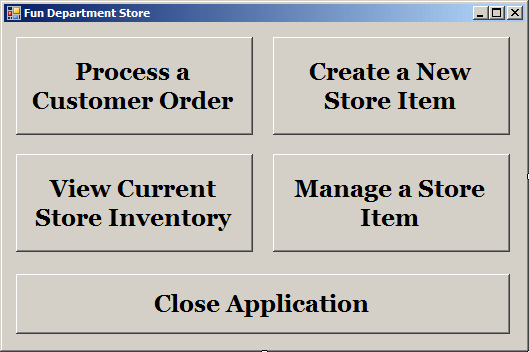
- Design the form as follows:
 |
| Control |
Text |
Name |
| Button |
 |
Process a Customer Order |
btnProcessOrder |
| Button |
 |
Create a New Store Item |
btnCreateStoreItem |
| Button |
 |
View Current Store Inventory |
btnCurrentInventory |
| Button |
 |
Manage a Store Items |
btnManageStoreItem |
| Button |
 |
Close |
btnClose |
|
- To add a new form, on the menu, click Project -> Add Windows Form...
- Set the Name to ShoppingSession and click Add
- From the Components section of the Toolbox, click Timer and click
the form
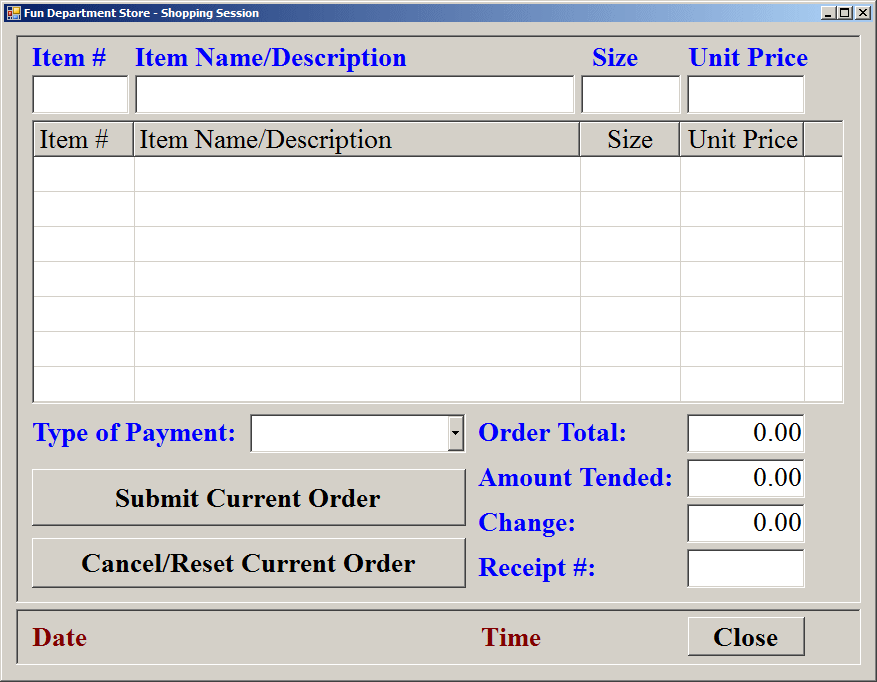
- Design the form as follows:
|
| Control |
Text |
Name |
Other Properties |
| Form |
Fun Department Store - Shopping Session |
|
ShowInTaskbar: False
StartPosition: CenterScreen |
| Panel |
|
|
BorderStyle: Fixed3D |
| Label |
Item # |
|
Font: Times New Roman, 20.25pt, style=Bold
ForeColor: Blue |
| Label |
Item Name/Description |
|
Font: Times New Roman, 20.25pt, style=Bold
ForeColor: Blue |
| Label |
Size |
|
Font: Times New Roman, 20.25pt, style=Bold
ForeColor: Blue |
| Label |
Unit Price |
|
Font: Times New Roman, 20.25pt, style=Bold
ForeColor: Blue |
| TextBox |
|
txtItemNumber |
Font: Times New Roman, 20.25pt
TextAlign: Center |
| TextBox |
|
txtItemName |
Font: Times New Roman, 20.25pt |
| TextBox |
|
txtItemSize |
Font: Times New Roman, 20.25pt |
| TextBox |
|
txtUnitPrice |
Font: Times New Roman, 20.25pt
TextAlign: Right |
| ListView |
|
lvwShoppingSession |
Anchor: Top, Bottom, Left, Right
Font: Times New
Roman, 20.25pt
FullRowSelect: True
GridLines: True
View: Details |
| |
Columns |
| (Name) |
Text |
TextAlign |
Width |
| colItemNumber |
Item # |
|
100 |
| colItemName |
Item Name/Description |
|
446 |
| colItemSize |
Size |
Center |
100 |
| colUnitPrice |
Unit Price |
Right |
124 |
|
| Label |
Type of Payment: |
|
Font: Times New Roman, 20.25pt, style = Bold
ForeColor: Blue |
| ComboBox |
|
cbxCurrencyType |
Font: Times New Roman, 20.25pt, style = Bold
Items: Cash
Check
Visa
Master Card
Store Card |
| Label |
Order Total: |
|
Font: Times New Roman, 20.25pt, style = Bold
ForeColor: Blue |
| TextBox |
|
txtOrderTotal |
Anchor: Bottom, Right
Font: Times New Roman,
20.25pt, style = Bold
Text: 0.00
TextAlign: Right |
| Label |
Order Time: |
|
Font: Times New Roman, 20.25pt, style = Bold
ForeColor: Blue |
| Label |
Order Date: |
|
Font: Times New Roman, 20.25pt, style = Bold
ForeColor: Blue |
| Label |
Amount Tended: |
|
Font: Times New Roman, 20.25pt, style = Bold
ForeColor: Blue |
| TextBox |
|
txtAmountTended |
Anchor: Bottom, Right
Font: Times New Roman,
20.25pt, style = Bold
Text: 0.00
TextAlign: Right |
| Button |
|
btnSubmitOrder |
Anchor: Bottom, Left, Right
Font: Times New
Roman, 20.25pt, style = Bold |
| Label |
Change: |
|
Font: Times New Roman, 20.25pt, style=Bold
ForeColor: Blue |
| TextBox |
|
txtChange |
Anchor: Bottom, Right
Font: Times New Roman,
20.25pt, style=Bold
Text: 0.00
TextAlign: Right |
| Label |
Receipt #: |
|
Font: Times New Roman, 20.25pt, style=Bold
ForeColor: Blue |
| TextBox |
|
txtReceiptNumber |
Anchor: Bottom, Right
Font: Times New Roman,
20.25pt, style=Bold |
| Button |
|
btnCancelOrder |
Anchor: Bottom, Left, Right
Font: Times New
Roman, 20.25pt, style=Bold |
| Button |
|
btnClose |
Anchor: Bottom, Left, Right
Font: Times New
Roman, 20.25pt, style=Bold |
| Panel |
|
|
BorderStyle: Fixed3D |
| Label |
|
lblDate |
Font: Times New Roman, 20.25pt, style=Bold
ForeColor: Blue |
| Label |
|
lblTime |
Font: Times New Roman, 20.25pt, style=Bold
ForeColor: Blue |
| Timer |
|
tmrDateTime |
Enabled: True |
|
- Double-click the timer
- Implement its event as follows:
private void tmrDateTime_Tick(object sender, EventArgs e)
{
    lblDate.Text = DateTime.Today.ToLongDateString();
    lblTime.Text = DateTime.Now.ToLongTimeString();
}
|
A Class for a Table Adapter
|
|
|
We already know how to visually create a data
set, by adding a new data source from either the main menu under
Data or the Data Sources window. We have seen various ways of doing
this using the Data Source Configuration Wizard. When the wizard
ends, a class is generated.
Remember that in the last page of the wizard,
you select one or more tables you would use from the database. When
the wizard ends, it creates a class for each table.
|
 |
The class is
based on the TypedTableBase class from the
System.Data namespace. Here is an example of how such a
class starts:
public partial class EmployeesDataTable :
			global::System.Data.TypedTableBase<EmployeesRow>
{

}
Inside the class for the table, a DataColumn
variable is declared for each column of the table. Inside the class for the
new data set, the wizard declares a variable for each table class.
Besides classes for the tables, the wizard also
generates classes referred to as table adapters. A table adapter class is
generated for each table. The class is derived from Component.
Here is an example:
public partial class EmployeesTableAdapter : global::System.ComponentModel.Component
{

}
The class includes various properties and methods that
can be used for database management and maintenance.
|
 Practical
Learning: Generating a Table Adapter Practical
Learning: Generating a Table Adapter
|
|
- On the main menu, click Data -> Add New Data Source...
- On the first page of the wizard, make sure Database is selected and
click Next
- In the second page of the wizard, make sure Dataset is selected and
click Next
- In the third page of the wizard, click New Connection...
If the
Choose Data Source dialog box comes up, click Microsoft SQL Server and
click Continue
- In the Server Name combo box, select the server or type
(local)
- In the Select or Enter a Database Name combo box, select FunDS1
- Click Test Connection
- Click OK twice
- On the Data Source Configuration Wizard, make sure the new
connection is selected
Click the + button of Connection String
- Click Next
- Change the connection string to csFunDS and click
Next
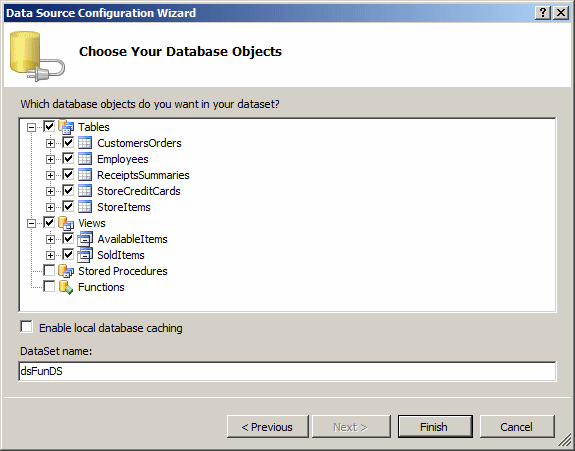
- Click the check box of Tables (to select all tables)
- Change the name of the data set to dsFunDS
- Click Finish
- In the Solution Explorer, double-click dsFunDS.Designer.cs to open
and view the file
- Execute the application
- After viewing the main form, close it
- Display the ShoppingSession form
- In the top section of the Toolbox, click dsFunDS
- Click the form
- In the top section of the Toolbox, click CustomersOrdersTableAdapter
- Click the form
- In the Properties window, change its name to
taCustomersOrders
- In the top section of the Toolbox, click
ReceiptsSummariesTableAdapter
- Click the form
- In the Properties window, change its name to
taReceiptsSummaries
- In the top section of the Toolbox, click StoreItemsTableAdapter
- Click the form
- In the Properties window, change its name to taStoreItems
|
Getting the Records of a Table Adapter
|
|
 |
When creating a table adapter, if its
corresponding table has records, it gets equipped with them and you
can use them as you see fit. To pass its records to a table, the
generated table adapter is equipped with a method named Fill.
This method takes as argument the table class that was generated, it
fills it with the records, and returns it.
To assist you with getting the records, the
table adapter class is equipped with a method named GetData.
This method takes no argument and returns an object of the table
class type that was generated. Here is an example of calling this
method:
|
private void btnLoadCustomers_Click(object sender, EventArgs e)
{
    dgvCustomers.DataSource = taCustomers.GetData();
}
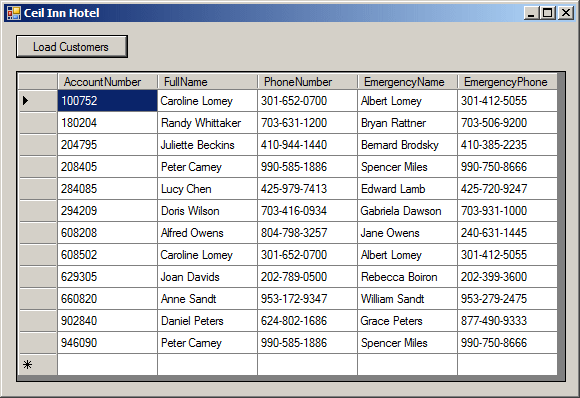
Remember that the GetData() method
returns a table adapter class that inherits from the DataTable.
Thanks to this, GetData() gives you access to regular
operations performed on a table.
|
 Practical
Learning: Getting the Records Practical
Learning: Getting the Records
|
|
- To add another form, on the main menu, click Project -> Add Windows
Form
- Set the Name to CurrentStoreInventory
- Click Add
- In the top section of the Toolbox, click dsFunDS
- Click the form
- In the top section of the Toolbox, click StoreItemsTableAdapter
- Click the form
- In the Properties window, change its name to taStoreItems
- Design the form as follows:
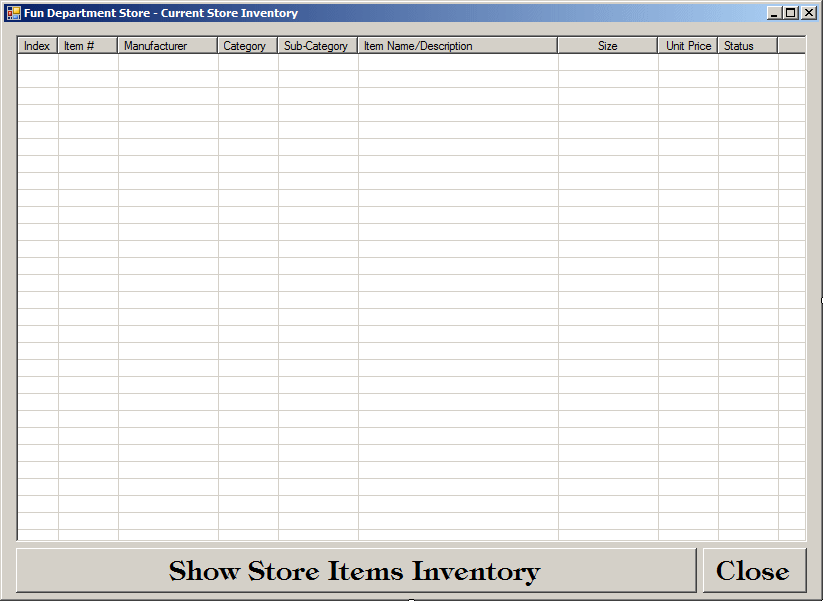
| Control |
Text |
Name |
Other Properties |
| ListView |
|
lvwStoreItems |
Anchor: Top, Bottom, Left, Right
FullRowSelect: True
GridLines: True
View: Details |
| |
Columns |
| (Name) |
Text |
TextAlign |
Width |
| colIndex |
Index |
|
|
| colItemNumber |
Item # |
|
80 |
| colManufacturer |
Manufacturer |
|
100 |
| colCategory |
Category |
|
|
| colSubCategory |
Sub-Category |
|
80 |
| colItemName |
Item Name/Description |
|
200 |
| colItemSize |
Size |
Center |
100 |
| colUnitPrice |
Unit Price |
Right |
|
| colSaleStatus |
Status |
|
|
|
| Button |
Show Store Items Inventory |
btnShowCurrentInventory |
Anchor: Bottom, Left, Right |
| Button |
Close |
btnClose |
Anchor: Bottom, Right |
- Double-click the Show Store Items Inventory button and implement its
Click event as follows:
private void btnShowCurrentInventory_Click(object sender, EventArgs e)
{
    for (int i = 0; i < taStoreItems.GetData().Rows.Count; i++)
    {
        DataRow rcdStoreItem = taStoreItems.GetData().Rows[i];

        ListViewItem lviStoreItem = new ListViewItem((i + 1).ToString());
        lviStoreItem.SubItems.Add(rcdStoreItem["ItemNumber"].ToString());
        lviStoreItem.SubItems.Add(rcdStoreItem["Manufacturer"].ToString());
        lviStoreItem.SubItems.Add(rcdStoreItem["Category"].ToString());
        lviStoreItem.SubItems.Add(rcdStoreItem["SubCategory"].ToString());
        lviStoreItem.SubItems.Add(rcdStoreItem["ItemName"].ToString());
        lviStoreItem.SubItems.Add(rcdStoreItem["ItemSize"].ToString());
        lviStoreItem.SubItems.Add(
            double.Parse(rcdStoreItem["UnitPrice"].ToString()).ToString("F"));
        lviStoreItem.SubItems.Add(rcdStoreItem["SaleStatus"].ToString());
        lvwStoreItems.Items.Add(lviStoreItem);
    }
}
- Return to the form and double-click the Close button
- Implement it as follows:
private void btnClose_Click(object sender, EventArgs e)
{
    Close();
}
- Close the CurrentStoreInventory.cs tab
- Close the CurrentStoreInventory.cs [Design] tab
- Show the Central form
- Double-click the View Current Store Inventory
- Implement its Click event as follows:
private void btnCurrentInventory_Click(object sender, EventArgs e)
{
    CurrentStoreInventory csi = new CurrentStoreInventory();
    csi.ShowDialog();
}
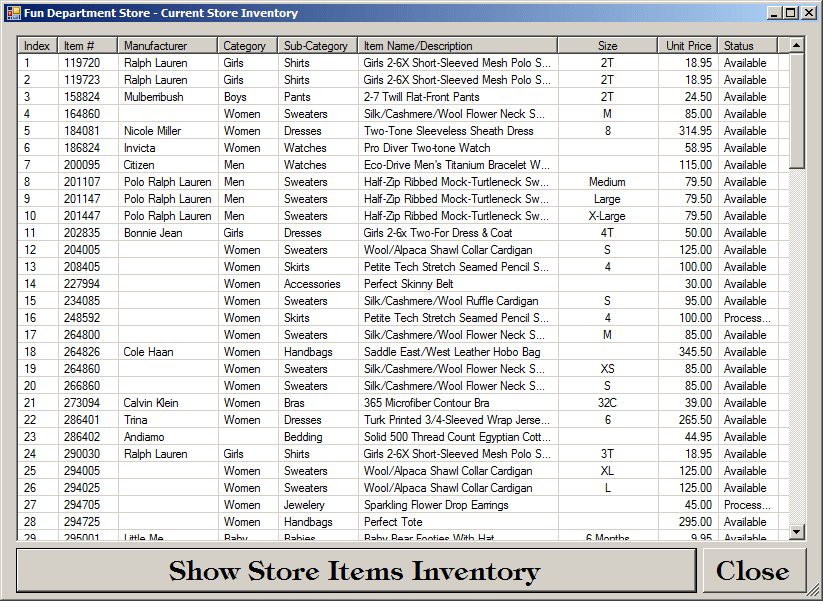
- Press Ctrl + F5 to execute
- Open the Current Inventory form
- Click the Show Store Items Inventory button
- Close the forms and return to your programming environment
|
Operations on a Table Adapter
|
|
 |
Among the characteristics that a table adapter
provides is a connection object. To give you access to the
connection the table adapter is using, the generated class is
equipped with a property named Connection and that is of type
SqlConnection. Here is an example of getting that
connection:
private void btnConnection_Click(object sender, EventArgs e)
{
    MessageBox.Show(taCustomers.Connection.ToString());
}
|
You can use the connection object to get such
information as the name of the server or the connection string. Here is an
example:
private void btnConnection_Click(object sender, EventArgs e)
{
    MessageBox.Show(taCustomers.Connection.ConnectionString);
}
The generated table adapter class is equipped with a
property named Adapter. This property is of type
SqlDataAdapter. It gives you access to some operations that can be
performed on a data adapter. Once a table contains records, you may be
interested in finding a value. To do this, you can use Transact-SQL through
the Adapter property of the table class that was genereated. Remember that
the Adapter property is of type SqlDataAdapeter. This means
that it is equipped with the SelectCommand property that
itself is of type SqlCommand. The SqlCommand
class is equipped with the CommandText property. This is
the property you would assign the Transact-SQL statement to.
|
Locating a Record Based on a Column
|
|
We mentioned that the table class generated by the
wizard provides the normal characteristics of a DataTable.
This means that it gives you access to the records of the table. This is
possible because the class inherits the Rows property from
its ancestor. As you may recall, the DataTable.Rows
property is of type DataRowCollection.
To locate a record, you can use a column name. To
support this, the data row is equipped with an Item indexed property that
takes a column name as parameter.
|
 Practical
Learning: Locating a Record Based on a Column Name Practical
Learning: Locating a Record Based on a Column Name
|
|
- Display the ShoppingSession form
- Double-click the Cancel/Reset Current Order button
- Implement its event as follows:
using System;
using System.Collections.Generic;
using System.ComponentModel;
using System.Data;
using System.Drawing;
using System.Linq;
using System.Text;
using System.Windows.Forms;
using System.Data.SqlClient;

namespace DepartmentStore1
{
    public partial class ShoppingSession : Form
    {
        // This variable will represent the receipt number
        int receiptNumber;
        // This variable will represent the total value of the shopping
        double totalOrder;

        public ShoppingSession()
        {
            InitializeComponent();
        }

        private void btnCancelOrder_Click(object sender, EventArgs e)
        {
            // First reset the form
            totalOrder = 0.00;
            txtItemNumber.Text = "";
            txtItemName.Text = "";
            txtUnitPrice.Text = "0.00";
            lvwShoppingSession.Items.Clear();
            txtOrderTotal.Text = "0.00";
            txtAmountTended.Text = "0.00";
            txtChange.Text = "0.00";

            if (taCustomersOrders.GetData().Rows.Count > 0){
                foreach (DataRow rcdCustomerOrder in taCustomersOrders.GetData().Rows)
                    receiptNumber = int.Parse(rcdCustomerOrder["ReceiptNumber"].ToString()) + 1;
            }

            txtReceiptNumber.Text = receiptNumber.ToString();
        }
    }
}
- Return to the Shopping Session form and double-click an unoccupied
area of its body (outside of any group box)
- Implement its event as follows:
private void ShoppingSession_Load(object sender, EventArgs e)
{
    totalOrder = 0.00;
    receiptNumber = 100000;
    btnCancelOrder_Click(sender, e);
}
|
Locating a Record Using the DataRowCollection's
Find
|
|
|
The table adapter provides many flexible methods
and properties that allow you to get various pieces of information
about its table. For example, you can use it to locate a record
using various techniques such as the index of a record followed by
the name of a column. Here is an example that gets to the second
record and its column named FullName:
|
 |
private void btnConnection_Click(object sender, EventArgs e)
{
    MessageBox.Show(taCustomers.GetData().Rows[2]["FullName"].ToString());
}
The DataRowCollection class is equipped
with a method named Find. You can call this method through
the table adapter variable to locate a record. Here is an example:
private void btnConnection_Click(object sender, EventArgs e)
{
    MessageBox.Show(taCustomers.GetData().Rows.Find("608208")["AccountNumber"].ToString());
}
|
 Practical
Learning: Finding a Record Practical
Learning: Finding a Record
|
|
- Return to the ShoppingSession form (the ShoppingSession.cs [Design]
tab)
- On the form, click the Item # text box
- In the Properties window, click Events
- Double-click Leave
- Implement the event as follows:
private void txtItemNumber_Leave(object sender, EventArgs e)
{
    double unitPrice = 0.00;

    if (txtItemNumber.Text == "")
    {
        return;
    }

    try
    {
        DataRow rcdStoreItem =
	    taStoreItems.GetData().Rows.Find(txtItemNumber.Text);

        txtItemName.Text = rcdStoreItem["ItemName"].ToString();
        txtItemSize.Text = rcdStoreItem["ItemSize"].ToString();
        unitPrice = double.Parse(rcdStoreItem["UnitPrice"].ToString());

        totalOrder = totalOrder + unitPrice;
        txtUnitPrice.Text = unitPrice.ToString("F");

        ListViewItem lviStoreItem = new ListViewItem(txtItemNumber.Text);
        lviStoreItem.SubItems.Add(txtItemName.Text);
        lviStoreItem.SubItems.Add(txtItemSize.Text);
        lviStoreItem.SubItems.Add(unitPrice.ToString("F"));
        lvwShoppingSession.Items.Add(lviStoreItem);

        txtOrderTotal.Text = totalOrder.ToString("F");

        txtItemNumber.Text = "";
        txtItemName.Text = "";
        txtItemSize.Text = "";
        txtUnitPrice.Text = "0.00";
        txtItemNumber.Focus();
    }
    catch (NullReferenceException)
    {
        MessageBox.Show("There is no store item with that number");
    }
    catch (IndexOutOfRangeException)
    {
        MessageBox.Show("There is no store item with that number");
    }
}
- Return to the Shopping Session form and click the Amount Tended text
box
- In the Events section of the Properties window, double-click Leave
- Implement the event as follows:
private void txtAmountTended_Leave(object sender, EventArgs e)
{
    double totalOrder = 0.00;
    double amountTended = 0.00;
    double change = 0.00;

    try
    {
        totalOrder = double.Parse(txtOrderTotal.Text);
        amountTended = double.Parse(txtAmountTended.Text);
        change = amountTended - totalOrder;

        txtChange.Text = change.ToString("F");
        btnSubmitOrder.Focus();
    }
    catch (FormatException)
    {
        MessageBox.Show("Invalid Value!",
                        "Fun Department Store",
                        MessageBoxButtons.OK, MessageBoxIcon.Information);
    }
}
- Return to the Central form
- Double-click the Process a Customer Order
- Implement its Click event as follows:
private void btnProcessOrder_Click(object sender, EventArgs e)
{
    ShoppingSession shop = new ShoppingSession();
    shop.ShowDialog();
}
- To create a new form, on the main menu, click Project -> Add Windows
Form...
- Set the Name to ManageStoreItem and click Add
- In the top section of the Toolbox, click dsFunDS
- Click the form
- In the top section of the Toolbox, click StoreItemsTableAdapter
- Click the form
- In the Properties window, change its name to taStoreItems
- Design the form as follows:
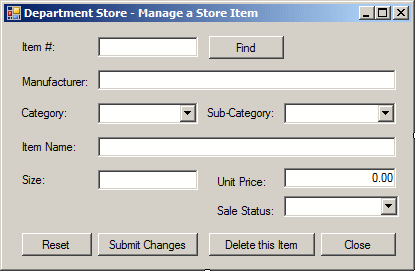 |
| Control |
Text |
Name |
Other Properties |
| Label |
Item #: |
|
|
| TextBox |
|
txtItemNumber |
|
| Button |
Find |
btnFind |
|
| Label |
Manufacturer: |
|
|
| TextBox |
|
txtManufacturer |
|
| Label |
Category: |
|
|
| ComboBox |
|
cbxCategories |
Items: Men
Girls
Boys
Babies
Women
Other |
| Label |
Sub-Category: |
|
|
| ComboBox |
|
cbxSubCategories |
Items:
Skirts
Pants
Shirts
Shoes
Beauty
Dresses
Clothing
Sweater
Watches
Handbags
Miscellaneous |
| Label |
Item Name: |
|
|
| TextBox |
|
txtItemName |
|
| Label |
Size: |
|
|
| TextBox |
|
txtItemSize |
|
| Label |
Unit Price: |
|
|
| TextBox |
|
txtUnitPrice |
Text: 0.00
TextAlign: Right |
| Label |
Sale Status: |
|
|
| ComboBox |
|
cbxSaleStatus |
Items:
Available
Sold
Processing
Other |
| Button |
Reset |
btnReset |
|
| Button |
Submit Changes |
btnSubmitChanges |
|
| Button |
Delete this Item |
btnDeleteStoreItem |
|
| Button |
Close |
btnClose |
|
|
- Double-click the Reset button
- Implement the event as follows:
private void btnReset_Click(object sender, EventArgs e)
{
    txtItemNumber.Text = "";
    txtManufacturer.Text = "";
    cbxCategories.Text = "Women";
    txtItemName.Text = "";
    txtItemSize.Text = "";
    txtUnitPrice.Text = "0.00";
    txtManufacturer.Focus();
}
- Return to the form
- Double-click the Find button
- Implement its event as follows:
private void btnFind_Click(object sender, EventArgs e)
{
    double unitPrice = 0.00;

    if (txtItemNumber.Text == "")
    {
        return;
    }

    try
    {
        DataRow rcdStoreItem =
		taStoreItems.GetData().Rows.Find(txtItemNumber.Text);

        txtItemName.Text = rcdStoreItem["ItemName"].ToString();
        txtManufacturer.Text = rcdStoreItem["Manufacturer"].ToString();
        cbxCategories.Text = rcdStoreItem["Category"].ToString();
        cbxSubCategories.Text = rcdStoreItem["SubCategory"].ToString();
        txtItemName.Text = rcdStoreItem["itemName"].ToString();
        txtItemSize.Text = rcdStoreItem["ItemSize"].ToString();
        unitPrice = double.Parse(rcdStoreItem["UnitPrice"].ToString());
        txtUnitPrice.Text = unitPrice.ToString("F");
        cbxSaleStatus.Text = rcdStoreItem["SaleStatus"].ToString();
    }
    catch (NullReferenceException)
    {
        MessageBox.Show("There is no store item with that number",
                        "Fun Department Store",
                        MessageBoxButtons.OK, MessageBoxIcon.Information);
        btnReset_Click(sender, e);

    }
    catch (IndexOutOfRangeException)
    {
        MessageBox.Show("There is no store item with that number",
                        "Fun Department Store",
                        MessageBoxButtons.OK, MessageBoxIcon.Information);
        btnReset_Click(sender, e);
    }
}
- Display the Central form
- Double-click the Manage Store Item
- Implement the event as follows:
private void btnManageStoreItem_Click(object sender, EventArgs e)
{
    ManageStoreItem msi = new ManageStoreItem();
    msi.ShowDialog();
}
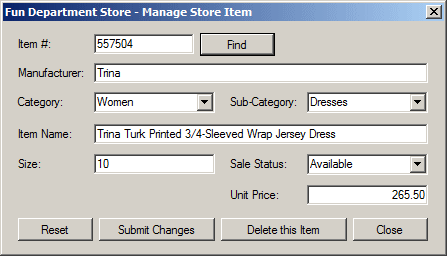
- Press Ctrl + F5 to execute
- Display the Manage Store Item form
- In the Item # text box, typer 557504
- Click Find
- Enter 294725
- Click Find
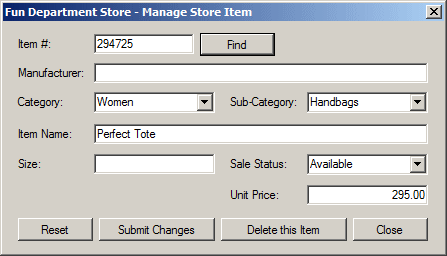
- Close the forms and return to your programming environment
One of the most fundamental operations you can
perform on a table adapter consists of creating a new record. To
assist you with this, the table adapter class that the wizard
generates is equipped with a method named Insert.
This method takes one or more arguments depending on its table. This
means that it takes an argument for each column of its table. To
create a record for the table, call this method and pass the value
of the columns observing the following rules:
- You must pass a value for each column
- You can specify a value only for a column that exists on the
table
- You must pass the values in the order they appear in the
table
- If you don't have a value for a column, pass it as null
- You must pass a value in the appropriate type: int,
string, decimal, etc. Because
this is a C# class, the values must be passed in C# types
- Don't assign a value to a column whose records must be
automatically specified. This is the case for a primary key
column with an identity property
- Don't assign a value to a column whose records are specified
by an expression
- Observe all check constraints
- If a column has a UNIQUE characteristic,
you must not give it a value that exists already in the table
|
 |
Here is an example:
private void btnAddNewRecord_Click(object sender, EventArgs e)
{
     taCustomers.Insert("204080", "Arsene Forland",
                        "(022) 197-0095", "Clint",
			"(048) 927-1153");
}
|
Updating or Editing a Record
|
|
Editing a record consists of changing one or more of its
values. To programmatically do this, you must first locate and open the
record. Then change the necessary value(s). After doing this, if you want to
apply the change to the table, you must update it. To assist you with this,
the generated table adapter is equipped with the Update()
method. This method is overloaded with four versions: one for a data set,
one for a data table, one for a record (a data row), and one for an array of
records (a DataRow[] array). Therefore, after making the
changes on either a record, some records, or a table, call the appropriate
version of the method to apply the changes. Here is an example:
private void btnUpdate_Click(object sender, EventArgs e)
{
    DataRow customer = taCustomers.GetData().Rows.Find("204080");

    customer["EmergencyName"] = "Alexander";
    customer["EmergencyPhone"] = "Balm";

    taCustomers.Update(customer);
}
|
 Practical
Learning: Adding and/or Updating a Record Practical
Learning: Adding and/or Updating a Record
|
|
- Display the Shopping Session form
- Double-click the Submit Current Order button
- Implement its event as follows:
private void btnSubmitOrder_Click(object sender, EventArgs e)
{
    if (lvwShoppingSession.Items.Count == 0)
    {
        MessageBox.Show("There is no record to create.");
        return;
    }

    // Add the list of items to the CustomersOrders table
    try
    {
        for (int i = 0; i < lvwShoppingSession.Items.Count; i++)
        {
            taCustomersOrders.Insert(receiptNumber.ToString(),
                                     lblDate.Text,
                                     lblTime.Text,
                                     lvwShoppingSession.Items[i].Text,
                                 lvwShoppingSession.Items[i].SubItems[1].Text,
                   lvwShoppingSession.Items[i].SubItems[2].Text,
                   decimal.Parse(lvwShoppingSession.Items[i].SubItems[3].Text));

            DataRow rcdStoreItem =
	taStoreItems.GetData().Rows.Find(lvwShoppingSession.Items[i].Text);
            rcdStoreItem["SaleStatus"] = "Sold";
            taStoreItems.Update(rcdStoreItem);
        }

        // Let the user know
	MessageBox.Show("The customer order has been saved.",
                        "Fun Department Store",
                        MessageBoxButtons.OK, MessageBoxIcon.Information);

    }
    catch (IndexOutOfRangeException)
    {
        MessageBox.Show("There is no store item with that number",
                        "Fun Department Store",
                        MessageBoxButtons.OK, MessageBoxIcon.Information);
    }

    // Create a record in the ReceiptSummaries table
    try
    {
        taReceiptsSummaries.Insert(receiptNumber.ToString(),
                                   lblDate.Text,
                                   lblTime.Text,
                                   decimal.Parse(txtOrderTotal.Text),
                                   cbxCurrencyType.Text,
                                   decimal.Parse(txtAmountTended.Text),
                                   decimal.Parse(txtChange.Text));

	// Receipt the form
        btnCancelOrder_Click(sender, e);
    }
    catch (IndexOutOfRangeException)
    {
        MessageBox.Show("There is no store item with that number",
                        "Fun Department Store",
                        MessageBoxButtons.OK, MessageBoxIcon.Information);
    }
}
- Press Ctrl + F5 to execute the application
- Click Process a Customer Order
- Create a customer order that uses
- Change the Amount Tended to 500 and press Tab
- Click Submit Current Order
- Create another customer order that uses
| Item #: |
927940 |
| Item #: |
790064 |
- Change the Amount Tended to 300 and press Tab
- Click Submit Current Order
- Create another customer order that uses
| Item #: |
290030 |
| Item #: |
790402 |
| Item #: |
729741 |
| Item #: |
297030 |
- Change the Amount Tended to 300 and press Tab
- Click Submit Current Order
- Create another customer order that uses
- Change the Amount Tended to 20 and press Tab
- Click Submit Current Order
- Close the forms and return to your programming environment
- Display the Manage Store Item form
- Double-click the Submit Changes button
- Implement its Click event as follows:
private void btnSubmitChanges_Click(object sender, EventArgs e)
{
    if (txtItemNumber.Text.Length == 0)
    {
        MessageBox.Show("You must provide a (unique) item number.",
                        "Fun Department Store",
                        MessageBoxButtons.OK, MessageBoxIcon.Information);
        return;
    }

    if (txtItemName.Text.Length == 0)
    {
        MessageBox.Show("You must provide a name for the item.",
                        "Fun Department Store",
                        MessageBoxButtons.OK, MessageBoxIcon.Information);
        return;
    }

    if (txtUnitPrice.Text.Length == 0)
    {
        MessageBox.Show("You must provide a price for the item.",
                        "Fun Department Store",
                        MessageBoxButtons.OK, MessageBoxIcon.Information);
        return;
    }

    try
    {
        DataRow rcdStoreItem =
        	taStoreItems.GetData().Rows.Find(txtItemNumber.Text);

        if (txtManufacturer.Text.Length != 0)
                    rcdStoreItem["Manufacturer"] = txtManufacturer.Text;
        if (cbxCategories.Text.Length != 0)
                    rcdStoreItem["Category"] = cbxCategories.Text;
        if (cbxSubCategories.Text.Length != 0)
                    rcdStoreItem["SubCategory"] = cbxSubCategories.Text;
        rcdStoreItem["ItemName"] = txtItemName.Text;
        if (txtItemSize.Text.Length != 0)
                    rcdStoreItem["ItemSize"] = txtItemSize.Text;
        rcdStoreItem["UnitPrice"] = txtUnitPrice.Text.ToString();

        taStoreItems.Update(rcdStoreItem);

	// Let the user know
        MessageBox.Show("The item has been updated",
                        "Fun Department Store",
                        MessageBoxButtons.OK, MessageBoxIcon.Information);

        btnReset_Click(sender, e);
   }
   catch (IndexOutOfRangeException)
   {
        MessageBox.Show("There is no store item with that number",
                        "Fun Department Store",
                        MessageBoxButtons.OK, MessageBoxIcon.Information);
   }
}
- Press Ctrl + F5 to execute the application
- Click the Manage a Store Item button
- Item the item number, enter 582604 and click Find
- If the record is found, change the values as follows:
 |
Manufacturer |
Delete |
 |
| Item Name |
Sleeveless Sweater Dress |
| Size |
L |
| Unit Price |
125 |
| Sale Status |
Available |
- Click Submit Changes
- In the item number, enter 770240 and click Find
- If the record is found, change the values as follows:
| Manufacturer |
Caparros |
| Sub Category |
Shoes |
| Item Name |
Peep-Toe Silk Stiletto Sandals |
| Size |
7.5 |
| Unit Price |
65.00 |
| Sale Status |
Available |
- Click Submit Changes
- Close the forms and return to your programming environment
|
|


