 |
ADO.NET Visual Support: The Binding Navigator |
|
|
|
If you drag a table from the Data Source window and drop
it on a form, Microsoft Visual Studio adds the necessary Windows controls to
the form and binds them to the columns of the table. To move from one record
to another, you would need a way to navigate among the records. You can
manually take care of this if you want. Alternatively, the .NET Framework
provides a class named BindingNavigator that contains all
the necessary functionality for this task.
|
|
 Practical
Learning: Introducing Visual Database Support Practical
Learning: Introducing Visual Database Support
|
|
- Start Microsoft Visual Studio
- Create a Windows Forms Application named spr1
- In the Solution Explorer, right-click Form1.cs and click Rename
- Type RentalManagement.cs and press Enter
- Right-clkick the form and click Properties
- Click Text and type Solas Property Rental - Properties
Listing
- Double-click the middle of the form and implement the Load event as
follows:
using System;
using System.Collections.Generic;
using System.ComponentModel;
using System.Data;
using System.Drawing;
using System.Linq;
using System.Text;
using System.Windows.Forms;
using System.IO;
using System.Data.SqlClient;

namespace spr1
{
    public partial class RentalManagement : Form
    {
        public RentalManagement()
        {
            InitializeComponent();
        }

        private void CreateRentalDatabase()
        {
            // We will use a directory named Solas Property Rental on the C: drive.
            // This will make it easy to delete the database and its files
            // when we don't need them anymore
            // If that directory was not yet created, create it
            Directory.CreateDirectory(@"C:\Solas Property Rental");

            using (SqlConnection cnnSolasPropertyRental =
                new SqlConnection("Data Source=(local);" +
                                  "Integrated Security='SSPI';"))
            {
                string strSolasPropertyRental =
                    "CREATE DATABASE SolasPropertyRental1 " +
                    "ON PRIMARY (NAME = RentalRecords, FILENAME = 'C:\\Solas Property Rental\\SolasPropertyRental1.mdf') " +
                    "LOG ON (NAME = RentalLog, FILENAME = 'C:\\Solas Property Rental\\SolasPropertyRental1.ldf')";

                SqlCommand cmdSolasPropertyRental =
                    new SqlCommand(strSolasPropertyRental,
                        cnnSolasPropertyRental);

                cnnSolasPropertyRental.Open();
                cmdSolasPropertyRental.ExecuteNonQuery();

                MessageBox.Show("The SolasPropertyRental1 database has been created",
                                "Solas Property Rental",
                                MessageBoxButtons.OK, MessageBoxIcon.Information);
            }

            using (SqlConnection cnnSolasPropertyRental =
            new SqlConnection("Data Source=(local);" +
                "Database='SolasPropertyRental1';" +
                "Integrated Security='SSPI';"))
            {
                string strSolasPropertyRental =
                    "CREATE TABLE Tenants " +
                    "( " +
                    " 	TenantID int identity(1,1) NOT , " +
                    " 	TenantCode nchar(16) , " +
                    " 	FullName nvarchar(50) , " +
                    " 	MaritalStatus nvarchar(40), " +
                    " 	ContactNumber nvarchar(20) " +
                    ");";

                SqlCommand cmdSolasPropertyRental =
		    new SqlCommand(strSolasPropertyRental, cnnSolasPropertyRental);

                cnnSolasPropertyRental.Open();
                cmdSolasPropertyRental.ExecuteNonQuery();

                MessageBox.Show("The Tenants table has been created",
                                "Solas Property Rental",
                                MessageBoxButtons.OK, MessageBoxIcon.Information);
            }

            using (SqlConnection cnnSolasPropertyRental =
            new SqlConnection("Data Source=(local);" +
                "Database='SolasPropertyRental1';" +
                "Integrated Security='SSPI';"))
            {
                string strSolasPropertyRental =
                    "CREATE TABLE RentalProperties " +
                    "( " +
                    " 	RentalPropertyID int identity(1,1), " +
                    " 	PropertyCode nchar(16) , " +
                    " 	PropertyType nvarchar(32) , " +
                    "	Address nvarchar(50), " +
                    "	City  nvarchar(40), " +
                    "	State nchar(2), " +
                    "	ZIPCode nvarchar(12), " +
                    " 	Bedrooms tinyint, " +
                    " 	Bathrooms float, " +
                    "	HasCarpet bit, " +
                    "	HardWoodFloor bit, " +
                    "	IndoorGarage bit, " +
                    "	HasWasherDryer bit, " +
                    "	PetsAllowed bit, " +
                    " 	OccupancyStatus nvarchar(30)', " +
                    " 	MonthlyRent money);";

                SqlCommand cmdSolasPropertyRental =
		    new SqlCommand(strSolasPropertyRental, cnnSolasPropertyRental);

                cnnSolasPropertyRental.Open();
                cmdSolasPropertyRental.ExecuteNonQuery();

                MessageBox.Show("The RentalProperties table has been created",
                                "Solas Property Rental",
                                MessageBoxButtons.OK, MessageBoxIcon.Information);
            }

            using (SqlConnection cnnSolasPropertyRental =
            new SqlConnection("Data Source=(local);" +
                "Database='SolasPropertyRental1';" +
                "Integrated Security='SSPI';"))
            {
                string strSolasPropertyRental =
                    "CREATE TABLE RentalAllocations " +
                    "( " +
                    " 	AllocationID int identity(1,1), " +
                    " 	AllocationCode nchar(16) , " +
                    " 	DateAllocated date, " +
                    " 	PropertyCode nchar(16) , " +
                    " 	TenantCode nchar(16) , " +
                    "   ContractLength nvarchar(50) , " +
                    " 	RentStartDate date, " +
                    " 	MonthlyRent money);";

                SqlCommand cmdSolasPropertyRental =
		    new SqlCommand(strSolasPropertyRental, cnnSolasPropertyRental);

                cnnSolasPropertyRental.Open();
                cmdSolasPropertyRental.ExecuteNonQuery();

                MessageBox.Show("The RentalAllocations table has been created",
                                "Solas Property Rental",
                                MessageBoxButtons.OK, MessageBoxIcon.Information);
            }

            using (SqlConnection cnnSolasPropertyRental =
            new SqlConnection("Data Source=(local);" +
                "Database='SolasPropertyRental1';" +
                "Integrated Security='SSPI';"))
            {
                string strSolasPropertyRental =
                    "CREATE TABLE RentPayments " +
                    "( " +
                    " 	PaymentID int identity(1,1), " +
                    " 	ReceiptNumber nchar(16) , " +
                    " 	PaymentDate date, " +
                    " 	AllocationCode nchar(16) , " +
                    "   PaymentForMonth nvarchar(20), " +
                    "   PaymentForYear int, " +
                    " 	Amount money);";

                SqlCommand cmdSolasPropertyRental =
		    new SqlCommand(strSolasPropertyRental, cnnSolasPropertyRental);

                cnnSolasPropertyRental.Open();
                cmdSolasPropertyRental.ExecuteNonQuery();

                MessageBox.Show("The RentPayments table has been created",
                                "Solas Property Rental",
                                MessageBoxButtons.OK, MessageBoxIcon.Information);
            }
        }

        private void RentalManagement_Load(object sender, EventArgs e)
        {
            CreateRentalDatabase();
        }
    }
}
- Press F5 to execute the application
- Click OK as many times as necessary
- Close the form and return to your programming environment
- Access the source code of the form and change it as follows:
private void RentalManagement_Load(object sender, EventArgs e)
{
    // CreateRentalDatabase();
}
- Display the form
- On the main menu, click Data -> Add New Data Source...
- On the first page of the wizard, make sure Database is selected and
click Next
- In the second page of the wizard, make sure Dataset is selected and
click Next
- In the third page of the wizard, click New Connection...
- In the Server Name combo box, select the server or type
(local)
- In the Select or Enter a Database Name combo box, select
SolasPropertyRental1
- Click Test Connection

- Click OK twice
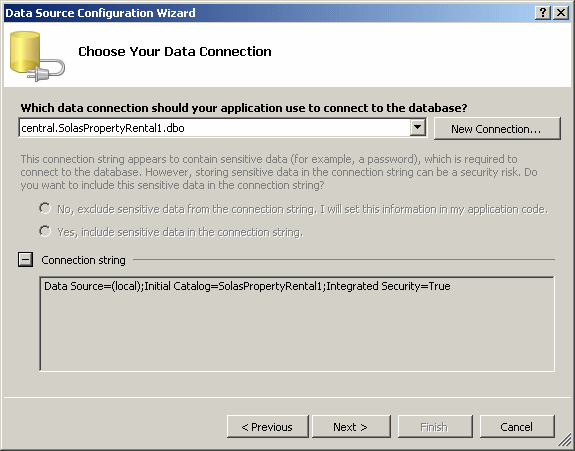
- On the Data Source Configuration Wizard, make sure the new
connection is selected
Click the + button of Connection String

- Click Next
- Change the connection string to csSolasPropertyRental
and click Next
- Expand the Tables node and click the check box of RentalProperties
- Change the name of the data set to dsSolasPropertyRental

- Click Finish
- Display the form if ncessary.
On the Toolbox, click Data
- Click BindingSource
- Click the form
- In the Properties window, change its (Name) to
bsSolasPropertyRental
- Click DataSource and click the arrow its combo box
- Click the + button of the Other Data Sources node to expand it
- Click the + button of the Project Data Sources node
- Click dsSolasPropertyRental
- While the binding source is still selected under the form, in the
Properties window, click DataMember and click the arrow its combo box to
select RentalProperties
- Under the form, click rentalPropertiesTableAdapter
- In the Properties window, click (Name) and type
taRentalProperties
|
Creating a Binding Navigator
|
|
There are various ways you can create a binding
navigator:
- You can declare a variable of type BindingNavigator and configure it
- From the Data section of the Toolbox, you can drag a
BindingNavigator object and drop it on a form. You should then access
the Properties window for the binding navigator. To support this, the
BindingNavigator class has a property named BindingSource. You can
access it from the Properties window of the binding navigator and select
the binding source
- If you drag a table from the Data Source window and drop it on a
form, Microsoft Visual Studio would create and configure a binding
navigator for you
|
 Practical
Learning: Creating a Binding Navigator Practical
Learning: Creating a Binding Navigator
|
|
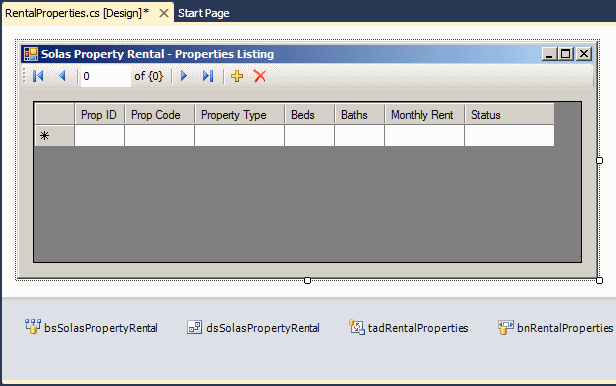
- In the Data section of the Toolbox, click BindingNavigator
- Click the form
- In the Properties window, change its Name to
bnRentalProperties
- Still in the Properties window, click BindingSource and select
bsSolasPropertyRental
- In the Data section of the Toolbox, click DataGridView
- Click the form
- Still in the Properties window, click DataSource and select
bsSolasPropertyRental
- Under the Properties window, click Edit Columns and configure the
columns as follows:
| Column |
HeaderText |
Width |
| RentalPropertyID |
Prop ID |
50 |
| PropertyCode |
Prop Code |
70 |
| PropertyType |
Property Type |
90 |
| Bedrooms |
Beds |
50 |
| Bathrooms |
Baths |
50 |
| MonthlyRent |
Monthly Rent |
80 |
| OccupancyStatus |
Status |
90 |
- Click OK
- In the Properties window, change the following characteristics:
(Name): dgvRentalProperties
Anchor: Top, Bottom,
Left, Right
ColumnHeadersHeightSizeMode: EnableResizing

- Execute the application to test it

- Close the form and return to your programming environment
- In the Server Explorer, right-click the SolasPropertyRental1
connection and click Delete
|
|