 |
Windows Controls: Check Boxes |
|
|
|
A check box is a control that makes a statement true or
false. To perform this validation, the control displays a small square box
that the user can click. Here are examples:
|
To start, the square box may be empty
 .
If the user clicks it, a check mark appears in the square box .
If the user clicks it, a check mark appears in the square box
 .
If the user clicks a check box that has a check mark in it, the check mark
may be removed. .
If the user clicks a check box that has a check mark in it, the check mark
may be removed.
To let the user know what the check box control
represents, the control is accompanied by a label that displays the
statement. When the square box is empty *,
the statement is false. When the square box is filled with a check mark
T, the statement is true.
To support check boxes, the .NET Framework provides the
CheckBox class. To add a check box to your application at design
time, from the Common Controls section of the Toolbox, yon can click the
CheckBox control and click the form or a container on the form. Unlike the
radio button but like the regular command button, a check box can safely be
positioned directly on a form.
To programmatically create a check box, declare a
variable of type CheckBox, use the new operator to allocate memory
for it, and add it to the Controls collection of its holder. Here is
an example:
using System;
using System.Drawing;
using System.Windows.Forms;

public class Exercise : System.Windows.Forms.Form
{
    CheckBox chkValidate;

    public Exercise()
    {
        InitializeComponent();
    }

    private void InitializeComponent()
    {
        chkValidate = new CheckBox();

        Controls.Add(chkValidate);
    }
}

public class Program
{
    static int Main()
    {
        System.Windows.Forms.Application.Run(new Exercise());
        return 0;
    }
}
Unlike the radio button that usually comes along with
other radio buttons, a check box can appear by itself. Even when it comes in
a group with others, the behavior of one check box is independent of the
other check boxes, even if they belong to the same group.
|
 Application:
Introducing Check Boxes Application:
Introducing Check Boxes
|
|
- Start a new Windows Application named DaniloPizza1
- In the Solution Explorer, right-click Form1.cs and click Rename
- Type Exercise.cs and press Enter
- On the main menu, click Project -> Add New Item...
- In the middle list, click Icon File
- Set the Name to pizza and click Add
- Using the Erase tool
 ,
wipe its interior to erase its content ,
wipe its interior to erase its content
- Use the Ellipse tool
 and the black color to draw an oval shape
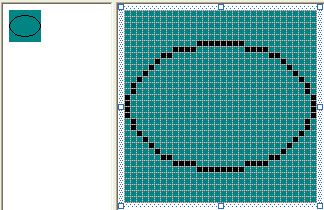
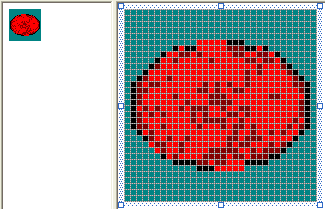
- Fill
 it up with a brown color (the color on the right side of the black)
- Click the red color
- Click the Airbrush tool

- Click the option button and select the Medium brush

- Randomly click different parts of the shape
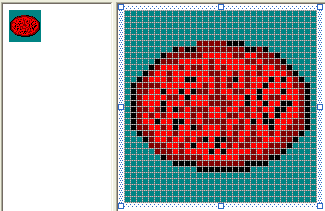
- To give the appearance of a crust, use the Pencil tool
 ,
click the black color, right-click the brown color, and draw a dark
border around the shape ,
click the black color, right-click the brown color, and draw a dark
border around the shape
- With still the black and the brown colors, randomly click and
right-click different points in the shape:
- Click the white color. Right-click the yellow color. Randomly click
and right-click a few times in the shape
- Click the brown color again and click the Line tool

- Randomly draw horizontal, vertical, and dialog lines in the shape

- Right-click a white section in the drawing area, position the mouse
on Current Icon Image Types, and click 16x16, 16 Colors
- Design it as follows:

- Save the icon and close it
- Use the Icon field of the form in the Properties window to assign
the pizza.ico icon to the form
- Design the form as follows:
 |
| Control |
Text |
Name |
Additional Properties |
| GroupBox |
 |
Pizza Size |
|
|
| RadioButton |
 |
Small |
rdoSmall |
|
| TextBox |
 |
8.95 |
txtSmall |
AlignText: Right |
| RadioButton |
 |
Medium |
rdoMedium |
Checked: True |
| TextBox |
 |
10.75 |
txtMedium |
AlignText: Right |
| RadioButton |
 |
Large |
rdoLarge |
|
| TextBox |
 |
12.95 |
txtLarge |
AlignText: Right |
| GroupBox |
 |
Side Orders |
|
|
| Label |
 |
Qty |
|
|
| Label |
 |
Unit Price |
|
|
| Label |
 |
Sub Total |
|
|
| Label |
 |
Bread Sticks |
|
|
| TextBox |
 |
0 |
txtQtyBread |
AlignText: Right |
| TextBox |
 |
3.25 |
txtPriceBread |
AlignText: Right |
| TextBox |
 |
0.00 |
txtTotalBread |
AlignText: Right
ReadOnly: True |
| Label |
 |
Buffalo Wings |
|
|
| TextBox |
 |
0 |
txtQtyWings |
AlignText: Right |
| TextBox |
 |
2.15 |
txtPriceWings |
AlignText: Right |
| TextBox |
 |
0.00 |
txtTotalWings |
AlignText: Right
ReadOnly: True |
| GroupBox |
 |
Toppings |
|
|
| CheckBox |
 |
Pepperoni |
chkPepperoni |
|
| CheckBox |
 |
Sausage |
chkSausage |
|
| CheckBox |
 |
Extra Cheese |
chkExtraCheese |
|
| CheckBox |
 |
Olives |
chkOlives |
|
| CheckBox |
 |
Onions |
chkOnions |
|
| Label |
 |
Each Topping |
|
|
| TextBox |
 |
0.45 |
txtEachTopping |
AlignText: Right |
| GroupBox |
 |
Drinks |
|
|
| Label |
 |
Qty |
|
|
| Label |
 |
Unit Price |
|
|
| Label |
 |
Sub Total |
|
|
| Label |
 |
Soda Can |
|
|
| TextBox |
 |
0 |
txtQtyCan |
AlignText: Right |
| TextBox |
 |
1.45 |
txtPriceCan |
AlignText: Right |
| TextBox |
 |
0.00 |
txtTotalCan |
AlignText: Right
ReadOnly: True |
| Label |
 |
Soda 20 Oz. |
|
|
| TextBox |
 |
0 |
txtQtySoda20 |
AlignText: Right |
| TextBox |
 |
1.45 |
txtPriceSoda20 |
AlignText: Right |
| TextBox |
 |
0.00 |
txtTotalSoda20 |
AlignText: Right
ReadOnly: True |
| Label |
 |
Soda 2L Bottle |
|
|
| TextBox |
 |
0 |
txtQtySoda2L |
AlignText: Right |
| TextBox |
 |
1.45 |
txtPriceSoda2L |
AlignText: Right |
| TextBox |
 |
0.00 |
txtTotalSoda2L |
AlignText: Right
ReadOnly: True |
| Label |
 |
Orange Juice |
|
|
| TextBox |
 |
0 |
txtQtyOJ |
AlignText: Right |
| TextBox |
 |
2.25 |
txtPriceOJ |
AlignText: Right |
| TextBox |
 |
0.00 |
txtTotalOJ |
AlignText: Right
ReadOnly: True |
| Label |
 |
Water |
|
|
| TextBox |
 |
0 |
txtQtyWater |
AlignText: Right |
| TextBox |
 |
1.25 |
txtPriceWater |
AlignText: Right |
| TextBox |
 |
0.00 |
txtTotalWater |
AlignText: Right
ReadOnly: True |
| Button |
 |
Close |
btnClose |
|
| Label |
 |
Total Price |
|
|
| TextBox |
 |
0.00 |
txtTotalPrice |
AlignRight: Right
ReadOnly: True |
|
- Save everything
|
Check Box Characteristics
|
|
By default, a check box appears empty, which makes its
statement false. To make the statement true, the user can click it. There
are three main ways you can use this property of a check box. To select a
check box, you can set its Checked property to True. You can
also do it programmatically as follows:
private void Form1_Load(object sender, System.EventArgs e)
{
        checkBox1.Checked = true;
}
To find out if an item is selected, get the value of its
Checked property. Another possibility consists of toggling the state
of the check mark. For example, you can check or uncheck the check mark when
the user clicks another button. To do this, you can simply negate the
truthfulness of the control as follows:
checkBox1.Checked = ! checkBox1.Checked;
Like the radio button, when a check box is clicked, the
control fires a CheckedChanged event to let you know that it has been
checked. This event is of type EventArgs. If the check box can
display only two states, checked or unchecked, this event is enough.
|
 Application: Configuring Check Boxes
|
|
- On the form click the Small radio button
- Press and hold Shift
- Click the Medium radio button, the Large radio button, the
Pepperoni, the Sausage, the Extra Cheese, the Olives, and the Onions
check boxes
- Release Shift
- In the Properties window, click the Events button

- In the Events section, double-click Click
- Return to the form
- Click the txtSmall text box
- Press and hold Shift
- Click each of the following controls: txtMedium, txtLarge,
txtEachTopping, txtQtyBread, txtPriceBread, txtQtyWings, txtPriceWince,
txtQtyCan, txtPriceCan, txtQtySoda20, txtPriceSoda20, txtQtySoda2L,
txtPriceSoda2L, txtQtyOJ, txtPriceOJ, txtQtyWater, and txtPriceWater
- Release Shift
- In the Events section of the Properties window, double-click Leave
- In the Code Editor, define a method named CalculatePrice() and
implement the events as follows:
using System;
using System.Collections.Generic;
using System.ComponentModel;
using System.Data;
using System.Drawing;
using System.Linq;
using System.Text;
using System.Windows.Forms;

namespace DaniloPizza1
{
    public partial class Exercise : Form
    {
        public Exercise()
        {
            InitializeComponent();
        }

        internal void CalculatePrice()
        {
            double PriceSize = 0.00;
            double PriceEachTopping = 0.00, BWings, Bread,
                SodaCan, Soda20, Soda2L, OJ, Water, PriceToppings, TotalOrder;
            int Pepperoni, Sausage, ExtraCheese, Onions, Olives;

            try
            {
                // Get the price of pizza depending on the selected size
                if (rdoSmall.Checked == true)
                    PriceSize = double.Parse(txtSmall.Text);
                if (rdoMedium.Checked == true)
                    PriceSize = double.Parse(txtMedium.Text);
                if (rdoLarge.Checked == true)
                    PriceSize = double.Parse(txtLarge.Text);
            }
            catch (FormatException)
            {
                MessageBox.Show("The value you typed for the price of a pizza is invalid" +
                    "\nPlease try again");
            }

            // Get the price of a topping if it was selected
            if (chkPepperoni.Checked == true)
                Pepperoni = 1;
            else
                Pepperoni = 0;

            if (chkSausage.Checked == true)
                Sausage = 1;
            else
                Sausage = 0;

            if (chkExtraCheese.Checked == true)
                ExtraCheese = 1;
            else
                ExtraCheese = 0;

            if (chkOnions.Checked == true)
                Onions = 1;
            else
                Onions = 0;

            if (chkOlives.Checked == true)
                Olives = 1;
            else
                Olives = 0;

            // Get the price of each topping
            try
            {
                PriceEachTopping = double.Parse(txtEachTopping.Text);
            }
            catch (FormatException)
            {
                MessageBox.Show("The value you typed for the price of a each topping is invalid" +
                    "\nPlease try again");
            }

            PriceToppings = (Pepperoni + Sausage + ExtraCheese + Onions + Olives) * PriceEachTopping;

            // Calculate the price of the side dishes
            // depending on the quantity entered
            BWings = double.Parse(txtTotalWings.Text);
            Bread = double.Parse(txtTotalBread.Text);

            // Calculate the price of the drink(s)
            SodaCan = double.Parse(txtTotalCan.Text);
            Soda20 = double.Parse(txtTotalSoda20.Text);
            Soda2L = double.Parse(txtTotalSoda2L.Text);
            OJ = double.Parse(txtTotalOJ.Text);
            Water = double.Parse(txtTotalWater.Text);

            TotalOrder = PriceSize + PriceToppings + BWings + Bread +
                SodaCan + Soda20 + Soda2L + OJ + Water;
            txtTotalOrder.Text = TotalOrder.ToString("F");
        }

        private void rdoSmall_Click(object sender, EventArgs e)
        {
            CalculatePrice();
        }

        private void txtSmall_Leave(object sender, EventArgs e)
        {
            int QtyBread = 0, QtyWings = 0, QtyCan = 0,
                QtySoda20 = 0, QtySoda2L = 0, QtyOJ = 0,
                QtyWater = 0;
            double PriceBread = 0.00, TotalBread = 0.00,
                   PriceWings = 0.00, TotalWings = 0.00,
                   PriceCan = 0.00, TotalCan = 0.00,
                   PriceSoda20 = 0.00, TotalSoda20 = 0.00,
                   PriceSoda2L = 0.00, TotalSoda2L = 0.00,
                   PriceOJ = 0.00, TotalOJ = 0.00,
                   PriceWater = 0.00, TotalWater = 0.00;

            // Retrieve the quantity set in the text box
            try
            {
                QtyBread = int.Parse(txtQtyBread.Text);
            }
            catch (FormatException)
            {
                MessageBox.Show("The value you entered for the quantify of bread sticks is not valid" +
                    "\nPlease try again!");
            }

            // Get the unit price of the item
            try
            {
                PriceBread = double.Parse(txtPriceBread.Text);
            }
            catch (FormatException)
            {
                MessageBox.Show("The value you entered for the price of bread sticks is not valid" +
                    "\nPlease try again!");
            }

            // Calculate the sub-total of this item
            TotalBread = QtyBread * PriceBread;
            // Display the sub-total in the corresponding text box
            txtTotalBread.Text = TotalBread.ToString("F");

            try
            {
                PriceWings = int.Parse(txtQtyWings.Text);
            }
            catch (FormatException)
            {
                MessageBox.Show("The value you entered for the quantify of orders of buffalo wings is not valid" +
                    "\nPlease try again!");
            }
            try
            {
                PriceWings = double.Parse(txtPriceWings.Text);
            }
            catch (FormatException)
            {
                MessageBox.Show("The value you entered for the price of buffalo wings is not valid" +
                    "\nPlease try again!");
            }

            TotalWings = QtyWings * PriceWings;
            txtTotalWings.Text = TotalWings.ToString("F");

            try
            {
                QtyCan = int.Parse(txtQtyCan.Text);
            }
            catch (FormatException)
            {
                MessageBox.Show("The value you entered for the quantify of soda cans is not valid" +
                    "\nPlease try again!");
            }
            try
            {
                PriceCan = double.Parse(txtPriceCan.Text);
            }
            catch (FormatException)
            {
                MessageBox.Show("The value you entered for the price of soda cans is not valid" +
                    "\nPlease try again!");
            }

            TotalCan = QtyCan * PriceCan;
            txtTotalCan.Text = TotalCan.ToString("F");

            try
            {
                QtySoda20 = int.Parse(txtQtySoda20.Text);
            }
            catch (FormatException)
            {
                MessageBox.Show("The value you entered for the quantify of soda 20 Oz. is not valid" +
                    "\nPlease try again!");
            }
            try
            {
                PriceSoda20 = double.Parse(txtPriceSoda20.Text);
            }
            catch (FormatException)
            {
                MessageBox.Show("The value you entered for the price of soda 20 Oz. is not valid" +
                    "\nPlease try again!");
            }

            TotalSoda20 = QtySoda20 * PriceSoda20;
            txtTotalSoda20.Text = TotalSoda20.ToString("F");

            try
            {
                QtySoda2L = int.Parse(txtQtySoda2L.Text);
            }
            catch (FormatException)
            {
                MessageBox.Show("The value you entered for the quantify of bottles of soda 2-litter is not valid" +
                    "\nPlease try again!");
            }
            try
            {
                PriceSoda2L = double.Parse(txtPriceSoda2L.Text);
            }
            catch (FormatException)
            {
                MessageBox.Show("The value you entered for the price of a bottle of soda is not valid" +
                    "\nPlease try again!");
            }

            TotalSoda2L = QtySoda2L * PriceSoda2L;
            txtTotalSoda2L.Text = TotalSoda2L.ToString("F");

            try
            {
                QtyOJ = int.Parse(txtQtyOJ.Text);
            }
            catch (FormatException)
            {
                MessageBox.Show("The value you entered for the quantify of a bottle of orange juice is not valid" +
                    "\nPlease try again!");
            }

            try
            {
                PriceOJ = double.Parse(txtPriceOJ.Text);
            }
            catch (FormatException)
            {
                MessageBox.Show("The value you entered for the price of bottles of orange is not valid" +
                    		"\nPlease try again!");
            }

            TotalOJ = QtyOJ * PriceOJ;
            txtTotalOJ.Text = TotalOJ.ToString("F");

            try
            {
                QtyWater = int.Parse(txtQtyWater.Text);
            }
            catch (FormatException)
            {
                MessageBox.Show("The value you entered for the quantify of bottles of water is not valid" +
                    		"\nPlease try again!");
            }
            try
            {
                PriceWater = double.Parse(txtPriceWater.Text);
            }
            catch (FormatException)
            {
                MessageBox.Show("The value you entered for the price of bottle of water is not valid" +
                    "\nPlease try again!");
            }

            TotalWater = QtyWater * PriceWater;
            txtTotalWater.Text = TotalWater.ToString("F");

            CalculatePrice();
        }

        private void btnClose_Click(object sender, EventArgs e)
        {
            Close();
        }
    }
}
- Return to the and double-click the Close button
- Implement its Click event as follows:
private void btnClose_Click(object sender, System.EventArgs e)
{
	Close();
}
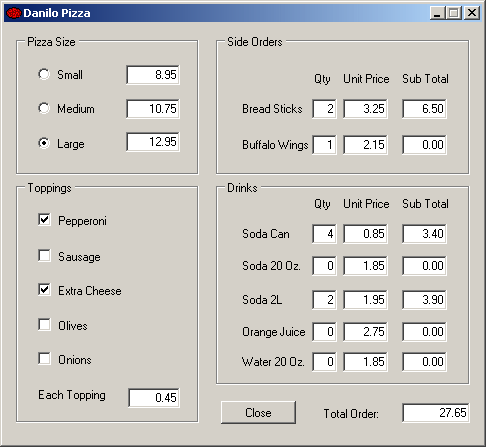
- Execute the application and test the form. Here is an example:
- Close the form and return to your programming environment
|
The Alignment of a
Check Box
|
|
By default, the square box of a check control is
positioned to the left side of its accompanying label. Instead of this
default left position, you can change as you wish. The position of the round
box with regards to its label is controlled by the CheckAlign
property that of type ContentAlignment. To programmatically set the
check alignment of a check box, you can call the ContentAlignment
enumeration and select the desired value. Here is an example:
private void Form1_Load(object sender, System.EventArgs e)
{
	this.checkBox1.Checked = true;
	this.checkBox1.CheckAlign = ContentAlignment.MiddleRight;
}
|
The Checked State of a
Check Box
|
|
Instead of being definitely checked, you can let the
user know that the decision of making the statement true or false is not
complete. This means that a check box can display as "half-checked". In this
case the check mark would appear as if it were disabled. This behavior is
controlled through the CheckState property. To provide this
functionality, assign the Indeterminate value to its CheckState
property. You can do this programmatically as follows:
this.ccheckBox1.CheckState = checkState.Indeterminate;
|
 |
The CheckState property only allows setting the
check box control as "undecided". If you actually want the user to control
three states of the control as checked, half-checked, or unchecked, use the
ThreeState property.
By setting the CheckState Boolean property to
true, the user can click it two to three times to get the desired value.
When this ability is given to the user, you can use or check the value of
the Indeterminate property to find out whether the control is
checked, half-checked, or unchecked.
Here is an example of specifying the check box control
as being able to display one of three states:
private void Form1_Load(object sender, System.EventArgs e)
{
	checkBox1.Checked = true;
	checkBox1.ThreeState = true;
}
If a check box is configured to assume one of three
states when it's clicked, that is, if the ThreeState property of a
check button is set to True, when the user clicks such a button, the button
acquires one of the available three states, which are Checked,
Unchecked, or Indeterminate. This causes the control to fire a
CheckStateChanged event. This event also is of type EventArgs.
This means that it does not let you know the current state of the button.
You would have to find it out yourself, which is easily done by getting the
value of the CheckState property.
|
The Appearance of a
Check Box
|
|
By default, a check box appears as a square box that
gets a check mark when the user clicks it. Optionally, you can make a check
box appear as a toggle button. In that case, the button would appear as a
regular button. When the user clicks it, it appears down. If the user clicks
it again, it becomes up.
To change the appearance of a check box, assign the
Button or Normal value to its Appearance property. The
Appearance values are defined in the Appearance enumeration. You
can also do this programmatically as follows:
private void Form1_Load(object sender, System.EventArgs e)
{
	checkBox1.Checked = true;
	checkBox1.ThreeState = true;
	checkBox1.Appearance = Appearance.Button;
}
Like the radio button, the check box control fires an
AppearanceChanged event when the button's appearance changes from
Normal to Button or vice-versa.
|
|

