A dialog box has the following characteristics:
To create a dialog box, you start with a form, which you can get by creating a Windows Application or deriving a class from Form. Here is an example: using System;
using System.Drawing;
using System.Windows.Forms;
public class Exercise : System.Windows.Forms.Form
{
public Exercise()
{
InitializeComponent();
}
private void InitializeComponent()
{
Text = "Domain Configuration";
Width = 320;
Height = 150;
Location = new Point(140, 100);
StartPosition = FormStartPosition.CenterScreen;
}
}
public class Program
{
static int Main()
{
System.Windows.Forms.Application.Run(new Exercise());
return 0;
}
}
This would produce:
There are a few actions you should perform on a form to transform it into a dialog box; but normally, these are only suggestions, not rules. Based on the Microsoft Windows design and standards, to create a dialog box, you should set a form’s FormBorderStyle property to FixedDialog. Setting this property changes the borders of the form to the standard borders of a dialog box (the border of a dialog box is thinner than that of a regular form). You can set this characteristic in the Properties window or programmatically. Here is an example: private void InitializeComponent()
{
Text = "Domain Configuration";
Width = 320;
Height = 150;
Location = new Point(140, 100);
StartPosition = FormStartPosition.CenterScreen;
FormBorderStyle = FormBorderStyle.FixedDialog;
}
Besides taking care of the border, you should also set both the MinimizeBox and the MaximizeBox properties to False. This causes the window to display only the system Close button. You can set these characteristics in the Properties window or programmatically. Here is an example: private void InitializeComponent()
{
Text = "Domain Configuration";
Width = 320;
Height = 150;
Location = new Point(140, 100);
StartPosition = FormStartPosition.CenterScreen;
FormBorderStyle = FormBorderStyle.FixedDialog;
MinimizeBox = false;
MaximizeBox = false;
}
This would produce:
You should provide a way for the user to close the dialog box. A dialog box should have at least one button labeled OK. This button allows the user to acknowledge the message of the dialog box and close it by clicking the button. If the user press Enter, the dialog box should also be closed as if the OK button was clicked.
Often the user will be presented with various options on a dialog box and may be asked to make a decision on the available controls. Most of the time, if you are creating such a dialog box, besides the OK button, it should also have a Cancel button. The OK button should be the default so that if the user presses Enter, the dialog box would be closed as if the user had clicked OK. Clicking OK or pressing Enter would indicate that, if the user had made changes on the controls of the dialog box, those changes would be acknowledged and kept when the dialog box is closed and usually the changed values of the control would be transferred to another dialog box or form. Keep in mind that you are responsible for implementing this functionality. To fulfill this functionality of the OK button, after adding it to a dialog box (or form), open the AcceptButton combo box in the Properties window for the form and select the name of the button.
The Cancel button is used to allow the user to dismiss whatever changes would have been made on the controls of the dialog box. The dialog box should also be configured so that if the user presses Esc, the dialog box would be closed as if the user had clicked Cancel. To fulfill this functionality of the Cancel button, after adding it to a dialog box (or form), open the CancelButton combo box in the Properties window for the form and select the name of the button. Besides the OK and the Cancel buttons, a dialog box can be created with additional buttons such as Finish or Help, etc. It depends on its role and the decision is made by the application developer.
Besides the system Close button, if you are planning to provide help on a dialog box, you can equip it with a Help button. To support this, the Form class is equipped with a Boolean property named HelpButton. The default value of this property is false. In the Properties window, you can set it to True. If you are programmatically creating the dialog box, you can access this property and set its value to true. Here is an example: private void InitializeComponent()
{
Text = "Domain Configuration";
Width = 320;
Height = 150;
Location = new Point(140, 100);
StartPosition = FormStartPosition.CenterScreen;
FormBorderStyle = FormBorderStyle.FixedDialog;
MinimizeBox = false;
MaximizeBox = false;
HelpButton = true;
}
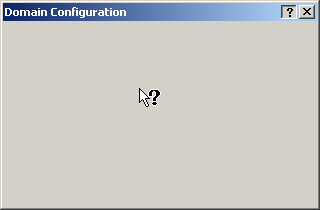
This would produce:
When the user clicks the help button, the mouse cursor becomes equipped with a question mark. Here is an example:
You can then write code so that, when the user clicks a control on the dialog box, some guiding help is provided as a tool tip.
There are two types of dialog boxes: modal and modeless. A Modal dialog box is one that the user must first close in order to have access to any other framed window or dialog box of the same application. One of the scenarios in which you use a dialog box is to create an application that is centered around one. In this case, if either there is no other form or dialog box in your application or all the other forms or dialog boxes depend on this central dialog box, it must be created as modal. Such an application is referred to as dialog-based. Some applications require various dialog boxes to complete their functionality. When in case, you may need to call one dialog box from another and display it as modal. Here is an example:
After creating a dialog used as an addition to an existing form or an existing dialog box, to call it as modal, use the ShowDialog() method.
A dialog box is referred to as modeless if the user does not have to close it in order to continue using the application that owns the dialog box. A modeless dialog box has the following characteristics
Here is an example:
Since the modeless dialog box does not display its button on the task bar, the user should know that the dialog box is opened. To make the presence of a modeless dialog box obvious to the user, it typically displays on top of its host application until the user closes it. A modeless dialog box is created from a form but it should look like a regular dialog box or a tool window. Therefore, to create a modeless dialog box, set the FormBorderStyle property to an appropriate value such as FixedSingle, FixedToolWindow, Sizable or SizableToolWindow. Also, set its ShowInTaskbar property to False. After creating the dialog box, to display it as modeless, call the Show() method. The fundamental difference between the ShowDialog() and the Show() methods is that the former displays a modal dialog box, which makes sure that the called dialog box cannot go in the background of the main application. By contrast, the Show() method only calls the dialog box every time it is requested. For this reason, it is up to you to make sure that the modeless dialog box always remains on top of the application. This is easily taken care of by setting the Boolean TopMost property of the form to True. There are two main ways a normal modeless dialog box can be dismissed:
When you create a Windows Forms Application, the starting form is made available to you. If one form is not enough for your application, you can add as many as necessary. To add (or to create) a (new) form, you have various options:
In the Add New Item dialog box and in the Templates section, click Window Form (.NET), provide a name in the Name edit box then click Open. If your application is using various forms and you want to display a particular one at design time:
If you visually add two (or more) forms to your application, you may need to link them, allow one to call the other. To do this, in the top section of the file, type #include followed by the name of the header file in which the form was defined. In the section where you want to access the form, declare a handle to the class of the form and use the new operator to allocate memory for it. To display the other form, you can call its Show() method.
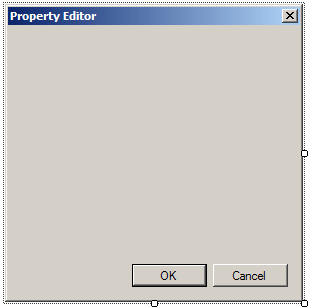
Microsoft Visual Studio provides a fast way to create a modal dialog box. To get it, on the main menu, click Project -> Add New Item... In the middle list, click Dialog and provide a name:
This would generate a dialog box with the necessary characteristics and two buttons: OK and Cancel:
All you have to do is to design and customize the dialog box as you see fit.
|
|||||||||||||||||||||||||||||||||||||||||||||||||||||||||||


