Home

Serialization: Binary


Introduction

Consider the following program:

using System;
using System.Collections.Generic;
using System.ComponentModel;
using System.Data;
using System.Drawing;
using System.Linq;
using System.Text;
using System.Windows.Forms;
using System.IO;

namespace Cars1
{
    public partial class Exercise : Form
    {
        public Exercise()
        {
            InitializeComponent();
        }

        private void btnWrite_Click(object sender, EventArgs e)
        {
            var Make  = txtMake.Text;
            var Model = txtModel.Text;
            var Year  = uint.Parse(txtYear.Text);
            var Color = cbxColors.SelectedIndex;

            var stmCar = new FileStream("Car1.car", FileMode.Create);
            var bnwCar = new BinaryWriter(stmCar);

            try
            {
                bnwCar.Write(Make);
                bnwCar.Write(Model);
                bnwCar.Write(Year);
                bnwCar.Write(Color);
            }
            finally
            {
                bnwCar.Close();
                stmCar.Close();
            }
        }
    }
}

Here is an example of running the program:

Serialization

This is an example of the techniques used in file processing to save individual data of primitive types:

Saving the variables in a method

The values can be retrieved with the following code:

using System;
using System.Collections.Generic;
using System.ComponentModel;
using System.Data;
using System.Drawing;
using System.Linq;
using System.Text;
using System.Windows.Forms;
using System.IO;

namespace Cars1
{
    public partial class Exercise : Form
    {
        public Exercise()
        {
            InitializeComponent();
        }

        private void btnWrite_Click(object sender, EventArgs e)
        {
            var Make  = txtMake.Text;
            var Model = txtModel.Text;
            var Year  = uint.Parse(txtYear.Text);
            var Color = cbxColors.SelectedIndex;

            var stmCar = new FileStream("Car1.car", FileMode.Create);
            var bnwCar = new BinaryWriter(stmCar);

            try
            {
                bnwCar.Write(Make);
                bnwCar.Write(Model);
                bnwCar.Write(Year);
                bnwCar.Write(Color);
            }
            finally
            {
                bnwCar.Close();
                stmCar.Close();
            }
        }

        private void btnRead_Click(object sender, EventArgs e)
        {
            var stmCar = new FileStream("Car1.car", FileMode.Open);
            var bnrCar = new BinaryReader(stmCar);

            try
            {
                txtMake.Text = bnrCar.ReadString();
                txtModel.Text = bnrCar.ReadString();
                txtYear.Text = bnrCar.ReadUInt32().ToString();
                cbxColors.SelectedIndex = bnrCar.ReadInt32();
            }
            finally
            {
                bnrCar.Close();
                stmCar.Close();
            }
        }
    }
}

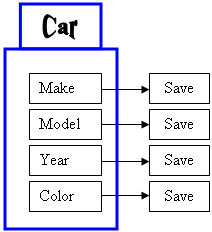
In the same way, you can save the individual fields of a class or you can retrieve the individual fields of a car:

Saving the individual parts of an object

Here is an example:

Class: Car.cs
using System;

namespace Cars1
{
    public class Car
    {
        public string Make;
        public string Model;
        public uint Year;
        public int Color;
    }
}
using System;
using System.Collections.Generic;
using System.ComponentModel;
using System.Data;
using System.Drawing;
using System.Linq;
using System.Text;
using System.Windows.Forms;
using System.IO;

namespace Cars1
{
    public partial class Exercise : Form
    {
        public Exercise()
        {
            InitializeComponent();
        }

        private void btnWrite_Click(object sender, EventArgs e)
        {
            var vehicle = new Car();
            vehicle.Make  = txtMake.Text;
            vehicle.Model = txtModel.Text;
            vehicle.Year  = uint.Parse(txtYear.Text);
            vehicle.Color = cbxColors.SelectedIndex;

            var stmCar = new FileStream("Car2.car", FileMode.Create);
            var bnwCar = new BinaryWriter(stmCar);

            try
            {
                bnwCar.Write(vehicle.Make);
                bnwCar.Write(vehicle.Model);
                bnwCar.Write(vehicle.Year);
                bnwCar.Write(vehicle.Color);
            }
            finally
            {
                bnwCar.Close();
                stmCar.Close();
            }
        }

        private void btnRead_Click(object sender, EventArgs e)
        {
            var stmCar = new FileStream("Car2.car", FileMode.Open);
            var bnrCar = new BinaryReader(stmCar);

            try
            {
                var vehicle = new Car();
                vehicle.Make = bnrCar.ReadString();
                vehicle.Model = bnrCar.ReadString();
                vehicle.Year = bnrCar.ReadUInt32();
                vehicle.Color = bnrCar.ReadInt32();

                txtMake.Text = vehicle.Make;
                txtModel.Text = vehicle.Model;
                txtYear.Text = vehicle.Year.ToString();
                cbxColors.SelectedIndex = vehicle.Color;
            }
            finally
            {
                bnrCar.Close();
                stmCar.Close();
            }
        }
    }
}

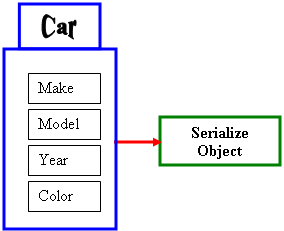
When it comes to a class, the problem with saving individual fields is that you could forget to save one of the fields. For example, considering a Car class, if you don't save the Make information of a Car object and retrieve or open the saved object on another computer, the receiving user would miss some information and the car cannot be completely identifiable. An alternative is to save the whole Car object.

Object serialization consists of saving a whole object as one instead of its individual fields:

Serialization

In other words, a variable declared from a class can be saved to a stream and then the saved object can be retrieved later or on another computer. The .NET Framework supports two types of object serialization: binary and SOAP.

Practical Learning: Introducing Serialization

  1. Start Microsoft Visual Studio
  2. Create a Windows Application named RealEstate1
  3. To create a new form, on the main menu, click Projects -> Add Windows Form...
  4. Set the Name to PropertyEditor and click Add
  5. Design the form as follows:
     
    Real Estate
    Control Text Name Other Properties
    Label Label Property #:    
    TextBox TextBox   txtPropertyNumber Modifiers: Public
    Label Label Property Type:    
    ComboBox ComboBox   cbxPropertyTypes Modifiers: Public
    Items:
    Unknown
    Single Family
    Townhouse
    Condominium
    Label Label Address:    
    TextBox TextBox   txtAddress Modifiers: Public
    Label Label City:    
    TextBox TextBox   txtCity Modifiers: Public
    Label Label State:    
    ComboBox TextBox   cbxStates Modifiers: Public
    Items:
    DC
    MD
    PA
    VA
    WV
    Label Label ZIP Code:    
    TextBox TextBox   txtZIPCode Modifiers: Public
    Label Label Bedrooms:    
    TextBox TextBox 0 txtBedrooms Modifiers: Public
    Label Label Bathrooms:    
    TextBox TextBox 1.0 txtBathrooms Modifiers: Public
    Label Label Market Value:    
    TextBox TextBox 0.00 txtMarketValue Modifiers: Public
    Button Button OK btnOK DialogResult: OK
    Button Button Cancel btnCancel DialogResult: Cancel
    Form
    FormBorderStyle: FixedDialog
    Text: Altair Realtors - Property Editor
    StartPosition: CenterScreen
    AcceptButton: btnOK
    CancelButton: btnCancel
    MaximizeBox: False
    MinimizeBox: False
    ShowInTaskBar: False
  6. In the Solution Explorer, right-click Form1.cs and click Rename
  7. Type AltairRealtor.cs and press Enter twice (to display that form)
  8. Design the form as follows:
     
    Altair Realtors
    Control Text Name
    Label Label Property #:  
    TextBox TextBox   txtPropertyNumber
    Button Open btnOpen
    Label Label Property Type:  
    TextBox TextBox   txtPropertyType
    Label Label Address:  
    TextBox TextBox   txtAddress
    Label Label City:  
    TextBox TextBox   txtCity
    Label Label State:  
    TextBox TextBox   txtState
    Label Label ZIP Code:  
    TextBox TextBox   txtZIPCode
    Label Label Bedrooms:  
    TextBox TextBox 0 txtBedrooms
    Label Label Bathrooms:  
    TextBox TextBox 1.0 txtBathrooms
    Label Label Market Value:  
    TextBox TextBox 0.00 txtMarketValue
    Button Button &New Property... btnNewProperty
    Button Button Close btnClose
    Form
    FormBorderStyle: FixedDialog
    Text: Altair Realtors - Property Editor
    StartPosition: CenterScreen
  9. Save the form

Serialization

Binary serialization works by processing an object rather than streaming its individual member variables. This means that, to use it, you define an object and initialize it, or "fill" it, with the necessary values and any information you judge necessary. This creates a "state" of the object. It is this state that you prepare to serialize. When you save the object, it is converted into a stream.

To perform binary serialization, there are a few steps you must follow. When creating the class whose objects would be serialized, start it with the [Serializable] attribute. Here is an example:

using System;

namespace Cars1
{
    [Serializable]
    public class Car
    {
        public string Make;
        public string Model;
        public uint Year;
        public int Color;
    }
}

Before serializing an object, you should reference the System.Runtime.Serialization.Formatters.Binary namespace. The class responsible for binary serialization is called BinaryFormatter. This class is equipped with two constructors. The default constructor is used to simply create an object.

After declaring the variable, to actually serialize an object, call the Serialize() method of the BinaryFormatter class. The method is overloaded with two versions. One of the versions of this method uses the following syntax:

public void Serialize(Stream serializationStream, object graph);

The first argument to this method must be an object of a Stream-based class, such as a FileStream object. The second argument must be the object to serialize. This means that, before calling this method, you should have built the object.

Here is an example:

using System;
using System.Collections.Generic;
using System.ComponentModel;
using System.Data;
using System.Drawing;
using System.Linq;
using System.Text;
using System.Windows.Forms;
using System.IO;
using System.Runtime.Serialization.Formatters.Binary;

namespace Cars1
{
    public partial class Exercise : Form
    {
        public Exercise()
        {
            InitializeComponent();
        }

        private void btnWrite_Click(object sender, EventArgs e)
        {
            Car vehicle = new Car();
            vehicle.Make  = txtMake.Text;
            vehicle.Model = txtModel.Text;
            vehicle.Year  = uint.Parse(txtYear.Text);
            vehicle.Color = cbxColors.SelectedIndex;

            FileStream stmCar = new FileStream("Car3.car",
                                               FileMode.Create);
            BinaryFormatter bfmCar = new BinaryFormatter();

            bfmCar.Serialize(stmCar, vehicle);
        }
    }
}

Practical Learning: Serializing an Object

  1. To create a new class, on the main menu, click Project -> Add Class...
  2. Set the Name to SampleProperty and click Add
  3. Change the file as follows:
    using System;
    using System.Collections.Generic;
    using System.Text;
    
    namespace RealEstate1
    {
        [Serializable]
        public class SampleProperty
        {
            public string PropertyNumber;
            public string PropertyType;
            public string Address;
            public string City;
            public string State;
            public int ZIPCode;
            public short Bedrooms;
            public float Bathrooms;
            public double MarketValue;
        }
    }
  4. On the main menu, click Windows -> AltairRealtors.cs [Design]
  5. On the form, double-click New Property...
  6. Implement the event as follows:
    private void btnNewProperty_Click(object sender, EventArgs e)
    {
        PropertyEditor editor = new PropertyEditor();
        DirectoryInfo dirInfo =
                Directory.CreateDirectory(@"C:\Altair Realtors\Properties");
    
        Random rnd = new Random();
        int left = rnd.Next(100, 999);
        int right = rnd.Next(100, 999);
        editor.txtPropertyNumber.Text = left.ToString() + "-"
                                        + right.ToString();
    
        if (editor.ShowDialog() == DialogResult.OK)
        {
            SampleProperty prop = new SampleProperty();
            prop.PropertyNumber = editor.txtPropertyNumber.Text;
            prop.PropertyType = editor.cbxPropertyTypes.Text;
            prop.Address = editor.txtAddress.Text;
            prop.City = editor.txtCity.Text;
            prop.State = editor.cbxStates.Text;
            prop.ZIPCode = int.Parse(editor.txtZIPCode.Text);
            prop.Bedrooms = short.Parse(editor.txtBedrooms.Text);
            prop.Bathrooms = float.Parse(editor.txtBathrooms.Text);
            prop.MarketValue = double.Parse(editor.txtMarketValue.Text);
    
            string strFilename = dirInfo.FullName + "\\" +
                        editor.txtPropertyNumber.Text + ".prp";
            FileStream stmProperty = new FileStream(strFilename,
                        FileMode.Create, FileAccess.Write);
            BinaryFormatter bfmProperty = new BinaryFormatter();
    
            bfmProperty.Serialize(stmProperty, prop);
        }
    }
  7. Return to the form and double-click Close
  8. Implement the event as follows:
    private void btnClose_Click(object sender, EventArgs e)
    {
        Close();
    }
  9. Execute the application and continuously click the New Property button to create the following properties (let the computer specify the property number):
     
    Real Estate
     
    Property Type  Address  City State  ZIP Code Beds Baths Market Value
    Single Family 11604 Aldora Avenue Baltimore MD 21205 5 3.5 325650
    Townhouse 495 Parker House Terrace Gettysburg WV 26201 3 2.5 225500
    Condominium 5900 24th Street NW #812 Washington DC 20008 1 1.0 388665
    Single Family 6114 Costinha Avenue Martinsburg WV 25401 4 3.5 325000
    Condominium 10710 Desprello Street #10D Rockville MD 20856 1 1.0 528445
  10. Close the form and return to your programming environment

De-Serialization

As serialization is the process of storing an object to a medium, the opposite, serialization is used to retrieve an object from a stream. To support this, the BinaryFormatter class is equipped with the Deserialize() method. Like Serialize(), the Deserialize() method is overloaded with two versions. One of them uses the following syntax:

public object Deserialize(Stream serializationStream);

This method takes as argument a Stream-based object, such as a FileStream variable, that indicates where the file is located. The Deserialize() method returns an Object object. As a goal, you want the Deserialize() method to produce the type of object that was saved so you can retrieve the values that the returned object holds. Because the method returns an Object value, you must cast the returned value to the type of your class.

Once the Deserialize() method has returned the desired object, you can access its values. Here is an example:

using System;
using System.Collections.Generic;
using System.ComponentModel;
using System.Data;
using System.Drawing;
using System.Linq;
using System.Text;
using System.Windows.Forms;
using System.IO;
using System.Runtime.Serialization.Formatters.Binary;

namespace Cars1
{
    public partial class Exercise : Form
    {
        public Exercise()
        {
            InitializeComponent();
        }

        private void btnWrite_Click(object sender, EventArgs e)
        {
            Car vehicle = new Car();
            vehicle.Make  = txtMake.Text;
            vehicle.Model = txtModel.Text;
            vehicle.Year  = uint.Parse(txtYear.Text);
            vehicle.Color = cbxColors.SelectedIndex;

            FileStream stmCar = new FileStream("Car3.car",
                                             FileMode.Create);
            BinaryFormatter bfmCar = new BinaryFormatter();

            bfmCar.Serialize(stmCar, vehicle);
        }

        private void btnRead_Click(object sender, EventArgs e)
        {
            FileStream stmCar = new FileStream("Car3.car",
                                             FileMode.Open);
            BinaryFormatter bfmCar = new BinaryFormatter();
            Car vehicle = (Car)bfmCar.Deserialize(stmCar);

            txtMake.Text = vehicle.Make;
            txtModel.Text = vehicle.Model;
            txtYear.Text = vehicle.Year.ToString();
            cbxColors.SelectedIndex = vehicle.Color;
        }
    }
}

Practical Learning: De-Serializing an Object

  1. On the (first) form, double-click the Open button and implement its event as follows:
    private void btnOpen_Click(object sender, EventArgs e)
    {
        DirectoryInfo dirProperties =
    	 new DirectoryInfo(@"C:\Altair Realtors\Properties");
        FileInfo[] fleProperties = dirProperties.GetFiles();
    
        if (dirProperties.Exists == true)
        {
            bool found = false;
            SampleProperty prop = null;
    
            foreach (FileInfo fle in fleProperties)
            {
                FileStream stmProperty = new FileStream(fle.FullName,
                                                        FileMode.Open,
    						    FileAccess.Read);
                BinaryFormatter bfmProperty = new BinaryFormatter();
                prop = (SampleProperty)bfmProperty.Deserialize(stmProperty);
    
                if (prop.PropertyNumber == txtPropertyNumber.Text)
                {
                    found = true;
                }
            }
    
            if (found == true)
            {
                txtPropertyType.Text = prop.PropertyType;
                txtAddress.Text = prop.Address;
                txtCity.Text = prop.City;
                txtState.Text = prop.State;
                txtZIPCode.Text = prop.ZIPCode.ToString();
                txtBedrooms.Text = prop.Bedrooms.ToString();
                txtBathrooms.Text = prop.Bathrooms.ToString("F");
                txtMarketValue.Text = prop.MarketValue.ToString("F");
            }
            else
            {
                MessageBox.Show("There is no property with " +
    			    "that number in our database");
    
                txtPropertyType.Text = "Unknown";
                txtAddress.Text = "";
                txtCity.Text = "";
                txtState.Text = "";
                txtZIPCode.Text = "00000";
                txtBedrooms.Text = "0";
                txtBathrooms.Text = "0.00";
                txtMarketValue.Text = "0.00";
            }
        }
    }
  2. Execute the application and try opening a previously save property using its number
  3. Close the form and return to your programming environment

Details on Serialization


Partial Serialization

In the examples we have used so far, we were saving the whole object. You can make it possible to save only some parts of the class. When creating a class, you can specify what fields would be serialized and which ones would not be. To specify that a member cannot be saved, you can mark it with the [NonSerialized] attribute. Here is an example:

[Serializable]
public class Car
{
    public string Make;
    public string Model;

    // Because the value of a car can change,
    // there is no reason to save it
    [NonSerialized]
    public decimal Value;
    public uint Year;
    public byte Color;
}

After creating the class, you can declare a variable of it and serialize it, using either the binary or the SOAP approach. You can then retrieve the object and its values, using any of the techniques we learned earlier.

Implementing a Custom Serialized Class

To support serialization, the .NET Framework provides the ISerializable interface. You can create a class that implements this interface to customize the serialization process. Even if you plan to use this interface, the class you create must be marked with the [Serializable] attribute.

.NET Built-In Serialized Classes

The .NET Framework is filled with many classes ready for serialization. To know that a class is ready for serialization, when viewing its documentation either in the MSDN web site or in the help documentation, check that it is marked with the [SerializableAttribute]. Here is an example of such as class:

The Serializable attribute of a built-in class

Some of these classes provide the properties and methods to create an object and directly save it. For some other classes, you must first create a class, mark it with the [Serializable] attribute, build an object of it, and then pass it to the .NET class.


Home Copyright © 2010-2016, FunctionX