|
One day I saw a JavaScript program on the Internet
that uses a pseudo-progress bar to display the clock on a form. This
exercise uses the same approach.
Prerequisites:
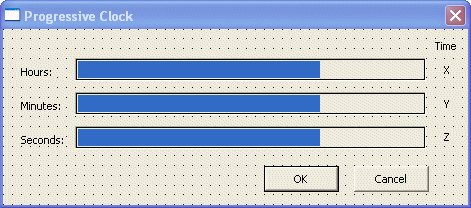
The dialog box on this exercise displays three
progress bars: one holds the value of the current hour, another holds the
value of the minutes in the current hour, the last displays the seconds of
the current minute. We also use a label on the right side of each progress
bar to display its corresponding value. |
To start this application, you can use either a form
or a dialog box. Then add the necessary controls to it as we will design
shortly. Although the hour holds 24 values while the minutes and the
seconds hold 60 values each, we will use the same dimensions (especially
the same width) for all progress controls. Because a progress control has
no mechanism or message to trigger the change of its position, we will use
a timer to handle such a message.
|
Practical Learning: Starting the Exercise |
|
- Start a new MFC Application named ProgressClock
- Create the project as a Dialog Based without an About Box. Set the Dialog Title
as Progressive Clock
- Add three Static Text controls to the left section of the dialog box with captions from top down as
Hours:, Minutes:, and Seconds: respectively
You will design the dialog box as follows:

- From the Controls toolbox, click the Progress button
 and click on the right side of the Hours label
- Using the Properties window, check its Smooth check box or set it to True
- Change its ID to IDC_PRGS_HOURS
- In the same way, add a Smooth progress bar to the right side of the Minutes label. Change its ID to
IDC_PRGS_MINUTES
- Once more, add a Smooth progress control to the right side of the Seconds static control and change its ID to
IDC_PRGS_SECONDS
- Add a Static Text control to the right side of the Hours progress control and change its ID to
IDC_VAL_HOURS
- Add another Static Text control to the right side of the Minutes progress bar and change its ID to
IDC_VAL_MINUTES
- Add another Static Text control to the right side of the Seconds progress bar and change its ID to
IDC_VAL_SECONDS
- Add a Static Text to the top right section of the dialog box and set its Caption to Time
- Add a Control Variable for the progress controls and name them from top down as:
m_ProgressHours, m_ProgressMinutes, and m_ProgressSeconds respectively
- Add a CString Value Variable for the IDC_VAL_HOURS, the
IDC_VAL_MINUTES, and the IDC_VAL_SECONDS identifiers and name them m_ValueHours,
m_ValueMinutes, and m_ValueSeconds respectively
- Test the application and return to MSVC
- To specify the initial values of the progress controls, set their range appropriately in the
OnInitDialog() event. Also, create a timer control:
BOOL CPClockDlg::OnInitDialog()
{
	CDialog::OnInitDialog();

	// Set the icon for this dialog. The framework does this automatically
	// when the application's main window is not a dialog
	SetIcon(m_hIcon, TRUE); // Set big icon
	SetIcon(m_hIcon, FALSE); // Set small icon

	// TODO: Add extra initialization here
	m_ProgressHours.SetRange(0, 23);
	m_ProgressHours.SetStep(1);
	m_ProgressMinutes.SetRange(0, 59);
	m_ProgressMinutes.SetStep(1);
	m_ProgressSeconds.SetRange(0, 59);
	m_ProgressSeconds.SetStep(1);

	SetTimer(1, 40, NULL);

	return TRUE; // return TRUE unless you set the focus to a control
}
|
- Generate the WM_TIMER message for the dialog box and implement it as follows:
void CPClockDlg::OnTimer(UINT nIDEvent)
{
	// TODO: Add your message handler code here and/or call default
	// Get the current time of the computer
	CTime CurTime = CTime::GetCurrentTime();

	// Find the hour, the minute, and the second values of the time
	int ValHours = CurTime.GetHour();
	int ValMinutes = CurTime.GetMinute();
	int ValSeconds = CurTime.GetSecond();

	// Change each progress bar accordingly
	m_ProgressHours.SetPos(ValHours);
	m_ProgressMinutes.SetPos(ValMinutes);
	m_ProgressSeconds.SetPos(ValSeconds);

	// Display the position of the progress in the right label
	m_ValueHours.Format("%d", m_ProgressHours.GetPos());
	m_ValueMinutes.Format("%d", m_ProgressMinutes.GetPos());
	m_ValueSeconds.Format("%d", m_ProgressSeconds.GetPos());
	UpdateData(FALSE);

	CDialog::OnTimer(nIDEvent);
}
|
- Test the application
- After using it, close it and return to your programming environment
|
|

