- Display the New (Project) dialog box to start a new application
- Create it using MFC AppWizard (exe) or MFC Application
- Set the name of the application to EmplSolutions
- Create it as a Single Document and accept the default view class as
CView
- Click Finish (and OK)
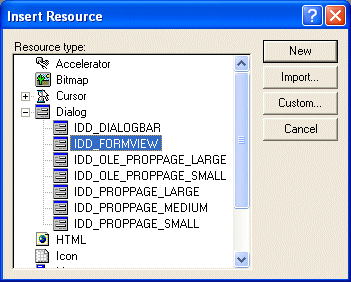
- To create a form, display the Insert Resources (Insert ->
Resource...) or the Add Resources (Project -> Add Resource...)
dialog box
- Expand the Dialog node and click IDD_FORMVIEW

- Click New
- On the form, delete the TODO line and place some random controls on
it
- Change the ID of the form to IDD_VIEW_EMPLAPP
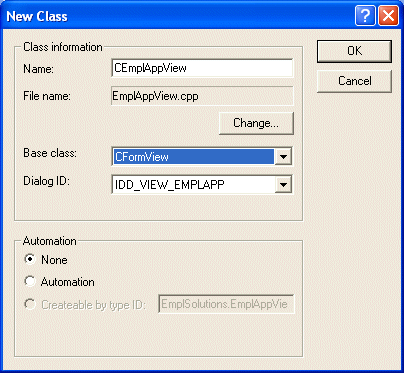
- Double-click an empty area on the form. When the Adding A Dialog Box
dialog comes up, click Create A New Class and click OK
- Set the Name of the class to CEmplAppView and set its Base Class to
CFormView

- Click OK twice
- Display the Insert Resource dialog box again
- Expand the Dialog node and double-click IDD_FORMVIEW
- Delete the TODO line and place some random controls on it
- Change the ID of the form to IDD_VIEW_TIMESHEET
- Create A New Class for the new form
- Name the class CTimeSheetView and base it on CFormView
- Display the Insert Resource dialog box again
- Expand the Dialog node and double-click IDD_FORMVIEW
- Delete the TODO line and place some random controls on it
- Change the ID of the form to IDD_VIEW_RFTIMEOFF
- Create A New Class for the new form
- Name the class CTimeOffView and base it on CFormView
- Display the EmplSolutions.cpp source file and change the default
document as follows:
// EmplSolutions.cpp : Defines the class behaviors for the application.
//

#include "stdafx.h"
#include "EmplSolutions.h"

#include "MainFrm.h"
#include "EmplSolutionsDoc.h"
#include "EmplSolutionsView.h"
#include "EmplAppView.h"

#ifdef _DEBUG
#define new DEBUG_NEW
#undef THIS_FILE
static char THIS_FILE[] = __FILE__;
#endif

/////////////////////////////////////////////////////////////////////////////
// CEmplSolutionsApp

BEGIN_MESSAGE_MAP(CEmplSolutionsApp, CWinApp)
	//{{AFX_MSG_MAP(CEmplSolutionsApp)
	ON_COMMAND(ID_APP_ABOUT, OnAppAbout)
	//}}AFX_MSG_MAP
	// Standard file based document commands
	ON_COMMAND(ID_FILE_NEW, CWinApp::OnFileNew)
	ON_COMMAND(ID_FILE_OPEN, CWinApp::OnFileOpen)
	// Standard print setup command
	ON_COMMAND(ID_FILE_PRINT_SETUP, CWinApp::OnFilePrintSetup)
END_MESSAGE_MAP()

/////////////////////////////////////////////////////////////////////////////
// CEmplSolutionsApp construction

CEmplSolutionsApp::CEmplSolutionsApp()
{
}

/////////////////////////////////////////////////////////////////////////////
// The one and only CEmplSolutionsApp object

CEmplSolutionsApp theApp;

/////////////////////////////////////////////////////////////////////////////
// CEmplSolutionsApp initialization

BOOL CEmplSolutionsApp::InitInstance()
{
	AfxEnableControlContainer();

	// Standard initialization

#ifdef _AFXDLL
	Enable3dControls();			// Call this when using MFC in a shared DLL
#else
	Enable3dControlsStatic();	// Call this when linking to MFC statically
#endif

	// Change the registry key under which our settings are stored.
	SetRegistryKey(_T("Local AppWizard-Generated Applications"));

	LoadStdProfileSettings();  // Load standard INI file options (including MRU)

	// Register document templates

	CSingleDocTemplate* pDocTemplate;
	pDocTemplate = new CSingleDocTemplate(
		IDR_MAINFRAME,
		RUNTIME_CLASS(CEmplSolutionsDoc),
		RUNTIME_CLASS(CMainFrame),       // main SDI frame window
		RUNTIME_CLASS(CEmplAppView));
	AddDocTemplate(pDocTemplate);

	// Parse command line for standard shell commands, DDE, file open
	CCommandLineInfo cmdInfo;
	ParseCommandLine(cmdInfo);

	// Dispatch commands specified on the command line
	if (!ProcessShellCommand(cmdInfo))
		return FALSE;
	m_pMainWnd->ShowWindow(SW_SHOW);
	m_pMainWnd->UpdateWindow();

	return TRUE;
}


. . .
|
- Test the application and close it to return to MSVC
- Display the IDR_MAINFRAME menu and change it as follows:
| ID |
Caption |
Prompt |
| ID_VIEW_EMPLAPP |
&Employment application |
Display the employment application\nEmployment Application |
| ID_VIEW_TIMESHEET |
Ti&me Sheet |
Display Time Sheet Form\nTime Sheet |
| ID_VIEW_REQTIMEOFF |
&Request For Time Off |
Display Request For Time Off form\nRequest For Time Off |
- Access the header file of the frame and declare an unsigned integer
of type UINT and named m_CurrentView
class CMainFrame : public CFrameWnd
{

protected: // create from serialization only
	CMainFrame();
	DECLARE_DYNCREATE(CMainFrame)

// Attributes
public:
	UINT m_CurrentView;

// Operations
public:

. . .
|
- In the constructor of the frame, initialize the above variable to
the IDentifier of the first view:
CMainFrame::CMainFrame()
{
	m_CurrentView = ID_VIEW_EMPLAPP;
}
|
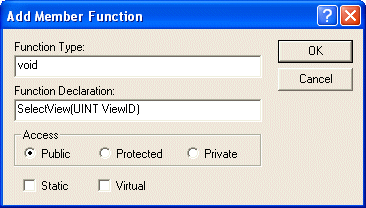
- In Class View, right-click the CMainFrame node and click Add Member
Function...
- Set the public function type as void and its name as SelectView
with an argument of type UINT named ViewID

- Implement the member function as follows:
// MainFrm.cpp : implementation of the CMainFrame class
//

#include "stdafx.h"
#include "EmplSolutions.h"

#include "MainFrm.h"
#include "EmplAppView.h"
#include "TimeSheetView.h"
#include "TimeOffView.h"

. . .

void CMainFrame::SelectView(UINT ViewID)
{
	// If the view the user selected is already displaying, do nothing
	if( ViewID == m_CurrentView )
		return;

	// Get a pointer to the current view
	CView* pCurrentView = GetActiveView();

	// We are about to change the view, so we need a pointer to the runtime class
	CRuntimeClass* pNewView;

	// We will process a form
	// First, let's change the identifier of the current view to our integer
	::SetWindowLong(pCurrentView->m_hWnd, GWL_ID, m_CurrentView);

	// Now we will identify what form the user selected
	switch(ViewID)
	{
	case ID_VIEW_EMPLAPP:
		pNewView = RUNTIME_CLASS(CEmplAppView);
		break;

	case ID_VIEW_TIMESHEET:
		pNewView = RUNTIME_CLASS(CTimeSheetView);
		break;

	case ID_VIEW_REQTIMEOFF:
		pNewView = RUNTIME_CLASS(CTimeOffView);
		break;
	}

	// We will deal with the frame
	CCreateContext crtContext;

	// We have a new view now. So we initialize the context
	crtContext.m_pNewViewClass = pNewView;
	// No need to change the document. We keep the current document
	crtContext.m_pCurrentDoc   = GetActiveDocument();

	CView* pNewViewer = STATIC_DOWNCAST(CView, CreateView(&crtContext));

	// Now we can create a new view and get rid of the previous one
	if( pNewViewer != NULL )
	{
		pNewViewer->ShowWindow(SW_SHOW);
		pNewViewer->OnInitialUpdate();
		SetActiveView(pNewViewer);
		RecalcLayout();
		m_CurrentView = ViewID;
		pCurrentView->DestroyWindow();
	}
}
|
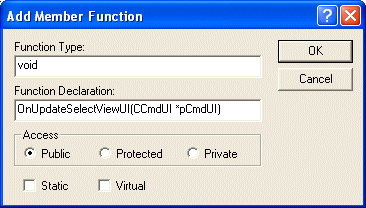
- In Class View, right-click the CMainFrame node and click Add Member
Function...
- Set the function type as void and its name as OnUpdateSelectViewUI
with a pointer argument of type CCmdUI* named pCmdUI

- Click OK
- Implement the member function as follows:
void CMainFrame::OnUpdateSelectViewUI(CCmdUI *pCmdUI)
{
	pCmdUI->SetCheck(pCmdUI->m_nID == m_CurrentView);
}
|
- In the same source file, to use the above two member functions for
the menu items used to change the view, create their command ranges as
follows:
/////////////////////////////////////////////////////////////////////////////
// CMainFrame

IMPLEMENT_DYNCREATE(CMainFrame, CFrameWnd)

BEGIN_MESSAGE_MAP(CMainFrame, CFrameWnd)
	//{{AFX_MSG_MAP(CMainFrame)
	ON_WM_CREATE()
	//}}AFX_MSG_MAP
	ON_COMMAND_RANGE(ID_VIEW_EMPLAPP, ID_VIEW_REQTIMEOFF, SelectView)
	ON_UPDATE_COMMAND_UI_RANGE(ID_VIEW_EMPLAPP, ID_VIEW_REQTIMEOFF, OnUpdateSelectViewUI)
END_MESSAGE_MAP()
|
- Test the application and change different views
|

