Home

Windows Controls: Scroll Bars


Introduction to Scroll Bars


Overview

A scroll bar is an object that allows the user to navigate either left and right or up and down, either on a document or on a section of the window. A scroll bar appears as a long bar with a (small) button at each end. Between these buttons, there is a moveable bar called a thumb. To scroll, the user can click one of the buttons or grab the thumb and drag it:

Types of Scroll Bars

There are two types of scroll bars: vertical or horizontal. A vertical scroll bar allows the user to navigate up and down on a document or a section of a window. A horizontal scroll bar allows the user to navigate left and right on a document or a section of a window.

As far as Microsoft Windows is concerned, there are two categories of scroll bars: automatic and control-based.


Practical LearningPractical Learning: Introducing Scroll Bars

  1. Because Borland C++BuilderX is free, we are going to use it.
    Start Borland C++ Builder X and, on the main menu, click File -> New...
     
  2. In the Object Gallery dialog box, click New GUI Application and click OK
  3. In the New GUI Application Project Wizard - Step 1 of 3, in the Directory edit box of the Project Settings section, type the path you want. Otherwise, type
    C:\Programs\Win32 Programming
  4. In the Name edit box, type ScrollBars
     
  5. Click Next
  6. In the New GUI Application Project Wizard - Step 2 of 3, accept the defaults and click Next
  7. In the New GUI Application Project Wizard - Step 3 of 3, click the check box under Create
  8. Select Untitled under the Name column header. Type Exercise to replace the name and press Tab
     
  9. Click Finish
  10. In the left frame, double-click Exercise.cpp and change the file to the following:
    #include <windows.h>
    #ifdef __BORLANDC__
      #pragma argsused
    #endif
    
    const char *ClsName = "CtrlExos";
    const char *WndName = "Controls Examples";
    HINSTANCE hInst;
    
    LRESULT CALLBACK WndProcedure(HWND hWnd, UINT uMsg,
                               WPARAM wParam, LPARAM lParam);
    
    int APIENTRY WinMain(HINSTANCE hInstance, HINSTANCE hPrevInstance,
    		   LPSTR lpCmdLine, int nCmdShow)
    {
            MSG        Msg;
            HWND       hWnd;
            WNDCLASSEX WndClsEx;
    
            hInst = hInstance;
    
            // Create the application window
            WndClsEx.cbSize        = sizeof(WNDCLASSEX);
            WndClsEx.style         = CS_HREDRAW | CS_VREDRAW;
            WndClsEx.lpfnWndProc   = WndProcedure;
            WndClsEx.cbClsExtra    = 0;
            WndClsEx.cbWndExtra    = 0;
            WndClsEx.hIcon         = LoadIcon(NULL, IDI_APPLICATION);
            WndClsEx.hCursor       = LoadCursor(NULL, IDC_ARROW);
            WndClsEx.hbrBackground = (HBRUSH)GetStockObject(WHITE_BRUSH);
            WndClsEx.lpszMenuName  = NULL;
            WndClsEx.lpszClassName = ClsName;
            WndClsEx.hInstance     = hInst;
            WndClsEx.hIconSm       = LoadIcon(NULL, IDI_APPLICATION);
    
            // Register the application
            RegisterClassEx(&WndClsEx);
    
            // Create the window object
            hWnd = CreateWindow(ClsName,
                              WndName,
                              WS_OVERLAPPEDWINDOW,
                              CW_USEDEFAULT,
                              CW_USEDEFAULT,
                              CW_USEDEFAULT,
                              CW_USEDEFAULT,
                              NULL,
                              NULL,
                              hInst,
                              NULL);
    
            // Find out if the window was created successfully
            if( !hWnd ) // If the window was not created,
                    return 0; // stop the application
    
            // Display the window to the user
            ShowWindow(hWnd, SW_SHOWNORMAL);
            UpdateWindow(hWnd);
    
            // Decode and treat the messages
            // as long as the application is running
            while( GetMessage(&Msg, NULL, 0, 0) )
            {
                 TranslateMessage(&Msg);
                 DispatchMessage(&Msg);
            }
    
            return Msg.wParam;
    }
    
    LRESULT CALLBACK WndProcedure(HWND hWnd, UINT Msg,
                               WPARAM wParam, LPARAM lParam)
    {
        switch(Msg)
        {
        case WM_CREATE:
            // There is nothing significant to do at this time
            return 0;
    
        case WM_DESTROY:
            // If the user has finished, then close the window
            PostQuitMessage(WM_QUIT);
            break;
        default:
            // Process the left-over messages
            return DefWindowProc(hWnd, Msg, wParam, lParam);
        }
        // If something was not done, let it go
        return 0;
    }
  11. Press F9 to test the application


Automatic Scroll Bars

Some controls need a scroll bar to efficiently implement their functionality. The primary example is the edit control, which is used to display text. On that control, when the text is too long, the user needs to be able to scroll down and up to access the document fully. In the same way, if the text is too wide, the user needs to be able to scroll left and right to view the whole document.

When creating a text-based document or window, you can easily ask that one or both scroll bars be added. Of course, an edit control must be able to handle multiple lines of text. This is taken care of by adding the ES_MULTILINE flag to its styles. Then:

  • To add a vertical scroll bar to the window, add the WS_VSCROLL flag to the Style argument of the CreateWindow() or the CreateWindowEx() function.
  • To add a horizontal scroll bar to the window, add the WS_HSCROLL flag to the Style argument of the CreateWindow() or the CreateWindowEx() function.
  • To make the vertical scroll bar appear when necessary, that is, when the document is too long, add the ES_AUTOVSCROLL style
  • To make the horizontal scroll bar appear as soon as at least one line of the document is too wide, add the ES_AUTOVSCROLL style

Of course, you can use only one, two, three or all four styles.


Practical LearningPractical Learning: Automatically Handling Scroll Bars

  1. To create a small editor with its scroll bars, modify the procedure as follows:
    LRESULT CALLBACK WndProcedure(HWND hWnd, UINT Msg,
                               WPARAM wParam, LPARAM lParam)
    {
        static HWND hWndEdit;
    
        switch(Msg)
        {
        case WM_CREATE:
    
            hWndEdit = CreateWindow("EDIT", // We are creating an Edit control
                                    NULL,   // Leave the control empty
                                    WS_CHILD | WS_VISIBLE | WS_HSCROLL |
                                        WS_VSCROLL | ES_LEFT | ES_MULTILINE |
                                        ES_AUTOHSCROLL | ES_AUTOVSCROLL,
                                    0, 0, 0, 0, // Let the WM_SIZE messge below take care of the size
                                    hWnd,
                                    0,
                                    hInst,
                                    NULL);
    
            return 0;
    
        case WM_SETFOCUS:
            SetFocus(hWndEdit);
            return 0;
    
        case WM_SIZE:
            MoveWindow(hWndEdit, 0, 0, LOWORD(lParam), HIWORD(lParam), TRUE);
            return 0;
    
        case WM_DESTROY:
            // If the user has finished, then close the window
            PostQuitMessage(WM_QUIT);
            break;
        default:
            // Process the left-over messages
            return DefWindowProc(hWnd, Msg, wParam, lParam);
        }
        // If something was not done, let it go
        return 0;
    }
    
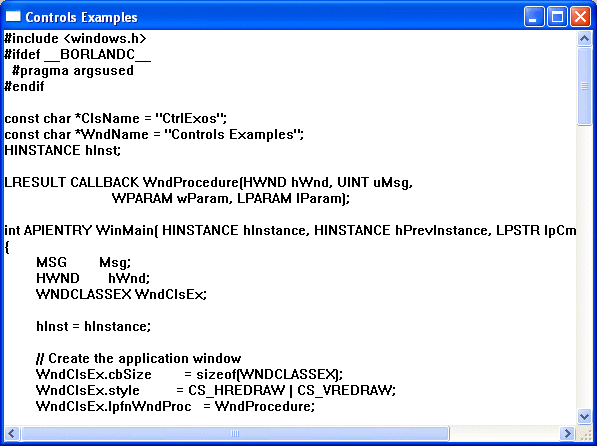
  2. Test the application


 Control-Based Scroll Bars


Introduction

Microsoft Windows provides another type of scroll bar. Treated as its own control, a scroll bar is created like any other window and can be positioned anywhere on its host.

To create a scroll bar as a Windows control, call the CreateWindow() or the CreateWindowEx() functions and specify the class name as SCROLLBAR.

Practical LearningPractical Learning: Using Scroll Bar Controls

  1. Start a new GUI Application and name it CtrlScrollBars
  2. Create its accompanying file as Exercise.cpp
  3. To create a resource header file, on the main menu, click File -> New File...
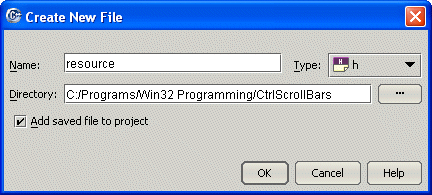
  4. In the Create New File dialog box, in the Name, type resource
  5. In the Type combo box, select h
     
  6. Click OK
  7. In the file, type:
    #define IDD_CONTROLS_DLG  101
    #define IDC_CLOSE_BTN     1000
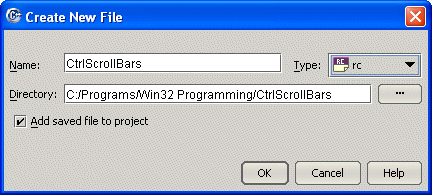
  8. To create a resource script, on the main menu, click File -> New File...
  9. In the Create New File dialog box, in the Name, type CtrlScrollBars
  10. In the Type combo box, select rc
     
  11. Click OK
  12. In the file, type:
    #include "resource.h"
    
    IDD_CONTROLS_DLG DIALOG DISCARDABLE  200, 150, 235, 151
    STYLE DS_MODALFRAME | WS_POPUP | WS_CAPTION | WS_SYSMENU
    CAPTION "Windows Controls"
    FONT 8, "MS Sans Serif"
    BEGIN
        PUSHBUTTON      "&Close",IDC_CLOSE_BTN,178,7,50,14
    END
  13. Display the Exercise.cpp file and change it as follows:
    #include <windows.h>
    #ifdef __BORLANDC__
      #pragma argsused
    #endif
    
    #include "resource.h"
    
    //---------------------------------------------------------------------------
    HWND hWnd;
    HINSTANCE hInst;
    LRESULT CALLBACK DlgProc(HWND hWnd, UINT Msg, WPARAM wParam, LPARAM lParam);
    //---------------------------------------------------------------------------
    int APIENTRY WinMain( HINSTANCE hInstance, HINSTANCE hPrevInstance, LPSTR lpCmdLine, int nCmdShow )
    {
        hInst = hInstance;
    
        DialogBox(hInst, MAKEINTRESOURCE(IDD_CONTROLS_DLG),
                  hWnd, reinterpret_cast<DLGPROC>(DlgProc));
    
      return 0;
    }
    //---------------------------------------------------------------------------
    LRESULT CALLBACK DlgProc(HWND hWndDlg, UINT Msg,
                           WPARAM wParam, LPARAM lParam)
    {
            switch(Msg)
            {
            case WM_INITDIALOG:
                    return TRUE;
    
            case WM_COMMAND:
                    switch(wParam)
                    {
                      case IDC_CLOSE_BTN:
                          EndDialog(hWndDlg, 0);
                          return TRUE;
                    }
                    break;
    
            case WM_CLOSE:
                    PostQuitMessage(WM_QUIT);
                    break;
            }
    
            return FALSE;
    }
    //---------------------------------------------------------------------------
  14. Test the application

Scroll Bar Creation

The easiest way to add a scroll bar to a project is through the resource script of the project. The syntax to follow is:

SCROLLBAR id, x, y, width, height [[, style [[, ExtendedStyle]]]]

This declaration starts with the SCROLLBAR keyword as the name of the class that creates a scroll bar.

The id is the identification of the control

The x parameter is the Left parameter of the control

The y parameter is the Top parameter of the control

The width parameter is the distance from the left to the right border of the control

The height parameter is the distance from the top to the bottom border of the control

These 5 parameters are required. Here is an example:

SCROLLBAR IDC_SCROLLBAR1,10,45,215,11

Alternatively, to create a scroll bar, you can use either the CreateWindow() or the CreateWindowEx() functions, specifying the class name as SCROLLBAR. Here is an example:

//---------------------------------------------------------------------------
LRESULT CALLBACK DlgProc(HWND hWndDlg, UINT Msg,
                       WPARAM wParam, LPARAM lParam)
{
    switch(Msg)
    {
    case WM_INITDIALOG:
        CreateWindowEx(0L,
                       "SCROLLBAR",
                       NULL, // There is no text to display
                       WS_CHILD | WS_VISIBLE,
                       50,
                       20,
                       220,
                       21,
                       hWndDlg,
                       NULL,
                       hInst,
                       NULL);

                return TRUE;

    case WM_CLOSE:
         PostQuitMessage(WM_QUIT);
         break;
    }

    return FALSE;
}
//---------------------------------------------------------------------------

A third alternative is to create your own class. Here is an example:

#include <windows.h>
#include "Resource.h"
//---------------------------------------------------------------------------
class WScrollBar
{
public:
	WScrollBar();
	HWND Create(HWND parent, HINSTANCE hinst,
		   DWORD dStyle = WS_CHILD | WS_VISIBLE,
		   int x = 0, int y = 0, int width = 200, int height = 20);
	virtual ~WScrollBar();
	HWND hWndScrollBar;
private:
};
//---------------------------------------------------------------------------
WScrollBar::WScrollBar()
{
}
//---------------------------------------------------------------------------
WScrollBar::~WScrollBar()
{
}
//---------------------------------------------------------------------------
HWND WScrollBar::Create(HWND parent, HINSTANCE hinst,
		      DWORD dStyle, int x, int y, int width, int height)
{
	hWndScrollBar = CreateWindow("SCROLLBAR", NULL, dStyle,
			           x, y, width, height, parent,
				  NULL, hinst, NULL);
	return hWndScrollBar;
}
//---------------------------------------------------------------------------
HWND hWnd;
HINSTANCE hInst;
LRESULT CALLBACK DlgProc(HWND hWnd, UINT Msg, WPARAM wParam, LPARAM lParam);
//---------------------------------------------------------------------------
INT WINAPI WinMain(HINSTANCE hInstance, HINSTANCE hPrevInstance,
				   LPSTR lpCmdLine, int nCmdShow)
{
	hInst = hInstance;

	DialogBox(hInst, MAKEINTRESOURCE(IDD_CONTROLS_DLG),
	          hWnd, reinterpret_cast<DLGPROC>(DlgProc));

	return FALSE;
}
//---------------------------------------------------------------------------
LRESULT CALLBACK DlgProc(HWND hWndDlg, UINT Msg,
		       WPARAM wParam, LPARAM lParam)
{
	WScrollBar ScrBar;

	switch(Msg)
	{
	case WM_INITDIALOG:
		ScrBar.Create(hWndDlg, hInst);
		return TRUE;

	case WM_COMMAND:
		switch(wParam)
		{
		case IDCANCEL:
			EndDialog(hWndDlg, 0);
			break;
		}
		break;

	case WM_CLOSE:
		PostQuitMessage(WM_QUIT);
		break;
	}

	return FALSE;
}
//---------------------------------------------------------------------------

Practical Learning Practical Learning: Creating a Scroll Bar

  1. Before creating the scroll bar control, modify the resource.h file as follows:
     
    #define IDD_CONTROLS_DLG  101
    #define IDC_CLOSE_BTN     1000
    #define IDC_SCROLLER      1001
  2. To add a scroll bar to the dialog box, add the following line:
     
    #include "resource.h"
    
    IDD_CONTROLS_DLG DIALOG DISCARDABLE  200, 150, 235, 151
    STYLE DS_MODALFRAME | WS_POPUP | WS_CAPTION | WS_SYSMENU
    CAPTION "Windows Controls"
    FONT 8, "MS Sans Serif"
    BEGIN
        PUSHBUTTON      "&Close",IDC_CLOSE_BTN,178,7,50,14
        SCROLLBAR       IDC_SCROLLER,10,45,215,11
    END
  3. Test the application
     
  4. Return to your programming environment

Scroll Bar Characteristics

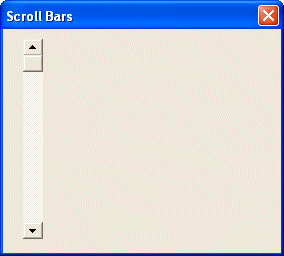
As mentioned already, there are two categories of scroll bars. The desired category is set using one of the scroll bar styles. As you can see from the above picture, the default orientation of a scroll bar is horizontal whose value is SBS_HORZ. If you want to produce a vertical scroll bar, you can OR the SBS_VERT style in addition to Windows styles but do not OR both SBS_HORZ and SBS_VERT styles on the same control. Here is an example that creates a vertical scroll bar control. Here is an example that creates a vertical scroll bar:

//---------------------------------------------------------------------------
LRESULT CALLBACK DlgProc(HWND hWndDlg, UINT Msg,
		       WPARAM wParam, LPARAM lParam)
{
	WScrollBar ScrBar;

	switch(Msg)
	{
	case WM_INITDIALOG:
		ScrBar.Create(hWndDlg, hInst, WS_CHILD | WS_VISIBLE | SBS_VERT,
					  20, 10, 20, 200);
		return TRUE;

	case WM_CLOSE:
		PostQuitMessage(WM_QUIT);
		break;
	}

	return FALSE;
}
//---------------------------------------------------------------------------

This would produce:


Practical Learning Practical Learning: Creating a Vertical Scroll Bar

  1. To make the scroll bar vertical, change the script as follows:
     
    #include "resource.h"
    
    IDD_CONTROLS_DLG DIALOG DISCARDABLE  200, 150, 235, 151
    STYLE DS_MODALFRAME | WS_POPUP | WS_CAPTION | WS_SYSMENU
    CAPTION "Windows Controls"
    FONT 8, "MS Sans Serif"
    BEGIN
        PUSHBUTTON      "&Close",IDC_CLOSE_BTN,178,7,50,14
        SCROLLBAR       IDC_SCROLLER,10,10,15,130,SBS_VERT
    END
  2. Test the application

Scroll Bar Functions

The SCROLLBAR class provides various functions that can be used to set its limits or change its position, etc. To use the scroll bar as a control, you should know its limits. These define the minimum and the maximum values that the thumb can navigate to. To set this range of values, you can call the SetScrollRange() function. Its syntax is:

BOOL SetScrollRange(HWND hWnd, int nBar, int nMinPos, int nMaxPos, BOOL bRedraw);

Here is an example:

#include <windows.h>
#include "Resource.h"
//---------------------------------------------------------------------------
class WScrollBar
{
public:
	WScrollBar();
	HWND Create(HWND parent, HINSTANCE hinst,
				DWORD dStyle = WS_CHILD | WS_VISIBLE,
				int x = 0, int y = 0, int width = 200, int height = 20);
	virtual ~WScrollBar();
	HWND hWndScrollBar;
	BOOL SetScrollRange(int min = 0, int max = 100, BOOL redraw = TRUE);
private:
};
//---------------------------------------------------------------------------
WScrollBar::WScrollBar()
{
}
//---------------------------------------------------------------------------
WScrollBar::~WScrollBar()
{
}
//---------------------------------------------------------------------------
HWND WScrollBar::Create(HWND parent, HINSTANCE hinst,
				DWORD dStyle, int x, int y, int width, int height)
{
	hWndScrollBar = CreateWindow("SCROLLBAR", NULL, dStyle,
			         x, y, width, height, parent, NULL, hinst, NULL);
	return hWndScrollBar;
}
//---------------------------------------------------------------------------
BOOL WScrollBar::SetScrollRange(int min, int max, BOOL redraw)
{
	BOOL SSR = ::SetScrollRange(hWndScrollBar, SB_CTL, min, max, TRUE);

	return SSR;
}
//---------------------------------------------------------------------------
HWND hWnd;
HINSTANCE hInst;
LRESULT CALLBACK DlgProc(HWND hWnd, UINT Msg, WPARAM wParam, LPARAM lParam);
//---------------------------------------------------------------------------
INT WINAPI WinMain(HINSTANCE hInstance, HINSTANCE hPrevInstance,
				   LPSTR lpCmdLine, int nCmdShow)
{
	hInst = hInstance;

	DialogBox(hInst, MAKEINTRESOURCE(IDD_CONTROLS_DLG),
	          hWnd, reinterpret_cast<DLGPROC>(DlgProc));

	return FALSE;
}
//---------------------------------------------------------------------------
LRESULT CALLBACK DlgProc(HWND hWndDlg, UINT Msg,
		       WPARAM wParam, LPARAM lParam)
{
	WScrollBar ScrBar;
	

	switch(Msg)
	{
	case WM_INITDIALOG:
		ScrBar.Create(hWndDlg, hInst, WS_CHILD | WS_VISIBLE | SBS_VERT,
					  20, 10, 20, 200);
		ScrBar.SetScrollRange(0, 224);

		return TRUE;

	case WM_CLOSE:
		PostQuitMessage(WM_QUIT);
		break;
	}

	return FALSE;
}
//---------------------------------------------------------------------------

If the limits of the controls have already been set, you can find them out by calling the GetScrollRange() function. Its syntax is:

BOOL GetScrollRange(HWND hWnd, int nBar, LPINT lpMinPos, LPINT lpMaxPos);

Here is an example:

//---------------------------------------------------------------------------
class WScrollBar
{
public:
	WScrollBar();
	HWND Create(HWND parent, HINSTANCE hinst,
				DWORD dStyle = WS_CHILD | WS_VISIBLE,
				int x = 0, int y = 0, int width = 200, int height = 20);
	virtual ~WScrollBar();
	HWND hWndScrollBar;
	BOOL SetScrollRange(int min = 0, int max = 100, BOOL redraw = TRUE);
	BOOL GetScrollRange(int *min, int *max) const;
private:
};
//---------------------------------------------------------------------------
WScrollBar::WScrollBar()
{
}
//---------------------------------------------------------------------------
WScrollBar::~WScrollBar()
{
}
//---------------------------------------------------------------------------
HWND WScrollBar::Create(HWND parent, HINSTANCE hinst,
		      DWORD dStyle, int x, int y, int width, int height)
{
	hWndScrollBar = CreateWindow("SCROLLBAR", NULL, dStyle,
			           x, y, width, height, parent,
				  NULL, hinst, NULL);
	return hWndScrollBar;
}
//---------------------------------------------------------------------------
BOOL WScrollBar::SetScrollRange(int min, int max, BOOL redraw)
{
	BOOL SSR = ::SetScrollRange(hWndScrollBar, SB_CTL, min, max, TRUE);

	return SSR;
}
//---------------------------------------------------------------------------
BOOL WScrollBar::GetScrollRange(int *min, int *max) const
{
	BOOL GSR = ::GetScrollRange(hWndScrollBar, SB_CTL, min, max);

	return GSR;
}
//---------------------------------------------------------------------------

When a window that has a scroll bar control comes up, the thumb is positioned in its minimum value. You may want the control to be positioned somewhere else than that. This attribute is taken care of by the SetScrollPos() function. Its syntax:

int SetScrollPos(HWND hWnd, int nBar, int nPos, BOOL bRedraw);

You can implement and use this function as follows:

#include <windows.h>
#include "Resource.h"
//---------------------------------------------------------------------------
class WScrollBar
{
public:
	WScrollBar();
	HWND Create(HWND parent, HINSTANCE hinst,
				DWORD dStyle = WS_CHILD | WS_VISIBLE,
				int x = 0, int y = 0, int width = 200, int height = 20);
	virtual ~WScrollBar();
	HWND hWndScrollBar;
	BOOL SetScrollRange(int min = 0, int max = 100, BOOL redraw = TRUE);
	BOOL GetScrollRange(int *min, int *max) const;
	int SetScrollPos(const int pos);
private:
};
//---------------------------------------------------------------------------
WScrollBar::WScrollBar()
{
}
//---------------------------------------------------------------------------
WScrollBar::~WScrollBar()
{
}
//---------------------------------------------------------------------------
HWND WScrollBar::Create(HWND parent, HINSTANCE hinst,
		      DWORD dStyle, int x, int y, int width, int height)
{
	hWndScrollBar = CreateWindow("SCROLLBAR", NULL, dStyle,
			         x, y, width, height, parent, NULL, hinst, NULL);
	return hWndScrollBar;
}
//---------------------------------------------------------------------------
BOOL WScrollBar::SetScrollRange(int min, int max, BOOL redraw)
{
	BOOL SSR = ::SetScrollRange(hWndScrollBar, SB_CTL, min, max, TRUE);

	return SSR;
}
//---------------------------------------------------------------------------
BOOL WScrollBar::GetScrollRange(int *min, int *max) const
{
	BOOL GSR = ::GetScrollRange(hWndScrollBar, SB_CTL, min, max);

	return GSR;
}
//---------------------------------------------------------------------------
int WScrollBar::SetScrollPos(const int position)
{
	int SSP = ::SetScrollPos(hWndScrollBar, SB_CTL, position, TRUE);

	return SSP;
}
//---------------------------------------------------------------------------
HWND hWnd;
HINSTANCE hInst;
LRESULT CALLBACK DlgProc(HWND hWnd, UINT Msg, WPARAM wParam, LPARAM lParam);
//---------------------------------------------------------------------------
INT WINAPI WinMain(HINSTANCE hInstance, HINSTANCE hPrevInstance,
				   LPSTR lpCmdLine, int nCmdShow)
{
	hInst = hInstance;

	DialogBox(hInst, MAKEINTRESOURCE(IDD_CONTROLS_DLG),
	          hWnd, reinterpret_cast<DLGPROC>(DlgProc));

	return FALSE;
}
//---------------------------------------------------------------------------
LRESULT CALLBACK DlgProc(HWND hWndDlg, UINT Msg,
		       WPARAM wParam, LPARAM lParam)
{
	WScrollBar ScrBar;
	

	switch(Msg)
	{
	case WM_INITDIALOG:
		ScrBar.Create(hWndDlg, hInst, WS_CHILD | WS_VISIBLE | SBS_VERT,
					  20, 10, 20, 200);
		ScrBar.SetScrollRange(0, 224);
		ScrBar.SetScrollPos(88);

		return TRUE;

	case WM_CLOSE:
		PostQuitMessage(WM_QUIT);
		break;
	}

	return FALSE;
}
//---------------------------------------------------------------------------

Practical Learning Practical Learning: Initializing a Scroll Bar

  1. To set the scroll range and initial position of the control, initialize it in the procedure as follows:
     
    //---------------------------------------------------------------------------
    LRESULT CALLBACK DlgProc(HWND hWndDlg, UINT Msg,
                             WPARAM wParam, LPARAM lParam)
    {
        HWND hWndScroller;
        SCROLLINFO si;
    
        hWndScroller = GetDlgItem(hWndDlg, IDC_SCROLLER);
    
        switch(Msg)
        {
        case WM_INITDIALOG:
            ZeroMemory(&si, sizeof(si));
            si.cbSize = sizeof(si);
            si.fMask  = SIF_RANGE | SIF_PAGE | SIF_POS;
            si.nMin   = 0;
            si.nMax   = 240;
            si.nPage  = 10;
            si.nPos   = 54;
            SetScrollInfo(hWndScroller, SB_CTL, &si, TRUE);
    
            return TRUE;
    
        case WM_COMMAND:
            switch(wParam)
            {
                case IDC_CLOSE_BTN:
                EndDialog(hWndDlg, 0);
                return TRUE;
            }
            break;
    
            case WM_CLOSE:
                    PostQuitMessage(WM_QUIT);
                    break;
            }
    
            return FALSE;
    }
    //---------------------------------------------------------------------------
  2. Test the application
     

Scroll Bar Messages

To use a scroll bar, a person either clicks one of its buttons, clicks and hold the mouse on one of its buttons, drags the thumb, or clicks an area on either side of the thumb. Any of these actions sends a message that specifies the item the user clicked or dragged. To support this, each category of scroll bar sends the appropriate message.

Practical Learning Practical Learning: Processing Scroll Bar Messages

  1. Modify the resource header as follows:
     
    #define IDD_CONTROLS_DLG  101
    #define IDC_CLOSE_BTN     1000
    #define IDC_SCROLLER      1001
    #define IDC_LABEL         1002
  2. Create a label in the resource script file as follows:
     
    #include "resource.h"
    
    IDD_CONTROLS_DLG DIALOG DISCARDABLE  200, 150, 235, 151
    STYLE DS_MODALFRAME | WS_POPUP | WS_CAPTION | WS_SYSMENU
    CAPTION "Windows Controls"
    FONT 8, "MS Sans Serif"
    BEGIN
        PUSHBUTTON      "&Close",IDC_CLOSE_BTN,178,7,50,14
        SCROLLBAR       IDC_SCROLLER,10,10,15,130,SBS_VERT
        LTEXT           "000",IDC_LABEL,40,68,13,8
    END
    
  3. To process a few messages of the scroll bar, change the procedure as follows:
     
    #include <windows.h>
    #include <cstdio>
    using namespace std;
    
    #ifdef __BORLANDC__
      #pragma argsused
    #endif
    
    #include "resource.h"
    //---------------------------------------------------------------------------
    HWND hWnd;
    HINSTANCE hInst;
    LRESULT CALLBACK DlgProc(HWND hWnd, UINT Msg, WPARAM wParam, LPARAM lParam);
    //---------------------------------------------------------------------------
    int APIENTRY WinMain( HINSTANCE hInstance, HINSTANCE hPrevInstance, LPSTR lpCmdLine, int nCmdShow )
    {
        hInst = hInstance;
    
        DialogBox(hInst, MAKEINTRESOURCE(IDD_CONTROLS_DLG),
                  hWnd, reinterpret_cast<DLGPROC>(DlgProc));
    
      return 0;
    }
    //---------------------------------------------------------------------------
    LRESULT CALLBACK DlgProc(HWND hWndDlg, UINT Msg,
                           WPARAM wParam, LPARAM lParam)
    {
        HWND hWndScroller;
        SCROLLINFO si;
        int CurPos;
        char strPosition[20];
    
        hWndScroller = GetDlgItem(hWndDlg, IDC_SCROLLER);
    
        switch(Msg)
        {
        case WM_INITDIALOG:
            CurPos = 0;
    
            ZeroMemory(&si, sizeof(si));
            si.cbSize = sizeof(si);
            si.fMask  = SIF_RANGE | SIF_PAGE | SIF_POS;
            si.nMin   = 0;
            si.nMax   = 240;
            si.nPage  = 10;
            si.nPos   = 54;
            SetScrollInfo(hWndScroller, SB_CTL, &si, TRUE);
    
            sprintf(strPosition, "%d", si.nPos);
            SetDlgItemText(hWndDlg, IDC_LABEL, strPosition);
    
            return TRUE;
    
        case WM_VSCROLL:
                    CurPos = GetScrollPos(hWndScroller, SB_CTL);
    
                    switch (LOWORD(wParam))
                    {
                    case SB_TOP:
                            CurPos = 0;
                            break;
    
                    case SB_LINEUP:
                            if (CurPos > 0)
                                    CurPos--;
                            break;
    
                    case SB_THUMBPOSITION:
                            CurPos = HIWORD(wParam);
                            break;
    
                    case SB_THUMBTRACK:
                            CurPos = HIWORD(wParam);
                            break;
    
                    case SB_LINEDOWN:
                            if (CurPos < 240)
                                    CurPos++;
                            break;
    
                    case SB_BOTTOM:
                            CurPos = 240;
                            break;
    
                    case SB_ENDSCROLL:
                            break;
                    }
    
            SetScrollPos(hWndScroller, SB_CTL, CurPos, TRUE);
    
            sprintf(strPosition, "%d", CurPos);
            SetDlgItemText(hWndDlg, IDC_LABEL, strPosition);
    
            break;
    
        case WM_COMMAND:
            switch(wParam)
            {
                case IDC_CLOSE_BTN:
                EndDialog(hWndDlg, 0);
                return TRUE;
            }
            break;
    
            case WM_CLOSE:
                    PostQuitMessage(WM_QUIT);
                    break;
            }
    
            return FALSE;
    }
    //---------------------------------------------------------------------------
  4. Test the application


Home