To perform a mail merge, you can use text that was prepared from a flat (ASCII)
text document.
You can create a text document from Notepad, WordPad, Microsoft Word, or any
other text editor that allows you to save text in ASCII format. You could also
convert an existing text created from another software such as a database's
table, a spreadsheet, an HTML file, etc, into a text document. Most of the
software products that support text files allow you to save their native
document as a text file. Microsoft products recognize such a file with a .txt
extension.
When creating the text, separate different fields by pressing Tab and follow
it carefully. Sometimes, as some parts of the documents take more space, they
will not appear aligned. You should not pay attention to that, just press Tab
after typing a field of information. At the end of each record, which covers a
line, press Enter (some people call this a hard return or a carriage return).
Save the file as text and remember the folder where it is located.
Once you have a text file, in Microsoft Word, click Tools -> Mail Merge to
initialize the mail merge process. After electing to create the document, such
as letters, labels, envelopes, etc, click the Get Data button and select Open
Data Source... From the Open Data Source dialog, click the Files Of Types combo
box and select either All Files or Text Files. Using the Look In combo box,
locate the folder where the file is located, select the file and click Open.
Another dialog will prompt you for the file format you want to use, select text
file and click OK. Finally, the Mail Merge Helper will ask you to edit the
document.
-
Start Microsoft Word.
-
On the main menu, click Tools -> Mail Merge...
-
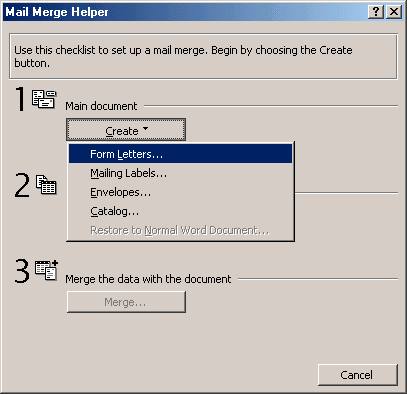
From the Mail Merge Helper dialog, click Create -> Form Letters...
-
From the Microsoft Word dialog, click New Main Document

-
From the Mail Merge Helper again, click Get Data
and click Open Data Source...
-
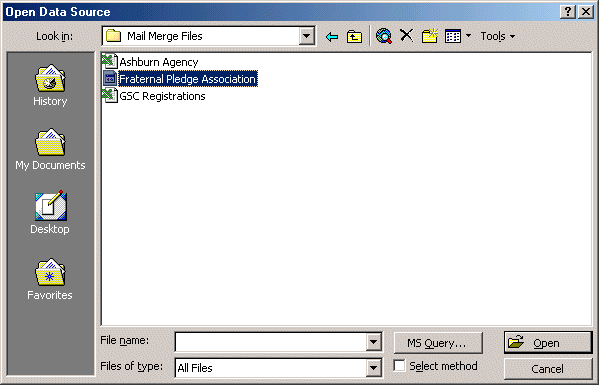
From the Open Data Source dialog, click the arrow of the
Files Of Types combo box and select All Files. Using the Look In combo box,
locate the folder where the exercise files were installed, it should be
C:\My Documents\Mail Merge Files
-
In the list of files, click Fraternal Pledge Association
and click Open.
-
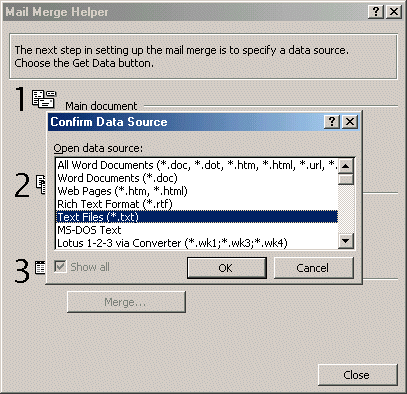
From the Confirm Data Source dialog, click Text Files
(*.txt)
-
And click OK.
-
Now Microsoft Word would like you to create the letter.

Click Edit Main Document
-
Now we will create the main letter.
Your cursor should be on the very first line. On the main menu, click View
-> Print Layout to make sure the document is
displaying in Print Layout View.
-
Press Enter twice to move the cursor down.
-
Press Ctrl + Home to return to the first, empty line.
-
Click the arrow of the Font combo box and select
Verdana.
-
Click the arrow of the Font Size com box and select 22.
-
On the Formatting toolbar, click the Bold and the Center
buttons.
-
If you have the Tables And Borders toolbar, fine.
Otherwise, right-click any button on any toolbar and click Tables And
Borders. Position the Tables And Borders toolbar at the bottom part of your
screen.
From the Tables And Borders toolbar, make sure the continuous line is
displaying in the Line Style combo box. Click the arrow of the Line Weight
combo box and select 2 1/4 pt.
-
Click the arrow of the Borders button and select Top
Border

-
Click the arrow of the Borders button again and select
Bottom Border.
-
On the Mail Merge toolbar, click Insert Merge Field
-> Association
-
Press Ctrl + End to position your cursor to the end of
the document (which is currently on the 3rd line).
-
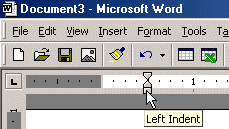
On the horizontal ruler, drag the Left Indent marker
right at 1/2 and inch
-
On the main menu, click Insert -> Date And Time...
-
From the Date And Time dialog, click the 3rd date and
click OK.
-
Press Enter twice.
-
Type Dear and press Space
-
On the Mail Merge toolbar, click Insert Merge Field
-> FirstName
-
Press Space
-
Click Insert Merge Field -> LastName
-
Type , and press Enter twice. If the Office
Assistant comes up, click Cancel.
-
Type Thank you for your recent pledge of
-
Press Space
-
Click Insert Merge Field -> PledgeAmount
-
Press Space and type to our annual fund raising operation conducted last
month.
-
Press Enter twice and type Although we have not yet received your donation, we are convinced you will mail it to us upon reception of this humble thank you note.

-
Press Enter twice and type The
-
Press Space
-
Click Insert Merge Field -> Association
-
Press Space and type you have generously decided to support is constantly conducting thorough research in the areas of
-
Press Space and click Insert Merge Field -> Disease
-
Press Space and type including prevention, pre and post occurrences, diagnosis, treatment, and all available extra care and assistance we can provide. We encourage you to review our brochure and visit our Web Site for more information.
-
Press Enter twice and type Supporting our on-going efforts in all areas involving
-
Press Space and click Insert Merge Field -> Disease
-
Press Space and type is a major step toward eradicating this disease. And, once again, we thank you.
-
Press Enter twice and type Celestine Hancock
-
Press Enter and type Pledge Program Director.
-
Press Enter 4 times and type Please send your check payable to
-
Press Space and click Insert Merge Field ->
Association
-
Press Enter four times
-
On the Standard toolbar, click the Insert Table button
and select a table with 4 columns and one row (1 x 4 table).
-
Click inside the first cell, the most left cell of the table, and type
Please
Mail-in This Form With Your Payment
-
Select the text you just typed. On the Formatting
toolbar, click the Font Size combo box and select 8
-
Right-click inside the first cell and choose Text
Alignment...
-
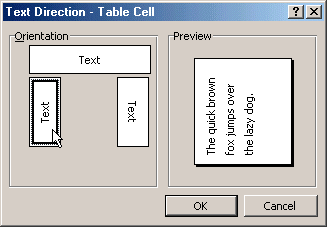
From the Text Direction dialog, in the Orientation
section, click the button in 1st column, 2nd row.
-
Click OK
-
Select the text in the first cell and press Ctrl + C.
-
Right-click in the last cell, the most right cell, and click Paste.
-
Change the direction of the text in the last cell to
appear vertically aligned like the first cell.
-
move the 2nd vertical line left and the 4th vertical
line right.
-
Click inside the 2nd cell and press Enter.
-
On the Mail Merge toolbar, click Insert Merge Field
-> Association and press Enter
-
Click Insert Merge Field -> AssAddress and press
Enter
-
Click Insert Merge Field -> AssCity
-
Press Space and click Insert Merge Field -> AssState
-
Press Space and click Insert Merge Field ->
AssZIPCode
-
Press Enter 4 times.
-
Click Insert Merge Field -> FirstName
-
Press Space and click Insert Merge Field -> LastName
-
Press Enter and click Insert Merge Field -> Address
-
Press Enter and click Insert Merge Field -> City
-
Press Space and click Insert Merge Field -> State
-
Press Space and click Insert Merge Field -> ZIPCode
-
Press Enter twice.
-
Click the empty cell in the right side.
-
Press Enter.
-
Type Pledge:
-
Press Space and click Insert Merge Field ->
PledgeAmount
-
Press Enter 6 times
-
Click Insert Merge Field -> Association
-
and press Enter
-
Click Insert Merge Field -> AssAddress and press
Enter
-
Click Insert Merge Field -> AssCity
-
Press Space and click Insert Merge Field -> AssState
-
Press Space and click Insert Merge Field ->
AssZIPCode
-
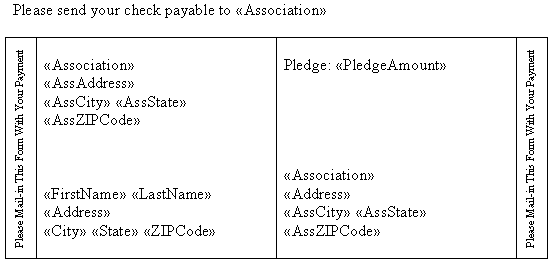
Once again, move the 2nd vertical line to the left and
move the 4th vertical line to the right.
-
Select the whole sentence that starts with Thank you for
your...
-
On the Formatting toolbar, click the Bold, the Italic,
and the Center buttons
-
Click anywhere on the line starting with Please send...
-
On the Table And Borders toolbar, click the arrow of the
Line Weight combo box and select 1/2 pt.
-
Click the arrow of the Borders button and click Top
Border.
-
Click the arrow of the Borders button again and click
Bottom Border.
-
On the same Tables And Borders toolbar, click the arrow
of the Shading Color button and select Gray 10%.
-
On the Formatting, click the Center button.
-
Right-click any button on any toolbar and click Drawing.
-
From the Drawing toolbar, click the Line button.
-
Click between the line Please send... and the top border
of the table and drag to draw a horizontal line. Resize the line so that it
covers the (whole) width of the letter.
-
While the line is still selected, on the Drawing toolbar,
click the Line Style button and click More Lines.
-
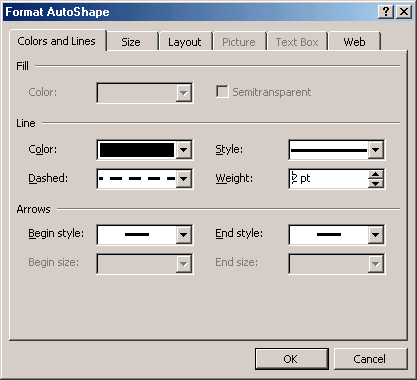
From the Format AutoShape dialog, make sure the Colors And
Lines property sheet is selected. Click the Dashed combo box and select
Dash.
-
Increase the Weight spin button to 2 pt
-
Click OK.
-
Click on the line under the graphic line you just added.
-
Press the up arrow key to move the cursor on the same
line the graphic line is.
-
On the Formatting toolbar, set the Font Size to 22.
-
On the main menu, click Insert -> Symbol...
-
From the Symbol dialog, make sure you are in the Symbols
property sheet. Click the arrow of the Font combo box and select Wingdings.
-
From the list, click the symbol on the 3rd column, 1st
row:

-
Click Insert. And click Close.
-
Adjust the graphic line and the scissors symbol so that
the scissors appear cutting the graphic line.
-
Right-click inside the table and click Borders And
Shading...
-
From the Borders and Shading dialog, click the Borders
property sheet.
-
In the Setting section, click None. Then click Box.
-
In the Width combo box, select 1 1/2 pt.
-
Click the Shading property sheet.
-
Click More Colors...
-
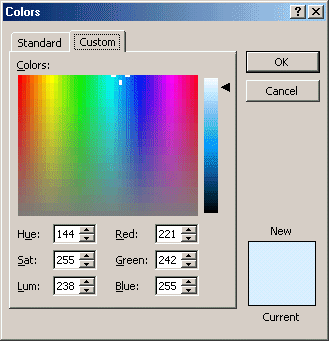
On the Colors dialog, click Custom.
-
Set the color to Red:221, Green:242, Blue:255.
-
On the Colors dialog, click OK
-
On the On the Borders And Shading dialog, click OK
-
To read the letter, on the Mail Merge toolbar, click
View Merged Data
-
Use the navigation buttons to review all the letters with
each recipient

