Introduction to Controls Containers

Introduction to Controls Containers
Hosting a Windows Control
Introduction
There are various types of Windows controls in an application. Those controls have different goals. We have already seen that every control has a class that holds the characteristics (properties), the actions that the control can perform (its methods), and the occurrences (events) related to it. When you pick up a control from the Toolbox, you must drop that control somewhere so your application can use it. A control container is a special control that can receive or host other controls. Microsoft Windows (and other operating systems) support various types of controls containers.
A Control's Container
To make it possible for an object to host other objects, the class of every container is equipped with a read-only property named Controls. This property is based on a class named ControlCollection:
[System.ComponentModel.Browsable(false)]
public System.Windows.Forms.Control.ControlCollection Controls { get; }
The ControlCollection class is equipped with all the necessay operations, including the ability to add, delete, or count the items in the list.
To support the ability to add a control to a container, the ControlCollection class is equipped with a method named Add. Its syntax is:
public virtual void Add (System.Windows.Forms.Control value);
This method takes as argument an object that derives from the Control class, which is the case for all Windows controls. Therefore, to programmatically add a control to a container, access the Controls property of the container and call the Add() method on it. Pass the variable name of the control you want.
![]() Practical Learning: Introducing Controls Containers
Practical Learning: Introducing Controls Containers
 |
 |
 |
 |
Characteristics of a Controls Container
As mentionned already, a control container is used to hold or carry controls placed on it. After positioning one or more controls on it, when a container moves, whether manually (including changing its Location in the Properties window) or programmatically (either changing the Location (which is of type Point), or changing either or both its Top and`or its Left values (that are of type int)), it does so with the controls placed on it. This characteristics is very valuable during application design.
The Visibility of a Container
Remember that, to manually hide a control at design time, select it on a form. Then, in the Properties window, set its Visible property to True. If a control is hidden, to reveal it, set its Visible property to False. This characteristisc can also be controller programmatically by accessing the Visible property of the control's variable.
When a control container is visible, the controls placed on it can be visible too, unless they have their own visibility removed. When a container is hidden, its child controls are hidden too, regardless of their own visibility status.
The Availability of a Container
As you are configuring a control container during application design or managing it programmatically, the availability of a controls container and the controls positioned on it can be controlled as a group. Remember that you can enable or disable a control using the Enabled property. This is done the same way with a controls container. As mentioned for the visibility, if you disable a controls container, all the controls positioned in its client area would be disabled. If you (re-)enable a controls container, it would become enabled. Its child controls that were enabled would become enabled also.
A Review of Controls Containers
A Form or Dialog Box as a Container
As seen so far, the form is the most fundamental container of an application. All the controls of an application are placed directly or indirectly on a form. Therefore, to programmatically position a control on a form, access the Controls property of the form, call the Add() method on that property, and pass the variable of the control to it. Here is an example:
using System.Drawing;
using System.Windows.Forms;

public class Exercise
{
    public static void Main()
    {
        Form frmExercise = new Form();

        Button medium = new Button();

        medium.Location = new Point(24, 58);
        medium.Text = "Medium";

        frmExercise.Controls.Add(medium);
        frmExercise.ShowDialog();
    }
}
A panel is a rectangular object that can provide various valuable services for application design. For example, a panel can be used as a control delimiter for objects that behave as a group.
To support panels, the .NET Framework provides a class named Panel. You can use it to programmatically create a panel. Unlike a form, during design, a panel must primarily be positioned on another container which would be a form, another container, or another panel. To add a panel to your project, on the Toolbox, expand the Containers section. Click the Panel button ![]() and click the form or another container.
and click the form or another container.
To programmatically create a panel, declare a variable of type Panel, allocate memory for it using the new operator, and add it to its parent. Here is an example:
using System.Drawing;
using System.Windows.Forms;

public class Exercise : System.Windows.Forms.Form
{
    Panel pnlContainer;

    public Exercise()
    {
        InitializeComponent();
    }

    private void InitializeComponent()
    {
        Text     = "Domain Configuration";
        Width    = 320;
        Height   = 210;
        Location = System.Drawing.Point(140, 100);
        StartPosition = FormStartPosition.CenterScreen;

        pnlContainer = new Panel();
        pnlContainer.Location = Point(20, 20);
        pnlContainer.Size = System.Drawing.Size(100, 60);
        Controls.Add(pnlContainer);
    }
}

public class Program
{
    static int Main()
    {
        System.Windows.Forms.Application.Run(new Exercise());
        return 0;
    }
}
The Panel class is derived from the ScrollableControl class where it gets its primary characteristics. The ScrollableControl class itself is derived from the Control class.
![]() Practical Learning: Creating Panels
Practical Learning: Creating Panels

| Control | (Name) | Text | Other Properties | |
| Panel | pnlCategories | |||
| Label | Select the Category of Known Values | Font: Times New Roman, 9.75pt, style=Bold | ||
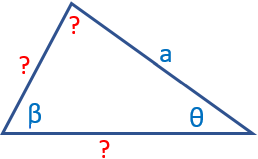
| RadioButton | rdoAAS | AAS - Known Values: Two angles and a side opposite one of them | ||
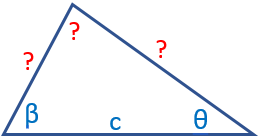
| RadioButton | rdoASA | ASA - Known Values: Two angles and the side between them | ||
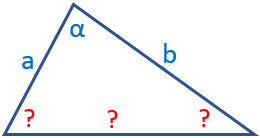
| RadioButton | rdoSAS | SAS - Known Values: Two sides and the angle between them | ||
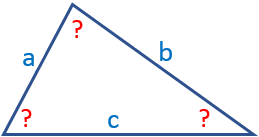
| RadioButton | rdoSSS | SSS - Known Values: All three sides | ||
| Panel | pnlAAS | |||
| PictureBox | pbxAAS | SizeMode: AutoSize | ||
| Label | BackColor: Blue AutoSize: False |
|||
| Label | Known Values | Font: Times New Roman, 12pt, style=Bold | ||
| Label | ______________________ | |||
| Label | Angle 1: | |||
| TextBox | txtAASAngle1 | TextAlign: Right | ||
| Label | Angle 2: | |||
| TextBox | txtAASAngle2 | TextAlign: Right | ||
| Label | Side 1 | |||
| TextBox | txtAASSide1 | TextAlign: Right | ||
| Button | btnAASCalculate | Calculate | ||
| Label | Unknown Values | Font: Times New Roman, 12pt, style=Bold | ||
| Label | ______________________ | |||
| Label | Angle 3: | |||
| TextBox | txtAASAngle3 | TextAlign: Right | ||
| Label | Side 2: | |||
| TextBox | txtAASSide2 | TextAlign: Right | ||
| Label | Side 3 | |||
| TextBox | txtAASSide3 | TextAlign: Right | ||
| Button | btnClose | Close | ||

| Control | (Name) | Text | Other Properties | |
| Panel | pnlASA | |||
| PictureBox | pbxASA | Image: asa SizeMode: AutoSize |
||
| Label | Known Values | Font: Times New Roman, 12pt, style=Bold | ||
| Label | Angle 1: | |||
| TextBox | txtASAAngle1 | TextAlign: Right | ||
| Label | Angle 2: | |||
| TextBox | txtASAAngle2 | TextAlign: Right | ||
| Label | Side 1: | |||
| TextBox | txtASASide1 | TextAlign: Right | ||
| Button | btnASACalculate | Calculate | ||
| Label | Unknown Values | Font: Times New Roman, 12pt, style=Bold | ||
| Label | Angle 3: | |||
| TextBox | txtASAAngle3 | TextAlign: Right | ||
| Label | Side 2: | |||
| TextBox | txtASASide2 | TextAlign: Right | ||
| Label | Side 3: | |||
| TextBox | txtASASide3 | TextAlign: Right | ||
| Panel | pnlSAS | |||
| PictureBox | pbxSAS | Image: sas SizeMode: AutoSize |
||
| Label | Known Values | Font: Times New Roman, 12pt, style=Bold | ||
| Label | Side 1: | |||
| TextBox | txtSASSide1 | TextAlign: Right | ||
| Label | Angle 1: | |||
| TextBox | txtSASAngle1 | TextAlign: Right | ||
| Label | Side 2: | |||
| TextBox | txtSASSide2 | TextAlign: Right | ||
| Button | btnSASCalculate | Calculate | ||
| Label | Unknown Values | Font: Times New Roman, 12pt, style=Bold | ||
| Label | Side 3: | |||
| TextBox | txtSASSide3 | TextAlign: Right | ||
| Label | Angle 2: | |||
| TextBox | txtSASAngle2 | TextAlign: Right | ||
| Label | Angle 3: | |||
| TextBox | txtSASAngle3 | TextAlign: Right | ||
| Panel | pnlSSS | |||
| PictureBox | pbxSSS | Image: sss SizeMode: AutoSize |
||
| Label | Known Values | Font: Times New Roman, 12pt, style=Bold | ||
| Label | Side 1: | |||
| TextBox | txtSSSSide1 | TextAlign: Right | ||
| Label | Side 2: | |||
| TextBox | txtSSSSide2 | TextAlign: Right | ||
| Label | Side 3: | |||
| TextBox | txtSSSSide3 | TextAlign: Right | ||
| Button | btnSSSCalculate | Calculate | ||
| Label | Unknown Values | Font: Times New Roman, 12pt, style=Bold | ||
| Label | Angle 1: | |||
| TextBox | txtSSSAngle1 | TextAlign: Right | ||
| Label | Angle 2: | |||
| TextBox | txtSSSAngle2 | TextAlign: Right | ||
| Label | Angle 3: | |||
| TextBox | txtSSSAngle3 | TextAlign: Right | ||
namespace ObliqueTriangles1
{
    public partial class ObliqueTriangles : Form
    {
        public ObliqueTriangles()
        {
            InitializeComponent();
        }

        private void rdoAAS_CheckedChanged(object sender, EventArgs e)
        {
            pnlAAS.Visible = true;
            pnlASA.Visible = false;
            pnlSAS.Visible = false;
            pnlSSS.Visible = false;
        }

        private void rdoASA_CheckedChanged(object sender, EventArgs e)
        {
            pnlASA.Visible = true;
            pnlAAS.Visible = false;
            pnlSAS.Visible = false;
            pnlSSS.Visible = false;
        }

        private void rdoSAS_CheckedChanged(object sender, EventArgs e)
        {
            pnlSAS.Visible = true;
            pnlASA.Visible = false;
            pnlAAS.Visible = false;
            pnlSSS.Visible = false;
        }

        private void rdoSSS_CheckedChanged(object sender, EventArgs e)
        {
            pnlSSS.Visible = true;
            pnlSAS.Visible = false;
            pnlASA.Visible = false;
            pnlAAS.Visible = false;
        }

        private void ObliqueTriangles_Load(object sender, EventArgs e)
        {
            pnlSSS.Location = pnlSAS.Location = pnlASA.Location = pnlAAS.Location;
            rdoAAS.Checked = true;
            rdoAAS_CheckedChanged(sender, e);
        }
    }
}
using System.Windows.Forms;

namespace ObliqueTriangles1
{
    public partial class ObliqueTriangles : Form
    {
        public ObliqueTriangles()
        {
            InitializeComponent();
        }

        private void rdoAAS_CheckedChanged(object sender, EventArgs e)
        {
            pnlAAS.Visible = true;
            pnlASA.Visible = false;
            pnlSAS.Visible = false;
            pnlSSS.Visible = false;
        }

        private void rdoASA_CheckedChanged(object sender, EventArgs e)
        {
            pnlASA.Visible = true;
            pnlAAS.Visible = false;
            pnlSAS.Visible = false;
            pnlSSS.Visible = false;
        }

        private void rdoSAS_CheckedChanged(object sender, EventArgs e)
        {
            pnlSAS.Visible = true;
            pnlASA.Visible = false;
            pnlAAS.Visible = false;
            pnlSSS.Visible = false;
        }

        private void rdoSSS_CheckedChanged(object sender, EventArgs e)
        {
            pnlSSS.Visible = true;
            pnlSAS.Visible = false;
            pnlASA.Visible = false;
            pnlAAS.Visible = false;
        }

        private void ObliqueTriangles_Load(object sender, EventArgs e)
        {
            pnlSSS.Location = pnlSAS.Location = pnlASA.Location = pnlAAS.Location;
            rdoAAS.Checked = true;
            rdoAAS_CheckedChanged(sender, e);
        }

        private void btnAASCalculate_Click(object sender, EventArgs e)
        {
            double angle1 = 0.00, angle2 = 0.00, side1 = 0.00;

            try
            {
                angle1 = double.Parse(txtAASAngle1.Text);
            }
            catch (FormatException)
            {
                MessageBox.Show("You must type a value for the lower left angle of the AAS shape.", "Obliques Triangles");
            }

            try
            {
                angle2 = double.Parse(txtAASAngle2.Text);
            }
            catch (FormatException)
            {
                MessageBox.Show("You must type a value for the lower right angle of the AAS shape.", "Obliques Triangles");
            }

            try
            {
                side1 = double.Parse(txtAASSide1.Text);
            }
            catch (FormatException)
            {
                MessageBox.Show("You must type a value for the right side of the AAS shape.", "Obliques Triangles");
            }

            // Here, we use the law of sines
            double angle3 = 180 - (angle1 + angle2);
            double side2 = side1 * Math.Sin(angle2 * Math.PI / 180) / Math.Sin(angle1 * Math.PI / 180);
            double side3 = side1 * Math.Sin(angle3 * Math.PI / 180) / Math.Sin(angle1 * Math.PI / 180);

            txtAASAngle3.Text = angle3.ToString();
            txtAASSide2.Text = side2.ToString();
            txtAASSide3.Text = side3.ToString();
        }

        private void btnASACalculate_Click(object sender, EventArgs e)
        {
            double angle1 = 0.00, side1 = 0.00, angle2 = 0.00;

            try
            {
                angle1 = double.Parse(txtASAAngle1.Text);
            }
            catch (FormatException)
            {
                MessageBox.Show("You must type a value for the lower left angle of the ASA shape.", "Obliques Triangles");
            }

            try
            {
                side1 = double.Parse(txtASASide1.Text);
            }
            catch (FormatException)
            {
                MessageBox.Show("You must type a value for the bottom side of the AAS shape.", "Obliques Triangles");
            }

            try
            {
                angle2 = double.Parse(txtASAAngle2.Text);
            }
            catch (FormatException)
            {
                MessageBox.Show("You must type a value for the lower right angle of the ASA shape.", "Obliques Triangles");
            }

            double angle3 = 180 - (angle1 + angle2);
            double side2 = side1 * Math.Sin(angle2 * Math.PI / 180) / Math.Sin(angle1 * Math.PI / 180);
            double side3 = side1 * Math.Sin(angle3 * Math.PI / 180) / Math.Sin(angle1 * Math.PI / 180);

            txtASAAngle3.Text = angle3.ToString();
            txtASASide2.Text = side3.ToString();
            txtASASide3.Text = side2.ToString();
        }

        private void btnSASCalculate_Click(object sender, EventArgs e)
        {
            double side1 = 0.00, angle1 = 0.00, side2 = 0.00;

            try
            {
                side1 = double.Parse(txtSASSide1.Text);
            }
            catch (FormatException)
            {
                MessageBox.Show("You must type a value for the left side of the SAS shape.", "Obliques Triangles");
            }

            try
            {
                angle1 = double.Parse(txtSASAngle1.Text);
            }
            catch (FormatException)
            {
                MessageBox.Show("You must type a value for the top angle of the SAS shape.", "Obliques Triangles");
            }

            try
            {
                side2 = double.Parse(txtSASSide2.Text);
            }
            catch (FormatException)
            {
                MessageBox.Show("You must type a value for the right side of the SAS shape.", "Obliques Triangles");
            }

            // Here, we use the law of cosines
            double side3 = Math.Sqrt((side1 * side1) +
                          (side2 * side2) -
                          (2 * side1 * side2 * Math.Cos(angle1 * Math.PI / 180)));
            double angle2 = Math.Acos(((side3 * side3) +
                          (side2 * side2) -
                          (side1 * side1)) /
                         (2 * side3 * side2)) * 180 / Math.PI;
            double angle3 = 180 - (angle1 + angle2);


            txtSASSide3.Text = side3.ToString();
            txtSASAngle2.Text = angle2.ToString();
            txtSASAngle3.Text = angle3.ToString();
        }

        private void btnSSSCalculate_Click(object sender, EventArgs e)
        {
            double side1 = 0.00, side2 = 0.00, side3 = 0.00;

            try
            {
                side1 = double.Parse(txtSSSSide1.Text);
            }
            catch (FormatException)
            {
                MessageBox.Show("You must type a value for the left side of the SSS shape.", "Obliques Triangles");
            }

            try
            {
                side2 = double.Parse(txtSSSSide2.Text);
            }
            catch (FormatException)
            {
                MessageBox.Show("You must type a value for the right side of the SSS shape.", "Obliques Triangles");
            }

            try
            {
                side3 = double.Parse(txtSSSSide3.Text);
            }
            catch (FormatException)
            {
                MessageBox.Show("You must type a value for the bottom side of the SSS shape.", "Obliques Triangles");
            }

            // Here, we use the law of cosines
            double angle1 = Math.Acos(((side3 * side3) +
                           (side2 * side2) -
                           (side1 * side1)) /
                         (2 * side3 * side2)) * 180 / Math.PI;
            double angle2 = Math.Acos(((side3 * side3) +
                           (side1 * side1) -
                           (side2 * side2)) /
                         (2 * side3 * side1)) * 180 / Math.PI;
            double angle3 = 180 - (angle1 + angle2);


            txtSSSAngle1.Text = angle1.ToString();
            txtSSSAngle2.Text = angle2.ToString();
            txtSSSAngle3.Text = angle3.ToString();
        }

        private void btnClose_Click(object sender, EventArgs e)
        {
            Close();
        }
    }
}
Angle 1:     58
Angle 2: 28
Side 1:   6.2


Angle 1: 43
Side 1:  4.56
Angle 2: 57


Side 1:  15
Angle 1: 28
Angle 2: 43.6


Side 1:  210
Side 2: 75
Side 3: 172


Table Layout Panel
A table layout panel is a control used to organize the objects on a form for a good design. As its name suggests, a table layout panel is an object made of columns and rows. A column is a vertical arrangement of objects where there is a first item, followed by an item exactly below, another item exactly below it, and so on. A row is a horizontal arrangement of items where an item starts on the left. The next item is positioned on the right side of the previous one, and so on. The columns and the rows must belong to the same object or arrangement to make it a table. The intersection of a row and a column is called a cell.
To support panels, the .NET Framework provides a class named TableLayoutPanel. Although you can create a table layout panel programmatically, it is better to proceed visually. To assist you, the Toolbox is equipped with a TableLayoutPanel button. You can use it to visually create a table layout panel. The table layout panel is a huge control that uses many dependent classes for its functionalities.
Group Boxes
A group box is a control container whose primary purpose is to host other controls. Like the panel, a group box has borders that can help you locate the limits of that control contrainer. One of the particularities of the group box, when compared to other controls containers, is that a group box has a special area for its title or caption.
To support group boxes, the .NET Framework provides a class named GroupBox. You can use it to programmatically create a group box. Here are examples:
using System.Windows.Forms;

namespace ControlsFundamentals
{
    public partial class Form1 : Form
    {
        public Form1() => InitializeComponent();

        private void btnControls_Click(object sender, EventArgs e)
        {
            GroupBox gbxPizzaSize = new GroupBox();
        }
    }
}
To visually create a group box, in the Toolbox, click the GroupBox button and click a form of your application. Either way, after creating a group box, you can add controls to it.
![]() Practical Learning: Introducing Group Boxes
Practical Learning: Introducing Group Boxes

| Control | (Name) | Text | Other Properties | |
| GroupBox | Loan Preparation | |||
| Label | Principal | |||
| TextBox | txtPrincipal | TextAlign: Right | ||
| Label | Interest Rate: | |||
| TextBox | txtInterestRate | TextAlign: Right | ||
| Label | % | |||
| Label | Number of Periods: | |||
| TextBox | txtPeriods | TextAlign: Right | ||
| ComboBox | cbxPeriods | Items: Days Years Months |
||
| GroupBox | Compound Frequency | |||
| RadioButton | rdoDaily | Daily | ||
| RadioButton | rdoWeekly | Weekly | ||
| RadioButton | rdoMonthly | Monthly | ||
| RadioButton | rdoQuaterly | Quaterly | ||
| RadioButton | rdoSemiannualy | Semiannualy | ||
| RadioButton | rdoAnnualy | Annualy | ||
| Button | btnCalculate | Calculate | ||
| GroupBox | Loan Evaluation | |||
| Label | Interest Earned: | |||
| TextBox | txtInterestEarned | TextAlign: Right | ||
| Label | Future Value: | |||
| TextBox | txtFutureValue | TextAlign: Right | ||
| Button | btnClose | Close | ||
namespace BusinessAccounting2
{
    public partial class CompoundedInterest : Form
    {
        public CompoundedInterest()
        {
            InitializeComponent();
        }

        private void btnCalculate_Click(object sender, EventArgs e)
        {
            /* A compound type specifies the frequency by which
             * the interest is evaluated. The options are that
             * the evaluation be made hourly, daily, weekly, biweekly,
             * semi-monthly, monthly, quaterly, semi-annually, or annually. */
            double compoundType;
            // The principal is the amount invested in getting a loan or the amount of money borrowed.
            double principal = 0d;
            // The interest rate is the fraction that influence the amount owned by the lender
            double iRate = 0d;
            // The period is the number of units by which the interest accrued is evaluated
            double per = 0d;

            if(string.IsNullOrEmpty(txtPrincipal.Text))
            {
                MessageBox.Show("You must provide a valid number for the principal.",
                                "Business Accounting", MessageBoxButtons.OK, MessageBoxIcon.Information);
                return;
            }

            if (string.IsNullOrEmpty(txtInterestRate.Text))
            {
                MessageBox.Show("Please type a valid decimal number for the interest rate.",
                                "Business Accounting", MessageBoxButtons.OK, MessageBoxIcon.Information);
                return;
            }

            if (string.IsNullOrEmpty(txtPeriods.Text))
            {
                MessageBox.Show("You are supposed to type a valid number for " +
                                "the number of days, weeks, months, quarters, or years.",
                                "Business Accounting", MessageBoxButtons.OK, MessageBoxIcon.Information);
                return;
            }

            try
            {
                // Retrieve the value of the principal
                principal = double.Parse(txtPrincipal.Text);
            }
            catch(FormatException fe)
            {
                MessageBox.Show("There is a problem with the value you provided " +
                                "for the principal." + Environment.NewLine +
                                "Please report the error as: " + fe.Message,
                                "Business Accounting", MessageBoxButtons.OK, MessageBoxIcon.Information);
            }

            try
            {
                // Retrieve the interest rate
                iRate = double.Parse(txtInterestRate.Text);
            }
            catch (FormatException fe)
            {
                MessageBox.Show("You must provide a valid fractional number for the interest rate." + Environment.NewLine +
                                "You can present the error as: " + fe.Message,
                                "Business Accounting", MessageBoxButtons.OK, MessageBoxIcon.Information);
            }

            try
            {
                // Get the number of periods
                per = double.Parse(txtPeriods.Text);
            }
            catch (FormatException fe)
            {
                MessageBox.Show("Please type the number of days, weeks, months, quarters, or years." + Environment.NewLine +
                                "The error resulting is: " + fe.Message,
                                "Business Accounting", MessageBoxButtons.OK, MessageBoxIcon.Information);
            }

            // Find out what radio button was clicked to apply the compound frequency
            if (rdoDaily.Checked == true)
                compoundType = 360d;
            else if (rdoWeekly.Checked == true)
                compoundType = 52d;
            else if (rdoMonthly.Checked)
                compoundType = 12d;
            else if (rdoQuarterly.Checked)
                compoundType = 4d;
            else if (rdoSemiannually.Checked)
                compoundType = 2d;
            else
            {
                compoundType = 1d;
                rdoAnnually.Checked = true;
            }

            double periods;

            if(cbxPeriods.Text == "Days")
                periods = per / 360d;
            else if (cbxPeriods.Text == "Months")
                periods = per / 12d;
            else
            {
                periods = per;
                cbxPeriods.Text = "Years";
            }

            // These values will make the calculation easier to read
            double interestRate = iRate / 100d;
            double i = interestRate / compoundType;
            double n = compoundType * periods;

            // Perform the necessary calculations
            // double ratePerPeriod = interestRate / periods;
            double futureValue = principal * Math.Pow(1 + i, n);
            double interestEarned = futureValue - principal;

            // Display the values in the appropriate text boxes
            txtInterestEarned.Text = interestEarned.ToString("C");
            txtFutureValue.Text = futureValue.ToString("C");
        }

        private void btnClose_Click(object sender, EventArgs e)
        {
            Close();
        }
    }
}


Tab Controls
A tab control is a group of controls containers where each container is represented by a tab, also called a property page.
![]() Practical Learning: Ending the Lesson
Practical Learning: Ending the Lesson
|
|
|||
| Previous | Copyright © 2008-2025, FunctionX | Sunday 28 May 2023 | Next |
|
|
|||