 |
Introduction to Data Relationships |
|
The Keys to a Relationship
Introduction to Relationships
A relational database is a computer application that contains two or more tables so that information in one table is made available to another table or other tables that need(s) it. The information
is entered once in one particular table. If the same information is needed in another table, it is simply identified one way or another. This reduces, and can eliminate, the likelihood of mistakes that result from duplicate data.
A Primary Key
To create a relational database, you must have a way for
tables to communicate or relate to each other. To start, for a table to make its
information available to the other table(s), the table must have a way to be
identified. This is done by creating a field used to refer to that table. This
field is called a primary key. The primary key can be represented by one field or it can be
a combination of fields.
To make a field a primary key,
display its table in the Design View. You have two options:
- You can right-click the field and click Primary Key
- In the Tools section of the Design tab of the Ribbon, you can click the
Primary Key button

The field that is made the primary key would then appear with a key icon to its
left. When you click a field that is a primary key, the Primary Key button
becomes highlighted
 . .
 Practical
Learning: Introducing Relationships Practical
Learning: Introducing Relationships
- Start Microsoft Access
- Click Blank Desktop Database
- Type Ceil Inn1 (this is the name of a hotel) as the File Name of the database
- Click Create
- On the default table, double-click ID to put it into edit mode
- Type MaritalStatusID and press Enter
- In the menu that appears, click Short Text
- Type MaritalStatus
- Click the cell under MaritalStatus and type Single
- Press the down arrow key and type Married
- Close the table
- When asked whether you want to save, click Yes
- Set the name to MaritalsStatus
- Click OK
- On the Ribbon, click File and click Options
- In the left frame, click Current Database. In the right frame, click the Overlapping
Windows radio button
- Click OK
- Read the message box and click OK
- On the Ribbon, click Create
- In the Tables section, click Table
- On the table, double-click ID to put it into edit mode
- Type FilingStatusID and press Tab
- In the menu that appears, click Short Text
- Type FilingStatus
- Click the cell under FilingStatus and type Unknown
- Press the down arrow key and type Head of Household
- Press the down arrow key and type Married Filing Jointly
- Close the table
- When asked whether you want to save, click Yes
- Set the name to FilingsStatus
- Click OK
- On the Ribbon, click Create
- In the Tables section, click the Table Design
- As the caret in blinking under Field Name, type EmployeeNumber and press Tab
- Click the arrow of the data type and select Number
- In the Tools section of the Ribbon, click the Primary Key button

- Click the cell under EmployeeNumber and type FirstName and press the down arrow key
- Under FirstName, type LastName and press the down arrow key
- Under LastName, type Title
- In the left section of the title bar of Microsoft Access, click the Save
button

- Set the name to Employees and press Enter
- On the Ribbon, click File and click Open
- In the list of files, click FunDS1 from the previous lesson
- On the Ribbon, click Create
- In the Tables section, click Table Design
- As the caret in blinking under Field Name, type EmployeeNumber
- Press Tab and type n.
Notice that number has been selected
- Click the cell under EmployeeNumber and type FirstName
- Click the cell under FirstName and type LastName
- Click the cell under LastName and type Title
- Right-click EmployeeNumber and click Primary Key
- To save the table, right-click its tab and click Save
- Set the name to Employees and click OK
- On the Ribbon, click Create
- In the Tables section, click Table Design
- As the caret in blinking under Field Name, type ItemNumber
- Click the arrow the Data Type combo box and select Number
- By typing a field name and pressing the down arrow key, create the following fields:
Manufacturer
Category
SubCategory
ItemName
ItemSize
- Right-click ItemNumber and click Primary Key
- To save and close the table, right-click its tab and click Close
- When asked whether you want to save, click Yes
- Set the name to StoreItems and press Enter
A Primary Key From Many Columns
A primary key can be made from a combination of many fields.
To create a primary key of more than one field, display the table in Design View.
Select, as a group, the fields that would constitute the primary key. Then:
- You can right-click one of the selected fields of the group and click Primary
Key
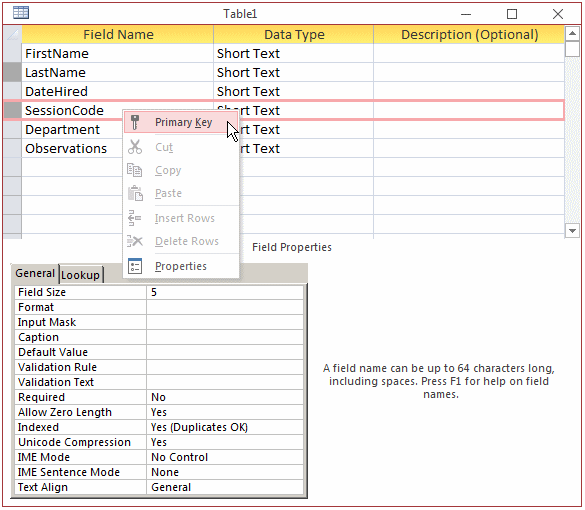
- In the Tools section of the Design tab of the Ribbon, you can click the
Primary Key button

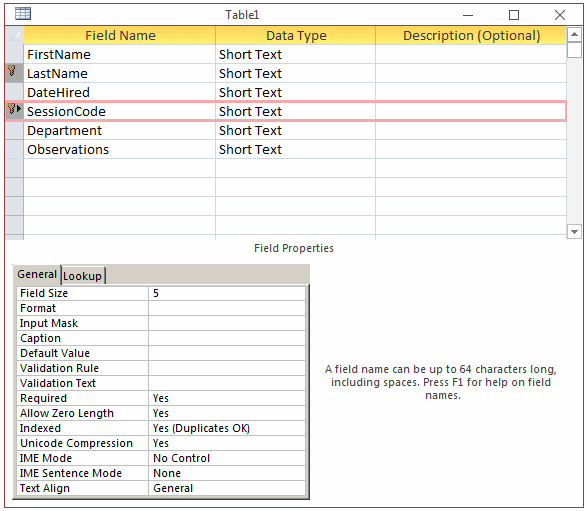
The fields would then appear each with a key icon to its left:
A Foreign Key
A primary key makes it possible for a table to make its data available
to other tables. If a table A wants to use the data stored in another table B,
the first table, A, has to be prepared for
it. The first table, A, can be called the child table. The other table can be
called the parent table. The child table must have a field that would communicate
with the parent table. That field represents the parent table. That field from the
child table is called a foreign key. In the same way, any table that wants to use data from
a certain table must have
a foreign key that can communicate with the primary key of that parent table.
To make it easy to identify a foreign key in a table, it is
a good idea, not a requirement, to give to the foreign key the same name as that
of the primary key. The only real requirement is that both fields use the same
data type.
 Practical
Learning: Introducing Relationships Practical
Learning: Introducing Relationships
- The Ceil Inn1 database should still be opened.
In the Navigation Pane, right-click the Employees table and click Design View
- Complete the table with the following MaritalStatusID and FilingStatusID foregn keys:
| EmployeeNumber |
FirstName |
| EmployeeNumber (Primary Key) |
Number |
| FirstName |
|
| LastName |
|
| Title |
|
| MaritalStatusID |
Number |
| HourlySalary |
|
| FilingStatusID |
Number |
- Close the table
- When asked whether you want to save, click Yes
- In the Navigation Pane, double-click Employees to open its table
- Create the following records:
| EmployeeNumber |
FirstName |
LastName |
Title |
MaritalStatusId |
FilingStatusID |
| 22958 |
Andrew |
Laskin |
General Manager |
1 |
2 |
| 24095 |
Fred |
Barclay |
Accounts Associate |
2 |
2 |
| 27049 |
Harriett |
Dovecot |
Accounts Associate |
2 |
3 |
- Close the Employees table
The Diagram of a Relationship
Introduction
The
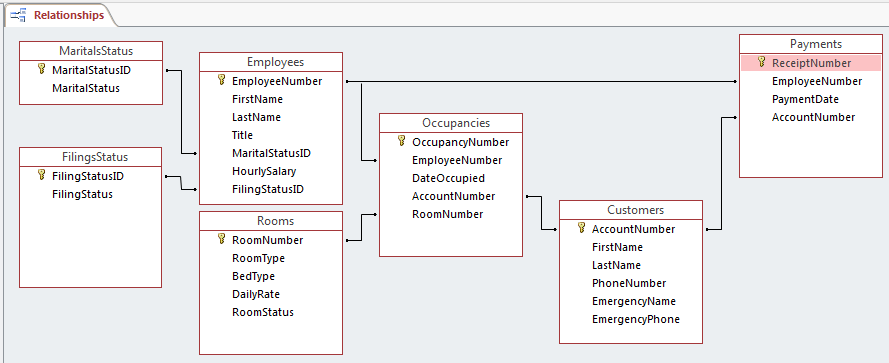
relationships among tables can be visualized and managed in a special window called the Relationships window. To display
it:
After clicking one of those:
- If no relationship exists among the tables in the current database, the Show Table dialog box would come up, asking you to select the tables whose
relationship(s) you want to create. To add a table, select it, click Add and click
Close
- If at least one relationship has been created between two tables, the Relationships window would come up and display that relationship or the already existing
relationships
When you are working on the relationships of your tables, a
window with a tab labeled Relationships displays in Microsoft Access. Also, the
Ribbon is equipped with a tab labeled design and that includes two sections:

The Design tab of the Ribbon provides various tools to
assist you with creating and managing the relationships. For example, if the
Show Table dialog box has been closed and if you want to show it:
- You can click the Show Table button
 on the Ribbon on the Ribbon
- You can right-click the body of the Relationships window and click Show
Table...
To establish a relationship that does not yet exist between two tables, you can drag the primary key from the parent table to the foreign key of the desired table. If
you drag and drop accurately, the relationship would be acknowledged and you can just click Create to make it formal. If you dropped the primary key on the wrong field, you would have time to select the appropriate fields in the Edit Relationship dialog box.
After working with the Relationships window, you can close it by clicking its
Close button
 . You would be asked to save it in order to keep the
relationship(s) created. . You would be asked to save it in order to keep the
relationship(s) created.
 Practical Learning: Establishing Tables Relationships Practical Learning: Establishing Tables Relationships
- The Ceil Inn1 database should still be opened.
On the Ribbon, click Database Tools
- In the Relationships section, click the Relationships button
 . .
The Show Table dialog box should display (otherwise, click the Show Table button
on the Ribbon):
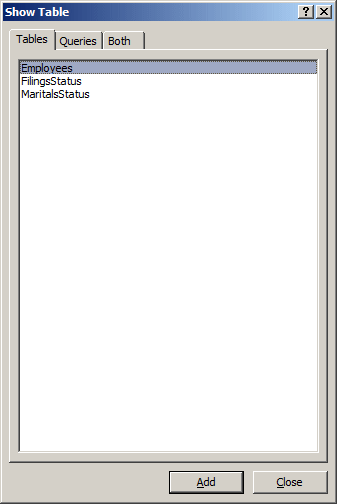
- Click MaritalsStatus
- Click the Add button
- In the Show Table dialog box, double-click Employees and FilingsStatus
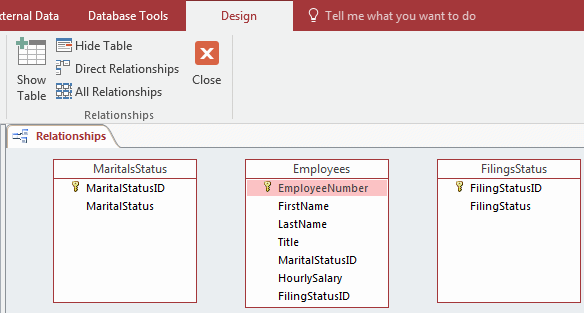
- In the Show Table dialog box, click Close
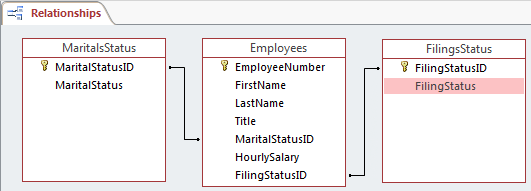
- From the MaritalsStatus table, drag the MaritalStatusID field and drop it on top of the
MaritalStatusID field in the Employees table:

The Edit Relationship dialog box would come up
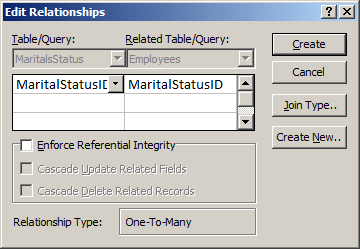
- Click Create
- Now you have a line relating these two tables.
Drag any field from the
FilingsStatus table and drop it on top of any field in the
Employees table as if you missed the target
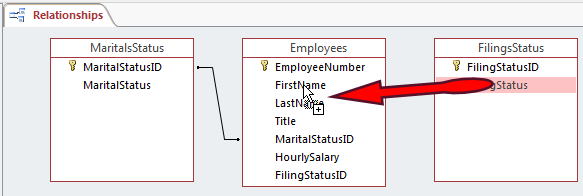
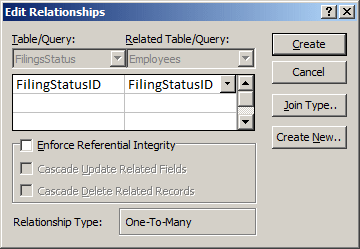
- On the dialog box, under the left Table/Query, click the field that is selected to display its combo box. In that left combo box, select
FilingStatusID and press Tab
- Under Related Table/Query, click the field that is selected. Click the
arrow of its combo box and select FilingStatusID
- Click Create
- On the Relationships section if the Ribbon, click the Close button

- When asked whether you want to save, click Yes
- On the Ribbon, click Create
- In the Tables section, click Table Design
- Under Field Name, type ReceiptNumber
- Press Tab and type n to select Number
- On the
Ribbon, click the
Primary Key button

- Save the table as Payments and close it
- On the Ribbon, click Create
- In the Tables section, click Table Design
- Type AccountNumber
- Press Tab and type n to select Number
- Right-click AccountNumber and click Primary Key
- Complete the table with the following fields:
| Field Name |
Data Type |
Field Size |
| AccountNumber (Primary Key) |
Number |
|
| FirstName |
Short Text |
25 |
| LastName |
Short Text |
25 |
| PhoneNumber |
Short Text |
30 |
| EmergencyName |
Short Text |
50 |
| EmergencyPhone |
Short Text |
30 |
- Save the table as Customers and close it
- On the Ribbon, click Create
- In the Tables section, click Table Design
- Under Field Name, type RoomNumber
- Press Tab
- On the
Ribbon, click the
Primary Key button

- Press F6 and type 10 for the Field Size
- Complete the table with the following fields:
| Field Name |
Data Type |
Field Size |
| RoomNumber (Primary Key) |
Short Text |
10 |
| RoomType |
Short Text |
25 |
| BedType |
Short Text |
20 |
| DailyRate |
Short Text |
10 |
| RoomStatus |
Short Text |
25 |
- Save the table as Rooms and close it
- On the Ribbon, click Create
- In the Tables section, click Table Design
- Type OccupancyNumber
- Press Tab and type n to select Number
- Right-click OccupancyNumber and click Primary Key
- In the left section of the toolbar of Microsoft Access, click the Save
button

- Set the name of the table as Occupancies
- Click OK
- In the Navigation Pane, double-click Customers
- Create the following records
| AccountNumber |
FirstName |
LastName |
| 100752 |
Caroline |
Lomey |
| 946090 |
Peter |
Carney |
- Close the Customers table
- In the Navigation Pane, double-click Rooms
- Create the following records
| RoomNumber |
RoomType |
BedType |
DailyRate |
RoomStatus |
| 104 |
Bedroom |
Queen |
75.85 |
Available |
| 105 |
Bedroom |
King |
92.75 |
Occupied |
| 106 |
Bedroom |
Queen |
75.85 |
Available |
| 107 |
Bedroom |
King |
92.75 |
Available |
- Close the Rooms table
- On the Ribbon, click File and click Open
- In the list of files, click FunDS1 from the
previous lesson
- On the Ribbon, click Create
- In the Tables section, click Table Design
- Type ReceiptNumber under Field Name
- Click the arrow the Data Type combo box and select Number
- Right-click ReceiptNumber and click Primary Key
- Click the cell under ReceiptNumber and type EmployeeNumber
- To save and close the table, click its Close button

- When asked whether you wan to save, click Yes
- Set the name to ShoppingSessions and click OK
- On the Ribbon, click Create
- In the Tables section, click Table
- Double-click ID, type SoldItemID and press Enter
- To save and change the view of the table, right-click its tab and click Design View
- Set the name to SoldItems and press Enter
- Click the cell under SoldItemID, type ReceiptNumber and press Tab
- In the combo box, select Number
- Click the cell under ReceiptNumber, type ItemNumber, press Tab, and type n
- By typing a field name and pressing the down arrow key, add the following fields:
Manufacturer
Category
SubCategory
ItemName
ItemSize
- To save and close the table, right-click its tab and click Close
- When asked whether you want to save, click Yes
|


 .
.


