 |
Managing Data Relationships |
|
Characteristics of Data Relationships - Referential Integrity
Introduction
A data relationship between two tables allows the user
to select existing information instead of typing it. This flow of
information brings up issues about what happens if data that exists in a
parent table gets deleted while such information has been made available to
another table.
When manipulating data that is in a relationship, it is very important to make sure that
the records keep their accuracy from one table or source to the other.
To accomplish that goal, some rules must be established to
"watch" or monitor the flow of information between two tables. Data or referential integrity is used to check that two tables are related through one
(sometimes more than one) field on each table used as the primary key and the foreign key, data entered in the foreign key of a child table must exist in the parent table,
otherwise it would be rejected. Only two fields of the same data type are used to establish a relationship between two tables, the tables involved in the relationship belong to the same
database.
Cascades on Related Records
After creating a legitimate relationship between two tables,
you must make sure that when data changes in the parent table, this change is
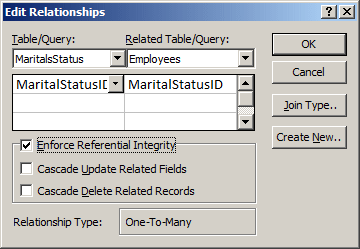
reflected in the child table. To enforce the rules of data integrity, Microsoft Access provides three check boxes in the Edit Relationship dialog box. First, if you want Microsoft Access to monitor data flow, you can click the Enforce Referential
Integrity check box. This would make available two check boxes.
 Practical Learning: Integrating Referential Integrity Practical Learning: Integrating Referential Integrity
- Start Microsoft Access
- From the list of files, click Ceil Inn1 from the previous lesson
- On the Ribbon, click Database Tools
- In the Relationships section, click
Relationships
The Direction of a Relationship
The One-To-Many Relationship
As mentioned already, a relationship between two tables allows one table, the parent, to make its information available to another table (the child).
It is likely that the same record
on a parent table can be tied to various records in the child table. This type of relationship is
referred to as one-to-many because one entry in the parent table can result in many entries in the child table.
To create a one-to-many relationship, in the Edit
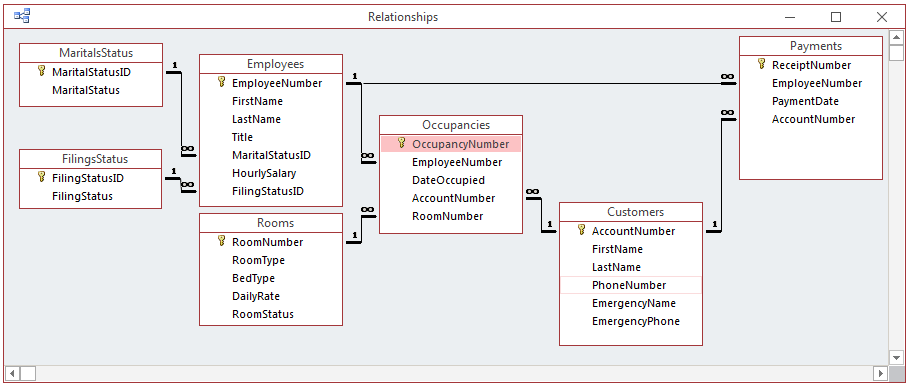
Relationships dialog box, click the Enforce Referential Integrity check box. The parent table would have a 1 sign on its side of the joining line. The child table would have the infinity symbol on its side of the joining line.
 Practical Learning: Managing Referential Integrity Practical Learning: Managing Referential Integrity
- Right-click the line between MaritalsStatus and Employees. Click Edit
Relationship...
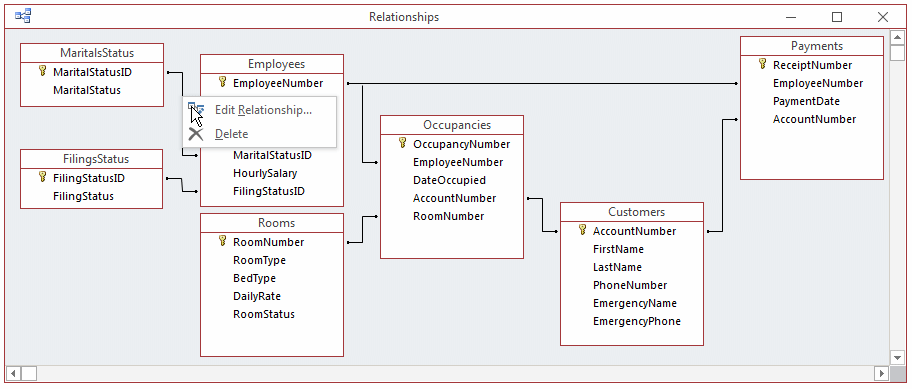
- In the Edit Relationship dialog box, click the Enforce Referential
Integrity check box
- Click OK.
Notice the 1 and the ∞ symbol
- Double-click the line between FilingsStatus Employees
- In the Edit Relationship dialog box, click the Enforce Referential
Integrity check box
- Click OK
- Do the same for the other remaining lines
- Close the Relationships window
- When asked whether you want to save, click Yes
The One-to-One Relationship
A one-to-one relationship is the type of junction between two tables A and B so
that one record in table A can have only one corresponding entry in table B and vice versa. Because
this is similar to one table of records, this type of relationship is hardly used since you can as
well simply create one table.
A Mutual One-To-Many Relationship
Mutual reference is a scenario in which each of two
tables references the other. A variant of this feature is where some records of a table A
would get their foreign value from a table B but also some records of the
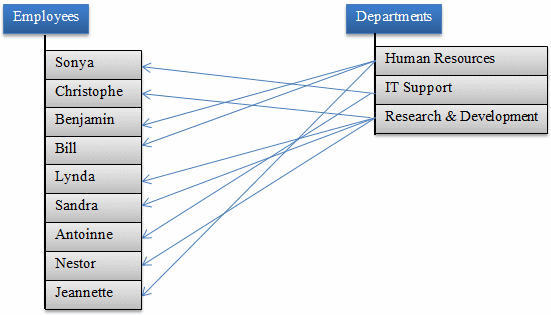
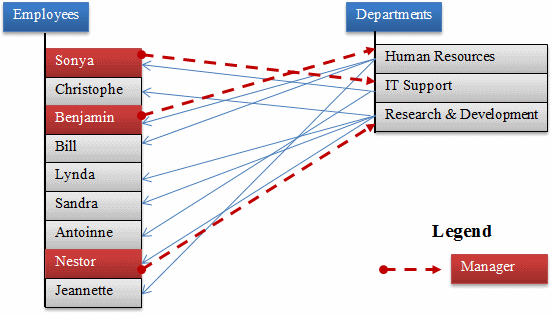
table B would get their foreign value from table A. To illustrate this, imagine you have a table of employees and each employee is recorded
as belonging to a certain department. Obviously, an employee can (should)
belong to only one department. This can be illustrated as follows:
For each department, you may want to specify who the
manager is. Obviously, the manager must be an employee, from the table of
employees. This can be illustrated as follows:
As another variant to a one-to-many relationship,
some records of a table A may get their foreign value from a table B, then
some records of table B may get their foreign value from a table C, and
finally some records of table C would get their foreign value from table
A.
A Many-To-Many Relationship: Junction Tables
A data relationship is referred to as many-to-many if a
record from one table A can be represented by many records from another B, and a
record from the table B can have a relationship with many records from the first
table A. As an example, if you drive your car on a typical day on one road, your
road will intersect with many other roads. Of course, someone else driving on
other roads would intersect with the road where you are driving. In other words,
a road name I-95 would cross (intersect with) other roads such as Rte 1, MD 198,
and I-95, etc. On the other hand, Rte 1 also would consider that it crosses (or
intersects with) I-95 and MD 32 among others.
To configure a many-to-many relationship in the
Relationships window, you may have to add the table twice.
A Junction Table
As a variance of a many-to-many relationship, instead of
just two tables, you can create a junction table that unites two or more
tables. You create the junction table the same way you do for two tables: Add a
foreign key for each of the tables.
 Practical
Learning: Creating a Many-To-Many Relationship Practical
Learning: Creating a Many-To-Many Relationship
- On the Ribbon, click File and click New
- Click Blank Desktop Database
- Set the File Name to Road System1
- Click Create
- In the default table, double-click ID and type IntersectionID
- Close the table
- When asked whether you want to save, click Yes
- Set the table name as Intersections and press Enter
- On the Ribbon, click Create
- In the Tables section, click Table Design
- Type RoadName and press F6
- In the Field Size, type 20
- In the top section of the table, right-click RoadName and click Primary Key
- Complete the table as follows:
| Field Name |
Field Size |
| RoadName |
|
| RoadType |
20 |
| Distance |
12 |
| Location |
|
- Close the table
- When asked whether you want to save, click Yes
- Set the name as Roads
- Click OK
- In the Navigation Pane, double-click Roads
- Create the followiong records:
| RoadName |
RoadType |
Distance |
Location |
| US 322 |
U.S. Highway |
494.00 |
From Cleveland, Ohio east to Atlantic City, New Jersey |
| I-90 |
Interstate |
412.76 |
I-90 traverses east–west from Seattle (WA) to Boston (MA) |
| I-64 |
Interstate |
297.62 |
From West Virginia to the Hampton Roads |
| NE 14 |
State Highway |
203.54 |
From Superior, KS to SD 37 |
| I-40 |
Interstate |
2555.10 |
|
| I-80 |
Interstate |
237.48 |
In Ohio, from I-80 to the north of the state |
| US 2 |
Road |
2571.00 |
Western Segment From Washington Rte 529 to I 75 in Michigan; Eastern Segment From US 11 in NY to I-95 in Maine. |
| MD 410 |
Road |
13.920 |
From East Bethesda to Pennsy Drive in Landover Hills |
| I-66 |
Interstate |
76.38 |
From Middletown, Virginia to US 29 in Washington, DC |
| I-476 |
Interstate |
132.10 |
In Pennsylvania between I-95 near Chester and I-81 near Scranton |
| I-29 |
Interstate |
750.58 |
From Kansas City, MO to Manitoba Highway 75 (in Canada) |
| PA 581 |
Capital Beltway |
27.6 |
Surrounds Harrisburg, PA |
| VSR 234 |
State Highway |
33.92 |
In Virginia, from U.S. Route 1 near Dumfries to U.S. Route 15 near Woolsey |
| I-94 |
Interstate |
352.39 |
From east–west through the central portion of North Dakota |
| I-77 |
Interstate |
613.41 |
Fom West Virginia to North Carolina and Ohio |
| US-81 |
U.S. Highway |
229.28 |
From the Great Plains region (Fort Worth, Texas) to the U.S.–Canadian border at Pembina, North Dakota) |
|
I-5 |
Interstate |
796.432 |
From Mexico-United States border to South of Oregon |
| I-35 |
Interstate |
1,569.06 |
From Laredo, TX to Duluth, Minnesota, at Minnesota Highway 61 |
| US 83 |
U.S. Highway |
1894.00 |
From Mexico–US border in Brownsville, TX to Westhope, ND, at the Canada–US border |
| I-81 |
Interstate |
855.00 |
From Dandridge, TN to Wellesley Island, NY/Hill Island, ON |
|
Highway 137 |
|
|
|
| I-78 |
Interstate |
75.23 |
From Union Township in Lebanon County, Pennsylvania to New York City |
| US 75 |
|
|
|
| I 296 |
Interstate |
3.43 |
Michigan |
| US 85 |
U.S. Highway |
1479 |
From the US-Mexico border in El Paso, TX to the US-Canada border in Fortuna, ND, to Saskatchewan Highway 35 |
| I-76 |
Interstate |
434.87 |
From an interchange with I-71 west of Akron, Ohio, east to I-295 in Bellmawr, New Jersey. |
| SR 254 |
State Highway |
25.01 |
In Virginia, from VSR 42 near Buffalo Gap to U.S. Rte 340 (US 340) in Waynesboro |
- Close the Roads table
- In the Navigation Pane, right-click Intersections and click Design
View
- Complete the table as follows:
| Field Name |
Field Size |
| IntersetionIID |
|
| Road1 |
20 |
| Road2 |
20 |
| InNear |
120 |
- Close the table
- When asked whether you want to save the file, click Yes
- In the Navigation Pane, double-click Intersections
- Create the followiong records:
| Road1 |
Road2 |
InNear |
| I-29 |
I-35 |
In Kansas City, MO |
| PA 581 |
I-81 |
West of Enola |
| I-81 |
I-77 |
In Wytheville, VA |
| US-81 |
I-40 |
In El Reno, Oklahoma |
| I-35 |
I-40 |
In Oklahoma City, OK |
| I-29 |
I-80 |
In Council Bluffs, IA |
| I-81 |
I-84 |
In Scranton, PA |
| I-81 |
I-64 |
From Lexington, VA to Staunton, VA |
| I-94 |
US 83 |
|
|
I-81 |
Highway 137 |
|
|
I-29 |
I-94 |
In Fargo, ND |
|
I-81 |
I-70 |
|
|
I-81 |
I-66 |
|
| US 322 |
I-80 |
In Clarion Township, PA |
| I-81 |
I-80 |
Near Hazleton, PA |
| I-81 |
I-76 |
In Penna Turnpike at Carlisle, PA |
| I-94 |
US 85 |
In Belfield, North Dakota |
| I-81 |
I-40 |
In Dandridge, TN |
| PA 581 |
I-81 |
Fom Colonial Park to west of Enola |
| I-81 |
I-476 |
|
| I-29 |
I-90 |
Near Sioux Falls, SD |
- Close the Intersections table
- On the Ribbon, click Database Tools
- In the Relationships section, click Relationships
- In the Show Table dialog box, double-click Roads
- Double-click Intersections
- Double-click Roads again
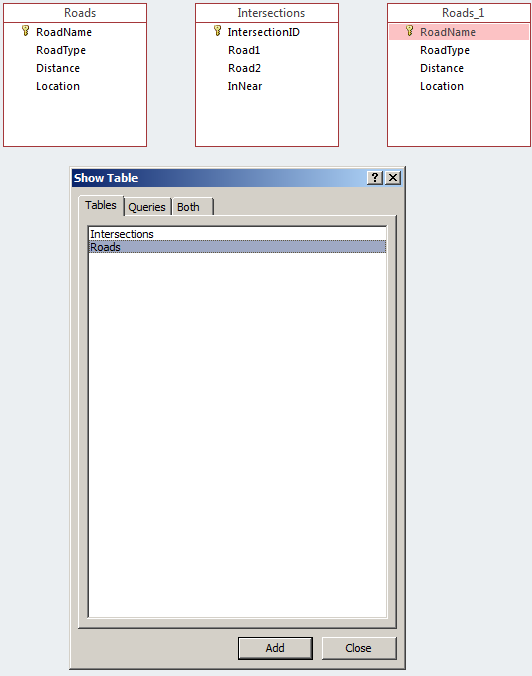
- Click Close
- Drag RoadName from Roads and drop it on Road1 in Intersections
- Click Create
- Drag RoadName from Roads_1 and drop it on Road2 in Intersections
- Click Create

- Close the Relationships window
- When asked whether you want to save, click Yes
|