Introduction to C
Introduction to C
Fundamentals of Dates
Introduction to Dates
A date is a non-spatial measure of the number of days that have occurred in a period. When a certain number of days, namely 28, 29, 30, or 31 (depending on some factors) is reached, the measure is called a month. When 12 months have occurred, the measure is called a year (after 10 years have occurred, the measure is called a decade; after 100 years have occurred, the measure is called a century. After 1000 years have occurred, the measure is called a millennium; but the decade, the century, and the millennium are hardly used in calculations).
![]() Practical Learning: Introducing Date Values
Practical Learning: Introducing Date Values
A Field that Supports Date Values
By default, to display date values in a database, Microsoft Access uses some letters and characters. As mentioned for times, the rules for dates are built in the operating system and you can check them in the computer:

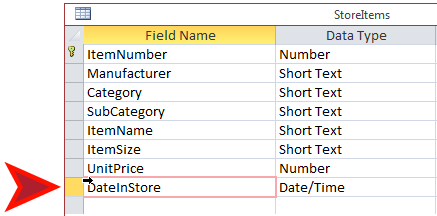
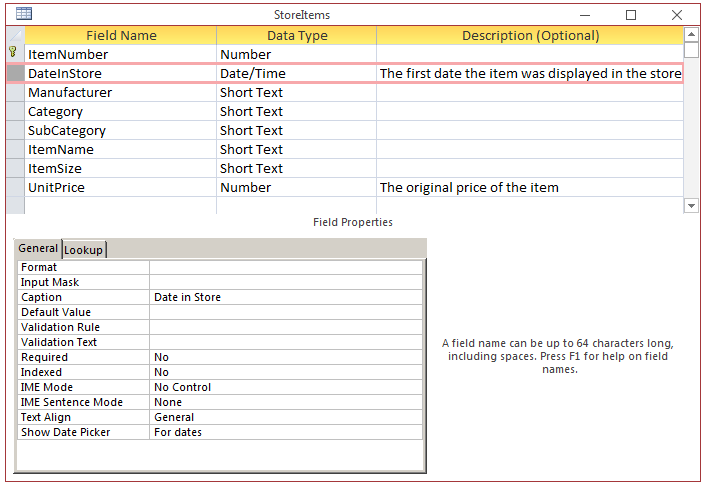
To support date values, Microsoft Access internally uses a data type named Date. In a table, this data type is referred to as Date/Time. Over all, dates and times are considered differently but, to specify that a field would use date, time, or both, set its Data Type to Date/Time. You can specify this data type for a field what creating a table either in the Datasheet View or in the Design View.
To create a field that receives or displays date values:

![]() Practical Learning: Introducing the Date Type
Practical Learning: Introducing the Date Type

Date Values in SQL
To support date values, the SQL provides a data type named DATETIME. It is equivalent to Microsoft Access Date/Time data type.
The Value of a Date
In Microsoft Access, the value of a date starts and ends with #. An example is:
#6/2/2018#
Introduction to the Formats of a Date Value
As stated already, every language or system provides some standard formats for date values. You can indicate the format a new field should use or you can change the format of an existing field.
When creating a new field, to directly specify its format, in the Datasheet View, click under Click to Add or click a cell in the column that will precede the new column. On the Ribbon, click Fields. In the Add & Delete section, click More Fields. In the Date and Time section, click the desired option (Short Date, Medium Date or Long Date):

If a field was created already with the regular Date & Time option in the Datasheet View or the Date/Time data type in the Design View, to specify or change its format:
![]() Practical Learning: Introducing Date Formats
Practical Learning: Introducing Date Formats

| Abbreviation | Date of Admission to the Union |
| AK | 01/03/1959 |
| AL | 12/14/1819 |
| AZ | 02/14/1912 |
| AR | 06/15/1836 |
| CA | 09/09/1850 |

If the regular formats don't satisfy your needs, you can use use a custom format created using some characters and symbols but based on some rules. A summary of the letters used and their combinations are as follows:
| Format | Used For | Used to Display |
| d | Days | The day as a number from 1 to 31 |
| dd | Days | The day as a number with a leading 0 if the number is less than 10 |
| ddd | Weekdays | The name of a weekday with 3 letters such as Mon, Tue, etc |
| dddd | Weekdays | The complete name of a week day such as Monday, etc |
| w | Week | The numeric day of the week such as 1 |
| ww | Week | The numeric week of the year, ranging from 1 to 53 |
| m | Months | The numeric month from 1 to 12 |
| mm | Months | The numeric month with a leading 0 if the number is less than 10 |
| mmm | Months | The short name of the month such as Jan, Feb, Mar, etc |
| mmmm | Months | The complete name of the month such as January, February, etc |
| q | Quarters | The numeric quarter of the year |
| yy | Years | Two digits for the year as 00 for 2000 or 03 for 2003 |
| yyyy | Years | The numeric year with 4 digits |
To use these letters, you can simply type the desired combination in the Format field of the Design View of the table or the Format combo box of the Property Sheet of the text box of a form or report. Here is an example:

This is configured to display a single digit for a day of the month if the day is less than 10, followed by the complete name of the month, followed by the year in 4 digits.
During data entry, the user can enter a valid date. Once the field looses focus, it displays the date based on the format. Based on this, you can use any combination of formats but you should use a combination most regularly used in your language so the users would not be confused.
Besides the indicated characters, you may want to use some other symbols to separate them. An example would be January 5, 2024, which uses a comma in the display. To create such sections, include the characters in double-quotes. What you would be doing is to ask Microsoft Access to display such characters "as is" while considering the non-quotes characters as part of the format. Here is an example:

![]() Practical Learning:
Using Date Masks
Practical Learning:
Using Date Masks

In the Design View of a table, the Format property allows you to specify how a date would
display in a field but not how the user must enter it. To specify how the date must be typed in a field or
control, you can use the Input Mask property. You can either type the mask or you can click the ellipsis
button ![]() and follow the wizard. If you
want to type your mask, you can use an appropriate combination of the letters and symbols we saw above.
and follow the wizard. If you
want to type your mask, you can use an appropriate combination of the letters and symbols we saw above.
Data and Date-Based Fields
Data Entry on a Date-Based Field
Microsoft Access provides two techniques to assist the user in specifying the value of a date-based field. To make data entry easy, after you have specified the data type of a field as Date/Time or Date & Time, in both the table and the form, the field or text box becomes equiped with a calendar. The calendar appears on the right side of the field or the text box when the object receives focus. The user can then click the calendar and select the desired date. The calendar completely reduces the likelihood of a mistake.
As an alternative to the calendar, the user can manually type the value of the date. In this case, the user must respect the rules of both the format that was set and the language that is being used. This means that the value to enter depends on the format that was set, if any. The value also depends on the universal rules of date. For example, the month of January cannot have more than 31 days and the month of February can have 29 days only if the specified year is leap.
If no format was set, after entering the value, the user can press Enter or Tab. At this time, Microsoft Access would analyze the value the user entered. If the value is not valid, Microsoft Access would display an error and reject the value. This is one of the fundamental differences between a text-based field and a date-oriented column. In a text-based field, the user can enter any date, including one that is not valid. You would find out only when you try to use that value in an operation.
![]() Practical Learning: Adding Date-Based
Fields
Practical Learning: Adding Date-Based
Fields
| Item # | Date in Store |
| 290699 | April 28, 2016 |
| 379367 | April 27, 2016 |
| 746827 | May 23, 2016 |
| 388729 | May 27, 2016 |
| 668156 | May 30, 2016 |
| 345500 | May 21, 2016 |
| 430669 | May 24, 2016 |
| 426643 | May 16, 2016 |
| 136843 | February 2. 2016 |
| 366154 | May 18, 2016 |
| 735312 | May 18, 2016 |
| 388663 | April 18, 2016 |
| 441180 | June 1, 2016 |
| 211771 | April 18, 2016 |
| 545127 | May 16, 2016 |
| 239679 | May 4, 2016 |
| Receipt # | Shopping Date |
| 100001 | June 1, 2016 |
| 100002 | June 1, 2016 |
| 100003 | June 2, 2016 |
| 100004 | June 2, 2016 |
| 100005 | June 2, 2016 |
| 100006 | June 4, 2016 |
Converting a Value to Date
Before involving a value or an expression in a date-based operation, you should first convert it. If the values of a table field are provided as strings, the primary way to convert them is to change the data type of the column to a date-based type. If all values are valid, the conversion would be smooth. If at least one of the values is not valid, the conversion would fail and you would receive an error.
To support value conversion to date, Microsoft Access provides a function named CDate. Its syntax is:
CDate(expression) As Date
The Components of a Date Value
This function takes a value, an expression, or the name of a field as argument and analyze it. The value of the argument must follow the rules of dates specified by both the universal conventions and the language being used (such as US English). If the argument holds a valid date, the function returns that date. If the value is not valid, the function returns an error.
Introduction
We saw that a date was made of the day, the month, and the year. On an existing date, you can get these values by calling their corresponding functions.
The Day, the Month, and the Year Parts of a Date
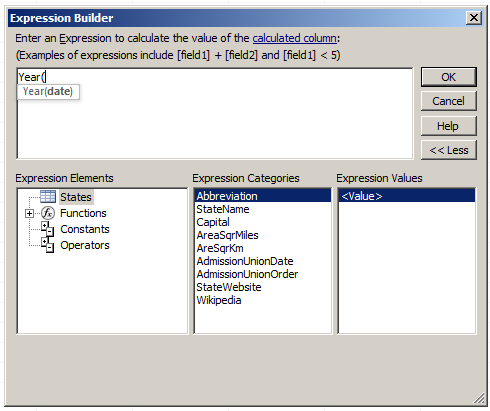
To let you get the year part of a date, Microsoft Access provides a function named Year. Its syntax is:
Year(expression) As Integer
This function takes a date as argument. If the argument is a valid date, the function produces the year as a number.
To get the month of a date, call a function named Month. Its syntax is:
Month(expression) As Integer
To get the day of a date, call a function named Day. Its syntax is:
Day(expression) As Integer
![]() Practical
Learning: Accessing the Year of a Date
Practical
Learning: Accessing the Year of a Date


The Week in a Date
The week is a combination of 7 days that consecutively occur in a date. To identify them, each day has a specific index and a specific name. In US English, the names of the days are Monday, Tuesday, Wednesday, Thursday, Friday, Saturday, and Sunday. In some cases, the days may be counted from Sunday (instead of Monday). The option to specify what is considered as the first day of the week is referred to as firstdayofweek and is represented in Microsoft Access by one of the following values:
| Value | Name |
| 0 | National Language Support (NLS) Setting |
| 1 | Sunday |
| 2 | Monday |
| 3 | Tuesday |
| 4 | Wednesday |
| 5 | Thursday |
| 6 | Friday |
| 7 | Saturday |
In most operations that involve date values, you will consider that the first day of the week is Sunday, represented with 1. In some cases, if you want to use another day as the starting point of a week, you can specify it from one of the above values.
To let you get the name of a week, Microsoft Access provides the WeekdayName() function. Its syntax is:
WeekdayName(weekday As Integer,
	    Option As Boolean,
	    Optional firstdayofweek As Integer) As String
This function takes three arguments with only the first required. The first argument is passed as an integer and can be one of the above values. The second argument is optional and it specifies whether the weekday name will be abbreviated. The third argument, firstdayofweek, also optional, specifies what day should be considered as the first day of the week. It can be one of the above numbers.
To get the index (or position) of a day of a week from a date value, you can call the Weekday() function. Its syntax is:
Weekday(expression, Optional firstdayofweek As Integer) as Integer
The first argument is required. It can be an expression or a control that must produce a date. If the function succeeds, it produces a number that represents the day of the week.
The Current Date
To let you know the current date on a computer, Microsoft Access provides a function named Date.
![]() Practical Learning: Getting the Current Date
Practical Learning: Getting the Current Date
Operations on Date Values
Finding the Difference Between Two Date Values
To let you find the difference between two date values, Microsoft Access provides a function named DateDiff. It allows you to find the number of days, weeks, months, or years from two date values. The DateDiff() function takes 5 arguments, 3 are required and 2 are optional. Its syntax is:
DateDiff(interval, date1, date2, option1, option2)
The interval argument is required and it specifies the kind of value you want as a result. This argument is passed as a string and can have one of the following values:
| Interval | Used To Get |
| w | Numeric Weekday |
| ww | Week of the Year |
| d | Day |
| y | Numeric Day of the Year |
| m | Month |
| q | Quarter |
| yyyy | Year |
The date1 and date2 arguments are required. They specify the date values for the operation.
By default, the days of a week are counted starting on Sunday. If you want to start counting from another day, pass the option1 argument using one of the following values: 1, 2, 3, 4, 5, 6, or 7 (there are other variances to that argument).
If your calculation involves weeks, or if you are trying to find the number of weeks, by default, the weeks are counted starting January 1st. If you want to count your weeks starting at a different date, use the option2 argument to specify where the program should start.
![]() Practical
Learning: Finding the Difference Between Two Date Values
Practical
Learning: Finding the Difference Between Two Date Values


Adding a Number to a Date Value
To let you add a value to a date, Microsoft Access provides a function named DateAdd. It is used to add a number of days, weeks, months, or years to a date. The syntax of the DateAdd() function is:
DateAdd(interval, Number, date) As Date
The interval argument is required and it specifies the kind of value needed as a result. This argument can be passed as a string (in double-quotes). It can have one of the following values:
| Interval | Used To Get |
| w | Numeric Weekday |
| ww | Week of the Year |
| d | Day |
| y | Numeric Day of the Year |
| m | Month |
| q | Quarter |
| yyyy | Year |
The number argument is required. It specifies the number of units you want to add or subtract. If you set it as positive, its value will be added. If you want to subtract, pass it as a negative value.
The date argument is the date to which you want to add the number.
Fundamentals of Times
Introduction to Time Values
A time is a non-spatial measure of the number of seconds that have elapsed in a set period. Starting at a specified period and counting incrementally, if the number of seconds reaches 60, the measure is called a minute. If the number of minutes reaches 60, the measure is called an hour. If 24 measures of hours occur, the measure is called a day (actually a day is 24 hours plus a few more seconds but the seconds are taken into consideration only every 4 years).
Time Values in SQL
The SQL support time values with the same DATETIME data type used for dates.
The Time Value
To create a time value, use an appropriate combination of the above letters and characters. In most cases, you should include the combination between two # signs. An example would be:
#05:42#
This would represent 5:42 AM. Another example is:
#10:26 AM#
This also represents a time in the morning. Remember that you can also include the seconds in your time value.
Time Rules
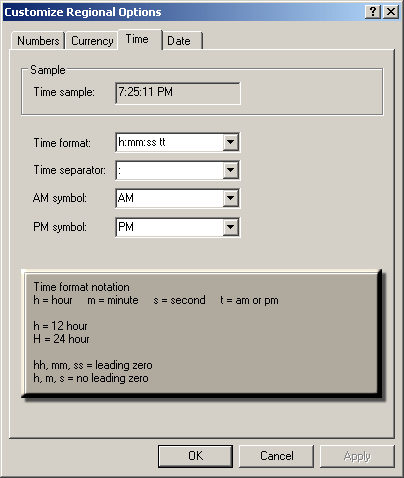
By default, to display or handle time values in a database, Microsoft Access uses some letters and characters. The default rules are defined in the computer:
To support time values, Microsoft Access uses the same Date data type reviewed for dates. If you are creating a field in a table, to make it hold time values, if you are working in the Datasheet View, apply the Date & Time type as we reviewed for the date. If you are working in the Design View of the table, specify the data type of the field as Date/Time.
You can specify how the time values would appear on a field or the corresponding text box. To do this, after creating a field:
![]() Practical Learning:
Creating a Time-Based Field
Practical Learning:
Creating a Time-Based Field
| Receipt # | Shopping Time |
| 100001 | 10:24 |
| 100002 | 16:38 |
| 100003 | 20:05 |
| 100004 | 13:12 |
| 100005 | 12:46 |
| 100006 | 14:26 |
The Format property in the Design View of a table is used to show how the time values should appear
in the field. First, the user must enter the value. To assist the user with how to enter the time, you can
create a custom mask. To do this, click Input Mask and type a mask. Otherwise, you can
click the ellipsis button ![]() and follow the wizard.
and follow the wizard.
As stated already, the rules that specify what characters and symbols are used to display time values are in the Time tab of the Customize Regional Options. The characters used for the hours, the minutes, and the seconds are defined in the Time Format combo box:
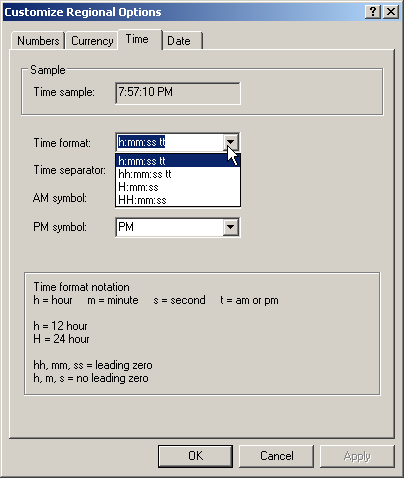
To control how time values should display in a field, after setting its Data Type to Date/Time, use the Format property. The characters used to create a format are:
| Format | Used For | Used to Display |
| : | Separator | The character separator for time
values This character is set in the Regional (and Language) Settings of Control Panel |
| h or H | Hours | An hour number from 0 to 23 If the hour is less than 10, it would display without the leading 0 |
| hh or HH | Hours | An hour number from 0 to 23 If the hour is less than 10, it would display with the leading 0 such as 08 |
| n or N | Minutes | A minute number from 0 to 59 If the number is less than 10, it would display without the leading 0 |
| nn or NN | Minutes | A minute number from 0 to 59 If the number is less than 10, it would display with the leading 0 such as 06 |
| s or S | Seconds | A second value from 0 to 59 If the number is less than 10, it would display without the leading 0 |
| ss or SS | Seconds | A second value from 0 to 59 If the number is less than 10, it would display with the leading 0 such as 04 |
| ttttt | The time using the formula of the Long Time of the Regional Settings of Control Panel | |
| am/pm | AM and PM | am (in lowercase) if the time is configured to display in the standard (non military time) and if the time occurs in the morning, or pm (in lowercase) if the time is configured to display in the standard (non military time) and if the time occurs in the afternoon |
| AM/PM | AM and PM | AM (in uppercase) if the time is configured to display in the standard (non military time) and if the time occurs in the morning, or PM (in uppercase) if the time is configured to display in the standard (non military time) and if the time occurs in the afternoon |
| a/p | AM and PM | a (in lowercase) if the time is configured to display in the standard (non military time) and if the time occurs in the morning, or p (in lowercase) if the time is configured to display in the standard (non military time) and if the time occurs in the afternoon |
| A/P | AM and PM | A (in uppercase) if the time is configured to display in the standard (non military time) and if the time occurs in the morning, or P (in uppercase) if the time is configured to display in the standard (non military time) and if the time occurs in the afternoon |
| AMPM | AM and PM | The AM-PM character. Microsoft Access would refer to the format set in the Regional (and Language) Settings of Control Panel |
When combining these characters to create a format, you should follow the rules of your language. You should refer to the formula set in the Time property page of the Regional (and Language) Settings of Control Panel. Microsoft Access also refers to it for the character separator. If you want to include any other character, type it in double-quotes.
Operations on Time Values
Conversion to a Time Value
Before involving a value in a time-based operation, you should first check and convert it to a recognizable format. To do this, call the same CDate() function we saw for dates. Its syntax is:
CDate(expression) As Time
This function takes one argument that can be passed as the name of a control, as a string that holds a time value, or as an expression that is supposed to produce a time value. If the value passed as argument holds a recognizable time, the function returns that time.
The Components of a Time Value
As mentioned in our introduction, a time value is made of the hours, the minutes, and the seconds. If you already have a time or if you retrieve one from an object or you get one from an expression, you may be interested in only one or its components. There are functions you can use to get these values.
To get the hour value of a time, call a function named Hour. Its syntax is:
Hour(expression) As Integer
To get the minute of a time value, call a function named Minute. Its syntax is:
Minute(expression) As Integer
To get the second value of a time, call a function named Second(). Its syntax is:
Second(expression) As Integer
The Current Time
To give you the current time, Microsoft Access provides a function named Time.
Adding to a Time Value
To add a value to a time, call the same DateAdd() function we reviewed for dates. The DateAdd() function is used to add an interval value to a specific time. With it, you can add a number of seconds, minutes, or hours to another time. As a reminder, the syntax of the DateAdd() function is:
DateAdd(interval, number, date) As Time
The interval argument is passed as a string and can have one of the following values:
| Interval | Used To Get |
| s | Second |
| n | Minute |
| h | Hour |
| w | Numeric Weekday |
The Number argument is required also. It specifies the number of units you want to add. If you set it as positive, its value will be added. If you want to subtract, make it negative.
The date argument is the date to which you want to add the number.
Subtraction From a time
The DateDiff() function is used to find the difference between two time values. It allows you to find the number of seconds, minutes, or hours when you supply two recognizable values. The DateDiff() function takes 5 arguments, 3 are required and 2 are optional.
The syntax of the function is
DateDiff(Interval, Time1, Time2, Option1, Option2) As Time
The Interval argument is required and it specifies the kind of value you want to subtract. This argument is passed as a string and can have one of the following values:
| Interval | Used To Get |
| s | Second |
| n | Minute |
| h | Hour |
Required also, the Time1 and Time2 arguments specify the time values that will be used when performing the operation.
The Date and Time Value
Introduction
In some cases, you may want to consider both the date and the time as one value. Microsoft Access supports this concept through the same Date/Time data type we have seen so far. In fact, when you set the data type of a field to Date & Time or Date/Time and set the format for a date, you are simply asking Microsoft Access to ignore the time part; otherwise, the time becomes set to midnight.
![]() Practical
Learning: Creating a Date/Time Field
Practical
Learning: Creating a Date/Time Field
Date/Time Values in SQL
The SQL DATETIME data type is used for dates, times, or combinations of date and time values.
The Format of a Date/Time Value
A date/time value is a combination of the date and the time. If you want a Date/Time based field to hold both the date and the time values as one, you can set its Format as Long Date. An alternative is to create a mask that is a combination of the dates and the times masks we reviewed in previous sections.
![]() Practical
Learning: Applying a Mask to a Date/Time Field
Practical
Learning: Applying a Mask to a Date/Time Field
Data Entry on a Date/Time Value
When a field or a text box that is used for both the date and the time value is accessed, if you know the date and time combination you want to use, type it between # symbols. An example would be #06/15/2016 10:44. Otherwise, when the field or the text box has focus, it displays a calendar button on the right side. You can use it to specify the value of the date. You should then press the Space bar and type the time value. The field or the text box would then display both values.
The Current Date and Time
To get both the current date and the current time of the computer, call a function named Now.
The Components of a Date and Time Value
Because the date/time value is a combination of date and time, it includes the components we reviewed for the date and those we reviewed for the time. As a result, you can call their functions to get the individual values.
Adding a Value to a Date/Time Value
To add a value to date and time value, you can call the same DateAdd() function used for date or time values. This allows you to add months, days, years, hours, minutes, or seconds. The result would include both the date and the time.
The Difference Between Two Date/Time Values
If you provide only date values to a the DateDiff() function, you will get only the raw days, months, or years. In the same way, a call to the DateDiff() function is suitable only if both times occur on the same day. As a better alternative, the Date data type (actually called a class) allows more precision if you provide a combination of the date and time values for each part.
![]() Practical
Learning: Creating Date/Time Values
Practical
Learning: Creating Date/Time Values


| Associated Label - Caption | Text Box Name | Control Source |
| Equivalent to: | txtDays | =IIf(DateDiff("n",[DropOffDateTime],[OrderCompletedDateTime])\1440=0,"",IIf(DateDiff("n",[DropOffDateTime],[OrderCompletedDateTime])\1440=1,DateDiff("n",[DropOffDateTime],[OrderCompletedDateTime])\1440 & " day",DateDiff("n",[DropOffDateTime],[OrderCompletedDateTime])\1440 & " days")) |
| Delete | txtHours | =IIf((DateDiff("n",[DropOffDateTime],[OrderCompletedDateTime])\60) Mod 24=0,"",IIf((DateDiff("n",[DropOffDateTime],[OrderCompletedDateTime])\60) Mod 24=1,(DateDiff("n",[DropOffDateTime],[OrderCompletedDateTime])\60) Mod 24 & " hour",(DateDiff("n",[DropOffDateTime],[OrderCompletedDateTime])\60) Mod 24 & " hours")) |
| Delete | txtMinutes | =IIf(DateDiff("n",[DropOffDateTime],[OrderCompletedDateTime]) Mod 60=0,"",IIf(DateDiff("n",[DropOffDateTime],[OrderCompletedDateTime]) Mod 60=1,DateDiff("n",[DropOffDateTime],[OrderCompletedDateTime]) Mod 60 & " minute",DateDiff("n",[DropOffDateTime],[OrderCompletedDateTime]) Mod 60 & " minutes")) |
|
|
||
| Previous | Copyright © 2002-2021, FunctionX | Next |
|
|
||