
Database Fields on Sheet
 |
Database Fields on Sheet |
Introduction to Data Fields
A Database From Scratch
 |
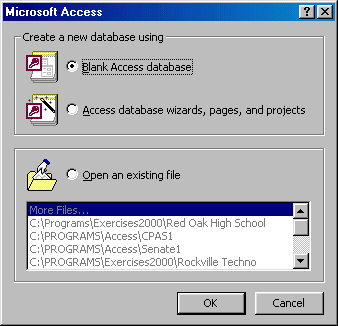
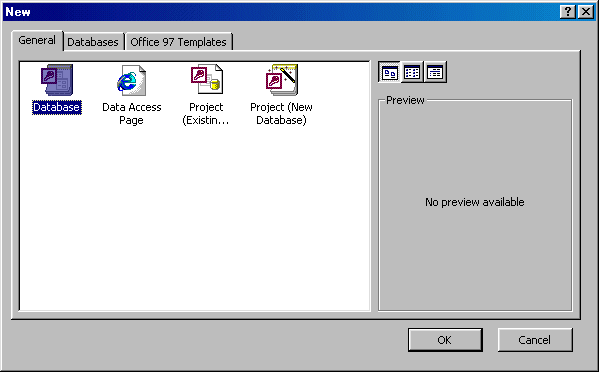
Starting a database from scratch allows you to create and add its different parts as needed. When using this process, the main advantage is that you will exercise as much control as possible on your database because you will be creating all of your objects. The disadvantage is that you will miss that primary layout that the Database Wizard offers. Creating a database from scratch simply means starting from a blank database and adding the different components. Of course, after learning how to perform some changes, you will be able to modify some aspects of a database created using the Database Wizard. To create a database from scratch, if you are just launching Microsoft Access, you can select the first radio button. If you had started Microsoft Access already, you can display the New dialog box and, from the General tab, select Database. Creating a database from scratch also means that you create a database file that does not contain any objects. Therefore, the most you must first do is to give this file a name. |
![]() Practical Learning: Creating a Blank Database
Practical Learning: Creating a Blank Database
Database Object and Fields
A field is an object used to host, hold, or store a piece of information of a database. Before such an object can perform its function, it must first be created. In the strict sense, the most important or the most regularly used fields of a database are created on a table; but as we have mentioned in previous sections, tables may not be the friendliest windows to present to a user for data entry. For this reason, fields can and should also be created on other windows.
The process of making a field available depends on the type of object it will reside on and probably how the field will be used. This leads to two categories of fields: those that can receive or store information and those that can only present or display it. All fields of a table, especially in Microsoft Access, are created to store data. On the other hand, fields on almost all of the other objects (queries, forms, reports) can be made of combinations of already existing fields of a table, or they can be created independently of any existing or non-existing data.
The Table Data Sheet and its Fields
Table Layout
 |
To make fields available on a table, you must create each one of them. Before adding the fields, you must first create the table. There are various techniques available. We have already seen how to use the Table Wizard to create a table. Another technique consists of displaying the table as if you were doing data entering. In this Datasheet View, you can create, add, or insert a field. You can also add fields to a table that was created using the Table Wizard. The last technique you can use consists of designing the table. |
|
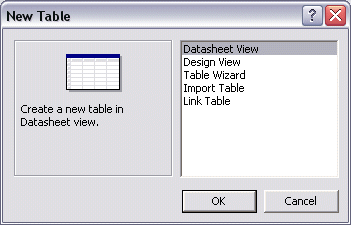
To create a table in Datasheet View, on the Database window, you can click the Tables button and double-click the Create Table By Entering Data. Alternatively, on the toolbar of the Database window, you can click the New button. You can also click Insert -> Table from the main menu. One of these techniques would display the New Table dialog box from which you can click Datasheet View and click OK.. |

|
![]() Practical Learning: Viewing a Table in Datasheet View
Practical Learning: Viewing a Table in Datasheet View
The Title Bar
A table is a rectangular window. On top, it presents a title bar. The title bar is made of a table's icon
![]() . The table icon provides a menu that allows you to minimize, maximize, restore or close the table. The
middle section of the table icon is formally called the title bar. Like most regular popup
windows, the right section of the title bar presents the system buttons.
. The table icon provides a menu that allows you to minimize, maximize, restore or close the table. The
middle section of the table icon is formally called the title bar. Like most regular popup
windows, the right section of the title bar presents the system buttons.
Columns and Rows
Imagine you create a list of people with whom you have some type of relationship. The list can be started with names as follows: Bill, James, Hermine, and Khan. This type of list is considered one-dimensional because all of its items fit in one category. In order to create a more significant list, you may want to include these people’s email addresses and probably other related information. If you include these additional pieces of information in the same category, the list may become confusing. To arrange the list, you would create categories. Here is an example: |
 |
| Name | Email Address | Phone Number | Relationship |
| Bill | bill@yahoo.com | Friend | |
| James | jamesemail.com | (102)399-2893 | |
| Hermine | (101) 447-8384 | Cousin | |
| Khan | @Khan.com |
This type of display allows you to refer to a piece of information by its category. This is the basis of a table. A table is a two-dimensional list of items so that the items are arranged by categories. A complete or incomplete series of items that represent each category is called a record. Therefore, a table can be represented as follows:
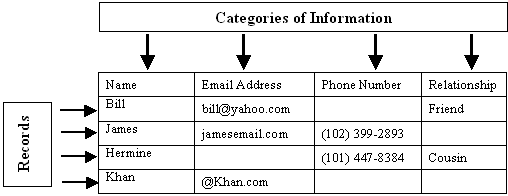
In the world of database development, a category is represented as a column. Sometimes it is also called a field. A record is represented as a row. To better organize its information, each column of a table must have a (unique) name. By default, Microsoft Access creates a table with columns named Field1, Field2, Field3, etc. By default, a table starts with 10 columns. You can add more or delete unneeded ones.
By default, a table starts with 21 rows. The number of rows increases as a user adds records. The number of rows decreases if you delete records. As we will learn latter, deleting a row is completely different
from deleting a column.
Table Cells
Although a table is primarily recognized as an arranged list of columns and rows, these are hardly important to the user. Each column and each row intersect to create a rectangular box called a cell. The cell is actually the object that holds data of a table. A cell holds only one piece of information. The database developer decides what type of information would go into a cell:
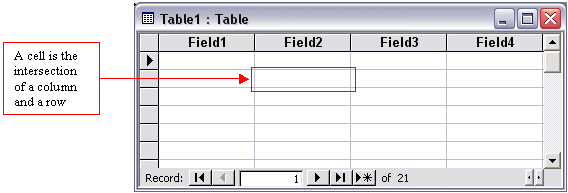
The Scroll Bars
If you start entering data into a table and there are more records than the height of the table can display, the table would be equipped with a vertical scroll bar. The vertical scroll bar would allow you to move up and down on the datasheet. This is useful if/when a table has more records than can be displayed all at once, and this will happen (almost) all the time. In the same way, if a table contains one or more records than the width of the table can display, the table would be equipped with a horizontal scroll bar:
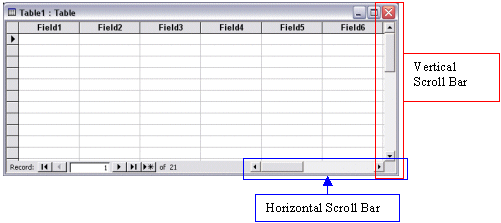
The presence or absence of one or both scroll bars is automatically managed by the operating system. Since you will usually not give your users access to tables, you should not be concerned with the management of scroll bars. If your users need to use a table, they know how to use a scroll bar.
Table Navigation Buttons
The lower left side of the table is made of five buttons used to navigate the table or create records, and a text box. Each button plays a specific picture:
|
|
Table Creation in Datasheet View |
|
Fields Names |
|
Once a table displays in Datasheet View, you can simply start entering data into its cells but because the columns would have insignificant names, you should make sure they display names that can identify their type of information. |

|
To name a field, first figure out what the data in the category will be made of. If you are planning to enter employees' salaries in a field, you can just call the field Salary. If you want to specify employees’ names by first name, middle name, and last name, you can use such field names and make them distinct. In this case, you could name the first field as firstname (in one word), the last name would be called lastname. Although this good technique allows you to use one word name, some people including yourself might be confused. The suggestion is to distinguish wherever a new English |
|
(or the language you are using to design your database) name starts in the field name, by using a starting uppercase. Instead of firstname, you can use FirstName. Instead of fullname, you can use FullName. Instead of firstdayofmonth, you can use FirstDayOfMonth. To change the name of a field, you can click its column header, such as Field1. You can also right-click a column and click Rename Column. Alternatively, when any cell under a column has focus, on the main menu, you can click Format -> Rename Column and type the new desired name. |
![]() Practical Learning: Naming Datasheet Fields
Practical Learning: Naming Datasheet Fields
The Name of a Table |
|
Like everything that is part of a database, a table must have a name that can be used to refer to the
object throughout the database in other files that can be linked to the table. Fortunately, when you perform data entry, information you type into a table is saved immediately, as soon as you move to another cell. There are two main ways you can specify the name of a table, either when you save it for the first time or if you decide to rename it. |
| Unlike the previous version of this site, we will not use the convention of prefixing the name of a database object with a three letters. For example, the names of tables will not start with tbl. We came to this decision because most other database environments, including Microsoft SQL Server, do not suggest this rule. Although the lack of this rule may create some confusion, because you will end up having a table and a form with the same name, we will strive to explicitly state what object type we are referring to. For example, we will avoid writing, “Open Employees” or “Open the Employees object”. Instead, we will usually state, “Open the Employees table”. This should clearly indicate that you must first click the Tables button in the Database Window because the tables are only in the Tables section, and then open the indicated table. In the same way, if we write, “Open the Employees form”, you must first click the Forms button in Database Window, then open the indicated form. |
![]() Practical Learning: Saving a Table
Practical Learning: Saving a Table
|
|
|
||
| Previous | Copyright © 2002-2005 FunctionX, Inc. | Next |
|
|
||