Home

Reports Fundamentals

AutoReport

A report provides an object used to print a database records. Although you can print tables, queries, or forms, reports are customized to be printer friendly. They can perform and display calculations. Once again, Microsoft Access provides wizards to quickly create reports.

The simplest way to create a report is by using the AutoReport feature available either from the New Object button on the Database toolbar or the New Report dialog box.

Practical Learning: Using AutoReport

  1. The Rockville Techno database should still be opened
    On the Database Window, click the Tables button
  2. Click the Payment Methods table to select it
  3. On the Database toolbar, click the arrow of the New Object button and select AutoReport
     
  4. After viewing the newly created report, close it
  5. When asked whether you want to save the report, click Yes
  6. Accept the suggested name for the report and press Enter
  7. On the menu bar, click Insert -> Report
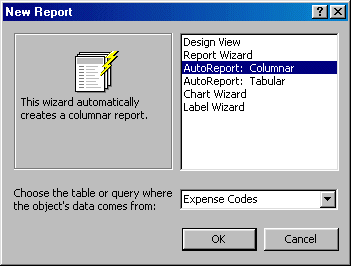
  8. On the New Report dialog box, select AutoReport: Columnar
  9. In the combo box, select Expense Codes
     
  10. Click OK
  11. After viewing the report, close it
  12. When asking to save it, click Yes
  13. Accept the suggested name for the report and click OK 


The Report Wizard

Microsoft Access can help you create a more elaborate report where you would use one of the pre-designed layouts. This is done using the Report Wizard. The Report Wizard is available from the New Report dialog box that you can access either from the menu bar or from the New button on the Database Window when in the Reports section. If you are using Microsoft Access 2000 or 2002, you can also double-click Create Report By Using Wizard.


Practical Learning: Using the Report Wizard

  1. On the main menu, click Insert -> Report
  2. On the New Report dialog box, click Report Wizard and click OK
  3. On the first page of the wizard, click the arrow of the Tables/Queries combo box and select Table: Employees
  4. Click the Select All Fields button 
  5. Click Next
  6. Accept anything in the second page and click Next
  7. Accept anything in the third page and click Next
  8. In the Layout section, click the Columnar radio button:
     
  9. Click Next
  10. Select the Bold Style to preview it. Then click Formal and click Next
  11. Accept the suggested Title of the report as Employees and press Enter
  12. Scroll down in the report to view the records and close the report

Report Printing

As stated already, the report is the favorite object used to print data. As done with the other objects, you can print a report whether it is opened or not. Before printing a report, you must first select or open it. If you want to print a report without opening it, in the Database window, make sure the Reports section is selected. Then, you can locate and right-click the desired report. If you follow this approach, the report would be sent directly to the printer.

If you want to control or customize the printing of a report, first select it in the Reports section of the Database window or open it. Then, on the main menu, you can click File -> Print… This would display the Print dialog box, allowing you to select a printer if you have more than one. You can also specify such aspects as the color, the number of copies or the range of records to be printed.


Practical Learning: Printing a Report

  1. On the Database window, click the Reports button
  2. Right-click the Expense Codes reports and click Print…
  3. To print a report after displaying it, double-click the Time Sheet report to open it
     
  4. On the main menu, click File -> Print…
  5. Click the Properties button
  6. Based on your printer, make it print in black and white or grayscale and click OK
  7. Click OK on the Print dialog box
  8. After printing the report, close it
  9. On the Database window, click the Forms button and double-click Clients
  10. From the Clients form, click Time Cards
  11. After viewing the Time Cards form, click its Preview Time Card… button
  12. To print the report, on the Print Preview toolbar, click the Print button
  13. After printing the report, close it
 

MOUS Topics

S6  Print database objects (..., forms, reports, ...)
S7 Navigate through records in a form
S16 Create a form with the Form Wizard
S23 Enter records using a form
S35 Create a report with the Report Wizard
S26 Preview and print a report
 

Exercises 


Tenley Associates Company Expenses

  1. Open the Tenley Associates database
  2. Use the Form Wizard to create a Columnar form based on the Employees table and including all fields. Save the form as Employees and set its display Style to Stone
  3. Use AutoForm: Columnar from the New Form dialog box to create a form based on the Expense Details table and save it as Expense Details
  4. Fill the Employees form up with the following values, ignoring those not mentioned:
     
    Last Name Department Work Phone Extension
    Bidds Accounting (202) 266-5022 2422
    Roberts Sales (202) 266-5022 2408
    Hoaks Sales (202) 266-5022 2412
    Baugh Administration (202) 266-5022 2418
  5. Print the Employees form
  6. Using the Report Wizard, create a Columnar report based on the Expense Categories table, including all fields and using the Corporate style. Save the report as
    Expense Categories and print all of its records
  7. Using the AutoReport from the Database toolbar, create a report based on the Employees Contact Information query. Save the report as
    Employees Contact Information and print all of its records
 

Previous Copyright © 2002-2019, FunctionX Next