 |
Column and Row Maintenance in Datasheet View |
|
Introduction
A database table and its fields are made of special properties that govern how a table displays its data and how the fields behave. Most of these features are highly customizable. The most important properties you will need to know from a table can help you decide what fields a table should display and in what sequence. Although users will usually not have access to your tables, you should still be aware of some of the internal configurations of a table so you would know what they can do on tables. Anticipating some of the features you will need to implement when designing tables, such as hiding and displaying items, freezing and unfreezing them, it is a good idea to know how these features operate on a table.
Column Insertion
 |
One of the jobs performed when maintaining or improving a table consists of adding new and necessary columns that were not previously available. This can be done in various ways. In the Datasheet View of a table, you can only insert a column in the middle of two existing columns or you can insert a new column to the beginning, that is, to the left of the first column. You cannot simply add a new column at the end of, that is, after the most right column of, the table.
|
To add, that is, to insert a new column, you can right-click the column header that will succeed the new column and click
Insert Column. Alternatively, if the caret is positioned in any cell under the column that will succeed it, on the main menu, you can click Insert -> Column.
 Practical Learning: Inserting a Column
- The Clarksville Ice Cream database should still be opened and the Tables button should be selected in the Database window
On the Database window, double-click the CustomersOrders table to open it
- To add a new field, right-click the OrderDate column header and click Insert Column
- Right-click the new Field1 column header and click Rename Column
- Type Clerk and click the cell under Container
- To insert another column, while the Container column has focus, on the main menu, click Insert -> Column
- While the caret is under Field1, on the main menu, click Format -> Rename Column
- Type Flavor and press Enter
- Enter the following records in the table:
| Clerk |
OrderDate |
OrderTime |
Flavor |
Container |
| Paulette McIntyre |
05/10/2000 |
10:16 AM |
Vanilla |
Cup |
| Ralph Ammian |
05/10/2000 |
10:28 AM |
Chocolate Cream |
Bowl |
| Alex Mendy |
|
11:35 AM |
Butter Pecan |
Cone |
| Ralph Ammian |
05/10/2000 |
|
Vanilla |
Cone |
- Close the table
Column Selection
Many times during design or once users have started using your database, you will find that a sequence of fields is not appropriate. In order to move fields, you should know how to select them:
- To select a column, click the desired column header and release your mouse
- To select more than one column, click and hold your mouse on one of them, then drag to cover the other desired column or columns, when all desired columns are highlighted, release the mouse
- To select more than one column, click one column that will be at one end, press and hold Shift, and then click the column that will be at the other end
 Practical Learning: Selecting Columns
- Right-click the CustomersOrders table and click Open
- To select a column, position the mouse on OrderTime until the mouse
cursor turns into a down-pointing arrow

- Then click

- Notice that the whole column has been selected
- To select columns in a range, click and hold the mouse on Container
- Then drag left until you get to OrderTime

- Then release the mouse
- To use another technique of selecting columns, click Flavor
- Press and hold Shift
- Then click Clerk and release Shift
- Close the table
Column Deletion
After creating a column, if you find out that you do not need it anymore, you can delete it.
 |
If you had created a relationship that the column is involved in, you cannot delete it until you “break” or delete the relationship first. |
To get rid of a column you do not need anymore, you can right-click it and click Delete Column.
 Practical Learning: Deleting Columns
- Double-click the CustomersOrders table to open it
- Right-click OrderTime and, from the context menu, click Delete
Column
- When a message box displays, read it and click Yes
- Close the table
Column Moving
If you find out during design, data entry, or database maintenance that a particular field is misplaced, you will likely want to move it for better navigation or to ease data entry.
To move a column or group of columns in Datasheet View, first select that column or those columns. Click and hold your mouse on it (or one of them). Then, start dragging left or
right in the desired direction. While your mouse is moving, a thick vertical line will guide you. Once the vertical line is positioned to the desired location, release the mouse.
 Practical Learning: Moving a Column
- Open the ROSH database and, on the Database window, click the Tables button. Open the
Staff table in Datasheet View
- Scroll right or left so you can see the Sate and the ZIPCode fields at the same time
- To move a field, position the mouse on the ZIPCode column header until the mouse cursor turns into a down-pointing arrow:

- Click to select the whole column (that means click once and release the
mouse)
- Click the selected column header again and hold the mouse down.
- Drag in the left direction until the guiding vertical line is positioned between State and HomePhone:

- Then release the mouse. Notice that the ZIPCode column has moved
- Make sure you can see the HomePhone, the WorkPhone, and the MaritalStatus fields.
To select two fields, position the mouse on HomePhone. With the mouse cursor pointing down, click and drag in the right direction until WorkPhone is selected,
then release the mouse.
- Click one of the selected column headers and hold your mouse down
- Drag in the right direction until the guiding vertical line is positioned on the right side of
MaritalStatus
- Then release the mouse
- To select a group of columns, click the MaritalStatus column header to select it
- Press and hold Shift, then click the WorkPhone column header and release Shift
- Click one of the selected column headers and hold your mouse down.
- Drag in the left direction until the guiding vertical line is positioned to the left of Extension:

- Then release the mouse
- Save and close the table
Record Selection
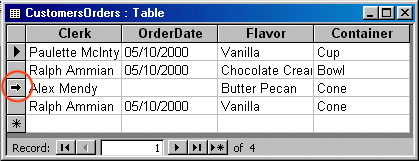
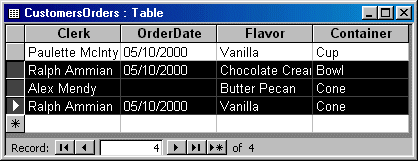
To select a row or record in Datasheet View, click the desired row header and release your mouse. To select more than one record, click and hold your mouse on one of them, then drag to cover the other desired row or rows. When all desired rows are highlighted, release the mouse. Another technique used to select more than one row consists of clicking one row that will be at one end, press and hold Shift, and then click the row that will be at the other end.
 Practical Learning: Selecting Records
- Open the Clarksville Ice Cream database (it should still be in the list of Most Recently Used files under the File menu category)
- Double-click the CustomersOrders table to open it
- To select one record, position the mouse on the gray button to the
left of the third record until the mouse turns into a right pointing
arrow

- Then click
- Notice that all cells of the second records are highlighted
- To select a range of records, click the gray button to the left of
the fourth record. Then click once
- Press and hold Shift. Then click the gray button to the left of the
second record, and release Shift

- Notice that three records have been selected
- Close the table
Record Deletion
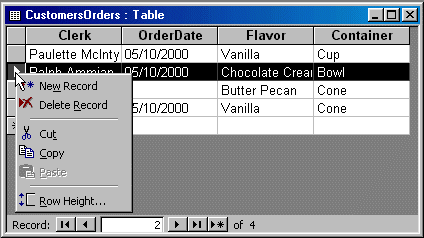
If a record is not needed anymore or has become irrelevant in a database, you can delete it. To do this, right-click the record selector button, which is the gray box, on the left side of the most left field of the record, and click Delete Record from the context menu.
 Practical Learning: Deleting Records
- Open the CustomersOrder table
- To delete a record, right-click the gray button to the left of the
second

- Click Delete Record
- A warning message box will appear. Read it and click Yes
- To delete more than one record, click and hold the mouse on the gray
button to the left of the second record, then drag down to include the
third record in the selection
- On your keyboard, press Delete
- Read the warning message box and press Enter
- To close the table, press Ctrl + F4
Columns Width and Rows Height
The columns and rows of a table use some default values to display their records and fields. When data exceeds the regular width of a column, part of the information would be hidden. If a particular column contains data that you want to display at all times, you can enlarge the column. On the other hand, if a column displays short pieces of information, such as one character for middle initial or two characters (US states or Canadian provinces), you can narrow the column to let it just fit the data as desired. In the same way, you can heighten or shrink rows of a table as you see fit.

There are various techniques you can follow to widen or narrow a column. You can position the mouse on the right border of the column header. The mouse pointer would change into a horizontal double arrow crossed by a vertical beam. If you double-click, the column would be sized to the widest value of the column, provided the widest value is wider than the column header. If the widest value is narrower than the column header, the column width would be wide enough to display the caption of the column. On the other hand, you can change a column's width by clicking on the column's right border and dragging in the desired direction.
To set or change the rows height, you can position the mouse on one of the rows lower border, then click and drag in the opposite direction.
 Practical Learning: Changing Columns Width and Rows Height
- Open the Rockville Techno database that you started in Lesson 2 and, in the Database window, click the Tables button
- From the Tables section of the Database window, double-click the Employees table to open it
- To resize the First Name column, position your mouse on the line between First Name and Last Name until the mouse pointer appears as an I-beam (also called a pipe) with a horizontal double-arrow:

- Then double-click
- To resize the Address column, position your mouse on the line between Address and City:

- Then click and drag in the right direction until the mouse is positioned in the middle of City:

- Release the mouse
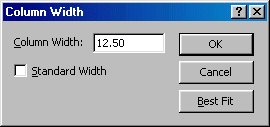
- Right-click the Country column header and click Column Width...
- In the Column Width dialog box, type 12.50 to replace the default
value

- Click OK
- Click and cell under the Title column
- On the main menu, click Format -> Column Width...
- On the Column Width dialog box, click Best Fit and click OK
- Save and close the table
| S8 |
Create a database (... in-design view) |
| S11 |
Modify field properties |
| S25 |
Delete records from a table |
Yugo National Bank
- Create a blank database and name it Yugo National Bank
- Using the Table Wizard, create a table based on the Accounts sample
table of the Personal category. Include the following fields: AccountTypeID,
AccountType, and Description. Save the table as
AccountTypes and fill it up as follows:
| Account Type ID |
Account Type |
Description |
| 1 |
Checking |
|
| 2 |
Saving |
|
| 3 |
CD |
|
- Using the Table Wizard, create a table based on the Employees sample
table of the Business category. Include the following fields: EmployeeID,
DepartmentName, EmployeeNumber, FirstName, LastName,
Title, EmailName, WorkPhone, Extension, Address,
City, StateOrProvince, PostalCode, Country, HomePhone,
Salary, and Notes. Save the table as Employees
and fill it up with employees
records
- Using the Table Wizard, create a table including the CustomerID field
from the Customers sample table of the Business category. From the
Accounts sample table of the Personal category, include the following
fields: AccountNumber, AccountTypeID, AccountName. From the Addresses
sample table, include the following fields: Address, City,
StateOrProvince, PostalCode, Country, EmailAddress,
HomePhone, WorkPhone, WorkExtension, DateUpdated, and
Notes. Save the table as
Customers and fill it up with sample
customers records
Watts A loan
- Catherine Watts lives in Baltimore, Maryland, US. Eight months ago,
while living with her father, one weekend, she went to attend the
wedding of her friend in Chicago. Meanwhile, her father had a heart
problem and was rushed to the hospital after a neighbor found him on the
floor of his dining room. The attending doctor wrote
on a chart that Catherine's father would be kept nightly for further
examinations. While her father was still lying in bed in the hallway and
sleeping, a nurse came back and from some events that nobody recalls,
Mr. Watts' chart was modified. Next, he was taken to a surgery room since
his chart now indicated that he had been in an unrecoverable
accident but that he was a happy organ donor. In the next few minutes,
his body was cut in various pieces. His right liver was sent to Canada while the
other gave new hope to a patient in California. His left eye gave
new site to a woman in Mexico and his skin allowed a man who had been in
the center of a mass fire a new cover for his body. The rest of his
organs were spread in the region like salt in boiling water. When the
attending doctor came back to look for his patient, he found out what
had happened but it was quite late to undo anything. When Catherine came
back from Chicago and was asked to recognize at least what was left of her father, she was furious but calmly considered
it was an accident. At her friend's insistence, she sued the hospital
and got a five-million-dollar settlement. To make sure she would not
spend all that cash picking up men in bars and night clubs, her friend encouraged her
to open a business. Since Catherine had taken some classes in banking
management, she decided to open a money lending institution. She would
lend money to individuals through car dealers, music instrument stores,
furniture stores, and personal loans, etc. She has contracted you to
create an application that can help her manage her business.
Create a blank database and name it Watts A Loan
- Using the Table Wizard, create a table with the following fields: CustomerID, (and from the Mailing List sample table)
FirstName, MiddleName, LastName, Address, City,
State,
PostalCode (rename it ZIPCode), Country, HomePhone, WorkPhone,
EmailAddress, and Notes. Name the table as Customers
- Using the Table Wizard, create another table with the following
fields: TransactionID, TransactionNumber, TransactionDate,
TransactionAmount, and Notes. Save the table as Transactions


![]() Practical Learning: Inserting a Column
Practical Learning: Inserting a Column![]() Practical Learning: Selecting Columns
Practical Learning: Selecting Columns


![]() Practical Learning: Deleting Columns
Practical Learning: Deleting Columns![]() Practical Learning: Moving a Column
Practical Learning: Moving a Column


![]() Practical Learning: Selecting Records
Practical Learning: Selecting Records

![]() Practical Learning: Deleting Records
Practical Learning: Deleting Records

![]() Practical Learning: Changing Columns Width and Rows Height
Practical Learning: Changing Columns Width and Rows Height


