Microsoft Access Lessons Home

Action Queries


Introduction to Action Queries

We have used the concept of a query so far only to create a list of fields that would be considered for a set of records. We also mentioned that a query in Microsoft Access is simply a means of visually representing data. Indeed, a query is based on a SQL statement. As SQL is its own, fully functional language, we can use it to perform far more operations than to only select columns for a query. The SQL can be used to create tables, modify tables, perform data entry, modify records, etc. Some of these operations can be performed visually in the query Design View. They can also be performed using SQL statements. To know what is going on behind the scenes, you can write your own code (SQL statement). You can also use the Design View to start a query, and then open the code to customize the statement.

You will hardly perform some of the operations we will review here, but you should know that they are available. It is very important to know that, when using an action query to perform a specific action such as creating a table, you are not creating a regular query in the strict sense. Most of these queries are usually useful only once. For this reason, you will hardly need to save them, as the action may be needed only once. If you perform the action of the query, you do not need to save it but once you apply its intended action, the related action is executed and stays with the database even if either you do not save the query or save it but later on delete the query. In practicality, this is also how queries are used in many other environments. For example, in Microsoft SQL Server, the statement that makes up a query is created as its own file, also called a view, then it can be called any time.

Practical Learning:  Introducing Action Queries

  1. To create a new database, on the Taskbar, click Start -> (All) Programs -> New Office Program
  2. In the New Office Document dialog box, click the General property page and click Blank Database
     
  3. Click OK
  4. Locate your Exercises folder and display it in the Save In combo box
  5. Change the File Name to Clarksville Ice Cream2 and click Create
 

Queries and Table Creation

Creating a database is usually the first action you perform in order to have one. Of course, you can also open an existing database. Creating a Microsoft Access database is done visually as you must create its file without using SQL code, contrary to many other database environments. The second action to take is probably to create a table.

Using queries, there are two main techniques you can use to create a new table for your database. Microsoft Access provides a technique called Make-Table Query. This type of query is used to retrieve all or some fields of an existing table and, instead of creating a new query that depends on an existing table, you would get a brand new table, independent of any existing table. This type of action can let you create a new table based on a rule applied on an existing table. For example, suppose the Cars table of your car rental database contains cars that should not be rented to customers anymore, perhaps because of their age. You can create a query that would make a list of cars that follow a rule, apply it, and then create a new table made of only such cars.

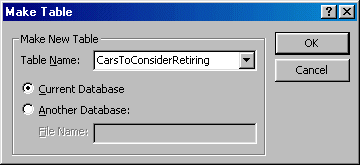
To create a table using a Microsoft Access query, start a new query in Design View. Then, on the main menu, you can click Query -> Make Table Query, this would present you with a Make Table dialog box that allows you to specify a new name for the query or to select an existing table that would receive the new data.

Practical Learning:  Using Make-Table Queries

  1. Open the Bethesda Car Rental1 database
  2. On the Database window, click the Tables button and click the Cars table to select it
  3. On the main menu, click Insert -> Query and, in the New Query dialog box, double-click Design View
  4. On the Query Design toolbar, click the arrow of the Query Type button and click Make-Table Query…
     
  5. In the Table Name combo box, type CarsToConsiderRetiring as the name of the table
     
  6. Make sure the Current Database radio button is selected and click OK
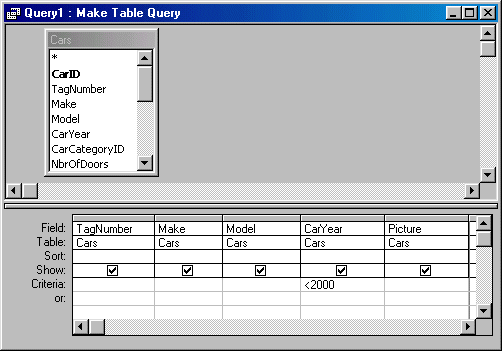
  7. In the Cars list, double-click TagNumber, Make, Model, CarYear, and Picture
  8. To set the criterion for an old car, click the Criteria field of the Year column
    Type < 2000
    This means that the list applies to any car made before 2000
     
  9. To preview the list of cars that will be considered, on the main menu, click View Datasheet View
  10. Switch back to Design View
  11. To execute the action, on the Query Design toolbar, click the Run button 
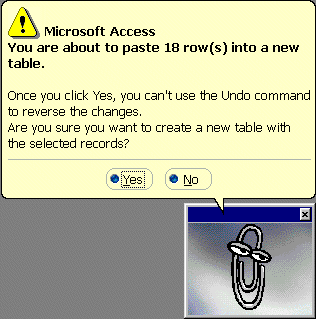
    You will receive an acknowledgement message box
     
  12. Read it and click Yes
  13. Close the query window. When asked whether you want to save it, click Yes
  14. Type Create A List Of Retiring Cars as the name of the query and press Enter


SQL and Table Creation

As a computer language, the SQL is equipped to perform all basic and necessary operations of a database. As such, it can be used to create a table. Although you will usually use the visual means of Microsoft Access, you can still use a SQL statement to create a table.

To create a table, you start your statement with the CREATE TABLE expression followed by the desired name of the table as follows:

CREATE TABLE TableName

As you have probably realized by now, every table must have at least one column. The list of columns of a table starts with an opening parenthesis “(“ and ends with a closing parenthesis with an optional semi-colon “);”. If the table will be made of more than one column, you can separate them with a comma. The syntax used would be:


CREATE TABLE TableName (Column1, Column2, Column_n);

To make the statement easier to read, and because some columns can be long, you can create each on its own line. The syntax would become: 

CREATE TABLE TableName
(
Column1,
Column2,
Column_n
)

To create a column, you specify its name, followed by its data type, and some possible options. Therefore, the syntax of creating a (one) column is:

ColumnName DataType Options

Notice that there is only space that separates the sections of the syntax. For this reason, the name of a column should be in one word because, if you put space after the first word, the SQL engine would treat the next word as a data type. For example, the following statement would produce an error:

CREATE TABLE Test
(
Marital Status
)

If you want to use space in a column name, include the name between an opening square bracket “[“ and a closing square bracket “]”. The above statement would be changed to:

CREATE TABLE Test
(
[Marital Status]
)

After (or on the right side of) the column name, you must specify the type of information, also called the data type, that will be stored in the cells under that column. Here are the SQL data types supported in Microsoft Access:

Data Type Description
Char or Text The char or the text data types can be used for columns whose fields would receive (or present) text. The field must not contain more than 255 characters
This is the same as Microsoft Access’ Text data type
Varchar This is one of the most regularly used data types of a SQL column. It can used for strings (text) of any kind
Memo The same as Microsoft Access’ Memo, its field can hold up to 65656 characters (many SQL environments don't support the Memo data type)
Bit This is used for a Boolean or logical field that accept only a True or False, a Yes or No, an On or Off, or a 0 or –1 as a value
This is equivalent to Microsoft Access' Yes/No
Smallint The smallint data type can be used for a field that would hold numbers that can range from –32,768 to 32767
Int or Integer Each of these data types can be used to represent a natural number 
Long This is used for fields that would hold small to very large natural numbers
Real Real is a relatively small data type in the world of double-precision representation but can be used on a column whose fields would hold decimal numbers that can range from – 3.402823E38 to – 1.401298E-45 for negative values or from 1.401298E-45 to 3.402823E38 for positive values.
This data type is close to Microsoft Access’ Single
Float The float data type can be used on a column whose fields would hold numbers with a decimal portion, like Microsoft Access’ Single. Like the Single data type, the float is mainly used on a column where number precision is not a significant issue. For example, you should not use it on a column that hold monetary values
Numeric The numeric data type can be used on a column whose fields would hold numbers with a decimal portion. It is close to the Microsoft Access’ Double data type and can be used when numeric precision is needed
Double This is the same as Microsoft Access’ Double data type
Money and Currency This data type is appropriate for fields that would hold numbers that represent monetary values
Datetime Equivalent to Microsoft Access Date/Time data type, the DATETIME data type can be applied to a column whose fields would display either date, time or both date and time values
Binary The binary data type can let a field accept any type of data but it is equipped to interpret the value. For example, it can be used to receive hexadecimal numbers
Image This can be used for fields that would hold OLE Object equivalents

 
Here is an example that creates a table named Persons

CREATE TABLE Persons
(
FirstName VARCHAR,
[Last Name] Text,
Gender int,
[Date Of Birth] DateTime,
MaritalStatus Integer,
IsMarried Bit,
PersonalIncome Money,
HouseholdIncome Currency
);

When studying techniques of creating fields in a table’s Design View, we saw that a property called Field Size can be used to specify the size of value used on a field. In the SQL also, this property is fixed for most fields expect those that are text-based. Therefore, when creating a field whose data type is char, text or varchar, you can specify the desired number of characters that the field should allow. If you are creating a char or a varchar column, you should (strongly) specify the number of characters instead of letting Microsoft Access assign the default. The text usually doesn't use a number of characters.

To specify the maximum number of characters of a text-based field, include it in parentheses to the left of the data type.

There are many other properties that can be applied to a column, as we have learned in the past. For example, you may want a column of a table to be used as the primary key. To provide this piece of information, on the right side of the column, before its comma, type primary key.

By default, except for a column set as primary key, the user is not required to provide a value for each field when performing data entry. This is because, by default, each field is set to NULL. This is equivalent to setting the Required property of a field to No (which is the default) in a table’s Design View. As this property is to No in the Design View, you can also specify it by typing null on the right side of any column you want. Here are examples:

CREATE TABLE Persons
(
PeronID long Primary Key,
FirstName VARCHAR NULL,
[Last Name] Text,
Gender int NULL,
[Date Of Birth] DateTime,
MaritalStatus Integer,
IsMarried Bit NULL,
PersonalIncome Money,
HouseholdIncome Currency
);

If you don't specify the NULL attribute, the nullity is implied. On the other hand, if you want to require the values of a field so the user cannot move to the next record unless the field is filled, type not null to its right. This would indicate to Microsoft Access that the field does not allow a null value.

During data entry, the user is allowed to type the same value in the same fields of two different records. For example, it is not unusual for two people to have the same last name. In some other cases, you may want each record to have a different value for a particular field. For example, a company may not allow two employees to have the same employee number or the same social security (US) numbers, just like two cars should not have the same tag number in the same state. To communicate this, on the right side, type the unique key word.

If you are creating a table that will participate in a relationship, when creating the field used as its primary key, on the right side of that field, type the constraint keyword followed by a name for primary key. This clause should be entered before primary key. Here is an example:

CREATE TABLE Genders
(
GenderID int CONSTRAINT PKGender Primary Key,
Gender char(20)
);

To establish a relationship from this table when creating another table, in that other table, create a field. By tradition, this would have the same name as we have mentioned already but this is not a requirement. The requirement is that both fields (the new field and the field it refers to in the parent table) must have the same data type. When creating the relationship, after specifying the name of the field and its data type, type the references keyword followed by the name of the table it is linked to and its primary key as argument. For example, to create a Persons table that is related to the above Genders table, you would type:

CREATE TABLE Persons
(
PeronID long Primary Key,
FirstName VARCHAR NULL,
LastName Text Not Null,
GenderID int REFERENCES Genders(GenderID),
Notes char
);

Practical Learning:  Creating Tables With SQL

  1. Open the Clarksville Ice Cream2 database that you started earlier
  2. On the Database window, click Queries and click the New button
  3. In the New Query dialog box, double-click Design View and, on the Show Table dialog box, click Close
  4. On the Query Design toolbar, click the View button 
  5. Change the statement in the Query1 window as follows:
     
    CREATE TABLE Ingredients
    (
    IngredientID LONG CONSTRAINT IngredientID PRIMARY KEY,
    Ingredient TEXT(50)
    );
  6. To save the query, on the Query Design toolbar, click the Save button 
  7. Type Create Table as the name of the query and press Enter
     
  8. To execute the query, on the Query Design toolbar, click the Run button 
  9. To create another table, in the Create Table window, change the statement as follows:
     
    CREATE TABLE Flavors
    (
    FlavorID Long Constraint FlavorID Primary Key,
    Flavor VarChar(50)
    );
  10. To execute the query, on the main menu, click the Query -> Run
  11. To create another table, in the Create Table window, change the statement as follows:
     
    CREATE TABLE Containers
    (
    ContainerID int constraint ContainerID primary key,
    Container char(50),
    Description text
    )
  12. To formally create the table, execute the query
  13. To create another table, in the Create Table window, change the statement as follows:
     
    CREATE TABLE Scoops
    (
    ScoopID Integer Constraint ScoopID primary key,
    Scoop Text(10)
    )
  14. To formally create the table, execute the query
  15. To create another table, change the SQL statement as follows:
     
    CREATE TABLE Employees
    (
    EmployeeID Long Constraint EmployeeID Primary Key,
    DateHired DateTime,
    FirstName char(20) Null,
    LastName text(20) Not Null,
    Title VarChar(100) Null,
    ContactPhone text(16),
    HourlySalary Money,
    Notes char
    )
  16. Create the table by executing the query
  17. To create another table, change the SQL statement as follows:
     
    CREATE TABLE OrderProcessing
    (
    OrderID Long Primary Key,
    EmployeeID Long REFERENCES Employees(EmployeeID),
    OrderDate DateTime,
    OrderTime DateTime,
    ContainerID Long references Containers(ContainerID),
    FlavorID Long references Flavors(FlavorID) Not Null,
    IngredientID Long References Ingredients(IngredientID) Null,
    ScoopID long References Scoops(ScoopID) Not Null,
    Notes Text
    )
  18. Execute the statement to actually create the table
  19. Close the window. When asked whether you want to save it, click Yes
  20. On the Database window, click the Tables button to see the list of tables
  21. On the main menu, click Tools -> Relationships… to see the already created diagram
     
  22. If you are using Microsoft Access 2000 and later, on the main menu, click File -> Print Relationships…
  23. Save the relationship as Ice Cream Structure
  24. Close the Relationships window

SQL and Data Entry

When using the Make-Table Query of Microsoft Access, you actually perform two actions at once. First you create a table, which is the primary requirement of the Make-Table Query, then, when you execute the query, you fill the new table’s fields with the existing values of the originating table.

The SQL allows you to actually perform data entry on a table. In the language’s standard, you can create a table and fill it with values. Alternatively, you can add various new records to the fields of an existing table. This is also referred to as inserting records. In the SQL, data entry is performed using the INSERT INTO expression, followed by the table name, followed by the VALUES keyword, and followed by the values in parentheses. If the table is made of only one column, you can include the desired value in the parentheses. If the table is made of more than one column, you must separate the values with commas. The syntax to use is:

INSERT INTO TableName VALUES(Column1, Column2, Column_n)

The TableName attribute must be the name of an existing table of the current database. If the name is wrong, that is, if the name is not found in the database, the SQL engine would consider that the table you are referring to does not exist. Consequently, you would receive an error.

The VALUES keyword indicates that you are ready to list the values of each field of the record. The values of the columns must be included in parentheses.

In the above syntax, the value of each field of the column must be entered in the exact order of the columns as they were created in the table. Fortunately, the SQL allows you to perform data entry in the order of your choice. To do this, when creating the statement, after specifying the name of the table, open the parentheses and type the order of the columns in the order of your choice but make sure you type valid names of existing columns. Then, in the parentheses of the VALUES attribute, type the values in the order specified in the parentheses of the table name. This random order of fields presents another advantage: it allows you to select only the fields whose values you want to enter.

If the column is a BIT data type, you must specify one of its values as 0, 1 (or –1), True, False, On, Off, Yes, or No.

If the column is a numeric type, you should pay attention to the number you type. If the column was configured to receive an integer (Int, Smallint, Integer, or Long), you should provide a valid natural number without the decimal separator.

If the column is for a decimal number (real, float, single, double, or numeric), you can type the value with its character separator (the period for US English).

If the column was created for a date data type, make sure you provide a valid date or a valid time value.

If the data type of a column is a string type, you can include its value between either single or double quotes. For example, a shelf number can be specified as 'HHR-604' and a middle initial can be given as 'D'.

Practical Learning:  Performing Data Entry

  1. Continuing with the Clarksville Ice Cream2 database, on the Database window, click Queries
  2. On the main menu, click Insert -> Query and, in the New Query dialog box, double-click Design View
  3. On the Show Table dialog box, click Close. Then, on the Query Design toolbar, click the View button
  4. Change the SQL statement as follows:
      
    INSERT INTO Ingredients VALUES(1, "None")
  5. To save the query, on the Query Design toolbar, click the Save button
  6. Type Data Entry as the name of the query and press Enter
     
  7. To execute the query, on the Query Design toolbar, click the Run button 
    You will receive a message box
     
  8. Read it and click Yes
  9. To add another record, change the statement as follows:
     
    INSERT INTO Ingredients VALUES(2, 'Cookies')
  10. Execute the statement and click Yes
  11. To use the same query and add a record to another table, change the statement as follows:
     
    INSERT INTO Flavors VALUES(1, 'Vanilla')
  12. Execute the statement
  13. Add another record by changing the statement as follows:
     
    INSERT INTO Flavors VALUES(2, "Cream of Cocoa")
  14. Execute the statement
  15. To add a record to the Scoops table, change the statement as follows:
     
    INSERT INTO Scoops VALUES(1, "One")
  16. Execute the statement
  17. Change the statement as follows to add one more record to the Scoops table:
     
    INSERT INTO Scoops VALUES(2, "Two")
  18. Execute the statement
  19. To a record to the Containers table, change the statement as follows:
     
    INSERT INTO Containers
    VALUES(1, 'Cone', 'We present various types of cones, 
    including chocolate-based')
  20. To another record to the Containers table, change the statement as follows:
     
    INSERT INTO Containers
    VALUES(2, "Cup", "A cup is a plastic utensil, similar to a glass 
    used in homes. Unlike a cone, it can be reused.")
  21. To add a record to the Employees table, change the statement as follows:
     
    INSERT INTO Employees
    VALUES(1,6/8/2000, "Allison", "Deans", "Crew Manager", 
    "(301) 821-4990", 8.35, "")
  22. To enter a customer record in the OrderProcessing table, change the statement as follows:
      
    INSERT INTO OrderProcessing
    VALUES(1, 1, 8/12/2000, "10:06", 2, 1, 1, 2, "")
  23. To add another in the OrderProcessing table, change the statement as follows:
     
    INSERT INTO OrderProcessing
    VALUES(2, 1, 8/12/2000, "10:22", 1, 2, 2,1, "")
  24. To enter a record in the Containers table with the order of our choice, change the statement as follows:
     
    INSERT INTO Containers(Description, ContainerID, Container)
    VALUES("A bowl is larger. Unlike the other two containers, a bowl  can 
    contain more than 2 scoops. We offer bowls or collectible 
    items.", 3, "Bowl")
  25. To perform random data entry in the Employees table, change the statement as follows:
      
    INSERT INTO Employees( ContactPhone, LastName, EmployeeID, HourlySalary)
    VALUES( "(202) 622-8674", "Nguyen", 2, 6.25)
  26. Close the query. When asked whether you want to save it, click OK

Queries and Record Appending

When working in a sensitive database, if you were the one in charge of data entry, you may prefer to use a temporary table to create records to make sure they are validated before actually adding them to the system. If you had created a significant number of these records and need to add them to the main table, the work can become overwhelming. Fortunately, Microsoft Access allows you to create a special query that can be used to add many records to a table in one step.

An Append Query allows you to add records to an existing table but you do not create the records. They must be retrieved from one table and transferred to another table.

In our Bethesda Car Rental1 database, imagine the company had acquired many cars at once but they were created in their own temporary table waiting to receive final approval after inspection. Now that this has been done, you can add them to the list of cars that is made available to the clerks who process order entry.

Practical Learning:  Appending Records

  1. The Bethesda Car Rental1 database should still opened.
    In the Database window, click Tables and double-click the Cars table to open it
  2. Notice the number of cars in the current table. After viewing the table, close it
  3. In the Database window, double-click the NewCars table to open it
  4. After viewing the table, close it
  5. In the Database window, make sure the NewCars table is selected.
    On the main menu, click Insert -> Query and double-click Design View in the New Query dialog box
  6. Right-click the title bar of the Query1 window. Position the mouse on Query Type and click Append Query…
     
  7. In the Append dialog box, click the arrow of the Table Name combo box, and select Cars
     
  8. Click OK
  9. In the NewCars list, double-click the asterisk field because we will involve all fields
  10. To save the query, on the Query Design toolbar, click the Save button
  11. Type Add New Cars To The System as the name of the query and press Enter
  12. To see the SQL statement, right-click the title bar of the Query1 window and click SQL View
     
  13. To execute the query, on the Query Design toolbar, click Run
    You will receive a message box:
     
  14. Read it and click Yes
  15. Close the query window
  16. From the Database window, open the Cars table to verify that the number of cars has increased

Queries and Records Updating

If you have a large database and all of a sudden, there are many records that need to receive a common change, you may face an arduous task. For example, you may have to check every record and make the change where needed. Fortunately, to apply this type of impact to a set of records, you can create a special query.

The Update Query allows you to change the existing values of one or more columns of a table. In other words, you can retrieve the values that are already in the fields of a table, change these values and have the table saved with them.

Practical Learning:  Updating Records

  1. The Bethesda Car Rental1 database should still be opened.
    In the Database window, double-click the Cars table to open it
  2. Scroll down and notice that the new recently added cars have their Available field set to No, False, or Off
  3. Close the table.
    Since we have recently added new cars, we will set their Available attribute to True so the clerks would know that these cars can be rented now to the customers
  4. Make sure the Cars table is selected in the Tables section of the Database window
    On the main menu, click Insert -> Query and double-click Design View in the New Query dialog box
  5. Right-click an empty area of the Query1 window. Position the mouse on Query Type and click Update Query
  6. In the Cars list, double-click Available
  7. In the Update To box of the Available column, type [Available]=0 and press the down arrow key
  8. In the Criteria box of the Available column, type [CarYear]>=2004
    This query is saying that, “If you find any car whose year is 2004 or up, set its Available property to true”
     
  9. To save the query, on the Query Design toolbar, click the Save button
  10. Type Control The Availability Of Cars as the name of the query and click OK
  11. To view the SQL statement, on the main menu, click View -> SQL View
     
  12. To execute the query, on the main menu, click Query -> Run
  13. You will receive a message box. Read it and click Yes
  14. Close the query window
  15. Open the Cars table and notice that the new cars have their Available field set to True, Yes, or On
  16. Close the table

Queries and Table Deletion

Microsoft Access provides various techniques to delete tables. In the next lesson, we will see how this can be done in the Database window. Meanwhile, the SQL provides its own mechanism to delete a table. This is easily done using the DROP command. The syntax is:

DROP TABLE TableName;

The DROP TABLE command is used only to delete tables (and indexes), not forms or reports. The TableName parameter must be a valid name of a table of the current database.

There are two big issues with the DROP TABLE command: it does not warn you and it is not reversible.

Practical Learning:  Deleting Database Tables

  1. Open the Bethesda Car Rental1 database
  2. On the Database window, click Tables and open the ForTheCustomers table to view. After viewing the table, close it
  3. On the Database window, click Forms 
  4. On the main menu, click Insert -> Query
  5. In the New Table dialog box, double-click Design View and click Close
  6. On the main menu, click View -> SQL View
  7. To delete a table, change the statement as follows:
     
    DROP TABLE ForTheCustomers
  8. Close the query window. When asked whether you want to save it, click Yes
  9. Type Delete Useless Table as the name of the query and press Enter
  10. On the Database window, click Tables and notice that the ForTheCustomers table is gone

Queries and Record Deletion

Besides deleting tables, you can also delete individual records of a table. Microsoft Access provides an easy mechanism of performing such an operation. To delete a group of records in one action, you can create a special query called a Delete Query.

Like all other Microsoft Access queries, a Delete Query allows you to select the necessary fields of a table. The first difference between this and the Select Query is that the Delete Query, like all other action queries, selects or considers all fields, even those you do not include in your statement. The other columns are those that would be used to specify the rules under which a record must be deleted.

The rule that governs whether a record must be deleted or not is also called a criterion. You can use many criteria to set the rule to follow in order to get rid of a record. Like most other action queries, the action of a Delete Query is irreversible.

Practical Learning:  Deleting Database Records

  1. The Bethesda Car Rental1 database should still be opened.
    On the Database window, click Tables and double-click the Cars table to open it
  2. Review the records and, in the Year column, notice some cars from 1998, 1996, or 1999. Now that the company has new cars, Management has decided it is time to retire any car that was made before 2000. We will use a query to delete all cars.
    Close the table but, in the Database window, make sure it is still selected
  3. On the main menu, click Insert -> Query and, in the New Query dialog box, double-click Design View
  4. On the main menu, click Query -> Delete Query
  5. In the Cars list, double-click TagNumber, Make, Model, and CarYear
  6. Click the Criteria box of the CarYear column. Type <2000 and press Enter
     
  7. To preview the list of cars that would be deleted, on the main menu, click View -> Datasheet View. Notice that 18 cars will be deleted
  8. Leave the query window opened and, on the Database window, double-click the Cars table to open and check the Available field of some cars. Notice that some cars (like the 2) are not available. Either they have been rented or we do not know for sure where they are. Because of this, we cannot delete a car from the system if we cannot certify where it is. Instead of starting to call everybody and sending emails all over the place, we will simply ignore non-Available cars for now: we will delete only cars that are available because we are more likely to know where they are.
  9. Close the Cars table and get back to the query
  10. Switch the query to Design View
  11. From the Cars list, double-click Available
  12. Click the Criteria box of the Available column. Type =True and press Enter
     
  13. Save the query as Retire Old Cars
  14. View the SQL statement
     
  15. Execute the query. When the message box appears, read it and click Yes
  16. Close the query window
  17. Open the Cars table and notice that cars older than 2000 have been deleted
  18. Close Microsoft Access
 

Previous Copyright © 2002-2019, FunctionX Next