 |
Windows Controls and Expressions |
|
Introduction
A person’s interaction with the computer is mostly done using Windows controls as these objects hold or present various pieces of information that the person can use. Therefore, Windows controls are highly involved in expressions. The expressions we have used so far were fairly straightforward and did not need any complex algorithm to accomplish their purpose. Unfortunately, as a database developer, you will face various scenarios, some of them might range from difficult to impossible. There are two main tools you need to build these sorts of expressions. First, you should know what is available so you can wisely play with Microsoft Access. Second, you will make use of your ability to logically think and process information.
Text-Based Controls
A string is an empty space, a character, or a group of characters. Because the character or group of characters that constitute a string is considered "as is", a string must be included in double-quotes whenever it is involved in any expression. Examples of strings are "g", "Gabriel", "Congo". In reality, these examples of strings are referred to as values. The value of a string is usually stored in the name of a field. For example, the last names of employees, such as "Pierre", "Harvey", "Charles", "Hermine", can be commonly stored in a field named FirstName. The ability to store a category of string in a named field allows such a field to be used in an expression, which then would produce a standard result for all records involved in that field. Based on this, you can use operators on names of fields instead of on values of those fields.
The most classic operation you will perform on strings consists of adding strings such as a first name and a last name in order to produce a new string that could represent a full name. Adding two strings is also referred to as concatenating
them.
To concatenate two or more strings, you can use the addition operator “+”. An example would be FirstName +
LastName. This would produce a string as FirstNameLastName. Instead of having the first and last names tied, you may need
to include an empty space between them. For this reason, you can add three strings such as
FirstName + " " + LastName to get a new string.
Although you can use the addition operator on strings, you might start thinking that any of the other algebraic operations can be used on strings, not at all. The addition operator was especially written (in computer programming, we say that it was overloaded) to be applied to strings. None of the other
arithmetic operations (subtraction, multiplication, division, and remainder) can be applied to strings and it would not make sense. For this reason, Microsoft Access (and the (Visual) Basic language) provide an alternate and appropriate operator to add strings.
Besides, or instead of, the addition operator, you can also add strings using the & (called ampersand) operator. To add two strings or fields named FirstName and
LastName, you can use the concatenation operator as FirstName & LastName. Like the addition operator, this operation appends the second string to the end or right of the first one. To produce a more readable string, you can add an empty string in the middle. The operation would become FirstName & " " & LastName
 Practical Learning: Concatenating Strings
- Open the Danilo Pizza1 database and click Tables
- Double-click the CustomersOrder table to open it in Datasheet View
- After viewing the table, switch it to Design View
- Right-click OrderDate and click Insert Rows. In the new empty field, type Cashier and press Tab. Type L and press F6. In the first page of the wizard, make sure the first radio button is selected and click Next. In the second page, click Employees and click Next. In the Available Fields list, double-click LastName. Click Next and click Finish
- In the lower section of the table, delete the Default Value and click
Lookup
- Click Row Source and click its ellipsis button
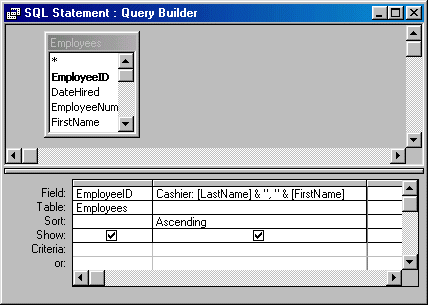
- Change LastName in the second column to LastName & “, “ & FirstName and press Enter
- To preview, on the Query Design toolbar, click the Run button
- After viewing the query, switch it back to Design View. In the new field, replace Expr1 with Cashier and, in the Sort field of the same column, select
Ascending:
- Close the SQL Statement window. When asked whether you want to save, click Yes
- Save the table and switch it back to Datasheet View. Click the arrow of the Processed By combo boxes and notice that each employee is represented with a last and a first name
- Close the table
- Open the College Park Auto Shop2 database and click Forms
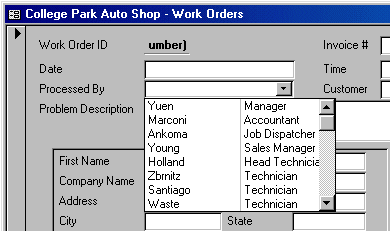
- Double-click the WorkOrders form to open it. Click the arrow of the Processed By combo box. Notice that each employee name is set only using the last name
- Switch the form to Design View and double-click the EmployeeID combo box
- In the Properties window, click the All tab and click Row Source. Then click the ellipsis button of the field to open its SQL Statement
- In the lower section of the query window, change LastName to display:
IIf(IsNull([MiddleName]),[LastName] & ", " &
[FirstName],[LastName] & ", " & [FirstName] & " " & [MiddleName])
- Preview the query and switch it back to Design View. In the second column, change Expr1 to
Employee and set the Sort field to Ascending for the same column

- Close the SQL Statement window. When asked whether you want to save it, click Yes
- Still in the All tab of the Properties window, change Column Width value to
0";1.4";1.25"
- Change the List Width value to 2.65
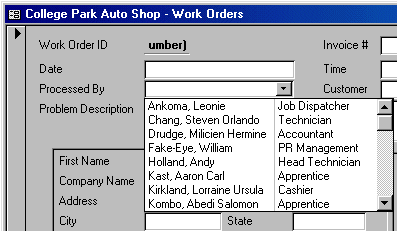
- Switch the form to Form View and click the arrow of the Processed By combo box
- Save and close the form
Command Buttons
Command buttons, or simply called buttons, are the most widely used objects to initiate actions on an application. Among other things, they are used to close windows, to open others, to validate a user’s choice, to present alternatives, etc. When introducing Windows controls, we that the easiest way to create a button consisted of using the Command Button Wizard. Indeed, when using this technique, there is a great deal of code that Microsoft Access writes to apply the desired functionality. The lines of code that Microsoft Access writes have already been prepared and were installed with it in some libraries called DLL. In some cases, either Microsoft Access is not prepared to write the exact functionality you need and it can write only part of the code. For this reason, you will either simply modify the code that Microsoft Access started or, if you know what to do, you can completely write your own code.
Imagine that, on the Bethesda Car Rental database, while processing an order and after the clerk has selected a car, the customer may ask various questions about the car. When creating subforms, we learned that an efficient subform includes only a reduced list of the fields that would be valuable on its parent form. You can then allow you the user to open the main form that holds more information about the subform but you should make sure that only the current record is made available to the user.
 Practical Learning: Using Command Buttons
- Open the Bethesda Car Rental2 database and click Forms
- Double-click the OrderProcessing form to open it
- After viewing the form, switch it to Design View
- On the Toolbox, make sure the Control Wizard button is clicked

In the Toolbox, click the Command Button  and click to the right side of the CarID combo box
- When the first page of the Command Button Wizard comes up, in the Categories list box, select
Form Operations
- In the Actions list, select Open Form and click Next
- In the second page of the wizard, click Cars and click Next
- In the third page of the wizard, click the first radio button: Open The Form And Find Specific Data To Display and click Next
- In the fourth page, in the OrderProcessing list box, click CarID. In the Cars list box, click CarID. Click the button between both lists
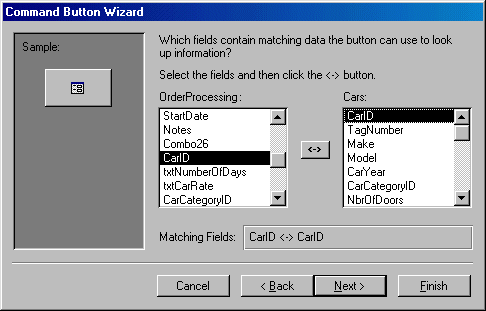
- Click Next
- In the text box, replace the string with Car Details and click Next
- Change the name of the button to cmdCarDetails and click Finish
- Resize and position the button for a better layout then close the form
- When asked whether you want to save it, click Yes
Radio Buttons
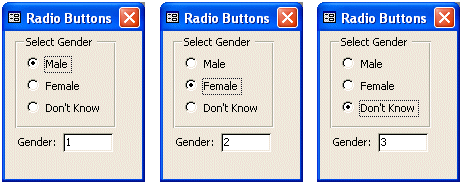
Options buttons are used in a group, which makes it particular to refer to them. If you design your option buttons in a "normal" way, which is classically done by including them in an Option Group, to find out which option button is selected in a group, you can call the Value property of the Option Group control. The first option button has a value of 1, the second has a value of 2, etc.
Imagine you have an Option Group control called fraGender that has three radio buttons and a text box called
txtGender. If you want to find out what radio button is selected from the option group and display its value in the text box, in the Control Source of the text box, you can type
=fraGender.Value
In the same way, if you have radio buttons on an Option Group box, you can use the
IIf() function to find out what button the user would have clicked. If you have only two option buttons, or if you have more than one radio button but want to consider only two possibilities, the use of the IIf() function would be easy. You can just decide which option button in the group would hold the necessary value.
The database engine recognizes that when you access an option button that is part of a group, you are actually asking the group control (the
Option Group box is in fact the "parent" of the radio buttons because it "carries" them) to find out what radio button was selected. In reality, the default property of an
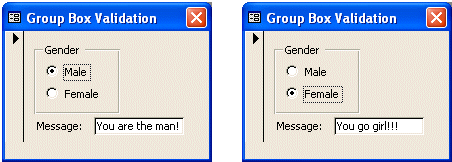
Option Group box is the Value. Therefore, in your expressions, you can omit the calling to the Value property. This means that when you write Frame12 for the name of a group box, you are in fact accessing the Value property of the control. Based on this, the minimum validation you can perform on an
Option Group is to do something if the desired option button is selected, or to do something else otherwise. Such a validation can be written with the
IIf() function as follows
=IIf([fraGender]=1,"You are the man!","You go girl!!!")
If you want to navigate through a group of radio buttons and validate each, you would have to include
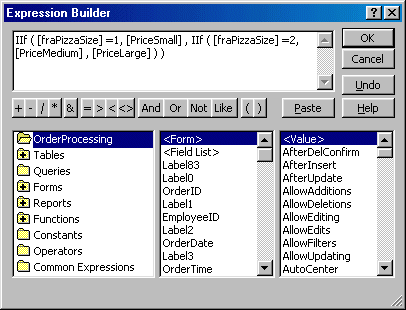
IIf() functions inside of others. This is referred to as nesting. Imagine that when processing the orders of a pizza application, you want to specify the price of a pizza based on the size selected and there are three sizes. A simple
IIf() function would not suffice. If the user selects the small size, you would apply the price for a small pizza. In a simple
IIf() function, if the user selects another size, you would have only one price left. In a text box that holds the price according to the selected size, you could write an expression as:
=IIf(fraPizzaSize=1, PriceSmall, PriceMedium)
What if the user selects a large size? The only solution is to nest another IIf() function and to include it as the False part of the Condition. The pseudo code you could use is
If Small Size is selected Then
    Apply Small Price
Otherwise
    If Medium Size is selected Then
        Apply Medium Price
    Otherwise
  	Apply Large Price
    End If
End If
 Practical Learning: Using Radio Buttons
- Open the Danilo Pizza1 database and click Forms in the Database window
- Double-click the OrderProcessing form to open it
- After viewing the form, switch it to Design View
- On the form, click the text box to the right of Total Price to select it
- In the Properties window, click the All tab and click the Control Source field
- Click the ellipsis button to call the Expression Builder dialog box
- On the left list, double-click Functions and click Built-in
Functions
- In the middle list, scroll down and click Program Flow. In the right list, double-click IIf
- In the top text box, click <<expr>> to select it
- In the left list, click OrderProcessing
- In the middle list, double-click fraPizzaSize
- Type =1
- In the top text box, click <<truepart>>
- In the middle list, double-click PriceSmall
- In the top text box, click <<falsepart>>
- In the left list, click Built-in Functions. In the middle list, click Program Flow. In the right list, look for and double-click IIf
- In the top text box, click <<expr>>
- In the left list, click OrderProcessing
- In the middle list, double-click fraPizzaSize
- Type =2
- In the top text box, click <<truepart>>
- In the middle list, double-click PriceMedium
- In the top text box, click <<falsepart>>
- In the middle list, double-click PriceLarge
- Click OK
- On the Properties window, set the Format to Currency and the Decimal Places to 2
- Switch the form to Form View
- On the form, click different option buttons and notice that the price of the pizza changes depending on the selected radio button
- Switch the form back to Design View.
- We will make invisible the text box we had added because the user will not need access to it.
On the form, click the txtPizzaPrice text box that was just added
- In the Properties window, click the Format tab and set the Visible property to No
- Save and close the form
Toggle Buttons
We defined a toggle button as a variant of a radio button or a check box. When toggle buttons come as a group and are treated as a group, they behave like radio buttons. When a toggle button is created as its own button, it behaves like a check box. To create toggle buttons that would behave like radio
buttons, you should use the Option Group control. Otherwise, to create a toggle button that behaves like a check box, you can use the
Toggle Button control on the Toolbox.
After creating a toggle button, you can implement its functionality. As stated already, a toggle button is first of all a button. Therefore, when it is clicked, it sends a message stating that it has been clicked. You can then take the necessary action. When a toggle button is part of a group created in an
Option Group control, the host (the Option Group control) can be used to take care of the action. To do this, each toggle button is represented by the Option Value property. Therefore, when implementing the Option Group, to know what button was clicked in the group, you can use a logical function like
IIf (or a conditional statement like If…Else) to check the value of the clicked button. Once you know what button was clicked, you can do what you want.
 Practical Learning: Configuring Toggle Buttons
- Open the Bethesda Car Rental2 database and click Forms in the Database window
- Double-click the Customers2 form to open it
- After viewing the form, switch it to Design View
- Scroll down to display the Form Footer section.
In the Toolbox, make sure Control Wizard button is clicked.
In the Toolbox, click the Option Group button and click somewhere under the Form Footer bar
- On the first page of the Option Group Wizard, under Label Names, type
Contact and press the down arrow key
- Type Driving Information and press the down arrow key
- Type Notes/Comments and press Enter
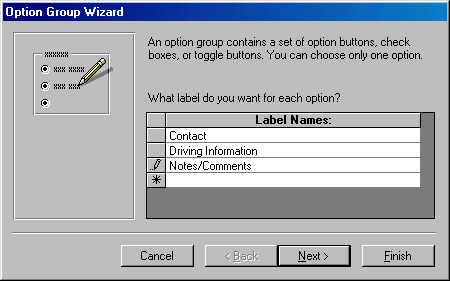
- Click Next
- In the second page of the wizard, accept to have Contact as the Default Choice and click Next
- In the third page, accept the suggested values and click Next
- In the fourth page, make sure the Save The Value For Later Use radio button is selected and click Next
- In the fifth page, click Toggle Buttons and accept the Etched Style
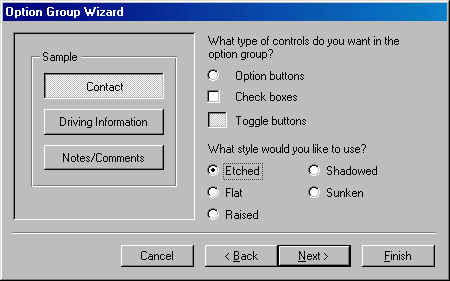
- Click Next
- In the sixth page of the wizard, accept the suggested Caption and click Finish
- While still in Design View, click the label that was added and press Delete to remove it. Move and resize the controls to redesign them as follows:

- To add a button to close the form, on the Toolbox, click the Command Button and click to the right of the Notes/Comments button in the Form Footer section and inside the group control
- When the first page of the Command Button Wizard comes up, in the Categories list, click Form Operations. In the Actions list, click Close Form and click Next. In the second page, in the text box, delete Form to have only Close and click Next. In the next page, change the name to cmdClose and click Finish
- Resize the button to occupy the area on the right side of the group control

- Double-click the border of the group control. In the Properties window, click the All tab and change the following two properties:
Name: fraSections
Border Style: Transparent
- Save the form
Check Boxes
A check box can have only two states: selected or not selected. (In most programming environments, a check can actually have three states, depending on how it was created. The third state would appear as "half" checked, also referred to as gray or indeterminate. For our databases here, we will consider that a check box can only be clicked or not clicked).
When a check box is selected, it has a value of True, Yes, On, or 1. When it is not clicked, it holds a value of False, No, or 0. This value can be used as you see fit. For, example, while only one option button can be selected in a group box, as many as necessary check boxes can be selected in a group. In fact, you do not have to include your check boxes in a group.
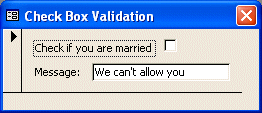
You can use the IIf() function to do something if a check box is selected or do something else if the same check box is not selected. You can use the IIf() function as follows:
=IIf([chkMaritalStatus],"Welcome to the club","We can't allow you")
 Practical Learning: Using Check Boxes in Expressions
- Open the Danilo Pizza1 application. From the Forms section, right-click the OrderProcessing form and click Design View
- On the Toolbox, click the Text Box control and click the area under the Olives label
- Change the caption of its label to Number
- Change the Name of the text box to txtToppings
- Drag PriceTopping from the Field List to the left group
- Change its label's Caption to Each
- Design the rest of the form as follows:
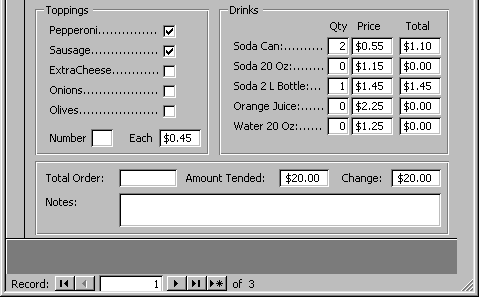
- To count the number of check boxes that are selected, that is, to get the number of toppings, set the Record Source of the txtToppings text box to
=Abs(([Pepperoni]+[Sausage]+[ExtraCheese]+[Onions]+[Olives]))
- To calculate the amount produced by the number of selected toppings, on the Toolbox, click Text Box and click an empty are on the form (anywhere will be fine as long as you can see it since this will be a temporary field)
- Set its Control Source to
=Abs([Pepperoni]+[Sausage]+[ExtraCheese]+[Onions]+[Olives])*Nz([PriceTopping])
- Switch the form to Form View to see the result. Then switch the form back to Design View and delete the text we just added
- On the form, click the text box on the right side of Total Order
- In its Control Source, type the following (this formula appears long but it contains only the functions we have used so far):
=CDbl(IIf([fraPizzaSize]=1,[PriceSmall],IIf([fraPizzaSize]=2,
[PriceMedium],[PriceLarge])))+CDbl([txtBreadSticks])+CDbl([txtBuffaloWings])+
(Abs([Pepperoni]+[Sausage]+[ExtraCheese]+[Onions]+[Olives])*[PriceTopping])+
CDbl([txtSodaCan])+CDbl([txtSoda20Oz])+CDbl([txtSoda2L])+CDbl([txtOJ])+
CDbl([txtWater])
- Preview the form and perform a few orders:
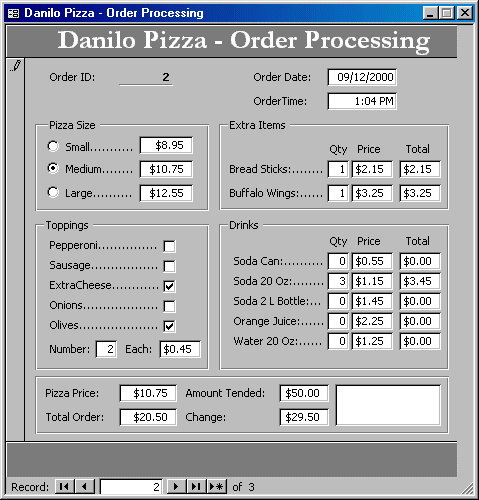
- Save and close the form
Combo Boxes
We have learned to use or create a field whose data is available through a combo box. We also know that a combo box can be made of more than one field of data. In that case, data is organized in columns when the combo box drops. Unfortunately, a combo box can display only one field of data when it is not dropped. If you want a combo box to display more than one field, you can create an expression that combines fields from the originating table.
 Practical Learning: Designing a Time Sheet
- Open the Bethesda Car Rental1 database
- On the Database Window, click Tables and click the New button
- From the New Table dialog box, click Design View and click OK
- For the first Field Name, type TimeSheetID and make it an AutoNumber Data Type. Also make it a Primary Key
- To save the table, on the Table Design toolbar, click the Save button
- Type TimeSheet and press Enter
- Set the name of the second Field Name to EmployeeID and set its
Data Type to Number
- Set the name of the third Field Name to DateSigned and set its
Data Type to Date/Time
- Set the next Field Name to MondayIn and for its Data
Type, select Lookup Wizard...
- When the first page of the Lookup Wizard dialog box comes up, click the second radio button and click Next.
- Under Col1, type 00:00 AM and press the down arrow key.
- Type 00:30 AM and press the down arrow key
- Complete it with the other values so that when you finish, the list will include 00:00 AM, 00:30 AM, 01:00 AM, 01:30 AM, 02:00 AM, 02:30 AM, 03:00 AM, 03:30 AM, 04:00 AM, 04:30 AM, 05:00 AM, 05:30 AM, 06:00 AM, 06:30 AM, 07:00 AM, 07:30 AM, 08:00 AM, 08:30 AM, 09:00 AM, 09:30 AM, 10:00 AM, 10:30 AM, 11:00 AM, 11:30 AM, 12:00 PM, 12:30 PM, 01:00 PM, 01:30 PM, 02:00 PM, 02:30 PM, 03:00 PM, 03:30 PM, 04:00 PM, 04:30 PM, 05:00 PM, 05:30 PM, 06:00 PM, 06:30 PM, 07:00 PM, 07:30 PM, 08:00 PM, 08:30 PM, 09:00 PM, 09:30 PM, 10:00 PM, 10:30 PM, 11:00 PM, 11:30 PM
- Click Next
- Accept the suggested name of the field and click Finish
- In the lower section of the table, click the Lookup property
sheet
- Set the Limit To List field to Yes and click
General
- Set the Default Value to "12:00 PM"
- On the upper section of the table, right-click the gray box on the left of MondayIn and click Copy
- Right-click the first empty field and click Paste
- Change the name of the new field to MondayOut
- Continue pasting into the empty field names and changing their names so that when you finish, you should have a complete time
sheet
- Set the last Field Name to Notes and set its Data Type to Memo
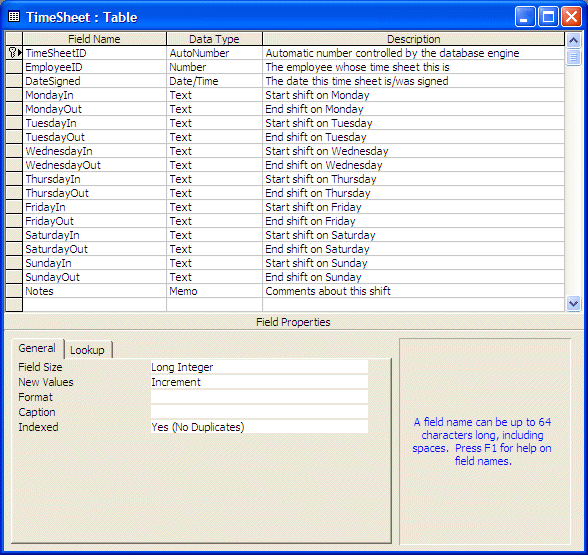
- Save and switch the table to Datasheet View to preview it
- Close the table
- To start a new form, on the menu bar, click Insert -> Form
- On the New Form dialog box, click Design View. In the combo box, select TimeSheet and click OK.
- Save the form as TimeSheet
- On the Toolbox, make sure the Control Wizards button is down
 . Click Combo Box and click the
form
- When the first page of the Combo Box Wizard comes up, make sure the first radio button is selected and clicked
Next
- In the list of tables and queries, click Employees and click
Next
- In the Available Fields list box, double-click EmployeeNumber, FirstName, and
LastName
- Click Next
- Make sure the Hide Key Column check box is checked and click Next
- Click the arrow of the combo box and select EmployeeID
- Click Next and click Finish
- Change the name of the combo box to cboEmployeeID
- On the Toolbox, click Text Box and click the form
- Change the Control Source of the Unbound text box to
=[cboEmployeeID].[Column](3) & ", " & [cboEmployeeID].[Column](2)
- Design the form as follows:
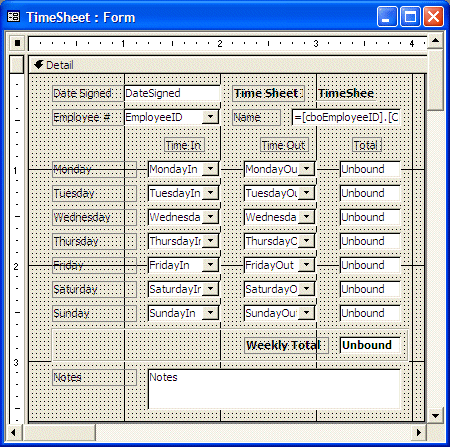
- Change the names of the text boxes under Total from top to bottom to txtMonday, txtTuesday, txtWednesday, txtThursday, txtFriday, txtSaturday, txtSunday, and txtWeeklyTotal repectively
- Save and preview the form. Switch back to Design View
Page Breaks
We saw that a form can be segmented in different sections to save space. This allows you to show only one group of controls at a time while still maintaining all of the controls of a large table on the same form. We also mentioned that, when using this technique, you should make sure that the user could get to the hidden controls when needed. One solution consisted of using scroll bars. If you decide to hide the scroll bars, you can use another technique to get to the other group(s) of controls.
 Practical Learning: Configuring Page Breaks
- The Bethesda Car Rental2 database should still be opened with the Customers2 form in Design View.
On the Form Design toolbar, click the Code button
- In the Object combo box, select fraSections
- In the Procedure combo box, select Click

- Implement the event as follows:
Private Sub fraSections_Click()
    If [fraSections] = 1 Then GoToPage 1
    If [fraSections] = 2 Then GoToPage 2
    If [fraSections] = 3 Then GoToPage 3
End Sub
- If you are using MS Access 97, close the window that contains the code. In other versions, close Microsoft Visual Basic
- Switch the form to Form View and click the Contact, Driving Information, and Notes/Comments buttons
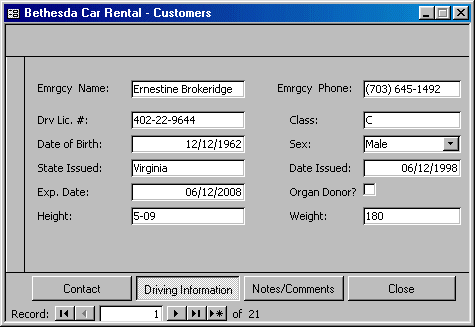
- To dismiss the form, click its bottom Close button. When asked whether you want to save, click Yes
Subforms and Subreports
Everything stated here for a subform also applies to a report and a subreport.
A subform is valuable for its ability to host its own fields that do not belong to the form it is embedded on. This feature also makes it possible to create an expression on a subform and then simply transfer the result of that calculation to the form that is hosting the subform. Furthermore, if an example involves a large value of all records on a subform, the resulting value can be made available to the hosting form only its record, based on the relationship the form and the form share.
MOUS Topics
| S17 |
Use the Control Toolbox to add controls |
| S31 |
Create a calculated field |
Exercises
Yugo National Bank
- Open the Yugo National Bank
Open the Customers table in Design View and make sure the EmployeeID
displays each item in its list as LastName, FirstName. Also, sort that
field

Save and close the table
- Open the Customers form in Design View. Delete the EmployeeID combo
box and, from the Field List, drag the EmployeeID field and drop it
where the other was
Save and close the Customers form
- Open the Customers form and complete the accounts with the following
information:
| Created By |
Account Number |
Account Type |
| Yuen, Matt |
28-3782-8 |
Checking |
| Marconi, Catherine |
92-3782-4 |
Checking |
| Holland, Andy |
38-4227-5 |
Checking |
| Kast, Aaron |
68-6434-5 |
Checking |
| Yuen, Matt |
83-4654-7 |
Savings |
| Kast, Aaron |
47-4783-2 |
Checking |
| Young, Sylvie |
82-3763-2 |
Checking |
| Marconi, Catherine |
72-3474-2 |
Checking |
| Holland, Andy |
34-5458-4 |
Checking |
| Yuen, Matt |
29-4586-4 |
Savings |
| Holland, Andy |
68-3465-8 |
Checking |
| Marconi, Catherine |
40-4658-6 |
Checking |
| Holland, Andy |
56-8468-5 |
Checking |
| Marconi, Catherine |
94-7785-3 |
Savings |
| Kast, Aaron |
37-5764-8 |
Checking |
| Yuen, Matt |
34-9754-7 |
Checking |
| Holland, Andy |
72-9375-4 |
Checking |
| Marconi, Catherine |
37-5490-6 |
Checking |
| Yuen, Matt |
20-3454-9 |
Savings |
| Holland, Andy |
76-5475-4 |
Checking |
| Young, Sylvie |
27-3457-4 |
Checking |
Close the form
- Open the sbfTransactions form in
Design View.
Add a Text Box to the Form Footer section. Name it txtWithdrawals. Set
it to get the sum of withdrawals
Add another Text Box named txtDeposits that gets the sum of the
deposits
Add another Text Box named txtServiceCharges that gets the sum of the
service charges
Set the Format of these text boxes to currency and that display 2
Decimal Places
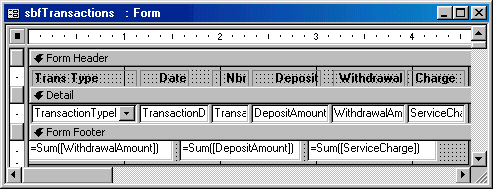
Reduce the heights of these text boxes completely and position them
just under the Form Footer bar, then hide them from the user
Save and close the form
- Open the CustomersTransactions form in Design View
Add a Text Box below the subform. Name it txtTotalDeposits and make it
displays the value of the txtDeposits control from the sbfTransactions.
Also, set its Format to Currency and to display 2 Decimal Places
Add another Text Box below the subform. Name it txtTotalWithdrawals
and make it displays the value of the txtWithdrawals control from the
sbfTransactions. Also, set its Format to Currency and to display 2
Decimal Places
Add another Text Box below the subform. Name it txtTotalCharges and
make it displays the value of the txtServiceCharges control from the
sbfTransactions. Also, set its Format to Currency and to display 2
Decimal Places
Add another Text Box below the subform. Name it txtCurrentBalance.
Make it subtract the value of the txtTotalWithdrawals text box from
the value of the txtTotalDeposits text box. Also, set its Format to
Currency and to display 2 Decimal Places
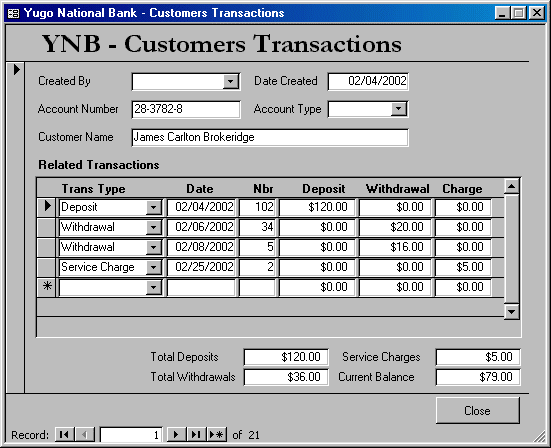
Save and close the form
Watts A Loan
- Open the Watts A Loan database
Open the sbfAccountTransactions form in Design View. Add a Text Box to
the Form Footer section of the form. Set its Name to txtTransactions.
Make it get the sum of the TransactionAmount values. Set its Format to
Currency for 2 Decimal Places. Reduce its height and hide it
Save and close the form


![]() Practical Learning: Concatenating Strings
Practical Learning: Concatenating Strings


![]() Practical Learning: Using Command Buttons
Practical Learning: Using Command Buttons


![]() Practical Learning: Using Radio Buttons
Practical Learning: Using Radio Buttons
![]() Practical Learning: Configuring Toggle Buttons
Practical Learning: Configuring Toggle Buttons



![]() Practical Learning: Using Check Boxes in Expressions
Practical Learning: Using Check Boxes in Expressions

![]() Practical Learning: Designing a Time Sheet
Practical Learning: Designing a Time Sheet

![]() Practical Learning: Configuring Page Breaks
Practical Learning: Configuring Page Breaks


