Lessons Logo

Built-In Functions Fundamentals


Conditional Functions


The Choose Function

Once again, since Microsoft Access doesn't inherently provide a programming environment, it relies on logical functions to take care of this aspect. The Choose() function is one of those that can test a condition and provide alternatives. The Choose() function works like nested conditions. It tests for a condition and provides different outcomes depending on the result of the test. Its syntax is:

Choose(Condition, Outcome1, Outcome2, Outcome_n)

The first argument of this function is the condition that should be tested. It should provide a natural number. After this test, the Condition may evaluate to 1, 2, 3, or more options. Each outcome is then dealt with. The first, Outcome1, would be used if the Condition produces 1. The second, Outcome2, would be used if Condition produces 2, etc.

The Switch Function

We have seen that the IIf() function is used to check a condition and can perform one of two statements depending on the result of the condition. In some expressions, there will be more than one condition to check. Although you can nest IIf() functions to create a complex expression, Microsoft Access provides another function that can perform this task. The function is called Switch and its syntax is:

Switch(Expression1, What To Do If Expression1 Is True,
       Expression2, What To Do If Expression2 Is True,
       Expression_n, What To Do If Expression_n Is True)

Unlike IIf(), the Switch() function does not take a fixed number of arguments. It takes as many combinations of <Expression -- Statement>s as you need. Each expression is evaluated. If the expression evaluates to true, the statement that follows it executes. Although you can spend a great deal of time tuning a conditional expression such as one involving a Switch() function, it is still possible that none of the expressions evaluates to true. In this case, you can add a last expression as True and provide a subsequent statement to use. The syntax you would use is:

Switch(Expression1, What To Do If Expression1 Is True,
       Expression2, What To Do If Expression2 Is True,
       Expression_n, What To Do If Expression_n Is True,
       True, What To Do With A False Expression)
   

Practical Learning: Using the Switch Function

  1. From the resources that accompany this book, copy the Operations database and paste it in your Exercises folder
  2. Open the Operations database and, on the Database window, click the Forms button (it should be clicked by default). The double-click frmSwitch to open it in Design View
    3. On the form, click the Result text box and, on the Properties window, click Control Source and change it as follows (on one line):
    =Switch([fraOperations]=1,Nz([txtNumber1])+Nz([txtNumber2]),
            [fraOperations]=2,Nz([txtNumber1])-Nz([txtNumber2]), 
            [fraOperations]=3,Nz([txtNumber1])*Nz([txtNumber2]), 
            [fraOperations]=4,Nz([txtNumber1])/Nz([txtNumber2]))
  3. Test the form:
     
  4. Save it
   

Arithmetic Functions

The Absolute Value

The decimal numeric system counts from minus infinity (-∞) to infinity (+∞). This means that a  number can be usually negative or positive, depending on its position from 0, which is considered as neutral. In some operations, the number considered will need to be only positive even if it is provided in a negative format.

The absolute value of a number x is x if the number is (already) positive. If the number is negative, then its absolute value is its positive equivalent. For example, the absolute value of 12 is 12, while the absolute value of –12 is 12.

To get the absolute value of a number, you can use one of the Abs() function. Its syntax is:

Abs(number)


The Exponential

The Exp() function is used to calculate the exponential value of a number. Its syntax is:

EXP(number)

The argument, number, a double-precision value, represents the number to be evaluated. If the value of number is less than -708.395996093 (approximately), the result is reset to 0 and qualifies as underflow. If the value of the argument x is greater than 709.78222656 (approximately), the result is infinity and qualified as overflow.

The Square Root

The Sqr() function is used to calculate the square root of a double-precision number. Its syntax is:

Sqr(number)

This function takes one argument as a positive floating number. After the calculation, the function returns the square root of x.


String Functions

Character Retrieval

The Chr() function is used to retrieve a character based on an ASCII character number passed to the function. It could be used to convert a number to a character. It could also be used to break a line in a long expression. The syntax of this function is:

Chr(Number)

Based on the table of ASCII characters, a call as Chr(65) would produce the letter A. Not all ASCII characters produce a known letter. For example, when Chr(10) is used in a string, it creates a “new line”.

The Message Box

A message box is a special form used to display some information to the user. As opposed to a regular form, the user cannot type anything on the box. There are usually two ways you can use a message box: You can simply display a message to the user, or you can get an answer from her. If you only want to display a message, the syntax you would use is:

MsgBox(Message To Display, Flag, Caption)

This function takes only one required argument, the message, and some optional arguments. You use the name of the function, MsgBox, to create a message box. Between its parentheses, type the desired message to display. An example would be:

MsgBox(“Remember to submit your time sheet”)

If you want to display the message box on various lines, edit the string to include a call to Chr(10). Here is an example:

MsgBox(“Remember to submit your time sheet” + Chr(10) 
       “Only time sheets received on time will be honored”, )

The message to display can also be created as an expression. After providing the message, you can display it without the other arguments. Here is an example of a message box created with

MsgBox("Remember to submit your time sheet")


After the message, as mentioned already, the other argument are optional. If you provide only the message, the message box displays the OK button. The second argument allows you to specify the button(s) to display. The options are as follows:

Value Buttons
0
1
2
3
4
5

If you provide a value other than those in the list, the message box would display only the OK button. Here is an example of a message box created with:

MsgBox("Do you want to submit your time sheet?",4)

Besides displaying a button, the second argument is also used to display an icon. To get an icon, you add one of the following values:

Value Icon Suited when
16 Warning the user of an action performed on the database
32 Informing the user of a non-critical situation
48 Asking a question that expects a Yes or No, or a Yes, No, or Cancel answer
64 A critical situation or error has occurred. This icon is appropriate when informing the user of a termination or deniability of an action
 

To use one of these icons, add (a simple addition) its value to that of the desired button or combination of buttons from the previous table. Here is an example created with

MsgBox("Do you want to submit your time sheet?", 32 + 4)

The same as:

MsgBox("Do you want to submit your time sheet?", 36)

When the buttons of a message box displays if the message box has more than one button, one of them has a thick border. This button is referred to as the default button. If the user presses Enter, such a button would be activated. Besides selecting the buttons and displaying an icon, the second argument can also be used to specify what button would have focus, that is, what would have a thick border and would be applied if the user presses Enter, on the message box. The default button is specified using one of the following values:

Value If the message box has more than one button, the default button would be

Value If the message box has more than one button, the default button would be
0 The first button
256 The second button
512 The third button
768 The fourth button
 

To specify this option, add the number to the button and/or icon value(s).

The third argument of the MsgBox function, Caption, is the string that would display on the title bar of the message box. It is a string whose word or words you can enclose between parentheses or that you can get from a created field.

As mentioned already, you can create a message to simply display a message to the user. Because MsgBox is a function, you can also retrieve the value it returns and use it as you see fit. The value this function returns corresponds to the button the user clicks on the message box. Depending on the buttons the message box is displaying, after the user has clicked, the MsgBox function can return one of the following values:

Displayed Button(s) If the user clicked The return value is
1
1
2
3
4
5
6
7
2
6
7
4
2
 

Date and Time

The Values of the Current Date and Time

Microsoft Access provides various functions to perform date and time related operations. These functions allow you to add dates or times, find the difference between dates or times, or add constant values to dates or times.

The current date is represented by a function called Date() while the current time of the computer is represented by a function called Time(). These two values (the current date and the current time) can be combined and are represented by a function called Now().

Practical Learning: Setting Current and Time on Data Fields

  1. Open the Bethesda Car Rental2 database and click Tables in the Database window
  2. Double-click the OrderProcessing table to open it
  3. After viewing the table, switch it to Design View
  4. Click OrderDate and press F6
  5. In the lower section of the table, click Default Value. Type =Date() and press Enter
  6. In the upper section of the table, click OrderTime and press F6
  7. In the lower section of the table, click Default Value. Type =Time() and press Enter
  8. Save the table and switch it to Datasheet View

Adding to a Date

Operations on dates and times are performed using functions such as DateAdd() and DateDiff().

The DateAdd() function is used to add an interval date value to the specified date. It is used to add a number of days, weeks, months, or years to another date. The syntax of the DateAdd() function is

DateAdd(Interval, Number, date)

The Interval argument is required and it specifies the kind of value needed as a result. This argument is passed as a string, thus enclosed between double quotes and can have one of the following values:

Interval Used To Get
s Second
n Minute
h Hour
w Numeric Weekday
ww Week of the Year
d Day
y Numeric Day of the Year
m Month
q Quarter
yyyy Year

The Number argument is required also. It specifies the number of units you want to add. If you set it as positive, its value will be added. If you want to subtract, make it negative.

The date argument is the date to which you want to add the number.

Subtraction From a Date

The DateDiff() function is used to find the difference between two date or time values. It allows you to find the number of seconds, minutes, hours, days, weeks, months, or years when you supply two recognizable values. The DateDiff() function takes 5 arguments, 3 are required and 2 are optional.

The syntax of the function is

DateDiff(Interval, Date1, Date2, Option1, Option2)

The Interval argument is required and it specifies the kind of value you want as a result. This argument is passed as a string and can have one of the following values:

Interval Used To Get
s Second
n Minute
h Hour
w Numeric Weekday
ww Week of the Year
d Day
y Numeric Day of the Year
m Month
q Quarter
yyyy Year

Required also, the Date1 and Date2 arguments specify the date or time values that will be used when performing the operation.

By default, the days of a week are counted starting on Sunday. If you want to start counting those days on another day, supply the Option1 argument using one of the following values: 1, 2, 3, 4, 5, 6, 7. There are other variances to that argument.

If your calculation involves weeks or finding the number of weeks, by default, the weeks are counted starting January 1st. If you want to count your weeks starting at a different date, use the Option2 argument to specify where the program should start.

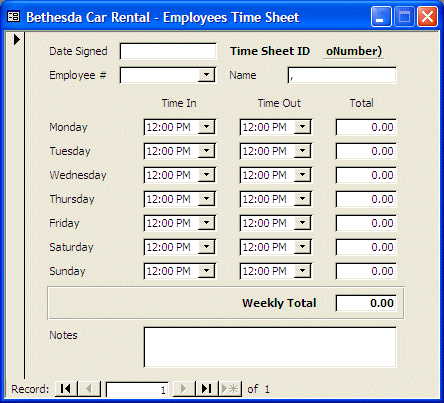
For our time sheet that we want employees to use, we will use a series of combo boxes so the user can only select the time instead of typing it. This reduces the likelihood of errors. When an employee signs a time sheet, he or she can select both starting and ending shifts. We should develop a basic algorithm that can solve our problem in a simple but effective manner. We need to make sure that the start time is less than or equal to the end time. In the same way, the end time should be set higher or equal to the start time. Since we cannot prevent the user from selecting a start time that is higher than the end time or from selecting an end time that is less than the start time, we will set the result to 0 hours whenever the user selects an invalid time sequence.

We will start with the following pseudo-code:

IF Time Out is greater than or equal to Time In THEN
    We can calculate the time
OTHERWISE
    Set the shift value to 0
END IF

This translates to

IF TimeOut >= TimeIn THEN
    Result = TimeOut - TimeIn
ELSE
    Result = 0
END IF

Now, we need to figure out how to calculate the time difference. Because the result will be used to calculate the employee's salary using the hourly wage, we need to have this result as a number, namely a decimal number (as 0.00). If we use the DateDiff() function, we can calculate the minutes or the hours value of the difference. If both start and end times are divisible by 60, as in 09:00 AM to 05:00 PM, the difference can be easily calculated to produce the number of hours, in this case 8.00. To find out if a number is divisible by another number, we can use the Mod operator. This can be done as follows:

IF (TimeOut - TimeIn) Mod 60 = 0  ' The difference is evaluated in minutes
    Result = TimeOut - TimeIn        ' The result is calculated in hours
END IF

If one of either the start or end time doesn't fall on a straight hour value, the resulting time will have a decimal value of 0.50. Therefore, we need to calculate the time difference in minutes instead of hours. Since we are dealing with minutes this time, we can divide the difference by 60 to get the result in minutes. Our pseudo-code would become:

IF (TimeOut - TimeIn) Mod 60 = 0  ' The difference is evaluated in minutes
    Result = TimeOut - TimeIn        ' The result is calculated in hours
OTHERWISE
    Result = TimeOut - TimeIn        ' The result is calculated in minutes

Now that we know how to calculate the time difference, we can include our pseudo-code with the original that would reset the result to 0 if the user selects a wrong time sequence.


Practical Learning Practical Learning: Using Dates and Times
  1. Open the Bethesda Car Rental1 assuming that you had created the time sheet form
  2. Open the TimeSheet form
  3. Click the total text box for Monday and, in the Properties window, click the ellipsis of the Control Source field
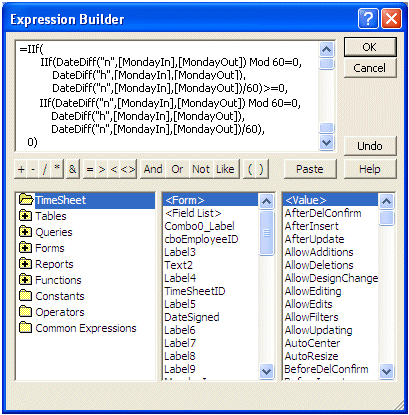
  4. On the Expression Builder dialog box, type the following expression:
     
    Expression Builder
     
    Which is:
    =IIf(
          IIf(DateDiff("n",[MondayIn],[MondayOut]) Mod 60=0,
              DateDiff("h",[MondayIn],[MondayOut]),
              DateDiff("n",[MondayIn],[MondayOut])/60)>=0,
          IIf(DateDiff("n",[MondayIn],[MondayOut]) Mod 60=0,
              DateDiff("h",[MondayIn],[MondayOut]),
              DateDiff("n",[MondayIn],[MondayOut])/60),
      0)
  5. Click OK
  6. Set the Format to Fixed and the Decimal Places to 2
  7. In the Properties window, right-click Control for the same Monday total and click Copy
  8. Open Notepad, right-click inside of Notepad and click Paste
  9. Press Ctrl + Home. On the main menu of Notepad, click Edit -> Replace...
  10. In the Find What text box, type Mon and press Tab
  11. In the Replace With text box, type Tues and click Replace All
  12. On the Replace dialog box, click Cancel
  13. Right-click in Notepad and click Select All. Right-click again and click Copy
  14. In Microsoft Access, click the total for Tuesday
  15. In the Properties Window, right-click Control Source and click Paste
  16. Set the Format to Fixed and the Decimal Places to 2
  17. Use the same steps to get the total for the remaining days
  18. Click the Weekly Total text box and set its Control Source to
    =Nz([txtMonday])+Nz([txtTuesday])+Nz([txtWednesday])+Nz([txtThursday])
    +Nz([txtFriday])+Nz([txtSaturday])+Nz([txtSunday])
  19. Set its Format to Fixed and the Decimal Places to 2
  20. Save the form and preview it
     
    Time Sheet
  21. Perform a few selections for different shifts
     
    Time Sheet
  22. Close the form
  23. Open the Bethesda Car Rental2 database
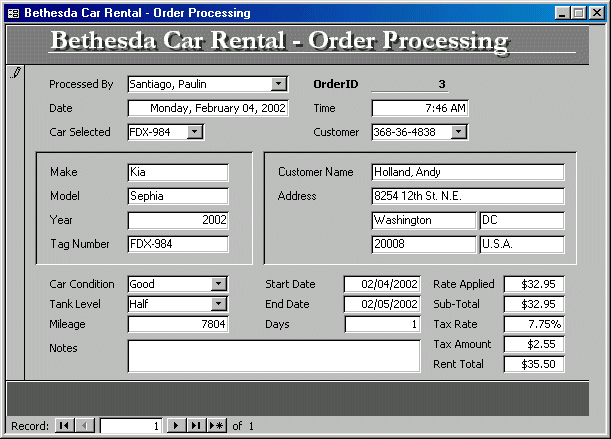
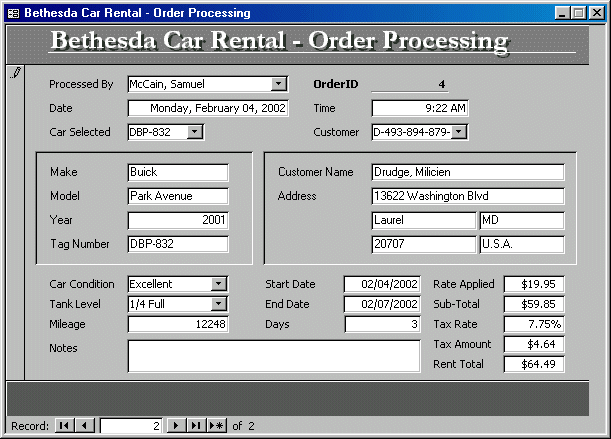
  24. In the Database window, click Forms and double-click the OrderProcessing form to open it
  25. After viewing the form, switch it to Design View
  26. On the form, double-click the text box on the right side of Days
  27. In the Properties window, click the All tab and click Control Source
    Type =DateDiff("d", StartDate, EndDate) and press Enter
  28. On the form, click the text box on the right side of the Sub-Total label
  29. In the Properties window, click Control Source. Type
    =Nz(RateApplied) * Nz(txtNumberOfDays) and press Enter
  30. Click the box to the right the Tax Amount label and set its Control Source property to =CLng([txtSubTotal]*[TaxRate]*100)/100
  31. On the form, click the text box to the right of Rent Total
  32. In the Properties window, set its Control Source to
    =(CLng([txtSubTotal]*[TaxRate]*100)/100) + txtSubTotal
  33. Save and close the form
  34. Open the RentalRates form and open the OrderProcessing form to display both on the screen
  35. Perform a few rental orders
     
     
  36. Close both forms
 

MOUS Topics

S17 Use the Control Toolbox to add controls
S31 Create a calculated field
 

Exercises 


Watts A loan

  1. Open the Watts A Loan database.
    Open the CustomersTransactions form in Design View. Add a Text Box below the subform. Set its Name to txtTotalPayments then set its Format to Currency with 2 Decimal Places. Make it get its value from the txtTransactions text box of the sbfAccountTransactions form
    Add another Text Box below the subform and change its properties as follows:
    Name: txtCurrentBalance
    Control Source: =DLookUp("LoanAmount", "LoanProcessing", "CustomerID = " & CustomerID) - Nz(txtTotalPayments)
    Format: Currency
    Decimal Places: 2

    Save and close the form
  2. Create a new table in Design View with the following fields:
     
    Field Name Data Type Additional Information
    LoanEvaluationID AutoNumber Primary Key
    Caption: Loan Evaluation ID
    LoanAmount Currency Caption: Loan Amount
    Default Value: 0
    InterestRate Number Field Size: Double
    Format: Percent
    Caption: Interest Rate
    Default Value: 0.0875
    NumberOfPeriods Number Field Size: Integer
    Caption: NumberOfPeriods
    Default Value: 12

    Save the table as LoanEvaluation and close it

  3. Create a new form based on the LoanEvaluation table
    Save the form as LoanEvaluation
    Add a Text Box in its Detail section and set its properties as follows:
    Name: txtPeriodicPayment
    Control Source:
    =Abs(Pmt(Nz(CDbl([InterestRate]))/12, Nz(CInt([NumberOfPeriods])),Nz(CDbl([LoanAmount])),0,0))

    Format: Currency
    Decimal Places: 2

    Use the Command Button Wizard to add a button that can be used to close the form
    Design the form as follows:


    Disable the Maximize button and make the form Pop Up. Don't make it automatically center itself. Before saving the form, position it slightly to the middle-right side of the screen so Microsoft Access would remember that position
    Save and close the form
  4. Open the LoanProcessing form in Design View. Use the Command Button Wizard to add a button that, when clicked, would open the LoanEvaluation form (remember that there is no relationship between both forms; therefore, you will Open The Form And Show All The Records). Set the button's Text to Loan Evaluation and its Name to cmdLoanEval
    Save and close the form
  5. Open the LoanProcessing form and use its Loan Evaluation button to open the LoanEvaluation form. In the Loan Evaluation form, evaluate a $1500.00 amount of a loan at 12.50% paid in 28 months. After evaluating it, manually (this is not done automatically) create a new personal loan in the Loan Processing form for the amount of $1500 at 12.50% for 28 payments. The loan is processed by the owner, for the 83-457-8 account on April 10th, 2002. Make the 1st payment due on May 20th of the same year and put a reminder that the payments are due every 22th of the month
    Evaluate other amounts and create loans for the other customers.
    Close both forms
  6. Open the CustomersTransactions form to see the results


Previous Copyright © 2002-2009 FunctionX, Inc. Next