
Data Import and Export
 |
Data Import and Export |
Microsoft Access and Microsoft Excel
Exporting to a Microsoft Excel Spreadsheet
|
As a spreadsheet application with various analysis tools, Microsoft Excel provides some features that are not available in Microsoft Access or some results can be difficult to get in the database. Therefore, it would not be unusual that you want to use the data of a table in a spreadsheet. You have various options. |
|
Probably the easiest way to transfer data from Microsoft Access to a spreadsheet involves copying and pasting. To start, in Microsoft Access, you can open a table in Datasheet View then select one, a few, or all records. After selecting the record(s), you can copy them, open Microsoft Excel, click the cell that would host the top-left value, and paste. If you use the copy and paste technique, you would have to open the table first. Another technique consists of exporting, and you can do it without first opening the table:
|
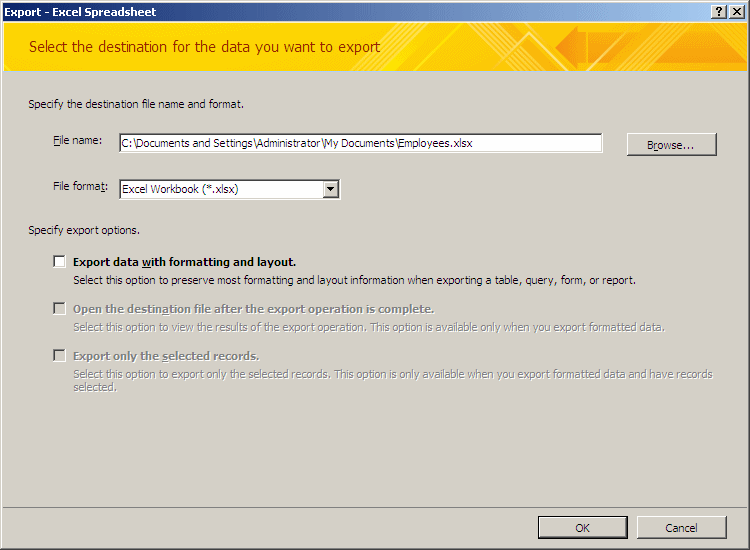
This would open the Export - Excel Spreadsheet dialog box with the path where the file will be saved. The default folder is the My Documents: |
|
The dialog box provides various options. For example, if you have Microsoft Office Excel 2007, you can accept the format with .xlsx extension. If you have a previous version, click the arrow of the File Format combo box and select the version. After making the selections, you can click OK. When the exporting is over, a message box would let you know. |
Importing a Microsoft Excel Spreadsheet
If you had worked on a spreadsheet to create a list of items and you want to convert that list into a table useful in a database, you can. Microsoft Access allows you to import a spreadsheet from Microsoft Excel, Corel Paradox, Lotus 1-2-3, or one of many other spreadsheet applications on the market. Before importing the spreadsheet, you should prepare it and you have many options. When creating the spreadsheet, you may have created a list anywhere on the document, without a title, and only the list of values. Here is an example:
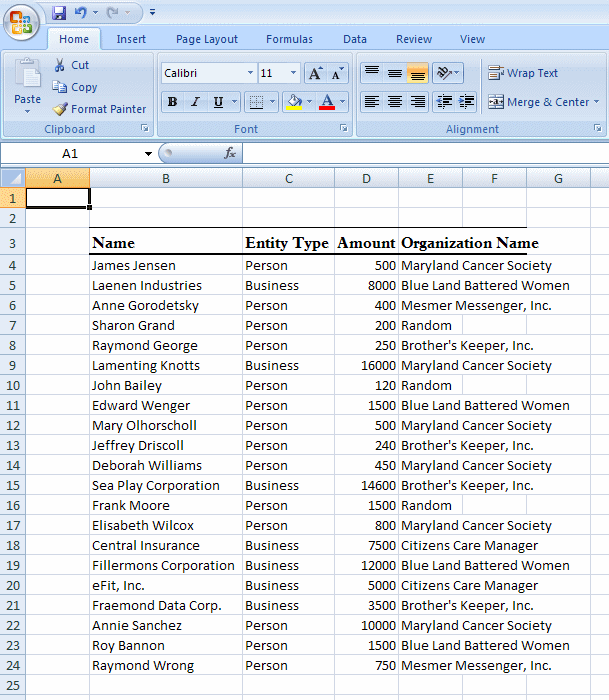
In this case, the spreadsheet is ready. When you import such a spreadsheet, Microsoft Access would be able to figure out where the list starts and where it ends. Microsoft Access can even identify the column names and their records (where the records start and where they end). The database engine can also identify the data type of each column, based on the values used in their fields.
On the other hand, you may have created a spreadsheet that includes sections other than the list you want to use in your database. Here is an example:

If you try to directly import such a spreadsheet, the database engine may get confused. It would not know where the actual list starts and where it ends. If you insist, you can still import the spreadsheet but you would get unpredictable results. If you create a spreadsheet in Microsoft Excel, Corel Paradox, or Lotus 1-2-3, and if the spreadsheet contains a mix of the desired list and other items, you can create a "name" for the list. To create a name in Microsoft Excel, select the list:
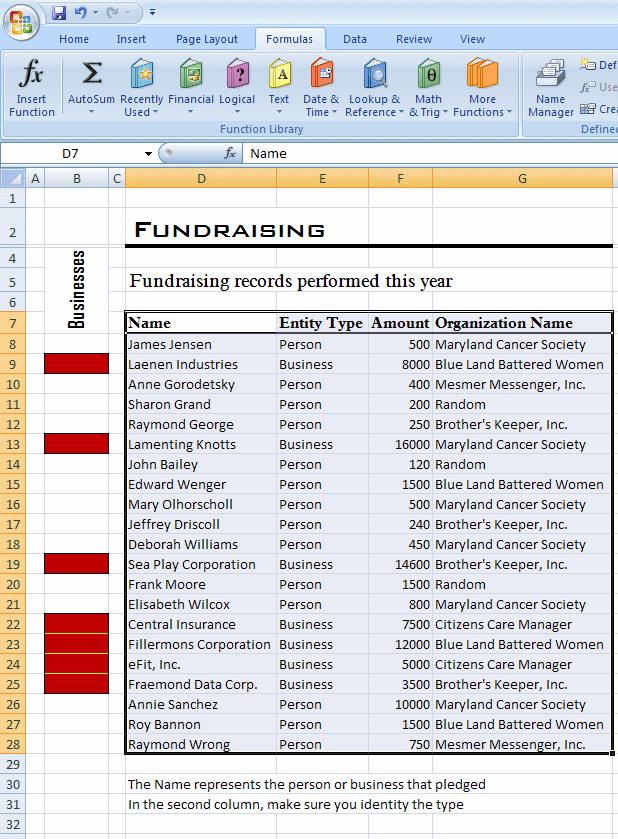
Then, on the Ribbon, click Formulas. In the Defined Names section, click the Define Name... button. In the New Name dialog box, specify the name and click OK. To create a name in the other applications, check their documentation.
After creating, preparing and saving the spreadsheet, you can import it. To do this in Microsoft Access, start a database:
This would start the Get External Data - Excel Spreadsheet wizard. You would then have to specify the file that holds the spreadsheet, and click OK. In the second page of the wizard, you would be asked to identify the section (sheet) where the table exists. You would also have the opportunity to provide some details about the data being imported.
Instead of manually importing a spreadsheet, you can select the values in a spreadsheet, copy them, and paste them in a table in Microsoft Access.
![]() Practical
Learning: Importing a Microsoft Excel Spreadsheet
Practical
Learning: Importing a Microsoft Excel Spreadsheet
If you do not have Microsoft Office Excel 2007, skip this section

Whether you have Microsoft Office Excel 2007 or not, continue the lesson here


|
If you do not have Microsoft Office Excel 2007, follow the same steps to import the Employees spreadsheet.
Importing a Text File |
||
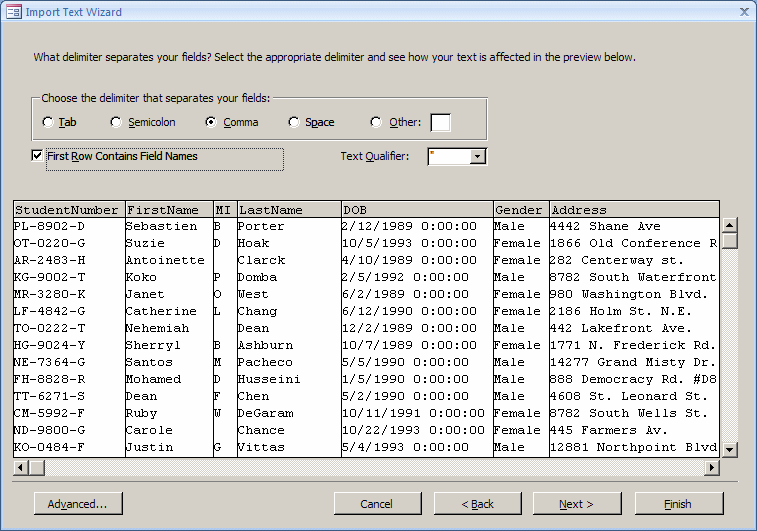
You can create a table using data from a text file. If you intend to import a text document, format it so that Microsoft Access can recognize where a field starts and where it ends. The file can be created using Notepad. If the file is from another type of application, you can first convert its data to text, save it as a text file, and then import it.
If you are creating the (text) file in Notepad, the delimitation of a field is usually done by pressing Tab after creating the fields' content. Instead of the Tab key, you can also use a comma or a semi-colon to separate two fields. Since a field is usually made of more than one word (such as an address), you can enclose the content of each field in double quotes, as in "1600 Pennsylvania Avenue". A file that contains the data to be imported must also indicate where a record starts and where it ends. If you are creating the file in a text editor, the delimitation of a record is done by pressing Enter at the end of each record.
To import a text file in Microsoft Access:
![]() Practical
Learning: Importing a Text Document
Practical
Learning: Importing a Text Document

|
Exporting a Text File |
The easiest way to use data from a Microsoft Access database to an external application is to save it as plain text. The reason is that almost every application that deals with databases can import text and convert it into a spreadsheet or a database table. This is only possible if the text file is appropriately formatted. Fortunately, if you ask Microsoft Access to save a table to text, it would take care of formatting it.
To save a table as text:
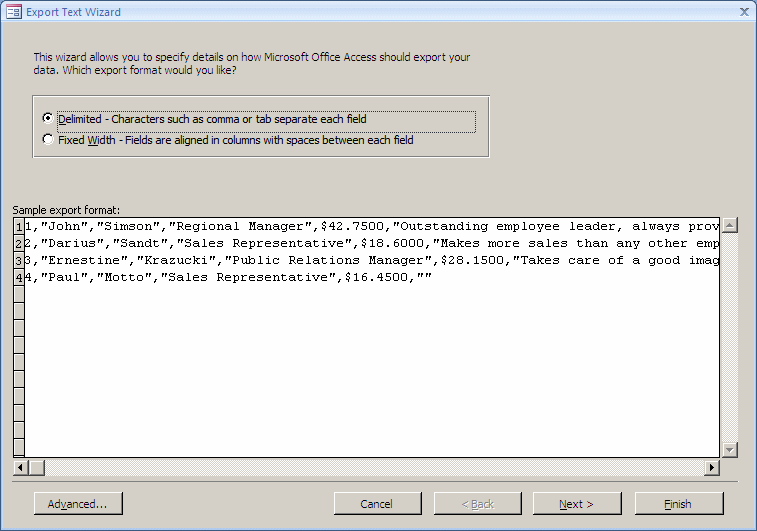
This would open the Export - Text File dialog box with the name of the file using the .txt extension. The default folder where the file would be saved is My Documents. If you want another, you can select it by clicking the Browse button. Once you are ready to export, you can click OK. This would open the Export Text Wizard that you can follow:
|
You would have various options to specify how you want Microsoft Access to format the document. You would also choose whether to include the column headers or not.
Importing an XML File |
||
An XML file is essentially a document made of at least one table. Normally, the table is very well structured because that's the essence of XML. An XML document can contain disparate data with various parents and different child nodes all over the place. Therefore, before importing an XML file to your database, you should be familiar with its structure.
A typical XML file starts with a root node:
<?xml version="1.0" standalone="yes"?>
Under it, the global parent node starts and closes itself:
<?xml version="1.0" standalone="yes"?>
<FunFurniture>
</FunFurniture>
This global parent node is not the table. Inside that node, you should have a node that would represent a table and it can repeat itself as many times as necessary:
<?xml version="1.0" standalone="yes"?>
<FunFurniture>
  <Employees>
  </Employees>
  <Employees>
  </Employees>
</FunFurniture>
Notice that, in our example, what we refer to as a record is in plural. This is not required. It is just our choice. In this example, the Employees node is our table. Put it another way, each Employees node represents the table we want.
Inside each table, you should have the name of each column followed by its value:
<?xml version="1.0" standalone="yes"?>
<FunFurniture>
  <Employees>
    <EmployeeNumber>924795</EmployeeNumber>
    <FirstName>Donald</FirstName>
    <LastName>Tripleton</LastName>
    <Title>Sales Manager</Title>
  </Employees>
  <Employees>
    <EmployeeNumber>274957</EmployeeNumber>
    <FirstName>Jeanne</FirstName>
    <LastName>Wooley</LastName>
    <Title>Sales Associate</Title>
  </Employees>
  <Employees>
    <EmployeeNumber>684078</EmployeeNumber>
    <FirstName>Irene</FirstName>
    <LastName>Polsen</LastName>
    <Title>Sales Associate</Title>
  </Employees>
  <Employees>
    <EmployeeNumber>297149</EmployeeNumber>
    <FirstName>Monica</FirstName>
    <LastName>Jackson</LastName>
    <Title>Sales Associate</Title>
  </Employees>
</FunFurniture>
The group of nodes inside the table represents that columns and their values. Of course an XML document can be more than that but this is a typical structure of a normal XML document that can be imported.
After creating and saving an XML file, you can import it in
Microsoft Access. To do this, in the External Data tab of the Ribbon and in the
Import section, click the XML File button ![]() .
This would display the Get External Data - XML File dialog box. After selecting
the file and clicking OK, a dialog would come up to help you identify the table
to use in the document. It would display the node(s) that indicate(s) a table.
.
This would display the Get External Data - XML File dialog box. After selecting
the file and clicking OK, a dialog would come up to help you identify the table
to use in the document. It would display the node(s) that indicate(s) a table.
![]() Practical
Learning: Importing an XML File
Practical
Learning: Importing an XML File

Exporting to XML
If you have created a (complete or semi-complete) database that you want to use outside of Microsoft Access, one way you can transfer it is to change its format into XML. Fortunately Microsoft Access can take care of the whole process for you. In fact, besides exporting a table, you can also ask Microsoft Access to create both a schema file and a style sheet for the table.
To export a table to XML format, in the Navigation Pane:
The Export - XML File dialog box that comes up allows you to verify the name of the file that will be created and the path where it will go. Once you are ready, you can click OK. A dialog box would come up asking which one(s) of the three files you want to have created:

If you want to create a more elaborate XML application with advanced options, you can click the More Options button. This would close the previous dialog box and open another one:
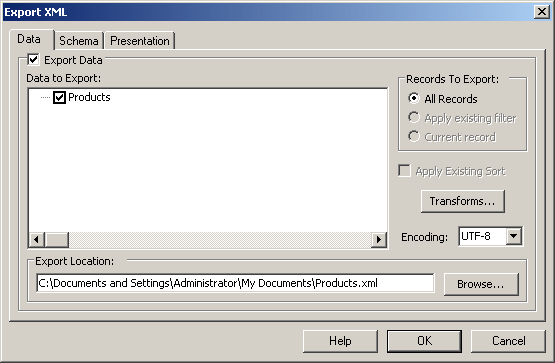
This dialog box allows you to specify more details on how the table should be exported. For example, you can change the encoding scheme you want. The two options available are UTF-8 (which should be enough for characters in US English) and UTF-16 (if you are planning to use Unicode or international characters) for characters referred to as wide characters. By default, when you ask Microsoft Access to create an extensible style sheet (XSL), it would create the file using the same name as the table. If you want a different name, you can click the Transforms button. This allows you either to select a different file or to create the file with a different name. Also, by default, if you ask Microsoft Access to create a schema, it creates an XSD file using the same name as the table. If you want a different name, you can click the Schema tab and specify another name for the file.
After making your selections, you can click OK. The file(s) you specified would be created in the folder that was indicated.
|
Microsoft Access and the Web |
Importing an HTML File
If you have a table on a web page and the table is well structured for a database, you can use it as a table of your database. That is, you can import it in Microsoft Access. Like a normal text file, a typical HTML document can contain anything. This means that you should not attempt to import just any HTML file into your database. When in doubt, you should first check it. A good candidate to be imported should have all the necessary tags of an HTML table: table, tr (for the records), and td (for the columns). As long as the table is well created inside of the document, Microsoft Access can identify, analyze, and decide whether it is ready to be imported.
To import an HTML file in Microsoft Access, on the Ribbon, click External Data and, in the Import section, click the More button and click HTML Document. The steps to follow are the same for a text document.

|
A Microsoft Access Table on a Web Page |
You can transfer a Microsoft Access table and its data to a web page and you have many options. If you are using an application such as Microsoft FrontPage or Microsoft Expression Web, you can copy and paste. To do this:
Employees
| Employee ID | First Name | Last Name | Title | HourlySalary |
|---|---|---|---|---|
| 1 | John | Simson | Regional Manager | $42.75 |
| 2 | Darius | Sandt | Sales Representative | $18.60 |
| 3 | Ernestine | Krazucki | Public Relations Manager | $28.15 |
| 4 | Paul | Motto | Sales Representative | $16.45 |
Some other applications do not support copy and paste. An alternative is to export the table to HTML. To save a table as HTML, in the Navigation Pane:
This would open the Export - HTML Document dialog box indicating the folder where the file will be saved, followed by the name of the file itself and its .html extension. Eventually, when the file has been saved, it would be complete with all the normal HTML tags. If you want the file to directly be part of a web site or a web project, you can change the path to point to your web folder. If you are only interested in the table, let the file be saved. Then, open the code of the document, which you can do with any text editor such as Notepad, copy only the code of the table and paste it in the desired section of your actual web page.
A Microsoft Access Database on the Web
Microsoft Access does not provide its own native means of connecting a database to the Internet, but it can be used as a server database accessed from the web. To make this happen, you can do everything manually or you would use an external application such as Microsoft Visual Studio, CodeGear Delphi.NET, Microsoft Expression Web, or many other applications. You can create an ASP application, a PHP web site, an ASP.NET project, etc.
|
Microsoft Access and Microsoft Word |
Introduction
There are various ways you can use Microsoft Word with a Microsoft Access database. The simplest way consists of copying and pasting. To transfer a database table, in the Navigation Pane of Microsoft Access, you can right-click a table and click Copy. In a Microsoft Word document, you can paste in the desired section. The whole table, including its columns and all the records, would be created in the document. Instead of the whole object, first open a table in Microsoft Access, select only some columns and/or some records, copy them, and then paste them in a Microsoft Word document.
As opposed to copying from a database table and pasting to a table, you may want the reverse. That is, you can copy a table from a Microsoft Word document. To do this, in Microsoft Word, select the table in a document and copy it. Start a table in Microsoft Access and paste in the Add New Field box.
Mail Merge
Mail merging allows you to use data on your database to create letters, labels, envelopes, and other documents that require external data originating from another document. When performing a mail merge, you usually do not need all the fields that are part of a table. Although you can use all fields on a table, you can create a query made only of fields you need for your document. This would include the names and addresses of the recipients.
To start a mail merge, in the Navigation Pane:
This would open the Microsoft Word Mail Merge Wizard. If you want to create a new document, click the second radio button:

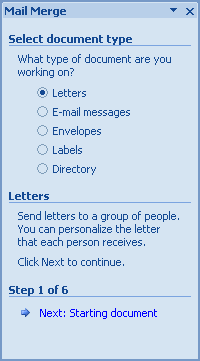
And click OK. Microsoft Word would open. In the Mail Merge window, if you want to create a letter to be sent out, accept the Letters radio button
 |
 |
Otherwise, you can click another radio button for the type of document you want
to create. Then click the Next link.
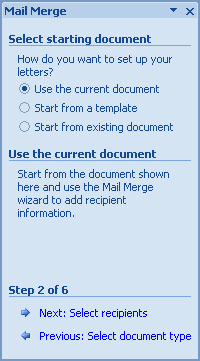
In the second page of the wizard, you can specify whether to continue with the currently opened document or you want to use a template. For our example, you would accept to use the current document and click the Next link.
The third page of the wizard wants you to specify the list that holds the fields that will be used. If you want to create a new list, you can click the Type A New List radio button. Otherwise, to use the table you selected in Microsoft Access, accept the first radio button and make sure it is specified in the Use An Existing List section:
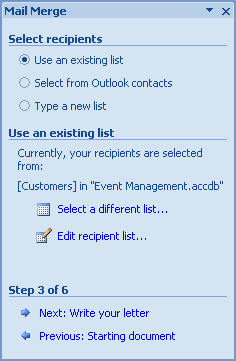
Once the list is ready, click the Next link. You would then have to create the document
When creating the letter, you can edit to insert different types of items. To add a field from the list, in the Mail Merge window, you can click More Items. This would open the Insert Merge Field dialog box:

In the Insert Merge Field, you can click the field you want to add and click Insert. You can continue doing this for each field you want to add:

To insert other types of items, in the Mail Merge window, you can click the Address Block link, the Insert Address Block dialog box would come up:
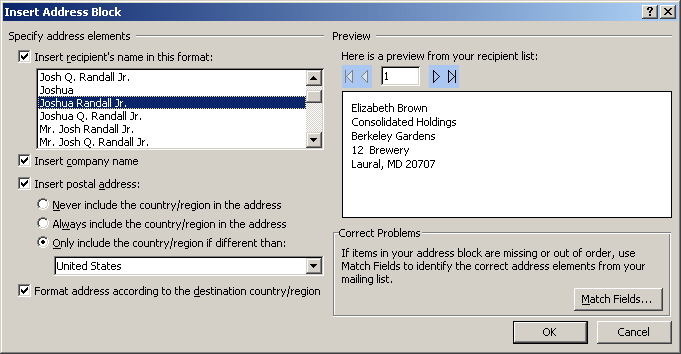
The Insert Address Block dialog box is made of various sections. It allows you to specify a type of greeting and other pieces of information to be inserted in the document. After making the selection(s), you can click OK.
After creating the document and adding the necessary fields
to it, you can preview and review it. To do this, in the Mail Merge window,
click the Next: Preview Your Letters link. When you do this, the letter appears
with the value(s) of the first record. To review the document with the other
values, in the Mail Merge window, you can click the previous ![]() or the next
or the next ![]() buttons.
buttons.
After reviewing the document, in the Mail Merge window, you can click the Next: Complete The Merge link. You can then save, print, and manage the document. In the same way, you can create labels or envelopes.
|
Microsoft Access and Other Documents |
Introduction
There are unlimited types of files you can import in a Microsoft Access database, including files created from known Microsoft Office applications and files from any other type of application, as long as the document has been prepared appropriately.
To import a dBase table, a Paradox table, or a Lotus 1-2-3 spreadsheet, in the Import section of the External Data tab of the Ribbon, click More and click the type of file you want to import:
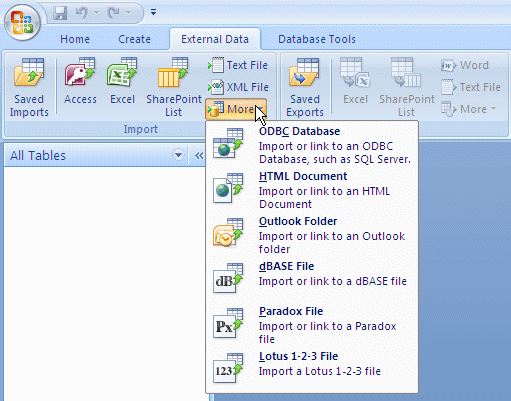
Depending on the type of file, a wizard would come up and guide you.
Microsoft Office Outlook
If you had created an address book in Microsoft Office Outlook, you can use it to create a table in your database. You would import it. When you do this, Microsoft Access is able to recognize all the fields you would have used in the address book and create the table columns. To import an address book, on the Ribbon, you can click External Data and, in the Import section, click More -> Outlook Folder. This would open the Get External Data - Outlook Folder dialog box with the top radio button selected as the default. In most cases, you can accept it and click OK. This would start the Import Exchange/Outlook Wizard with some of the folders from your Microsoft Outlook installation. You can expand a node and select the desired object:
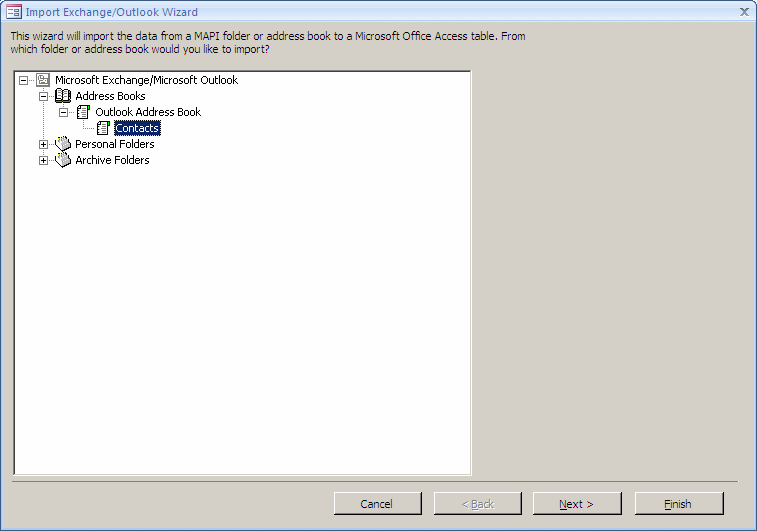
After selecting the object, the file, or the address book, click Next. The next pages of the wizard would assist you in identifying the columns of the list and complete the table.
Lesson Summary
MCAS: Using Microsoft Office Access 2007 Topics
| E5 | Import data |
Exercises
Yugo National Bank
Watts A Loan
|
|
||
| Previous | Copyright © 2008-2016, FunctionX, Inc. | Next |
|
|
||