
Introduction to Controls Design
 |
Introduction to Controls Design |
Form and Report Design Fundamentals
Introduction
|
So far, we have used forms or reports already available with a database or forms and reports generated automatically for us. We simply accepted how those forms or reports looked and they were presented to us as friendly as possible. Form and report design consists of specifying the various characteristics of the object. |
|
You can set the characteristics when creating a brand new form or report or you can change some aspects of an already designed form or report. These include the layout of the object, the color of its body, the objects positioned on it, etc. To design a form or a report or to change the existing design of a form or report, you must display it in an appropriate setting called the Design View. To display a form or a report in Design View:
|
|
As mentioned previously, you can create a form whose data come from a table or you can create a form that is not meant to display data. |
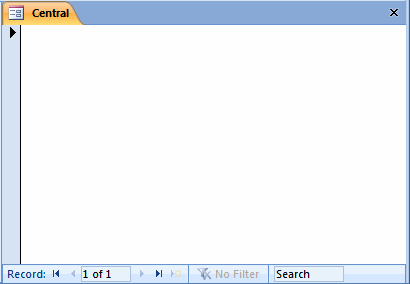
When designing a form or a report, one of the objects you will regularly use is called the Properties window. To get the Properties window of the properties associated with a control, while the form or report is in Design View, right-click the object and click Properties. To display the Properties window for the form or the report in Design View:
Any of these actions would display the Properties window. The Properties window is dockable. This means that you can drag its title bar and position it either in the middle of the screen or to the left or the right side of the screen:

There are various ways you can close or hide the Properties window:
The title bar of the Properties window displays the Property Sheet string. Under the title bar, a label identifies the type of object whose characteristics the Properties window is displaying. Under the label, there is a combo box that displays the name of the object whose characteristics are displayed in the Properties window. To change the object whose properties you want to access:
Made of five property pages, the Properties window displays the characteristics associated with the object or the control that is selected on the screen or in its top combo box.
![]() Practical Learning: Accessing the Properties Window
Practical Learning: Accessing the Properties Window
To populate a form or a report, you will use various objects called Windows controls or simply, controls. These are the objects a user of your database uses to interact with your product. The objects are available in the ribbon when the form or report is in Design View. To access the controls, you can click Design on the ribbon. The controls are listed in the Controls section:

In our lessons, we will mostly use controls listed in the Controls section of the ribbon; but if they are not enough, to access more controls, you can click the ActiveX Controls button. This would bring the Insert ActiveX Control dialog box from where you can select a control:

After selecting the desired control, you can click OK.
The Windows controls are represented with small icons in the Controls section. Each item is identified with a name. Some of these objects may not be familiar to you. To know the name of a control and have an idea of what it is used for, you can position the mouse on top and a tool tip would appear. Here is an example for a combo box:

For the rest of our lessons, each control will be referred to by the name that displays from the tool tip.
![]() Practical Learning: Identifying the Controls
Practical Learning: Identifying the Controls
|
Controls Design Fundamentals |
Adding Controls to a Form or a Report
To select a control, you can click
it in the Controls section.
Once a control, such as the button ![]() ,
has been clicked, it becomes highlighted
,
has been clicked, it becomes highlighted ![]() . If you clicked a control
by mistake but want to use another, you can click that other control. If you
clicked a control but do not want to use any, you can click the Select button
. If you clicked a control
by mistake but want to use another, you can click that other control. If you
clicked a control but do not want to use any, you can click the Select button
![]() that is used to dismiss any selected control.
that is used to dismiss any selected control.
There are various techniques you can use to add a control to your form or report:
Some controls are meant to assist you with performing
an action on the form or report. To make this possible, the Controls
section is equipped with a Use Control Wizards button ![]() .
If the control is set to perform an action, to use that action, the Use
Control Wizards button must be selected or highlighted
.
If the control is set to perform an action, to use that action, the Use
Control Wizards button must be selected or highlighted ![]() .
In this case, if you click a control and click the form or report, a wizard would come up and you can use it to configure the
desired behavior. We will see examples in other sections and lessons. In
some cases, you will not want to use the wizard. For this reason, you
should always check whether the Use Control Wizards button is not selected
.
In this case, if you click a control and click the form or report, a wizard would come up and you can use it to configure the
desired behavior. We will see examples in other sections and lessons. In
some cases, you will not want to use the wizard. For this reason, you
should always check whether the Use Control Wizards button is not selected
![]() . You can
click it to put it up to make sure the control's action is not launched.
. You can
click it to put it up to make sure the control's action is not launched.
![]() Practical Learning: Adding Controls From the Ribbon
Practical Learning: Adding Controls From the Ribbon
| In the following exercises, there is a 100% guaranty that the fields on our form do not display as those on your form. Therefore, the screenshots are provided only as a guide: they are not showing how your form should or must appear. When we would like you to have the same type of design, we will let you know and we will show you. Based on this, follow only the instructions and do not make any attempt to match our screenshots. |

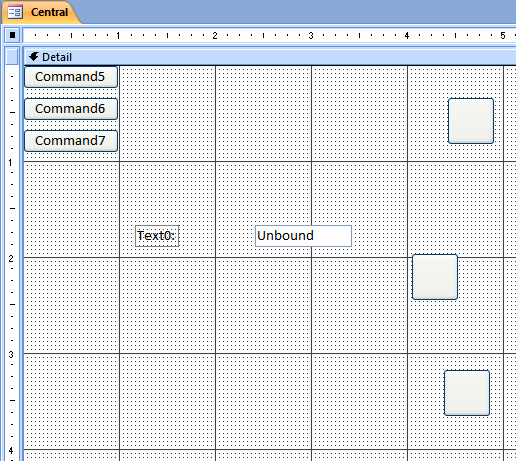
Using Rulers and Dimensions
To perform your design, a form or a report in Design View is equipped with two rulers, one horizontal in the top section and one vertical in the left section. Since the rulers are dimensionally configured, there are divisions inside of the rulers to assist you with some precision. Between two numbered dimensions, there are 7 marks that create 8 divisions. The mark in the middle, a little taller than the others, represents the middle of two dimensions. In our lessons, the middle division will be referred to as ½. The first division on the right side of a number represents 1/8 of a dimension, the 2nd represents 2/8 = ¼ of a dimension, the 3rd represents 3/8, and that is why the 4th represents 4/8 = ½. This is how we will refer to these dimensions.
The rulers can be very useful during control design. If you do not want to
use them, you can remove or hide them. To do this, on the ribbon, click Arrange.
In the Show/Hide section, click the Ruler button ![]() .
Alternatively, you can right-click the middle of the form or report and click
Ruler. Here is an example of a form in Design View without the rulers:
.
Alternatively, you can right-click the middle of the form or report and click
Ruler. Here is an example of a form in Design View without the rulers:

Because you can ignore the rulers during design, you should leave them on.
Control Design and the Grid Lines
To assist you with setting the characteristics of a control, a form or a report in Design View is equipped with grid lines on its body:
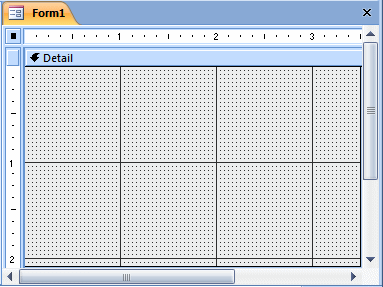
If you do not want to use the grid lines, to remove or hide
them, on the ribbon, click Arrange and, in the Show/Hide section, click the Grid
button ![]() .
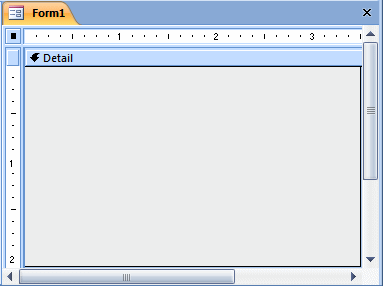
Alternatively, you can right-click the form or the report and click Grid. Here
is an example of a form in Design View without the grid lines:
.
Alternatively, you can right-click the form or the report and click Grid. Here
is an example of a form in Design View without the grid lines:
As we will see in the next sections, you should display the grid lines because you can ignore them during design.
Introduction
In Lesson 3, we saw that you could automatically generate a form or a report using data from a table. In this lesson, we have seen how to add controls from the ribbon to a form or report. By default, the controls from the ribbon are not related to any data of a table. When working on a database, most of the controls you will use are meant to display data. When starting a form or report or while designing it, if it is meant to display data from a table, you must specify it.
![]() Practical Learning: Using Existing Fields of a Table or Query
Practical Learning: Using Existing Fields of a Table or Query
While designing an unrelated form or report, if you decide that it must display data, you can specify the table that holds that data. To do this, while in Design View, you can display the Properties window for the form or report. Then, click the arrow of the Record Source combo box and select a table. Here is an example:
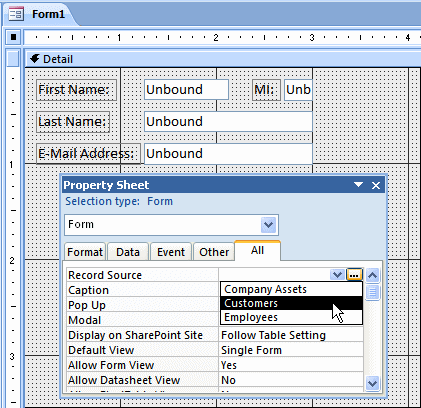
After specifying the Record Source of a form or report, the controls positioned on it, if any, are ready to show the values stored in the table. To make this happen, you can first add unrelated controls, as we saw earlier, to the form or report, then "link" those controls to the columns of the Records Source's table. Microsoft Access provides another technique.
Besides the Properties window that we introduced earlier, another window that can assist you when designing a form or a report is called the Field List. This window is useful only if the form or the report is meant to display data from a table, that is, if the form or report is not an unrelated object.
The Field List is a window that
holds the names of columns from the table specified as the Record Source. To
display the Field List, while the form or the report is in Design View, on the
ribbon, click Design and, in the Tools section, if the Add Existing Fields
button is highlighted  ,
this indicates that the Field List is already displaying. Otherwise, you can
click it
  . This
would open the Field List. Like the Properties window, the Field List is
dockable, meaning you can move it around the screen, and you can position it
either to the left or to the right sides of the Microsoft Access interface.
The Properties window and the Field List share the same window
object. Consequently, when one is displaying, the other closes, and vice versa.
Based on this, to display the Properties window, you can either double-click the
button at the intersection of the rulers ![]() or you can click the Property Sheet button
or you can click the Property Sheet button ![]() in the Tools section of the Design category of the ribbon. If the Field List was
displaying, it would be replaced by the Properties window. To display the Field
List, as mentioned already, in the Tools section of the Design category of the
ribbon, you can click the Add Existing Field button
in the Tools section of the Design category of the ribbon. If the Field List was
displaying, it would be replaced by the Properties window. To display the Field
List, as mentioned already, in the Tools section of the Design category of the
ribbon, you can click the Add Existing Field button  .
If the Properties window was displaying, it would be closed and replaced by the
Field List.
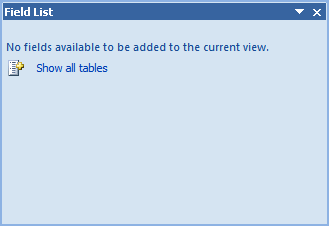
If you open the Field List for an unrelated form or report, that is, a form or report whose Record Source is empty, the Field List would appear blank:
If the Record Source of the form or report is already specified, the Field List would show the list of the columns of the base table. Here is an example:
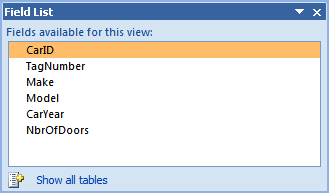
When the Record Source of a form or report has been specified, by default, the Field List displays only the columns of its base table. Still, the Field List is equipped to show the columns of the various tables of the current database. To show the columns of the other tables, on the Field List, you can click the Show All Tables button.
![]() Practical Learning: Accessing the Fields List
Practical Learning: Accessing the Fields List
 ,
click it
  .
.Adding Fields to Forms and Reports
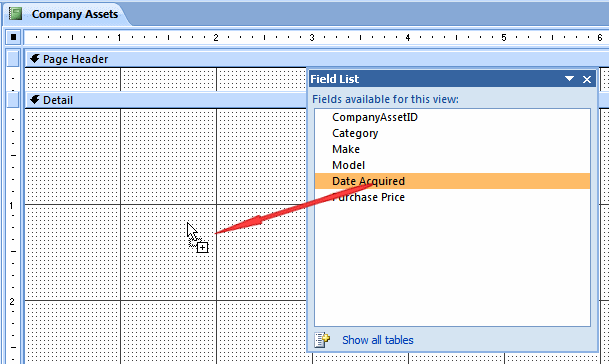
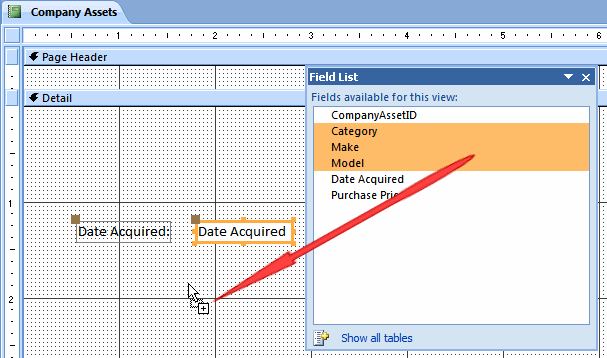
When designing a form or a report, one of the most usual actions you will perform consists of inserting items from the Field List to the form or the report. To add a field, you can drag it from the Field List to the form or report. To drag many fields at the same time, first select them.
To select all items at the same time on the Field List, you can click the item on one end of the list, press and hold Shift, and click the item on the other end. In fact, you can use this same process to select fields in a range.
To select fields at random, press and hold Ctrl, then click each one of the desired fields. If you had selected an item but want to remove it from the selection. While still holding Ctrl, you can click the undesired item.
To add one item to the form or report, you can drag it from the Field List and drop it on the form or the report. Alternatively, you can double-click double-click it from the Field List and it would be positioned in the body of the form or report.
To add a group of items, first select them from the Field List, then drag the selection and drop it on the form or report.
![]() Practical Learning: Inserting Fields
Practical Learning: Inserting Fields
|
Control Selection |
Selecting One Control
After adding a control to a form or report in Design View, to manipulate it, you can first select the control. To select a control, you can just click it.
A control that is selected displays 8 handles around its body with the top-left handle thicker than the others:
![]()
When a control is selected on the form or report, the Properties window shows only its characteristics and you can change only the characteristics of the selected control:
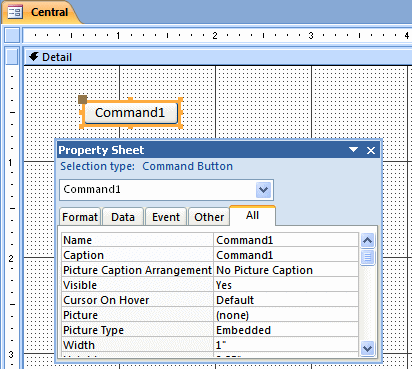
Notice that the combo box in the Properties window displays the name of the selected control.
Selecting Various Controls
To select more than one control, at random, click one, then press and hold Shift. While holding Shift, click each of the desired controls. After selecting the controls, release Shift.
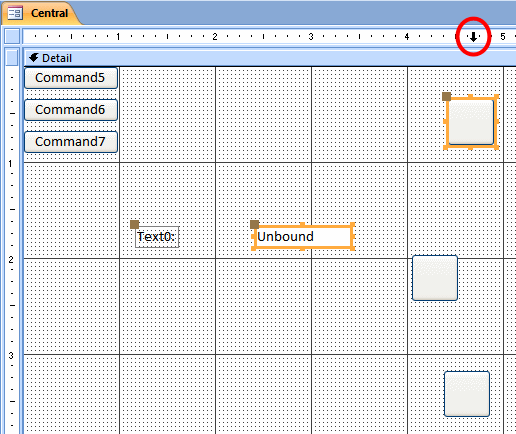
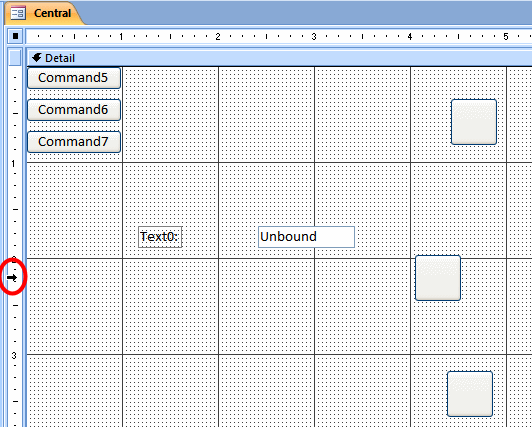
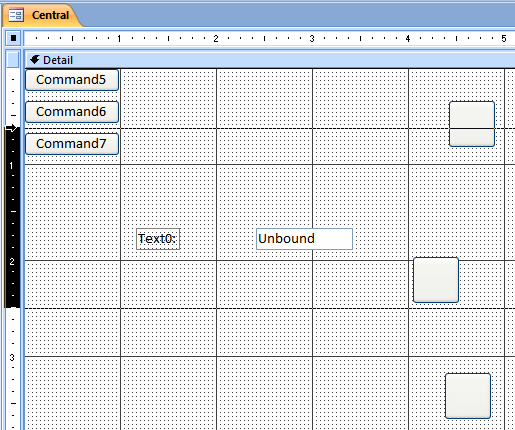
To select controls aligned vertically, click inside of the horizontal ruler above the highest positioned control: everything that would be touched by the fake line will be selected. In the same way, you can select controls that are horizontally aligned by clicking inside the vertical ruler.
To select many controls in the same area on the form, click next to one of them and draw a fake rectangle that covers each of the desired controls. All controls touched by the fake rectangle would be selected when you release the mouse.
To select all controls on the form or report, you can press Ctrl + A. You can also click inside of one of the rulers on one end and drag to the other end.
After selecting the controls, we will see in the next sections that you can change the common properties of the selected control. To remove a control from a group of selected controls, press and hold Shift, then click the undesired control of the group. You can include an object back in the group by pressing Shift and clicking the control. To dismiss a group of selected controls, you can simply click an unoccupied area of the form or report. In some cases, you may have removed a control from the group by mistake or you may have dismissed the group by mistake while you still need it.
If you have a group of controls that you will use over and over again, you can include them in a formal group so that, even if you click an unoccupied area of the form or report, the group would have been saved and you can get it back when needed.
To create and save a
group of controls, first select the group. Then, on the Ribbon, click Arrange
and, in the Page Layout section, click the Group ![]() button. A rectangle would be drawn to surround the extreme objects of the group:
button. A rectangle would be drawn to surround the extreme objects of the group:

Notice and remember that the selected controls do not have to be adjacent. If you
click an unoccupied area of the form or report, the surrounding rectangle would
disappear but the group would have been saved. If you click any control of the
group, the rectangle would appear again to indicate that the selected control is
part of a group. When you do not need the group anymore, to dismiss it, in the
Page Layout section of the ribbon, you can click the Ungroup button ![]() .
.
When many controls are selected, the Properties window shows (only) the characteristics common to those controls:
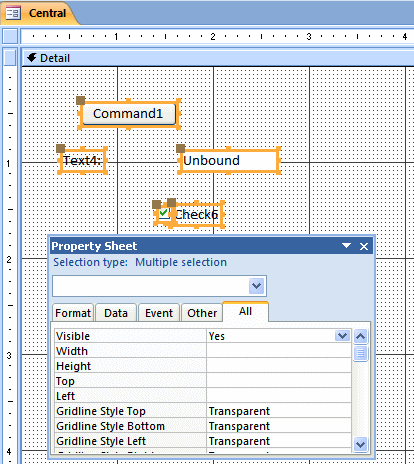
This means that you can change the common characteristic(s) that many controls share and each would receive the change.
![]() Practical Learning: Selecting Controls
Practical Learning: Selecting Controls

|
Lesson Summary |
MCAS: Using Microsoft Office Access 2007 Topics
| C7 | Modify the design of reports and forms |
Exercises
Yugo National Bank
World Statistics
|
|
||
| Previous | Copyright © 2008-2016, FunctionX, Inc. | Next |
|
|
||