
Details on Controls Design
 |
Details on Controls Design |
The Location of a Control on a Form or a Report
The Top and Left Properties of a Control
|
When you add a control to a form or report, it takes a position on its host but it depends on the control. The location of a control is both:
|
|
In the Properties window, the distance between the top border of the form or report and the top border of the control is represented by the Top property. The distance between the left border of the form or report and the left border of the control is represented by the Left property:
|
|
Moving Controls Randomly |
After adding a control to a form or report, it assumes a position based on where you clicked but this may depend on the control. Most of the time, you will want to change the position. Moving a control consists of changing its location on the form or the report. There are various ways you can do this.
You can move a control along the grid lines or you can ignore them:
To move a control or a group of controls with even more precision, in the Properties window, you can change either or both the Left and the Top values.
![]() Practical
Learning: Moving Controls Randomly
Practical
Learning: Moving Controls Randomly
|
Moving Controls Vertically |
Introduction
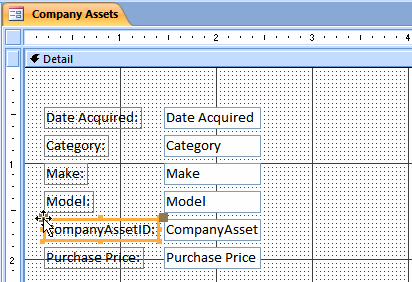
When a control has been selected, as your mouse moves over it, its pointer displays a different cursor. One of these cursors can be used to move a control. This cursor is represented as a cross with four arrows:
![]()
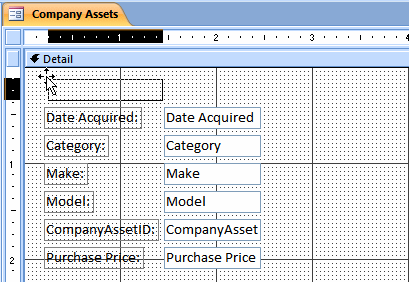
By default, when dragging the control(s), it(they) move(s) by one unit of the grid lines on the form or report and you can move left, right, up, or down but:
You can also move the controls vertically using the Properties window:
![]() Practical
Learning: Moving Controls Vertically
Practical
Learning: Moving Controls Vertically
Aligning Controls Vertically
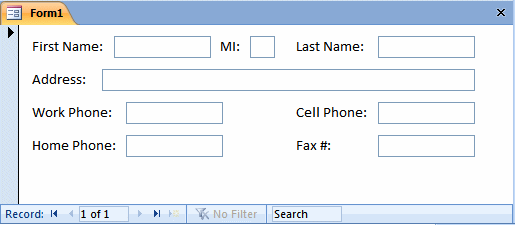
Consider the following form:
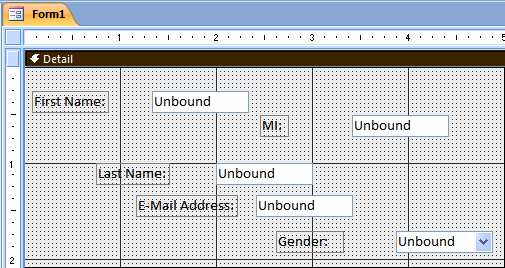
One of the obvious problems is that this layout does not follow any reasonable logic. Among the remedies to this, you can better align the controls. For example, you may want the First Name label, the top Unbound text box, the MI label and its text box to have the same distance from the top border of the form. Aligning the controls consists of using a reference to position other controls based on this reference. Fortunately, Microsoft Access provides all the necessary tools to align the controls on a form or report.
To assist you with aligning the controls on a form or a report, the ribbon provides the Control Alignment section. To access it, while the form or report is in Design View, on the ribbon, click Arrange and you will see the section labeled Control Alignment:

Before aligning some controls you must first decide which one would be used as a reference. This means that you can use the alignment of one control as a reference for the other controls. To do this, position that control as the others should be aligned vertically. For example, imagine that, from the above form, you want to position the First Name label, its text box, the MI label, and its text box to have the same distance from the top border of the form. You can start by positioning one of these control at the top distance you want. Here is an example:
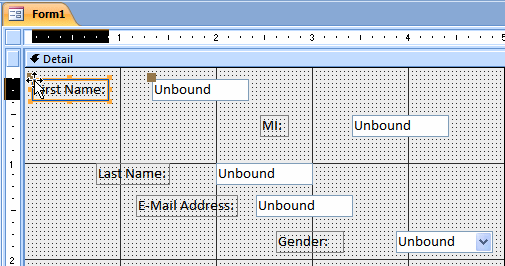
After doing this, the alignment of such a control, in this case the top alignment of the First Name label, can be used to align the First Name text box, the MI label, and the MI text box. To align the other controls, first select them. Here is an example:

To align the controls, in the Control Alignment
section of the Arrange group of the ribbon, you can click the Top button ![]() .
You can also right-click one of the selected controls, position the mouse
on Align, and click Top. Here is the result from the above selection:
.
You can also right-click one of the selected controls, position the mouse
on Align, and click Top. Here is the result from the above selection:
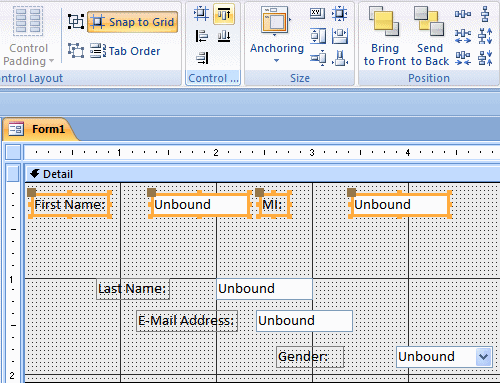
In the same way, you can align other controls. You can also align controls to the bottom: first align the one that would be used as the reference, select the others, and click the Bottom button in the Control Alignment section of the ribbon. You can also right-click one of the controls in the selection, position the mouse on Align, and click Bottom.
![]() Practical
Learning: Aligning Controls Vertically
Practical
Learning: Aligning Controls Vertically
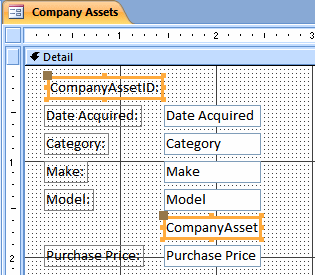
|
Moving Controls Horizontally |
Introduction
Instead of moving the control(s) randomly or vertically, you can move it(them) horizontally only:
You can also move the controls horizontally using the Properties window:
![]() Practical
Learning: Moving Controls Horizontally
Practical
Learning: Moving Controls Horizontally
Aligning Controls Horizontally
Imagine you want to position some labels of the above form to the left. You can start by positioning the First Name label to the desired left distance:

After doing this, the alignment of such a control, in this case the First Name label, can be used as a reference for the others. To align the other controls, first select them. Here is an example:
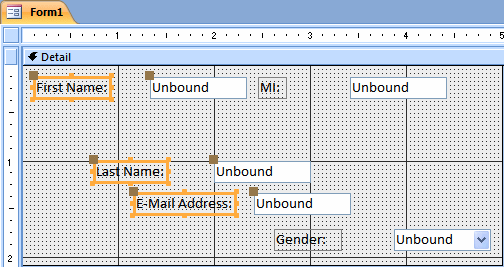
Notice that only the controls that will be aligned, in
this case only some labels, have been selected. To align them, in the
Control Alignment section of the Arrange group of the ribbon, you can
click Left ![]() .
Alternatively, you can right-click one of the controls in the selection,
position the mouse on Align, and click Left. Here is the result from the
above selection:
.
Alternatively, you can right-click one of the controls in the selection,
position the mouse on Align, and click Left. Here is the result from the
above selection:

In the same way, you can align other controls. You can also align controls to the right: first align the one that would be used as the reference, select the others, and click the Right button in the Control Alignment section of the ribbon.
![]() Practical
Learning: Aligning Controls Horizontally
Practical
Learning: Aligning Controls Horizontally
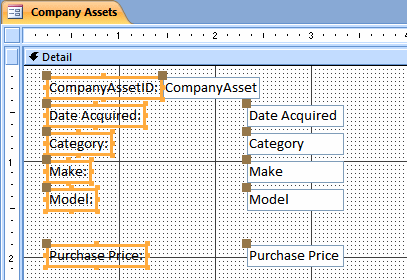
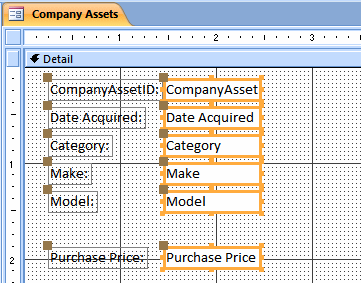
Introduction
The size of a control is both:
When you add a control to a form or report, it assumes a certain size depending on the type of control. In some cases, you will want to change the size the a control. Resizing a control consists of changing its measures. There are various ways you can do this.
Resizing a Control
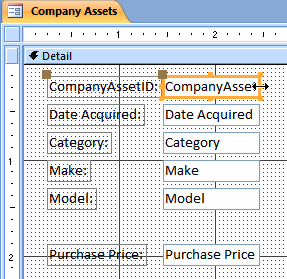
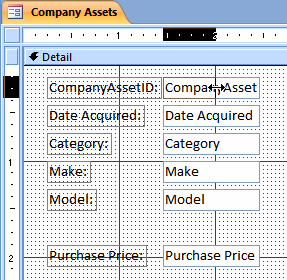
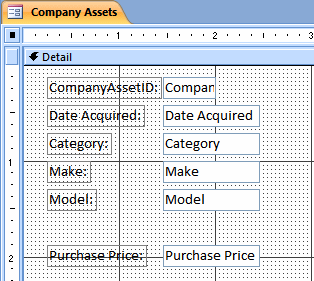
Resizing a control consists of changing either its width, its height, or both. Before resizing a control, first select it. To resize a selected control, position the mouse on one of its borders. When the mouse moves over a selected control and reaches one of the handles, the mouse pointer displays a double-arrow cursor. The possible mouse pointers are:
| Cursor | Role |
| Shrinks or heightens the control | |
| Resizes the control in North-East <-> South-West direction | |
| Narrows or widens the control | |
| Resizes the control in North-West <-> South-East direction |
Although these pointers can be used to resize one control, they can also be applied to a group of controls. Based on this:
![]() Practical
Learning: Resizing a Control
Practical
Learning: Resizing a Control
Resizing Various Controls
Instead of one, you can also resize a group of controls at the same time:
To further assist you with resizing a control, Microsoft Access provides the Size section of the ribbon. To access it, while the form or report is in Design View, click Arrange. To resize a group of controls, first select one and set the desired size, such as the desired width. Consider the following form:
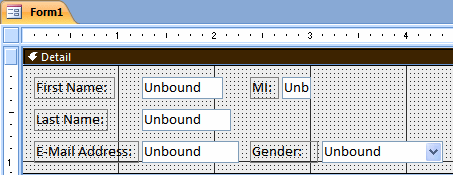
Imagine you would like the First Name text box, the Last Name text box, and the Gender combo box to have the same dimensions. First select the controls that will be resized:
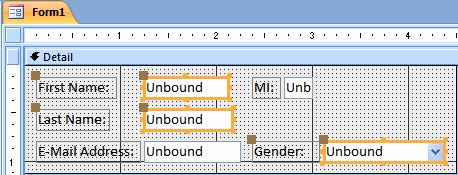
To resize the controls, on the ribbon, click Arrange and select in the Size section. Alternatively, you can click one of the selected controls, position the mouse on Size, and select one of the options:
| Ribbon Button | Name | Shortcut Menu | Description |
| Size to Fit | To Fit | The controls will be resized based on the contents of their value | |
| Size to Grid | To Grid | The controls will be resized so their borders fit with the grid lines | |
| Size to Tallest | To Tallest | The heights of the selected controls will be increased to match the height of the tallest control | |
| Size to Widest | To Widest | The widths of the selected controls will be increased to match the width of the widest control | |
| Size to Shortest | To Shortest | The heights of the selected controls will be decreased to match the height of the shortest control | |
| Size to Narrowest | To Narrowest | The widths of the selected controls will be decreased to match the width of the narrowest control |
![]() Practical
Learning: Resizing Various Controls
Practical
Learning: Resizing Various Controls
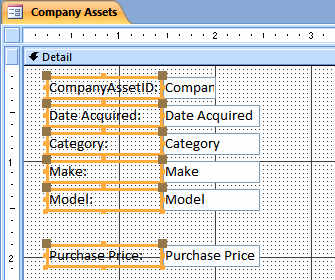
The Width and the Height Properties of a Control
You can also resize a control or a group of controls using the Properties window. In the Properties window, the width of a control is represented by the Width property while the height of a control is represented by the Height field. Therefore, to resize a control with more precision, you can change either or both its Width and/or its Height properties. To resize a group of controls, first select them. In the Properties window, change either or both the values of the Width and/or the Height fields.
|
Spacing the Windows Controls |
Spacing the Ranges of Controls Vertically
Consider the following form that is being designed:

Notice that the controls are logically and vertically aligned. For example, the First Name label, its text box, the Last Name label, and its text box have the same top alignment (distance from the top border of the form). In the same way, the City label, its text box, the State label, and its text box have the same top alignment (distance from the top border of the form). When moving and aligning the controls on a form or report, one of the concerns you may have is that the vertical distance among the controls from one range to the next or from one range to the previous range is not logically sound. Of course, you can move the controls to adjust this. Fortunately, Microsoft Access provides a set of tools you can use to create a better spacing between the ranges of controls. You can first select the controls that have been vertically aligned already. Here is an example:

Then, on the ribbon, click Arrange and, in the Position section, select one of the Vertical options:

If you select:


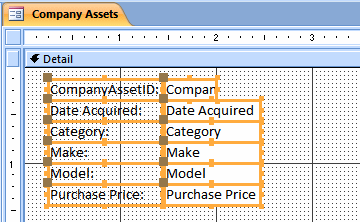
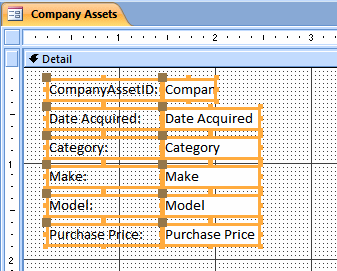
Here is one way you can take advantage of the Vertical buttons of the Position section of the ribbon:


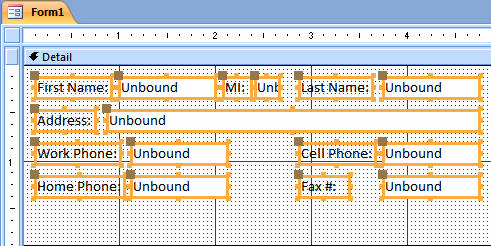
![]() Practical
Learning: Spacing the Ranges of Controls Vertically
Practical
Learning: Spacing the Ranges of Controls Vertically
Spacing a Stack of Controls Horizontally
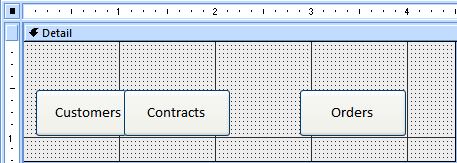
Consider the following two sets of controls (buttons) on a form that is being designed:

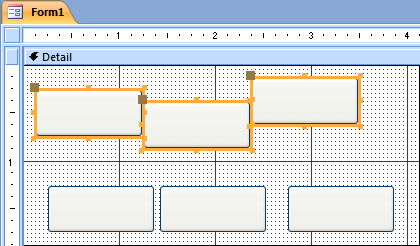
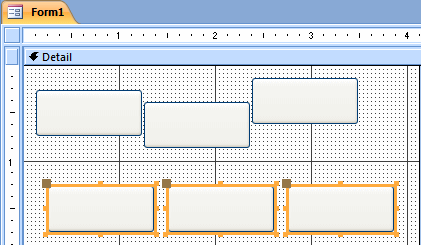
Notice a problem of horizontal spacing among the controls of the same range. In the top range, the controls are positioned on top of each other. In the bottom range, the space between the left and the middle buttons is not the same as the space between the middle and the right buttons, although they are clearly in the same range. To solve this type of problem, of course you can move the controls using any of the techniques we have reviewed so far. Alternatively, Microsoft Access provides another set of tools you can use to create a better spacing among the controls of the same range.
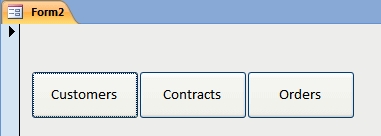
Image you want the controls in the top range to rather have their borders touch each other instead of having them positioned one on top of another. To start, you can select them. Here is an example:
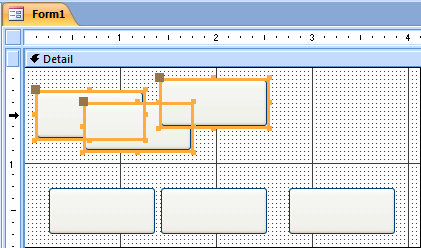
After selecting the controls, on the ribbon, click Arrange and, in the Position section, you can click Equal Horizontal. In this case, the controls would be moved to be adjacent to each other. The above selection would produce:
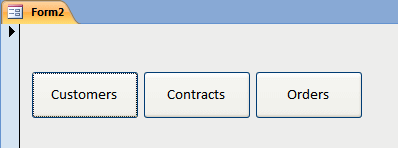
Imagine the controls were not positioned on top of each other, for example, suppose you want to position the controls of our bottom range. Once again, first select them:

Then click the Equal horizontal button. In this case, Microsoft Access would get the various distances among the controls (in this case, that would be the distance between the left control and the middle control), and the distance between the middle control and the right one). Then, Microsoft Access would calculate the average of these measures, and would apply it as the new distance mong the controls. The above selection would produce:
Once again, consider the following form in design:

Notice that the controls in the bottom range don't show a good spacing (the distance between two controls). Imagine you want to apply a better spacing among the controls of the same range. First select the controls of the same range. Here is an example:

If you click:
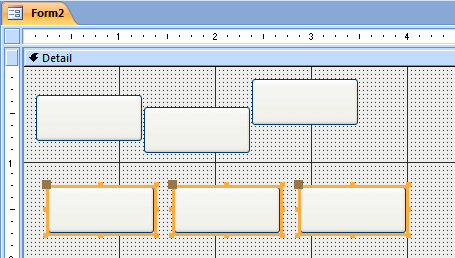
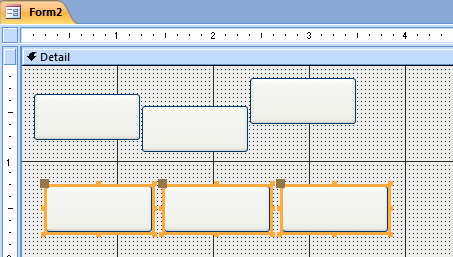
Here is one way you can take advantage of the horizontal alignment:


![]() Practical
Learning: Spacing Stacks of Controls Horizontally
Practical
Learning: Spacing Stacks of Controls Horizontally
|
Control Maintenance |
Copying a Control
If you had applied some design on a control and you want to replicate that design, you can copy the control. This is mostly a simple operation of copy n' paste. You can copy a control on a form (or report) and paste it on the same form (or report) or you can paste it in another form (or report). When you copy and paste a control, there are some characteristics it would retain and some others it would loose. Normally, it would keep its aesthetic characteristics (such as the color) and its size but it will loose some others (such as its location and its programmatic characteristics such as its name (we will learn that two controls cannot have the same name on the same form or report).
To copy a control, first select it and then press Ctrl + C. You can also right-click a control and click Copy.
To control a group of controls, select them and press Ctrl + C. You can also select the controls, right-click one of the selected controls, and click Copy.
To paste a copied control or a copied group of controls from the clipboard, click the destination and press Ctrl + V. You can also right-click the destination and click Paste.
Deleting a Control
If you have added a control or it was created by the
Form Wizard or the Report Wizard but you don't need it anymore, you can
remove it from the database. You can also delete a group of controls in
one step.
To remove a control from a form or a report, click it and press Delete. If
you click a text box or a control that is accompanied by a label and
delete it, its label is deleted also.
To remove a group of controls, select them and press Delete.
Tab Order
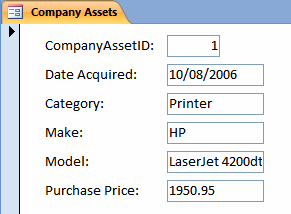
When we introduced data entry for a form, we saw that the user could press Tab to move from one control to another. For example, after the user has entered data in the most left text box of the form, if there is another text box on the right side, when the user presses Tab, the caret should move to that right control. If there is no control on the right side, the caret should move to the control under the one previously used. If the caret or focus is in the last bottom control on the form and the user press Tab, the caret should move to the next record, unless the form is configured to display only one record. This follows the arranged sequence of the controls on the form. For this reason, the controls on a form should be aligned in the order of a logical sequence.
When you add a control to a form that already has other controls, it is sequentially positioned at the end of the existing controls. If you don't fix it, the data entry personnel could have a hard time figuring out how the sequence should be followed.
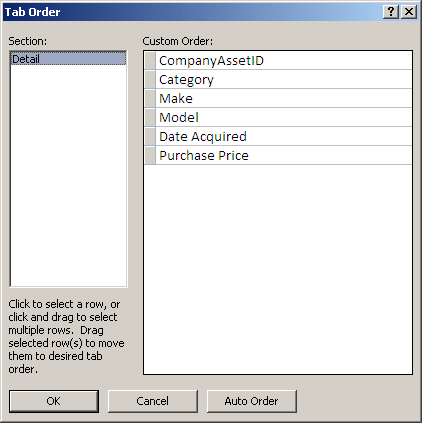
The sequence of controls navigation is set using the Tab Order dialog box. The Tab Order dialog box is available when the form is opened in Design View. In the Design View, you can right-click the form and click Tab Order... Alternatively, on the ribbon, you can click Arrange and, in the Page Layout section, you can click Tab Order. This would open the Tab Order dialog box:

The simplest and quickest way to rearrange the order of items is to click the Auto Order button. Sometimes, you will not like the arrangement made by the Tab Order dialog box. To rearrange items manually, you can move a row or a group of rows.
![]() Practical
Learning: Sequentially Ordering Controls
Practical
Learning: Sequentially Ordering Controls


|
Lesson Summary |
MCAS: Using Microsoft Office Access 2007 Topics
| C7 | Modify the design of reports and forms |
Exercises
Yugo National Bank
| TransactionType |
| Deposit |
| Withdrawal |
| Fund Transfer |
| Money Order |
| Service Charge |
Close the table
Watts A Loan
Us Senate
|
|
||
| Previous | Copyright © 2008-2016, FunctionX, Inc. | Next |
|
|
||