
Database Conditional Values
 |
Database Conditional Values |
The Boolean Data Type |
||
A value is referred to as Boolean when it is either true or false. In other words, the value can only be one or the other, never both, and not any other value. To support Boolean values, Microsoft Access provides a data type named Boolean (but we will not explicitly use that data type in our lessons).
| Unknown |
| Excellent |
| Good Condition |
| Needs Some Repair |
| Bad Shape |
| Field Name | Data Type | Field Size | Input Mask | Default Value | Other |
| PropertyID | |||||
| Property # | Number | ||||
| Property Type | 20 | "Unknown" | |||
| Condition | 20 | "Unknown" | |||
| Address | 100 | ||||
| City | 50 | ||||
| State | 2 | >LL | "MD" | ||
| ZIP Code | 12 | 00000\-9999;0;_ | |||
| Bedrooms | Number | Byte | |||
| Bathrooms | Number | Single | |||
| Stories | Number | Integer | |||
| Year Built | Number | Integer | |||
| Market Value | Number | Double | Format: Currency |
Boolean Fields
A data field is referred to as Boolean when it can assume only one of two values. It can be either Yes or No, True or False, On or Off, non-zero or 0. Such a field is appropriate when you want the user to indicate the state of a value.
There are various ways you can set up a field for Boolean values:
![]() Practical Learning: Using the Boolean Data Type
Practical Learning: Using the Boolean Data Type

Options of Boolean Fields
To support various ways of expressing a Boolean field, Microsoft Access provides different options. After setting the Data Type of a field to Yes/No, you can control how the field would be presented to the user. The most classic way consists of displaying a check box:
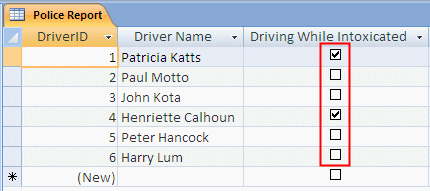
With this layout, the user can either click the check box or give it focus and press the space bar. Alternatively, if you prefer, you can let the user type a value. To do this, in the Design View of the table, after setting the Data Type combo box to Yes/No, in the lower section of the table, click the Lookup property page and, on the Display Control combo box, select one of the available options:
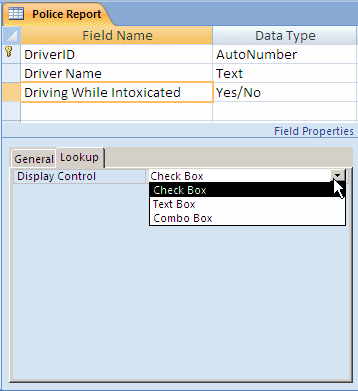
If you select Combo Box, many other options would be presented to you:
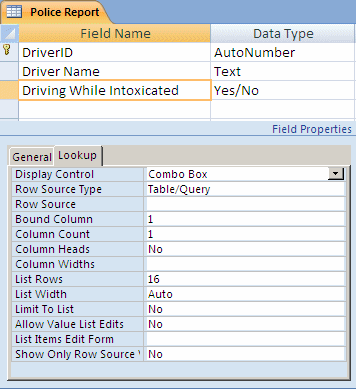
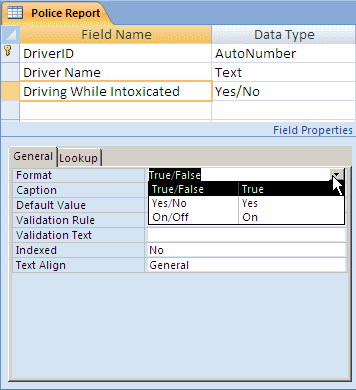
The default option is Check Box. If you select Text Box, then the user will be able to type True, False, Yes, No, On, Off, 0, or any number. Once the user types one of these values and presses Enter, Tab, or clicks somewhere else, you can control how the field would display the value. To do this, in the lower section of the table in Design View, click the General property page and, in the Format property, select one of the available options:
![]() Practical Learning: Setting Boolean Options
Practical Learning: Setting Boolean Options
| PropertyID | Has a Finished Basement? | With Indoor Garage |
| 1 | Yes | Checked |
| 2 | Yes | |
| 3 | ||
| 4 | Yes | Checked |
| 5 | ||
| 6 |
|
Logical Constants |
Introduction
A database environment like Microsoft Access provides operators you can use to perform logical operations on values of a database. The operators used are called logical operators because they are used to perform comparisons that produce a result of true or false.
True or False
In Boolean algebra, something is considered True when it holds a value. The value is also considered as 1 or Yes. By contrast, if something does not hold a value, it is considered non-existent and not worthy of consideration. Such a thing has a value of False, 0, or No. In reality, everything in your database has a value, as far as the database engine is concerned. To retrieve such a value, you can just find out if the value of a field is existent or not.
The comparison for a True or False value is mostly performed on Boolean fields of Yes/No type. If a record has a check mark, the database engine considers that such a field is True. If the check box is not checked, then it holds a False value.
NULL
While the True and False constants are used to find out whether a check box is marked or not, the database provides another constant used to find out whether a field is empty. This can be done using the NULL constant.
When a field holds a value, the value would be considered using the comparison operators we will learn shortly. If the field is empty, it holds a value of NULL.
|
Logical Operations |
The IS Operator
One of the logical operations you can perform on a field is to check whether it is NULL or not. To support this operation, Microsoft Access provides an operator named IS. The formula to use it is:
something IS NULL
The something factor can be a placeholder for the name of a field. An example would be
txtRadius IS NULL
In this case, the database engine would check the status (not the value) of a control named txtRadius. If the txtRadius control is null, the expression produces a True value.
The NOT Operator
To negate an expression or the existence of a value, you can use the NOT operator. This operator is primarily used to reverse an IS NULL expression. For example, we have learned that False is the opposite of True. In the same way, True is the opposite of False. If you want to compare a value as not being True, the NOT TRUE expression would produce the same result as the False value. For the same reason, the expression Not False is the same as True.
In the same way, you can use the NOT operator to negate an expression such as the one we saw above. Consider the following expression:
txtRadius IS NOT NULL
This time, the database engine would check the status of a control named txtRadius. If the control holds a value, the comparison would produce a False result (note this very importantly) but if the control doesn't hold a value, then the comparison would produces a True result.
|
Logical Functions |
Introduction
To support logic on actions that can be performed on the values of a database, besides the operators we saw above, Microsoft Access provides various functions.
In the strict sense, because Microsoft Access is not a programming environment, it does not provide a feature called conditional or control statement, which is used to check a condition. Instead, it provides functions you can use to check that a condition is true or false. There are various functions that can be used to create an expression as complex as an algorithm would allow. It is important to note that, although most of these functions perform conditional checking, they do not return the same type of value. For this reason, you should choose the right function. Most of these functions will also be used in combination with other functions as necessary.
![]() Practical Learning: Basic Expressions
Practical Learning: Basic Expressions
| Field Name | Data Type | Field Size | Format | Default Value |
| CleaningOrderID | ||||
| Customer Name | 50 | |||
| Customer Phone | 20 | |||
| Deposit Date | 40 | |||
| Retrieve Date | 40 | |||
| Unit Price Shirts | Number | Double | Currency | 1.15 |
| Quantity Shirts | Number | Integer | 0 | |
| Unit Price Pants | Number | Double | Currency | 1.95 |
| Quantity Pants | Number | Integer | 0 | |
| Other Item1 | 80 | "None" | ||
| Unit Price Item1 | Number | Double | Currency | 0.00 |
| Quantity Item1 | Number | Integer | 0 |
| None |
| Tie |
| Coat |
| Dress |
| Other |
| Jacket |
| Swede |
| Silk Shirt |
| Sweater |
| Comforter |
| Women Suit |
| Regular Skirt |
| Men's Suit 2Pc |
| Men's Suit 3Pc |
| Skirt With Hook |
| Field Name | Data Type | Field Size | Format | Default Value |
| Tax Rate | Number | Double | Percent | 0.0775 |
| Notes | Memo |
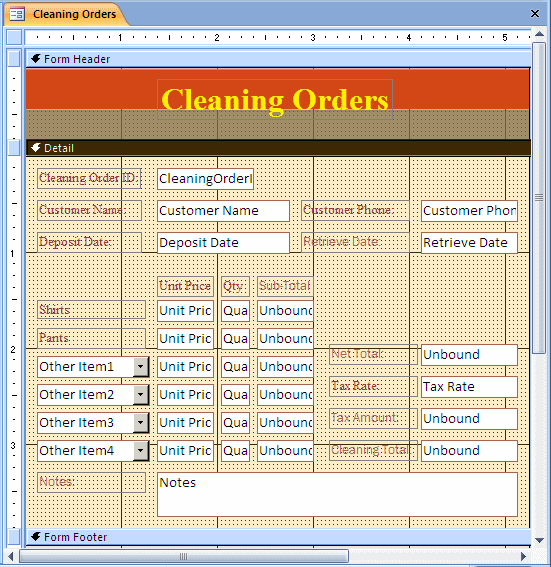
One of the most regularly used functions to perform conditional statements is called IIf. The Immediate If function, IIf(), needs three pieces of information in order to accomplish its assignment. The formula used is:
IIf(Condition,
    WhatToDoIfConditionIsTrue,
    WhatToDoIfConditionIsFalse) As Boolean
The first action this function performs is to evaluate a
condition. This condition could involve an operation or the result of an
operation. If the Condition is true, then the function would execute the
first expression, which is identified in our syntax as WhatToDoIfConditionIsTrue.
The Condition could lead to only one of two results. For example, the Condition
could consist of checking whether an employee is married or not. If the field is
a combo box, it might have only a Yes and a No values.
A Condition could also result in more than two values. For example, suppose a combo box holds the book categories of a database. Such a combo box could display values such as History, Entertainment, Biographies, Computers, Computer Programming, Geography, and Artificial Intelligence. When a field can hold various values, the Condition you specify as the first item of your IIf() function would be checked. If it produces a true result, the WhatToDoIfConditionIsTrue statement would be executed. If the Condition produces a false result, the WhatToDoIfConditionIsFalse statement would be executed. This is important to keep in mind: the IIf() function checks only one condition. If you want to check more than one condition, you would have to write a more elaborate expression.
![]() Practical
Learning: Using IIf
Practical
Learning: Using IIf
The Choose Function
Since Microsoft Access doesn't inherently provide a programming environment, it relies on logical functions to take care of this aspect. One of the functions used to perform looping operations is called Choose. The Choose() function is one of those that can test a condition and provide alternatives. The Choose() function works like nested conditions. It tests for a condition and provides different outcomes depending on the result of the test. Its syntax is:
Choose(Condition, Outcome1, Outcome2, Outcome_n) As Number
The first argument of this function is the condition that should be tested. It should provide a natural number. After this test, the Condition may evaluate to 1, 2, 3, or more options. Each outcome is then dealt with. The first, Outcome1, would be used if the Condition produces 1. The second, Outcome2, would be used if Condition produces 2, etc.
We saw that the IIf() function was used to check a condition and could perform one of two statements depending on the result of the condition. In some expressions, there will be more than one condition to check. Although you can nest IIf() functions to create a complex expression, Microsoft Access provides another function that can perform this task. The function is called Switch and its syntax is:
Switch(Expression1, What To Do If Expression1 Is True,
       Expression2, What To Do If Expression2 Is True,
       Expression_n, What To Do If Expression_n Is True) As Some Value
Unlike IIf(), the Switch() function does not take a fixed number of arguments. It takes as many combinations of <Expression -> Statement>s as you need. Each expression is evaluated. If the expression evaluates to true, the statement that follows it executes.
Although you can spend a great deal of time tuning a conditional expression such as one involving a Switch() function, it is still possible that none of the expressions evaluates to true. In this case, you can add a last expression as True and provide a subsequent statement to use. The syntax you would use is:
Switch(Expression1, What To Do If Expression1 Is True,
       Expression2, What To Do If Expression2 Is True,
       Expression_n, What To Do If Expression_n Is True,
       True, What To Do With A False Expression) As Some Value
|
Value Checking Functions |
Non-Zero Checking
When studying numeric types, we reviewed different functions that could be used to convert a value or an expression to the desired type. We saw CByte, CInt, CSng, CDbl, and CCur. Before performing any operation on the value held by a field, you should first convert it to the appropriate type. The conversion functions we mentioned assume that the field contains a value. Unfortunately, this is not always the case. Microsoft Access provides the Nz() function that can be used to check whether a field contains a value, whether the field is empty, or is null. The syntax of this function is:
Nz(Value, ValueIfNull) AS Appropriate Type
The first argument, Value is required. The second argument is optional. The pseudo-code for this function is:
If the field contains a value
    Return that value
Otherwise
    Return 0
In other words, this function considers the value provided by the Value argument. This could be an expression or the name of a field (on control) that is involved in a calculation. If the Value argument or the passed field is empty, this function returns 0. If the field contains a value, this function returns it. The beauty of this function is that it provides a valuable safeguard for an operation.
The second argument is optional and it would be used as the return value if the Value argument were null.
![]() Practical Learning: Using the Nz() Function
Practical Learning: Using the Nz() Function
| Name | Format | Control Source |
| txtTotalShirts | Currency | =CCur(Nz([Unit Price Shirts]))*CInt(Nz([Quantity Shirts])) |
| txtTotalPants | Currency | =CCur(Nz([Unit Price Pants]))*CInt(Nz([Quantity Pants])) |
| txtTotalItem1 | Currency | =CCur(Nz([Unit Price Other]))*CInt([Quantity Other])) |
| txtTotalItem2 | Currency | =CCur(Nz([Unit Price Item2]))*CInt([Quantity Item2])) |
| txtTotalItem3 | Currency | =CCur(Nz([Unit Price Item3]))*CInt([Quantity Item3])) |
| txtTotalItem4 | Currency | =CCur(Nz([Unit Price Item4]))*CInt([Quantity Item4])) |
| txtNetTotal | Currency | =CCur(Nz([txtTotalShirts])) + CCur(Nz([txtTotalPants])) + CCur(Nz([txtTotalItem1])) + CCur(Nz([txtTotalItem2])) + CCur(Nz([txtTotalItem3])) + CCur(Nz([txtTotalItem4])) |
| txtTaxAmount | Currency | =CLng(CCur(Nz([txtNetTotal]))*CDbl(Nz([Tax Rate]))*100)/100 |
| txtCleaningTotal | Currency | =CCur(Nz([txtNetTotal])) + CCur(Nz([txtTaxAmount])) |
| Customer Name | Shirts | Pants | Other Item1 | Other Item2: | ||||||
| Unit Price | Qty | Unit Price | Qty | Name | Unit Price | Qty | Name | Unit Price | Qty | |
| John Hancock | 1.15 | 4 | 1.85 | 2 | Regular Skirt | 3.25 | 2 | Men's Suit 2Pc | 6.50 | 1 |
| April Drasco | 0.00 | 0 | 1.95 | 1 | Comforter | 18.95 | 1 | |||
| Christie Hanson | 1.15 | 1 | 1.85 | 4 | ||||||
| Amie Perlman | 0.00 | 0 | 0.00 | 0 | Silk Shirt | 2.55 | 3 | |||
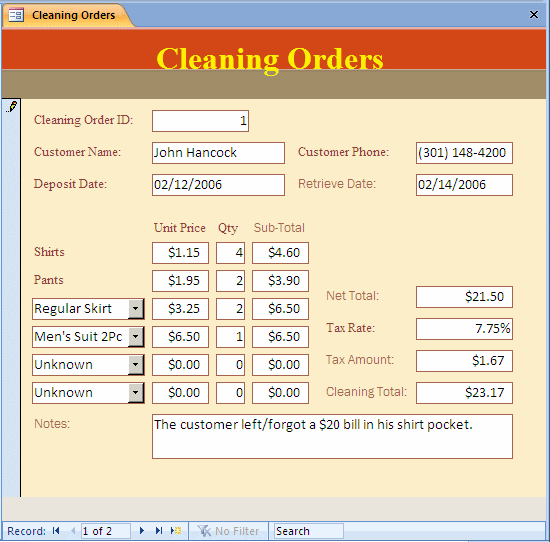
Field Emptiness
The conversion functions we reviewed are effective if they are supplied a value to convert. In some expressions, you will provide a data field as argument to use by a function. Even if you decide to convert a field to the appropriate value, you may need to first check whether the field is empty. This can be taken care of by the IsEmpty() function. Its syntax is:
IsEmpty(Value) As Boolean
This function checks its argument, which could be a field or an expression. If it is a field and the field is empty, this function returns True. If the field is not empty, the IsEmpty() function returns False.
Nullity Checking
Another problem you may encounter when involving a field in an operation is whether the field has never contained a value. This operation is sometimes confused with that of checking whether a field is empty. Here is the difference (it is important to understand this because it is used in many other environments, including Microsoft Visual Basic and Microsoft SQL Server):
To check whether a field (or a value) is null, you can call the IsNull() function. Its syntax is:
IsNull(Value)
Also used on fields, the IsNull() function checks the state of a field (remember, this functions does not check whether a field is empty or not; it checks whether the field has ever contained a value). If the field it null, this function returns True. If the field is not null, this function returns False.
![]() Practical
Learning: Checking the Nullity of a Field
Practical
Learning: Checking the Nullity of a Field
Numerical Checking
When the word "operation" is stated, most people think of a numeric value, an operator, and another numeric value. Such values must be valid in order for the operation to succeed. It certainly would not make sense to multiply a Date Hired by an Hourly Salary. Therefore, before involving a value or field to an operation, you should check that it contains a valid number. To perform this checking, Microsoft Access provides the IsNumeric() function. Its syntax is:
IsNumeric(Value)
The IsNumeric() function returns True if its argument is a valid number. Otherwise, it returns False.
The Equality =
The equality operator is used to compare two values for similarity. The formula to use is:
Value1 = Value2
If Value1 and Value2 hold the same value, then the comparison produces a True result. If they hold different values, the comparison renders a False value
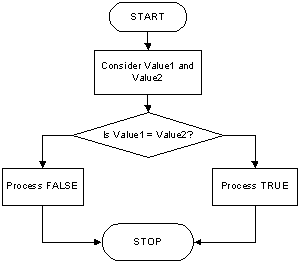
An example of a comparison would be:
txtLength = txtWidth
In this case, the database engine would compare the value of a control named txtLength to the value of a control named txtWidth. If both controls hold the same value, the comparison would produce a True result. If the controls hold different values, the comparison would produce a False result.
To negate the equality comparison, you can use the NOT operator followed by paretheses. In the parentheses, type the equality expression. Here is an example:
NOT(txtLength = txtWidth)
This time, the database engine would compare the values of two controls named txtLength and txtWidth respectively. If both controls hold the same value, the comparison would produce a False result. If the controls hold different values, the comparison would produce a True result.
Inequality <>
To find out if two fields hold different values, you can use the inequality operator which is represented by <>. Its formula is:
Value1 <> Value2
This comparison is performed between Value1 and Value2. If they hold different values, then the comparison produces a True value. If they hold the same value, the comparison produces False:
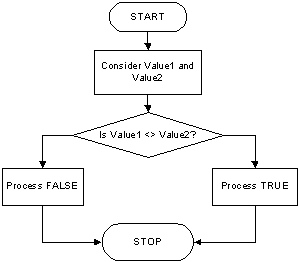
This shows you that the equality (=) and the inequality (<>) operators are opposite each other. Here is an example:
txtLength <> txtWidth
When the database engine performs this comparison, it checks the values held by both controls.
To negate this comparison, you can use the NOT operator and the comparison would be performed as if it were the equality comparison. Here is an example:
NOT(txtLength <> txtWidth)
When performing this comparison, if the controls hold the same value, the comparison would produce a True result. If they hold different values, the comparison would produce a False result.
Less Than <
To find out if one value is lower than another, you can use the < operator. Its formula is:
Value1 < Value2
If Value1 holds a value that is lower than that of Value2, the comparison produces True. If Value1 holds a value that is greater than or similar to that of Value2, the comparison produces false:
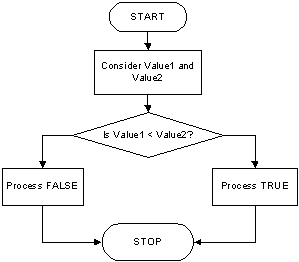
To negate this comparison, you can precede it with the NOT operator.
Less Than Or Equal <=
When comparing two values, you may want to know whether two fields hold the same value or if one is lower than the other. This comparison can be performed with the "Less Than Or Equal To" operator. It is represented by <=. Its formula is:
Value1 <= Value2
If both operands (Value1 and Value2) hold the same value, then the comparison produces a True result. If Value1 holds a value that is lower than that of Value2, the comparison still produces a True result. By contrast, if the value of Value1 is higher than that of Value2, the comparison renders a False result:
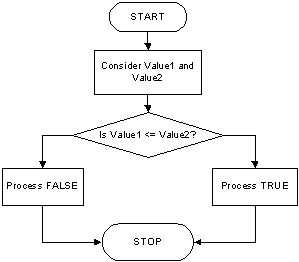
Note that the > and the <= operators are opposite each other.
To negate this comparison, you can precede it with the NOT operator.
Greater Than >
The > operator is used to find out whether one value is "Greater Than" another. The formula to use is:
Value1 > Value2
The operation is performed on the values of Value1 and Value2. If Value1 holds a value greater than that of Value2, then the comparison produces True. Otherwise, the comparison produces False. That is, if the value of Value2 is greater than or equal to that of Value1, then the comparison produces False:
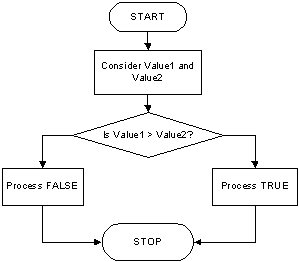
To negate this comparison, you can use the NOT operator. The comparison would be the same as if you were using the <= operator on two values.
Greater Than Or Equal >=
If you have two values and want to find out whether they hold similar values or the first is greater than the second, you can use the >= operator whose syntax is:
Value1 >= Value2
If both Value1 and Value2 hold the same value, then the comparison produces a True result. Similarly, if the left operand, Value1, holds a value greater than that of the right operand, Value2, the comparison still produces True. If the value of Value1 is less than the value of Value2, the comparison produces a False result:
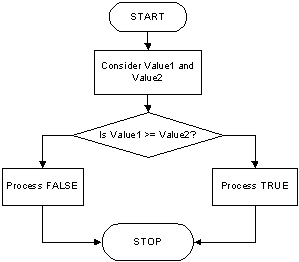
Therefore, < and >= are opposite. This also means that, if you negate a >= comparison, you would get the same result as if you were performing the comparison using the < operator.
|
Lesson Summary |
MCAS: Using Microsoft Office Access 2007 Topics
| C4 | Create fields and modify field properties |
Exercises
Yugo National Bank

| Account Number | Date Created | Account Number | Date Created | |
| 28-3782-80 | 02/04/2008 | 92-3782-42 | 02/04/2008 | |
| 38-4227-59 | 02/04/2008 | 68-6434-15 | 02/04/2008 | |
| 83-4654-73 | 02/04/2008 | 47-4783-29 | 02/05/2008 | |
| 82-3763-62 | 02/05/2008 | 72-3474-26 | 02/05/2008 | |
| 34-5458-04 | 02/05/2008 | 29-4586-46 | 02/05/2008 | |
| 68-3465-84 | 02/05/2008 | 40-4658-63 | 02/05/2008 | |
| 56-8468-25 | 02/05/2008 | 94-7785-03 | 02/08/2008 | |
| 37-5764-28 | 02/08/2008 | 34-9754-57 | 02/08/2008 | |
| 72-9375-44 | 02/08/2008 | 37-5490-26 | 02/08/2008 | |
| 20-3454-49 | 02/08/2008 | 76-5475-24 | 02/08/2008 | |
| 27-3457-84 | 02/08/2008 |
Close the form
Watts A loan

US Senate
|
|
||
| Previous | Copyright © 2008-2019, FunctionX, Inc. | Next |
|
|
||