
Operations on Data Analysis
 |
Operations on Data Analysis |
Introduction |
|||
The techniques we used in the last three lessons to analyze data consisted of identifying a value in a particular field and using that value as a basis for filtering.
|
Microsoft Access provides another technique that allows you to select a value from a column and use that value to isolate one or more records. As an introduction, in the last two lessons, we learned to select a value by a category, such as empty, string-based, number-based, date/time-based, or Boolean based fields. Another technique consists of selecting a value in a column and viewing only the records that use that value. In reality, this is just another technique of filtering by selecting a value, except that in the last two lessons, we learned to identify the values by their types. Microsoft Access provides various alternatives to this. |
|
|
Filtering By Value
In a typical table, each column would have one or more values. As mentioned in our introduction to sorting, a column may have the same value(s) occurring over and over again while another column may have a different value for each record. When filtering data, you can ask Microsoft Access to include only a certain value or only some of the values of the list. One way you can do this:
In both cases, a window would display, containing the values of the column on which the action was performed. Each value has a check box:
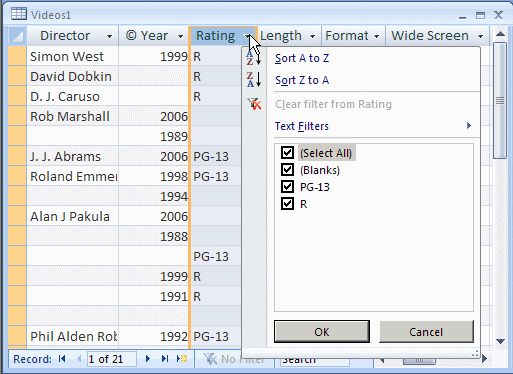
In the window that comes up, besides the values of the column, there are the (Select All) and the (Blank) items (the values of the columns in the checked list box are arranged in alphabetical order). To dismiss the window, you can press Esc or click Cancel.
When the window comes up, to select only the one value whose record(s) must be displayed, clear the check boxes of the other items and leave the check box on that one only:
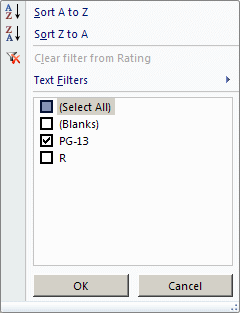
Then click OK. This would display only the records that share the value that had the check box:

In the same way, you can show only empty fields by selecting the (Blanks) option.
To remove the filter, we saw in Lesson
22, that you could click the Toggle Filter button ![]() on the Ribbon or the Filtered button
on the Ribbon or the Filtered button ![]() on the table, the query, or the form. As an alternative, you can display the
window again, click the (Select All) option and click OK.
on the table, the query, or the form. As an alternative, you can display the
window again, click the (Select All) option and click OK.
![]() Practical
Learning: Filtering for a Value
Practical
Learning: Filtering for a Value
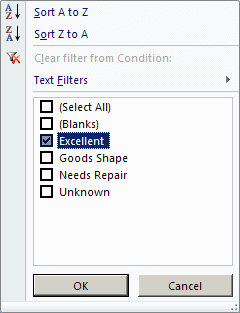
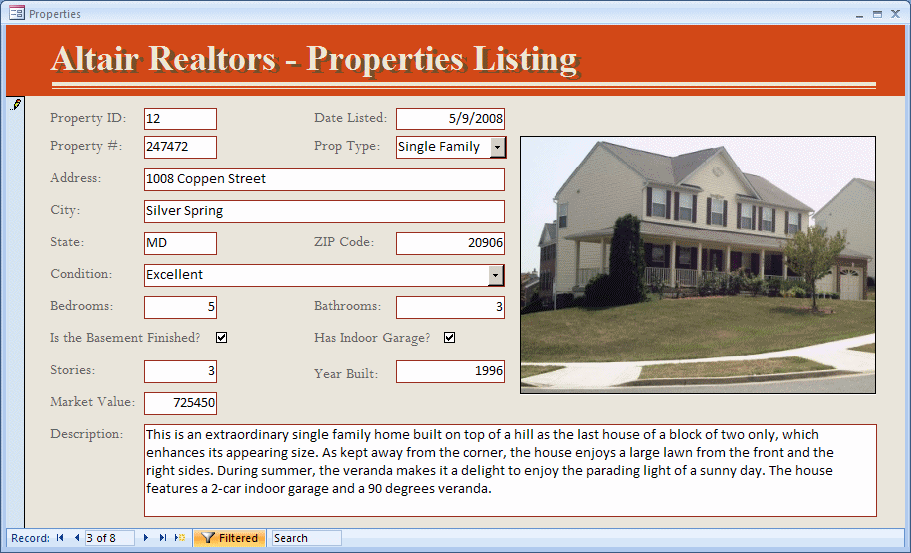
|
Filtering By Form |
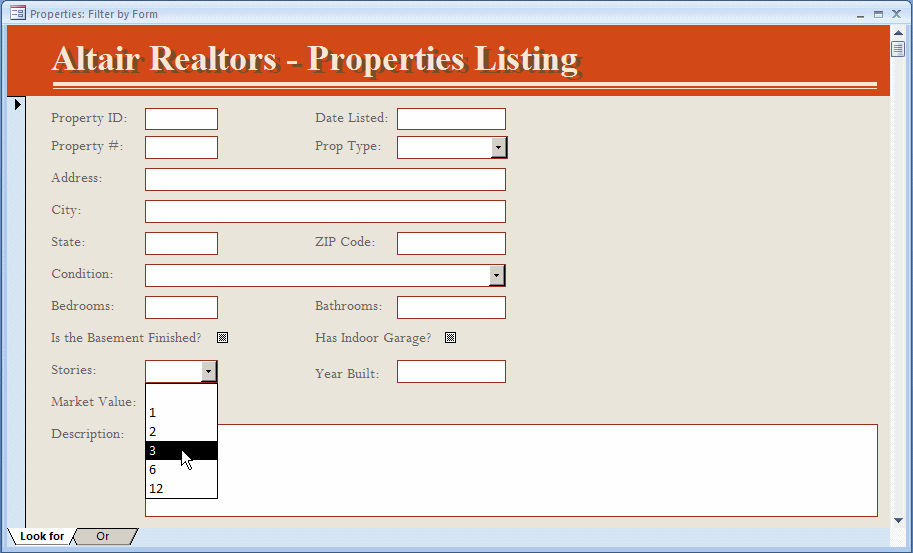
Besides the techniques we saw in Lessons 22 and 23, as an alternative to filtering by value, you can filter by form. To do this, open the table or query in Datasheet View or, or a form in Form View. Then, in the Sort & Filter section of the Ribbon, click Advanced and click Filter By Form. The table, query or form would become empty and all records would get hidden:

To select a value, click the cell under its column header. A combo box would come up. Click the arrow of that combo box to display its values. The list would contain an empty item as the first, followed by the values of the column that was selected:

If you want to show the records that are empty on that column, select the blank first item. Otherwise, select the desired value from the list.
The combo box in a column displays an editable text box. Instead of selecting a value from the list, you can type a Boolean expression. Here is an example:

After making a selection or typing the expression, to apply the filter:
This action would cause the table, query, or form to display the result.
To save the results of data analysis on a table or query, display the Filter By Form format again. Then, right-click the table or query and click Save As Query. You will be prompted for a name.
After filtering, the value (criterion) is stored in memory
and you can filter again as many times as you want by clicking the Apply
Filter/Sort button on the Ribbon. Otherwise, you can remove the filtering by
clicking the Toggle Filter button ![]() on the Ribbon.
on the Ribbon.
|
|
|
Filtering Using a Grid |
To further assist you with sorting and filtering, Microsoft Access is equipped with a grid that resembles a query. Before using it, display the table or query in Datasheet View, or display the form in Form View. Then, in the Sort & Filter section of the Ribbon, click Advanced -> Advanced Filter/Sort... A window with a top and a bottom sections would appear:
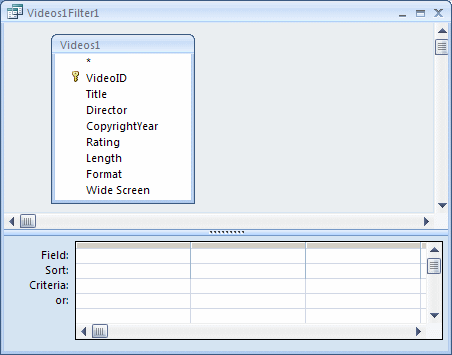
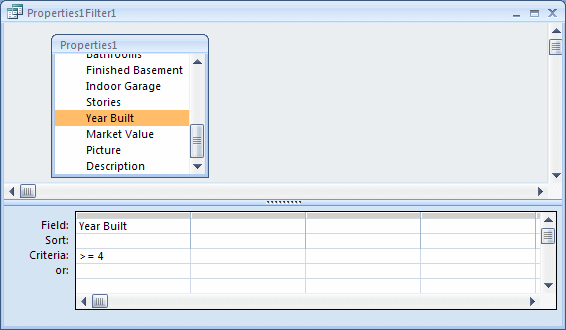
To use it, select a column as we learned in Lesson 21. After selecting a column, in the bottom section of the window, in the Criteria box corresponding to the column, type a Boolean expression. Here is an example:
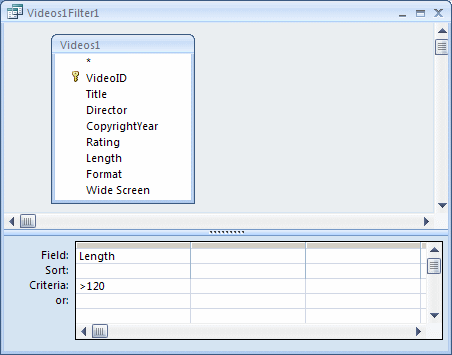
To apply the filter:
To perform another query, you can return to the grid and change your criterion.
After filtering data with a grid, if you want to save the result, right-click the window and click Save As Query. A dialog box would request a name from you.
To remove the previous criterion, right-click the window and click Clear Grid. After using the grid, you can close it and keep the table, query, or form open.
![]() Practical
Learning: Filtering Using a Grid
Practical
Learning: Filtering Using a Grid
|
Using Operators on Queries |
Introduction
To perform data analysis beyond what we learned so far in terms of the techniques of sorting, data selection, and exclusion, you can use operators. These operators are part of SQL. If you analyze data visually using the techniques we saw in the last two lessons, Microsoft Access applies the operators behind the scenes and you would not be aware of them. In the next few sections and lessons, we will learn how to use some of these operators. The operators can be used on a table, a query, or a form. The operators can also be applied to a SQL statement used as the Record Source of a form or report. The operators can also be included in a SQL expression used as the Control Source or the Row Source of a control on a form or report. You can use an operator to only perform data analysis or to create a query to be saved:
When writing the expression, there are a few rules you should observe:
Of course, there are situations in which these rules can or must be applied differently. When in case, you will be appropriately directly. Remember that nothing is case sensitive.
Using an Alias Name for a Column
If you create a query and display its result, by default, each column displays its caption as the name of the column. If you want, you can display a different caption for any column of your choice. To do this, display the query in Design View. Then, in the Field box that corresponds to the column, on the left side of the column name, type the caption of your choice, followed by :, and followed by the name of the column. Here is an example:

You can use the same technique to create aliases for other columns as you want. Here are examples:

When you execute the query, a column that received an alias would display it as its caption:
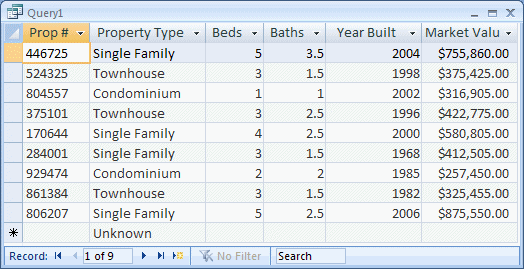
In SQL, an alias is created using the AS keyword as in the following formula:
ColumnName AS Alias
The ColumnName factor is the name of the column in the table (or query). The AS keyword is required. The Alias factor is the caption you want the column to display. Here are examples from the above query:
SELECT Properties.[Property #] AS [Prop #],
       Properties.[Property Type],
       Properties.Bedrooms AS Beds,
       Properties.Bathrooms AS Baths,
       Properties.[Year Built],
       Properties.[Market Value]
FROM Properties;
Concatenating the Strings
One of the results you may want to get from data analysis or a query consists of combining two or more columns to display them together as one. For example, when creating a table that would hold information about people, you may decide to keep the first and last names separate, but during data analysis or when creating a query, you may want to combine the first and last names to get a full name.
To concatenate two column names, you can use the + operator. To concatenate more than two strings, enter their names separated by + operators. An example would be: FirstName + " " + LastName. To do this for a query, open it in Design View. In a Field box, enter the concatenating expression. Here is an example:

To create a more complex expression, you can use one or more of the functions we reviewed in Lesson 17 such as the Immediate If function. Instead of just the columns in the query, you can also include normal strings in the operation. Here is an example:
Sex: IIf([Gender]="Male","M","F")
This expression says, "If the the value of the Gender field is Male, display M, otherwise display F". If this expression is entered in the Field box of a query, when the query is run, a column named Sex would display and its values would result from the expression.
Using Arithmetic Operators
An arithmetic operator can be used to create an expression that results in a calculation. For example, you can multiply hourly salaries by the time the employees worked in a day to produce their dai salaries:
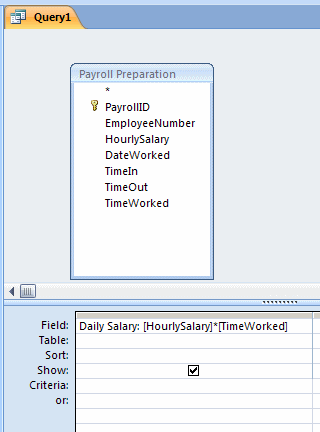
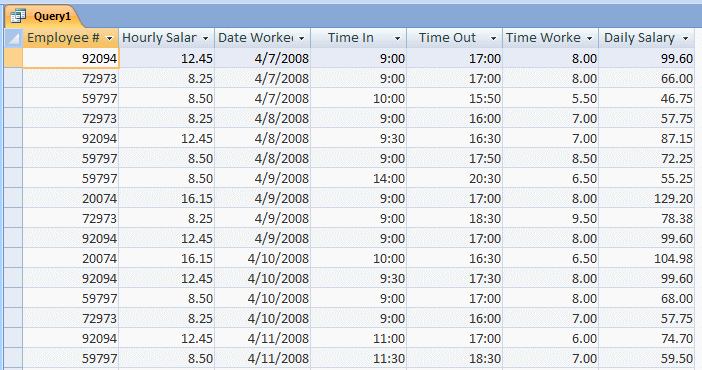
You can also use a MOD operator to find out if the value of a column is divisible by a certain number. You can also combine a function and an arithmetic operation to create a good expression.
Negating an Expression
In previous lessons we saw how to select a value to apply to a filter. In this and the next few lessons, we will learn many other operations that evaluate to true or false. The SQL provides an operator that can be used to change the Boolean result of an operation from true to false or from false to true. This operator is called NOT and comes in two flavors. To use it, in most cases, you can precede the expression with NOT or <>.
Imagine you perform filtering by form on a table that includes a column that lists a value as PG-13:


To negate such a filter, you can precede the string with NOT:


The result would include all records that do not include the value that was set on the right side of NOT. Remember that you can also use <> instead of NOT. Here is an example:

|
WHERE Is What |
Introduction
In our introduction to filtering in the previous lesson, we saw how to select a particular value from a column and get a list of only the records that include that value for that column. We also saw that, using Filter By Form, we could select a value from a combo box under a column header, apply that filter, and get the records that include that value. All these techniques actually allowed us to apply SQL visually. The SQL supports this filtering through an operator named WHERE.
Using WHERE
In SQL, the WHERE operator is used to specify what value, from a column, to apply to a filter. The formula to follow is:
SELECT What FROM WhatObject
WHERE Condition;
From what we learned in Lesson 21, the new operator in this formula is WHERE and it is required. The Condition is formulated as a logical comparison in the form:
FieldName Operator Value
The FieldName is the name of the field on which to apply the filtering. The Operator factor is a Boolean operator. Depending on the operator and your intentions, the Value can be one of the values in the FieldName or it can be a value not necessarily in the field.
There are various ways you can visually use the WHERE operator:
Besides using WHERE in data analysis, we have already seen that if you want to save the results of data analysis, you should store them in a query. We also saw that you could create a SQL expression and use it as the Record Source of a form or a report. Therefore, after opening a query in Design View or the Query Builder for a form or report, select the desired column(s). In the bottom section, click the Criteria box of the column that holds the values and type the desired value.
![]() Practical
Learning: Using WHERE
Practical
Learning: Using WHERE

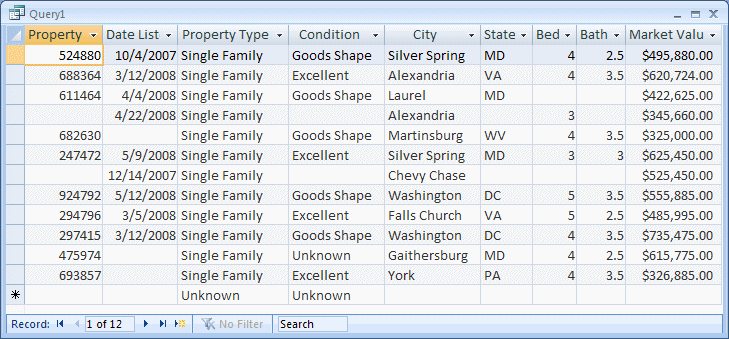
SELECT Properties.[Property #], Properties.[Date Listed], Properties.[Property Type], Properties.Condition, Properties.City, Properties.State, Properties.Bedrooms, Properties.Bathrooms, Properties.[Market Value] FROM Properties WHERE (((Properties.[Property Type])="Single Family")); |
|
Hiding a Conditional Column |
When creating a query that creates a list of records based on a particular value, the presence of the column that holds that value may become redundant. For example, if you create a list of real estate properties that includes only single family homes, and if it is evident to the user that the list includes only those properties, there is no point to still include that column in the view. This means that the column that holds the WHERE condition can be left out of the expression displaying it. This technique also applies to the other SQL operators we will study in this and the next lessons.
To visually remove the column that holds a condition, in the Design View of the query, you can clear its Show check box.
![]() Practical
Learning: Hiding a Conditional Column
Practical
Learning: Hiding a Conditional Column
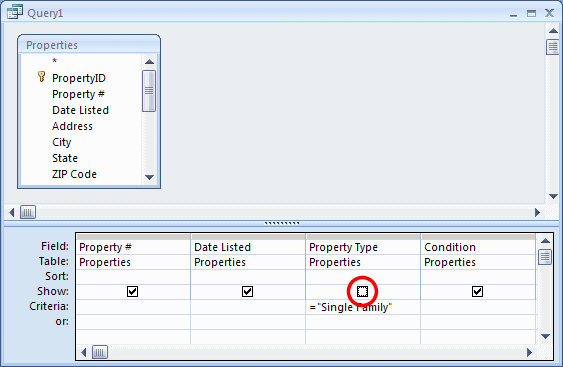
SELECT Properties.[Property #], Properties.[Date Listed], Properties.Condition, Properties.City, Properties.State, Properties.Bedrooms, Properties.Bathrooms, Properties.[Market Value] FROM Properties WHERE (((Properties.[Property Type])="Single Family")); |
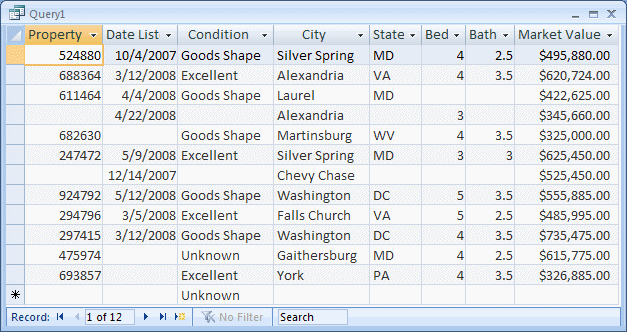
BETWEEN This AND That Value
In the previous two lessons, we saw that you could filter by a value between two other values, in a range. The SQL supports this technique through an operator named BETWEEN. The BETWEEN operator is combined with the AND operator to get a list of records between two values. Its formula is:
WHERE FieldName BETWEEN Value1 AND Value2
The WHERE, BETWEEN, and AND operators are required. The FieldName must be one of the fields on the table. The first value represents the lowest (or highest) value in the range while the second value represents the highest (or lowest) value of the range.
To visually filter BETWEEN:
If you want to save the list, start a query and display it in Design View. Select the column(s) you want to use. In the Criteria box that corresponds to that column, enter the the BETWEEN Value1 AND Value2 expression. Then save the query.
![]() Practical
Learning: Filtering BETWEEN
Practical
Learning: Filtering BETWEEN
|
IN What Range? |
Introduction
When studying filtering by value, we saw that you could display a list of the values of a certain column, clear the check boxes of the values you do not want, keep the check boxes on the values you want, and apply the criteria. That was a technique of working on a range of values. To support this, the SQL allows you to create a list of values from a column and get only the records that include one of those values. This is done using the IN operator. After the SELECT expression of the statement, the formula to use IN is:
IN(Value1, Value2, Value_n)
The IN operator is followed by parentheses. Inside the parentheses, type each of the desired values from the column on which to apply the filter, separated by commas.
Using IN
To create an IN operation:

If you want to save the list, start a query and display it in Design View. Select the column(s) you want to use. In the Criteria box that corresponds to that column, enter the IN expression.
![]() Practical
Learning: Using IN
Practical
Learning: Using IN


|
LIKE What? |
Introduction
In Lesson 22, we saw that when a column uses strings, sometimes you may know an approximation of a string you are looking for, or you may want to filter based on a range of characters. For example, you may not remember the exact first name of a student you are looking for but you think the name ends with "ette", like Jeannette, Bernadette, Pierrette, or Paulette. In another case, you may know only the character by which a name starts, or you may know a substring in the name you are looking for. The SQL supports these types of filtering using an operator named LIKE.
Using LIKE
The LIKE operator uses some special characters or symbols called wildcards. To start:
If you want to save the result, start a query in Design View, select the column(s) you want to use. Then, in the Criteria box that corresponds to that column, type the LIKE expression.
To use a LIKE operation in SQL, after the SELECT expression, type LIKE followed by the intended expression. When you apply the filter, all records that abide by the expression would be in the result.
LIKE an Exact String
The simplest way to use LIKE is to apply a string to it, the same way you would use a filter by selection. For example, if you have a list of people and one of them is named "Moore" or some of them are named "Moore" and you want to find the record(s) with that name, you would use LIKE "Moore".
LIKE a Date/Time Value
If the value you want to find is a date, include it between two # signs as in LIKE #8/8/1993#.
LIKE Multiple Characters
The most regular use of the LIKE is with strings. To get a list of strings that include any characters as a substring in a string, use the * symbol. For example, if you do not know how the string starts but you know how it ends, type LIKE "*". On the right side of *, type the substring that the string should end with. Here is an example:
 |
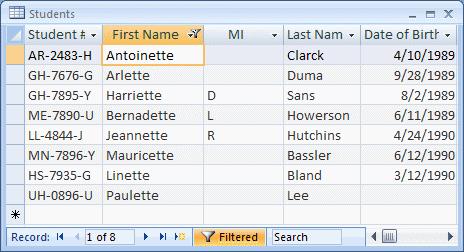 |
If you know how the string starts but do not know how it ends, precede the substring with *. An example would be LIKE "jean*". This would produce records that have a string that starts with jean regardless of how it ends. Examples would be Jean, Jeannette, Jeanot.
If you do not know how the string starts or how it ends but know one or more characters that it includes, surround the substring with * symbols. Here is an example:
 |
 |
|
LIKE a Range of Characters |
You may want to use a range of characters to filter by. For example, imagine you want to find the strings that start with characters in the range from d to g. To specify the range, use [] as a placeholder for the range. Inside the square brackets, type the first character of the desired range, followed by -, and followed by the last character of the desired range. Outside the [] placeholder, use the * character to specify that the rest would precede, would follow, or both. For example, to specify that you want the strings that start with any character from o to r followed by anything, you would use LIKE "[o-r]*":

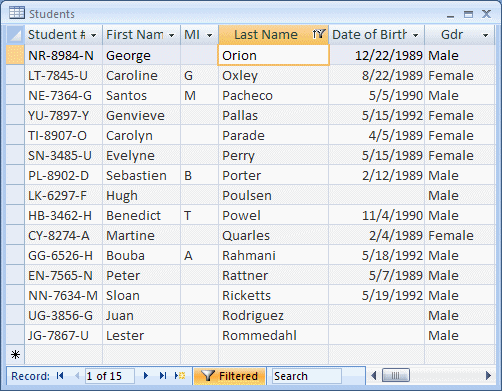
In the same way, as stated already, you can use the * to the left, to the right or both. Also, you can combine the [] placeholder with the other wildcards.
|
NOT LIKE Excluding a Range of Characters |
Instead of using a range of characters, you may want to exclude the characters of a specific range. To negate the filter of a range of characters, you can precede the LIKE operation with the NOT operator. An example would be NOT LIKE "[c-w]*":

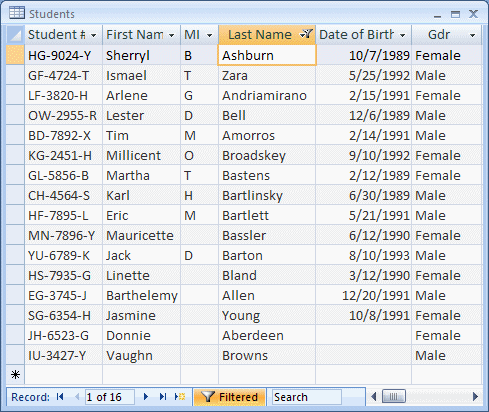
As an alternative, you can start the inside of the [] placeholder with !. An example would be LIKE "[!o-r]*". This would result in all records that do not start with o, p, or r.
|
LIKE a Specific Character |
Instead of finding a range of characters, you may want to use specific characters. To do this, use the [] as the placeholder. Inside the square brackets, enter the characters separated by commas. An example would be LIKE "[a, h, o, y]*":

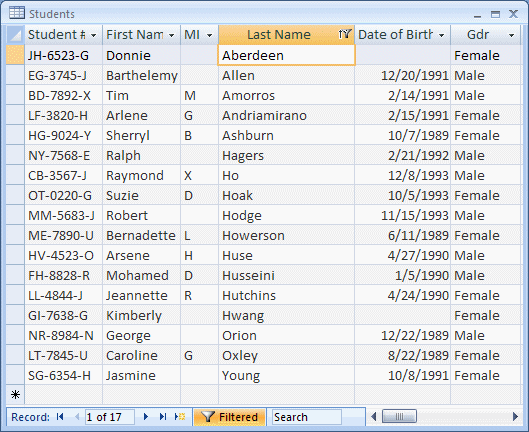
To negate the filter, you can precede the LIKE operation with the NOT operator. An example would be NOT LIKE "[a, h, o, y]*". As an alternative, inside the [] placeholder, start with the ! symbol. An example would be LIKE "[!a, h, o, y]*". In both cases, the list would include records that do not start with a, h, o, or y.
LIKE a Single Character
The * character on a LIKE operation is used to find many characters. If you want to find only one character, use the ? wildcard. For example, if you do not know by what character a string starts but know one or more characters after it, you can use ? followed by a substring. An example would be LIKE "?ane". This would produce such strings as Pane, Bane, or Sane.
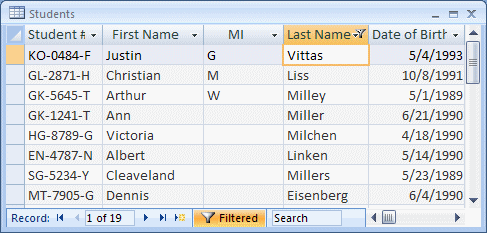
If you do not know by what character a string starts, know the second character, but do not remember the rest of the characters, you can combine the ? and the * symbols. An example would be LIKE "?i*":

|
Lesson Summary |
MCAS: Using Microsoft Office Access 2007 Topics
| P2 | Filter data |
Exercises
Yugo National Bank


Watts A Loan
 |
 |
 |
 |
World Statistics
US Senate
|
|
||
| Previous | Copyright © 2008-2016, FunctionX, Inc. | Next |
|
|
||