
Introduction to Data Relationships
 |
Introduction to Data Relationships |
The Keys to a Relationship
Introduction to Relationships
Imagine you have been asked to create a database for a hotel. The manager gives you many pieces of paper that are currently used to handle the business. One of the papers has the names of customers, the times they staid in the hotel, the rates paid for the rented rooms, etc. As you examine the list, you see various names of customers. One of the names on one line is Gwendolyn Sims.
On another line, you see a name as Gwen Simms. You ask the manager whether it is the same or another customer. The manager says it is the same customer. On another piece of paper, you see the name Gwenn Simm. After asking, the manager confirms once again that it is the same customer, just typed differently. A computer database helps to solve this type of problem so that information can be typed once, in one list. Then, the information in that list can be made available to other lists that can use it by selecting it, instead of re-typing it.
So far in our databases, we created a table with the necessary columns. To perform data entry, we were typing the necessary value in each field. If we needed another table, we would just create one.
This made it possible for a database to have as many tables as we wanted, except that these lists did not communicate. There was a risk of error if we tried to enter the same information in various lists.
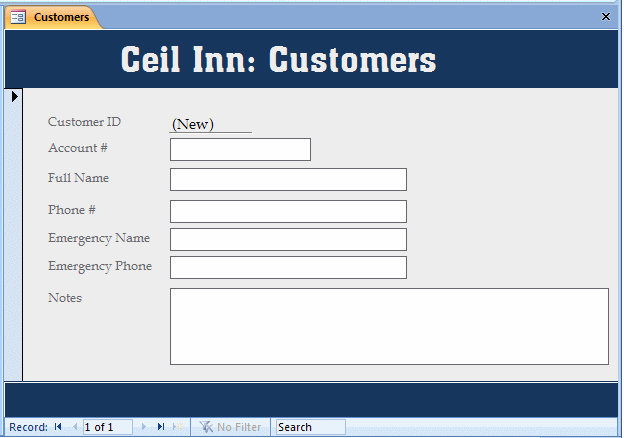
One of the rules a database developer should follow is to avoid duplicate entry of data. That is, the same piece of information should not be entered in two different lists. For example, when a potential customer wants to rent a room at the hotel, you can create an account that the clerk can use to enter the customer's information in one table. This information can consist of the name, the phone number, the emergency contact (name and phone number), etc:

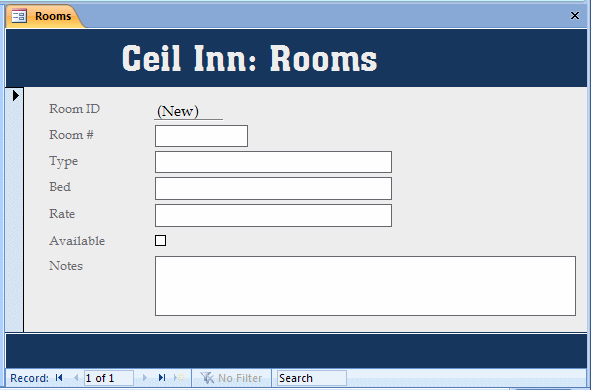
In the same way, you would need a list of the rooms available for renting to customers. Each room would hold some information such as the type of room (regular bedroom, studio, or conference room, etc), the type of bed (queen, double, or king), the rate, and the availability. We cannot put the room information in the customer's information because the room does not belong to the customer and, even if a particular customer A is renting a room 104 today, that room would be rented to another customer next time. If we put the room information in a customer's information, when another customer comes, we would have to re-enter the same room information into the other customer's record. This is not professional and is prone to error. Therefore, the customer and room's information should be kept separate.
After creating the customer information and the rooms lists, to rent a room, we can select the customer and associate him or her to a room:

One of the problems we need to solve is to keep track of the customer's room occupancy: what night the customer stays in the allocated room and how much is charged for the room for one night or for each night the customer uses it. The manager might also have indicated that the hotel offers wireless Internet access but the customer has to pay a one-time fee for it if he or she wants it. The customers are also allowed to use the phone in their room but they must pay for each phone call placed outside the hotel. Therefore, simply assigning the room to a customer does not take care of tracking the regular charges and expenses. To solve this problem, we can create another list in which we would enter some information for the customer (such as his or her name or an account number) and some room information (such as the room number):

This is the idea behind a relational database. A relational database is an application that contains two or more tables so that information in one table is made available to another table or other tables that need(s) it. The information is entered once in one particular table. If the same information is needed in another table, it is simply identified one way or another. This reduces, and can eliminate, the likelihood of mistakes that result from duplicate data.
A Primary Key
As its name implies, to create a relational database, you must have a way for tables to communicate or relate to each other. To start, for a table to make its information available to the other lists, the table must have a way to be identified. This is done by creating a field used to refer to that table. This field is called a primary key. The primary key can be one field or it can be represented by many fields.
To make a field primary key, display its table in the Design View. You have two options:
The field that is made the primary key would then appear with a key icon to its left.
To create a primary key of more than one field, display the table in Design View and select, as a group, the fields that would constitute the primary key. Then:
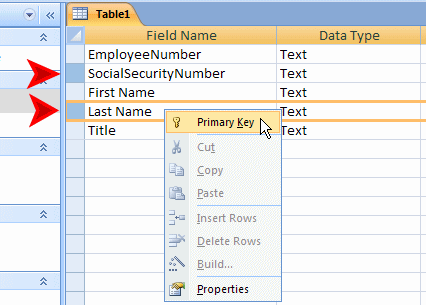
The fields would then appear each with a key icon to its left:

One of the rules that the primary key must follow is that it must be able to uniquely identify each record in the table. If you make a field a primary key, you can instruct the person performing data entry to make sure no two records have the same value for that field. Sometimes this can be easy to implement. For example in a small company of 2 to 20 people, it is usually easy to make sure that each employee is assigned a unique number. In a database with many records such as a department store that gives credit cards to its customer, it can be difficult to give a unique account number to each customer. In fact in this case, the clerk performing data entry might not have the appropriate number for a customer when creating his or her account. Fortunately, Microsoft Access (like most database environments) provides a quick fix to this.
To automatically have a unique identifier associated with each new record created on a table, you can create a field whose data type is AutoNumber. When a field receives this data type and when the clerk creates the first record, it receives the number 1. Every time a new record is created, the number is increased and assigned to the field. The number never repeats. If a record is deleted, the numbers are not reset: the deleted record is gone with its assigned unique number. This ensures that each record keeps a unique number.
The AutoNumber in Microsoft Access is not a real data type, just as, except for Text, none of the items in the Data Type combo box of the Design View of the table is a true data type. Their names are only made friendly to help you identify their types. AutoNumber is actually a long integer.
![]() Practical
Learning: Introducing Relationships
Practical
Learning: Introducing Relationships
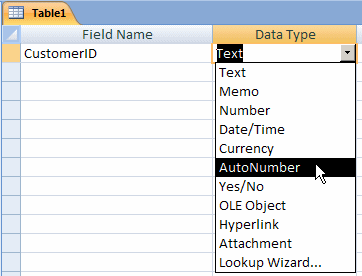
| Field Name | Data Type | Caption | Field Size | Indexed |
| CustomerID (Primary Key) |
AutoNumber | Customer ID | ||
| AccountNumber | Text | Account # | 20 | Yes (No Duplicate) |
| FullName | Text | Full Name | 80 | |
| PhoneNumber | Text | Phone # | 40 | |
| EmergencyName | Text | Emergency Name | 50 | |
| EmergencyPhone | Text | Emergency Phone | 40 | |
| Notes | Memo |

| Cust ID | Account # | Full Name | Phone # | Emergency Name | Emergency Phone |
| 1 | 294209 | Doris Wilson | 703-416-0934 | Gabriela Dawson | 703-931-1000 |
| 2 | 608502 | Caroline Lomey | 301-652-0700 | Albert Lomey | 301-412-5055 |
| 3 | 208405 | Peter Carney | 990-585-1886 | Spencer Miles | 990-750-8666 |
| 4 | 284085 | Lucy Chen | 425-979-7413 | Edward Lamb | 425-720-9247 |
| 5 | 629305 | Joan Davids | 202-789-0500 | Rebecca Boiron | 202-399-3600 |
| 6 | 180204 | Randy Whittaker | 703-631-1200 | Bryan Rattner | 703-506-9200 |
| 7 | 204795 | Juliette Beckins | 410-944-1440 | Bernard Brodsky | 410-385-2235 |
| 8 | 608208 | Alfred Owens | 804-798-3257 | Jane Owens | 240-631-1445 |
| 9 | 902840 | Daniel Peters | 624-802-1686 | Grace Peters | 877-490-9333 |
| 10 | 660820 | Anne Sandt | 953-172-9347 | William Sandt | 953-279-2475 |
| 11 | 946090 | Peter Carney | 990-585-1886 | Spencer Miles | 990-750-8666 |
| 12 | 100752 | Caroline Lomey | 301-652-0700 | Albert Lomey | 301-412-5055 |
| Field Name | Data Type | Caption | Field Size | Indexed |
| EmployeeID (Primary Key) |
AutoNumber | Employee ID | ||
| EmployeeNumber | Text | Employee # | 20 | Yes (No Duplicate) |
| FirstName | Text | First Name | 50 | |
| LastName | Text | Last Name | 50 | |
| Title | Text | 65 | ||
| Notes | Memo |


| Employee # | First Name | Last Name | Title |
| 22958 | Andrew | Laskin | General Manager |
| 70429 | Lynda | Fore | Shift Manager |
| 27049 | Harriett | Dovecot | Associate |
| 28405 | Peggy | Thompson | Associate |
| 24095 | Fred | Barclay | Associate |
| 72947 | Sheryl | Shegger | Intern |

| Field Name | Data Type | Caption | Field Size | Format | Indexed |
| RoomID (Primary Key) |
AutoNumber | Room ID | |||
| RoomNumber | Text | Room # | 20 | Yes (No Duplicate) | |
| Type | Text | 50 | |||
| Bed | Text | 50 | |||
| Rate | Number | Double | Fixed | ||
| Available | Yes/No | ||||
| Notes | Memo |

| Room # | Type | Bed | Rate | Available |
| 104 | Bedroom | Queen | 75.85 | Unchecked |
| 105 | Bedroom | King | 85.75 | Checked |
| 106 | Bedroom | Queen | 75.85 | Checked |
| 107 | Bedroom | King | 85.75 | Unchecked |
| 108 | Bedroom | Queen | 75.85 | Checked |
| 110 | Conference | 450.00 | Checked | |
| 112 | Studio | King | 98.95 | Checked |
| 202 | Studio | King | 98.95 | Unchecked |
| 203 | Studio | Queen | 94.50 | Checked |
| 204 | Bedroom | Double | 79.90 | Checked |
| 205 | Bedroom | Queen | 75.85 | Checked |
| 206 | Bedroom | King | 85.75 | Unchecked |
| Field Name | Data Type | Caption |
| OccupancyID (Primary Key) | AutoNumber | Occupancy ID |
| DateOccupied | Date/Time | Date Occupied |
A Foreign Key
We have seen how to create a primary key to prepare a table for a relationship. The primary key makes it possible for such a table to make its data available. It only signals this to the other table(s) of the (same) database. If one table wants to use the data stored in another table, the first table has to be prepared for it. The first table can be called the parent table. The other table can be called the child table.
To make it possible for the child table to access the data in the parent table, the child table must have a field that would communicate with the parent table. This field represents the parent table. To act as a liaison between both tables, the field in the child table communicates with the primary key of the parent table. In order to get this communication to work, the communicating key in the child table must use the same data type as the primary key of the parent table. Since the field in the new table is only used to represent the data from the first table, it is called a foreign key:

In the same way, any table that wants to use data from a certain table must have a foreign key that can communicate with the primary key of that parent table.
To make it easy to identify a foreign key in a table, it is a good idea, not a requirement, to give to the foreign key the same name as that of the primary key. The only real requirement is that both fields use the same data type. Remember that AutoNumber is not an actual data type. Therefore, if the primary key is of type AutoNumber, the foreign key should use the Long Integer as its data type after selecting the Number in the Data Type combo box of the Design View of the table.
|
Establishing a Relationship With a Lookup Field |
Using the Table Design View
There are various ways you can create and manage a relationship between two tables. Once you have a primary key in one table, to get a foreign key, you can ask Microsoft Access to create and even configure one for you. You can simply indicate where the data will come from, that is, you must indicate the table that holds the primary key, select the field that holds the actual data to use. Microsoft Access would take care of configuring everything, or almost everything, behind the scenes for you. For this approach, you use a lookup field, which can be a combo box or a list box.
As done with the simple lookup, you can create a field whose data would be selected from a list. As opposed to an unbound lookup field whose values you can predict at the time you are creating a database, a bound lookup field is one whose values are not known in advance. The values for such a field become available as the database is growing.
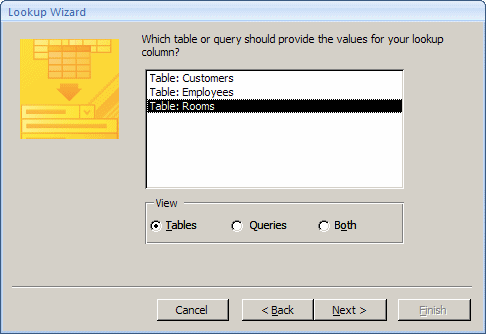
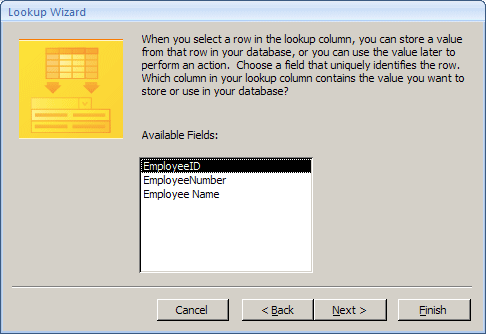
To create a bound lookup field, you can open the table in Design View, set the data type of the field to Lookup Wizard... This would open the Lookup Wizard. Since you are creating a field that would get its data from another table or query, you must select the first radio button and click Next. Then follow the wizard.
![]() Practical
Learning: Introducing Bound Lookup Fields
Practical
Learning: Introducing Bound Lookup Fields


Using the Table Datasheet View
You can also create a lookup combo box using the Datasheet View of a table. To do this:
Any of these actions would open the Lookup Wizard. Since you are creating a field that would get its data from another table or query, you must select the first radio button and click Next. Then follow the wizard.
![]() Practical
Learning: Configuring Lookup Fields
Practical
Learning: Configuring Lookup Fields

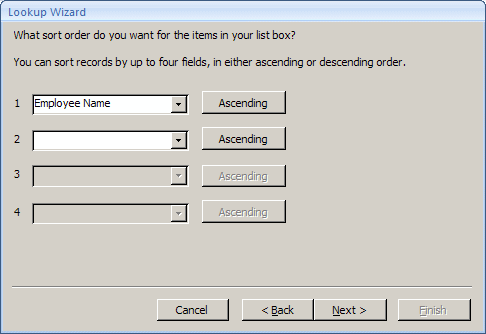
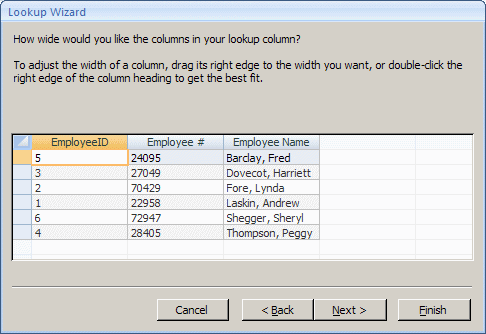
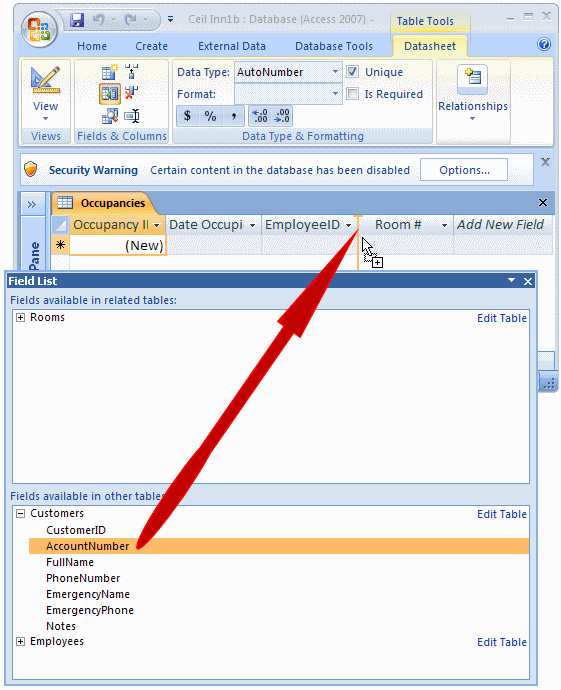
Using the Field List
Once you have created a foreign key on a child table, you
can use the Field List to add the desired column of a parent table to the child
table. To do this, open the child table in Datasheet View. On the Ribbon, click
Datasheet. In the Fields and Columns section, click the Add Existing Fields
button  .
The Field List would come up. To use the field, locate and expand its table. You
can then drag the desired field from the Field List to the table. The Lookup
Wizard would come up. You can then follow it as we saw previously.
![]() Practical Learning: Using the Field List
Practical Learning: Using the Field List


| Field Name | Data Type | Caption | Field Size | Format |
| OccupancyID (Primary Key) |
||||
| DateOccupied | ||||
| EmployeeID | Processed By | |||
| CustomerID | Processed For | |||
| RoomID | Room # | |||
| RateApplied | Number | Rate Applied | Double | Fixed |
| PhoneUse | Number | Phone Use | Double | Fixed |
| InternetFee | Number | Internet Fee | Double | Fixed |
| Notes | Memo |

The Characteristics of a Lookup Field
When creating a bound lookup field, if you select only one column in the third page of the Lookup Wizard, a combo box would be created so the user can select the desired value. If the value you selected represents some type of insignificant number or character, when the user clicks the arrow of the combo box, the list of values that appear can be confusing and could lead the user to select the wrong one. Consider the following example:

When the user clicks the arrow of the combo box to select a room, this list does not specify what type of room the number represents. Any number could be for a bedroom, a studio, or a conference room. Because these numbers are vague, the user could select the wrong number and for example assign a conference room to a person who wants to rent a simple bedroom. There are various ways you can solve this type of problem. If no records have already been created and that involve that field, you can recreate the lookup field and make it display more than one column of values.
If you are creating or recreating a lookup field and you want it to display more than one column, in the third page of the wizard, you can double-click each of the desired values from the Available Fields list box:

Then continue with the wizard. When you finish with the wizard, Microsoft Access would take care of configuring the column. Sometimes you will not like the way Microsoft Access did the job. You can then modify it to your liking.
If the records exist already, you can simply modify the configuration of the lookup field. You have many options.
The configurations of the lookup field can be found in the Lookup section of the bottom part of the table in Design View. To configure a lookup field, click it in the top section of the table and, in the bottom section, click the Lookup tab. Here is an example:
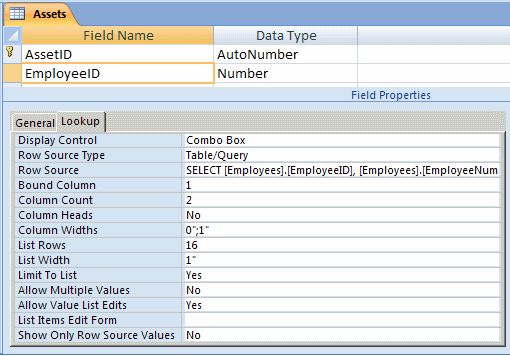
To change a property, click it in the left section and change the value in the right section:
![]() Practical
Learning: Configuring Lookup Fields
Practical
Learning: Configuring Lookup Fields
SELECT [Clerks].[EmployeeID], [Clerks].[EmployeeNumber], [Clerks].[Employee Name] FROM Clerks ORDER BY [Employee Name]; |

SELECT Rooms.RoomID, Rooms.RoomNumber, Rooms.Type, Rooms.Bed, Rooms.Rate, Rooms.Available FROM Rooms; |
SELECT Customers.CustomerID, Customers.AccountNumber AS [Account #], Customers.FullName AS [Customer Name] FROM Customers; |

| Date Occupied | Processed By | Customer | Room # | Rate Applied | Phone Use | Internet Fee |
| May 10, 2008 | 27049 | 294209 | 105 | 85.75 | 0.00 | 0.00 |
| May 11, 2008 | 28405 | 294209 | 105 | 85.75 | 5.35 | 0.00 |
| May 11, 2008 | 70429 | 608502 | 110 | 450.00 | 8.75 | 3.25 |
| May 12, 2008 | 70429 | 294209 | 105 | 85.75 | 0.00 | 0.00 |
| May 12, 2008 | 24095 | 208405 | 108 | 75.85 | 3.45 | 3.25 |
| May 13, 2008 | 28405 | 208405 | 108 | 75.85 | 2.65 | 0.00 |
| May 14, 2008 | 28405 | 208405 | 108 | 75.85 | 3.15 | 0.00 |
| May 15, 2008 | 27049 | 208405 | 108 | 75.85 | 1.95 | 0.00 |
| May 15, 2008 | 28405 | 284085 | 205 | 75.85 | 0.00 | 0.00 |
| May 16, 2008 | 24095 | 208405 | 108 | 75.85 | 5.50 | 0.00 |
| May 17, 2008 | 24095 | 629305 | 112 | 98.95 | 0.00 | 0.00 |
| May 18, 2008 | 70429 | 629305 | 112 | 98.85 | 0.00 | 0.00 |
| Room # | Type | Bed | Rate | Available |
| 104 | Bedroom | Queen | 79.95 | Unchecked |
| 105 | Bedroom | King | 94.50 | Checked |
| 106 | Bedroom | Queen | 79.95 | Unchecked |
| 107 | Bedroom | King | 94.50 | Checked |
| 108 | Bedroom | Queen | 79.95 | Checked |
| 110 | Conference | 500.00 | Unchecked | |
| 112 | Studio | King | 112.95 | Unchecked |
| 202 | Studio | King | 112.95 | Checked |
| 203 | Studio | Queen | 104.50 | Checked |
| 204 | Bedroom | Double | 115.95 | Checked |
| 205 | Bedroom | Queen | 79.95 | Unchecked |
| 206 | Bedroom | King | 94.50 | Checked |
| Date Occupied | Processed By | Customer | Room # | Rate Applied | Phone Use | Internet Fee |
| June 16, 2008 | 28405 | 180204 | 105 | 94.50 | 0.00 | 3.25 |
| June 16, 2008 | 72947 | 660820 | 204 | 115.95 | 0.00 | 0.00 |
| June 16, 2008 | 28405 | 608208 | 206 | 94.50 | 0.00 | 3.25 |
| June 16, 2008 | 72947 | 204795 | 204 | 0.00 | 0.00 | 0.00 |
| June 16, 2008 | 28405 | 902840 | 203 | 104.50 | 0.00 | 0.00 |
| June 17, 2008 | 24095 | 180204 | 105 | 94.50 | 0.00 | 0.00 |
| June 17, 2008 | 24095 | 660820 | 204 | 115.95 | 0.00 | 0.00 |
| June 17, 2008 | 24095 | 608208 | 206 | 94.50 | 0.00 | 0.00 |
| June 17, 2008 | 24095 | 204795 | 204 | 0.00 | 0.00 | 0.00 |
| June 17, 2008 | 72947 | 902840 | 203 | 104.50 | 0.00 | 0.00 |
|
Lesson Summary |
MCAS: Using Microsoft Office Access 2007 Topics
| S2 | Define and print table relationships |
| S3 | Add, set, change, or remove primary keys |
Exercises
Yugo National Bank
Watts A Loan
World Statistics
US Senate
| Field Name | Data Type | Field Size | Caption |
| StateID | AutoNumber | State ID | |
| StateAbbreviation | Text | 50 | State Abbreviation |
| StateName | Text | 50 | State Name |
| WebSite | Text | 100 | Web Site |
| Capital | Text | 50 | |
| Governor | Text | 50 |
| Field Name | Data Type | Field Size | Caption |
| PartyID | AutoNumber | Party ID | |
| PartyName | Text | 50 | Party Name |
| Field Name | Data Type | Field Size | Caption |
| SenatorID | AutoNumber | Senator ID | |
| SenatorName | Text | 50 | Senator Name |
| SeatingStatus | Text | 50 | Seating Status |
| Gender | Text | 30 | |
| StateID | Number | Long Integer | |
| Race | Text | 40 | |
| Religion | Text | 50 | |
| YearElected | Number | Integer | Year Elected |
| PartyID | Number | Long Integer | |
| DCAddress | Text | 255 | DC Address |
| DCOfficePhoneNumber | Text | 40 | Office Phone # |
| WebSite | Hyperlink | Web Site | |
| LocalAddress1 | Text | Local Address 1 | |
| LocalAddress2 | Text | Local Address 2 | |
| LocalAddress3 | Text | Local Address 3 | |
| LocalAddress4 | Text | Local Address 4 | |
| Pictures | Attachment | ||
| Biography | Memo |
|
|
||
| Previous | Copyright © 2008-2016, FunctionX, Inc. | Next |
|
|
||