
Details on Data Relationships
 |
Details on Data Relationships |
Diagramming a Relationship
Introduction
|
In the previous lesson, we saw how to establish a relationship between two tables. We also saw that the fields that relate both tables must be of the same data type. To make it possible to visually perform data entry on a table, we learned to create a lookup field. Indeed, this is based on Microsoft Access' high level of support for visual database development. |
|
In reality, the only important requirement is that the primary key and the foreign key be of the same data type. In most database scenarios and implementation, the primary key and the foreign key should integer based. As discussed in the previous lesson, the relationship is typically managed through the long integer data. With experience, you do not need to create a lookup field on a table. Besides, since you will usually not let your users use your tables, your primary concern for user interact is to create the combo boxes on forms. To start, you can create the tables and the primary keys as you judge them necessary. |
| Field Name | Data Type | Caption | Field Size | Format |
|
CategoryID (Primary Key) |
AutoNumber | Category ID | ||
| Category | Text | 50 | ||
| Daily | Number | Double | Fixed | |
| Weekly | Number | Double | Fixed | |
| Monthly | Number | Double | Fixed | |
| Weekend | Number | Double | Fixed |
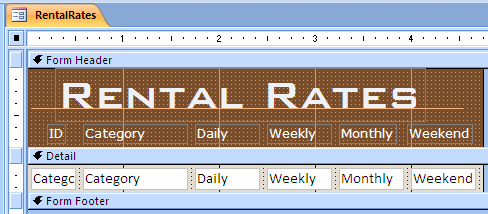
| Category | Daily | Weekly | Monthly | Weekend |
| Economy | 34.95 | 28.75 | 24.95 | 24.95 |
| Compact | 38.95 | 32.75 | 28.95 | 28.95 |
| Standard | 45.95 | 39.75 | 35.95 | 34.95 |
| Full Size | 50.00 | 45.00 | 42.55 | 38.95 |
| Mini Van | 55.00 | 50.00 | 44.95 | 42.95 |
| SUV | 56.95 | 52.95 | 44.95 | 42.95 |
| Truck | 62.95 | 52.75 | 46.95 | 44.95 |
| Van | 69.95 | 64.75 | 52.75 | 49.95 |
| Field Name | Data Type | Caption | Field Size |
|
CarID (Primary Key) |
AutoNumber | Car ID | |
| TagNumber | Text | Tag Number | 20 |
| Make | Text | 50 | |
| Model | Text | 50 | |
| CarYear | Number | Year | Integer |
| CategoryID | Number | Category | Long Integer |
| Doors | Number | Byte | |
| Picture | OLE Object | ||
| Condition | Text | 50 | |
| Available | Yes/No | ||
| Notes | Memo |
| Field Name | Data Type | Caption | Field Size |
|
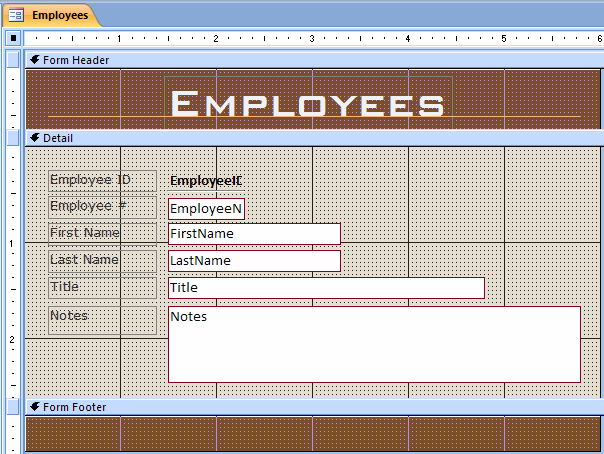
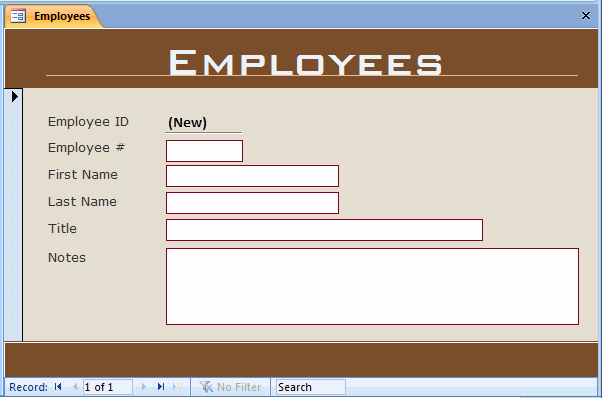
EmployeeID (Primary Key) |
AutoNumber | Employee ID | |
| EmployeeNumber | Text | Employee # | 20 |
| FirstName | Text | First Name | 50 |
| LastName | Text | Last Name | 50 |
| Title | Text | 100 | |
| Notes | Memo |
 |
 |
| Field Name | Data Type | Caption | Field Size |
|
CustomerID (Primary Key) |
AutoNumber | Cutomer ID | |
| DrvLicNumber | Text | Driver's License # | 50 |
| FullName | Text | Full Name | 100 |
| Address | Text | 100 | |
| City | Text | 50 | |
| State | Text | 100 | |
| ZIPCode | Text | ZIP Code | 20 |
| Notes | Memo |
 |
 |
| Field Name | Data Type | Caption | Field Size | Other Properties |
|
RentalOrderID (Primary Key) |
AutoNumber | Rental Order ID | ||
| EmployeeID | Number | Processed By | Long Integer | |
| CustomerID | Number | Processed For | Long Integer | |
| CarID | Number | Car | Long Integer | |
| CarCondition | Text | Car Condition | 50 | |
| TankLevel | Text | Tank Level | 50 | |
| MileageStart | Number | Mileage Start | Integer | |
| MileageEnd | Number | Mileage End | Integer | |
| TotalMileage | Number | Total Mileage | Integer | |
| StartDate | Date/Time | Start Date | ||
| EndDate | Date/Time | End Date | ||
| TotalDays | Number | Total Days | Integer | |
| RateApplied | Number | Rate Applied | Double | Format: Fixed |
| TaxRate | Number | Tax Rate | Double | Format: Percent Default Value: 7.50 |
| OrderStatus | Text | Order Status | 50 | Default Value: "Unknown" |
| Notes | Memo |
The Relationships Diagram
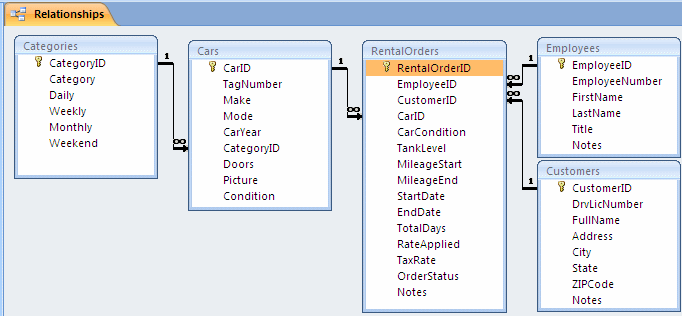
Tables and fields relationships can be created and managed in a special window called the Relationships window. To display it:

After clicking one of those:
When you are working on the relationships of your tables, a window with a tab labeled Relationships displays in Microsoft Access. Also, the Ribbon is equipped with a tab labeled design and that includes two sections:

The Design tab of the Ribbon provides various tools to assist you with creating and managing the relationships. For example, if the Show Table dialog box has been closed and if you want to show it:
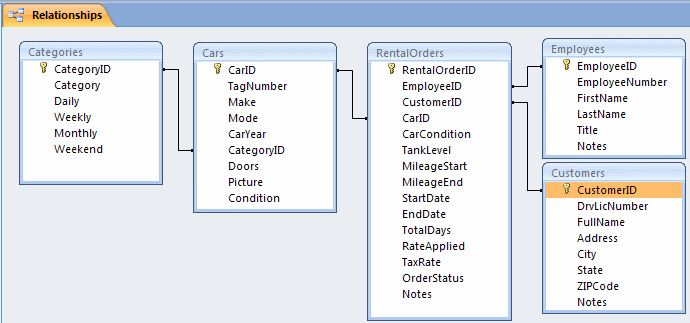
You can create a relationship only between two tables that are present on the Relationships window. This means that even if a table is part of your database and you want to link it to another table (of your database), if the table has not been added to the Relationships window, you cannot create or manage its relationship to another table. Of course, there are other ways you can create relationships without using the Relationships window but the Relationships window gives you detailed means of creating and managing relationships.
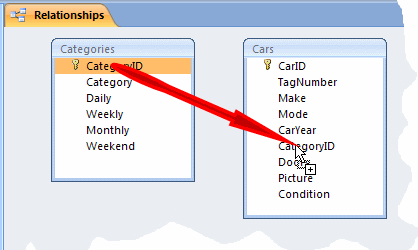
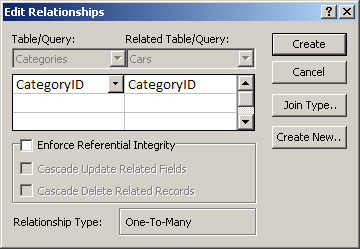
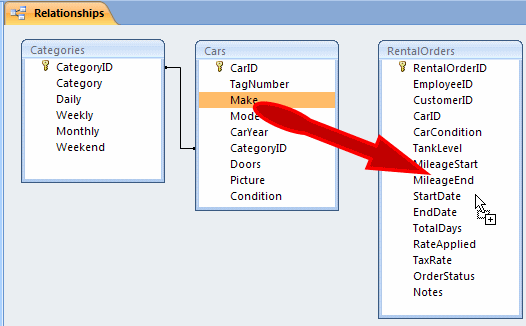
To establish a relationship that does not yet exist between two tables, you can drag the primary key from the parent table to the foreign key of the desired table. If you drag and drop accurately, the relationship would be acknowledged and you can just click Create to make it formal. If you dropped the primary key on the wrong field, you would have time to select the appropriate fields in the Edit Relationship dialog box.
After working with the Relationships window, you can close it by clicking its
Close button ![]() . You would be asked to save it in order to keep the
relationship(s) created.
. You would be asked to save it in order to keep the
relationship(s) created.
![]() Practical Learning: Establishing Tables Relationships
Practical Learning: Establishing Tables Relationships
 .
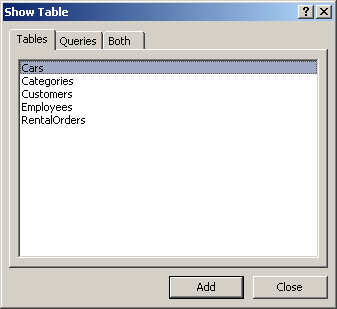
The Show Table property sheet comes up:

|
A Sub-Datasheet |
Introduction
A sub-datasheet is a means of displaying the dependent records of a parent record on a datasheet. Obviously to make this possible, each record on a table must be configured to have child records. In other words, there must be a table containing a foreign key so that the child table can be, or has been, connected to the current table. For example, imagine that, in a hotel application, various customers have previously rented some rooms and sometimes you want to see the records related to a particular room.
Once a relationship has been established between records, when you open the parent table in Datasheet View, each record would appear with a + button to its left:

This means that Microsoft Access is configured to recognize relationships and apply them to show the sub-datasheet.
By its definition, a sub-datasheet allows you to view the related records by clicking the + button. This would expand that record and display its related records. You can expand just one record by clicking its + button or a few records but clicking the + buttons of the desired records. Here is an example:
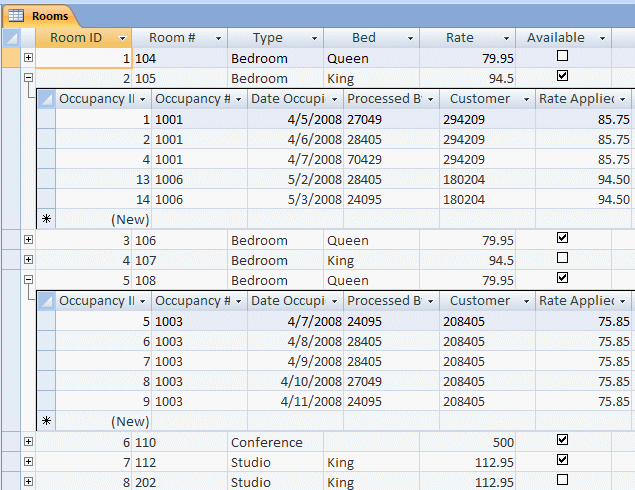
You can also expand all records. To do this, open the table in Datasheet View. In the Records section of the Home tab of the Ribbon, click More -> Subdatasheet -> Expand All.
When a record is expanded, it displays a - button to its left. After viewing a record, to collapse it back, you can click its - button. You can do the same for any other record. You can also collapse all records. To do this, open the table in Datasheet View. In the Records section of the Home tab of the Ribbon, click More -> Subdatasheet -> Collapse All.
![]() Practical Learning: Introducing Subdatasheets
Practical Learning: Introducing Subdatasheets

| Actor ID | Actor |
| 1 | Eddie Murphy |
| 2 | Tom Cruise |
| 3 | Ving Rhames |
| 4 | Mel Gibson |
| 5 | Charlie Sheen |
| 6 | Jaime Pressly |
| 7 | Sheryl Lee Ralph |
| 8 | Daryl Hannah |
| 9 | Joe Don Baker |
| 10 | Victoria Rowell |
| 11 | Grant Shaud |
| 12 | Kevin McCarthy |
| 13 | Charles S. Dutton |
| 14 | Mia Kirshner |
| 15 | Lane Smith |
| 16 | Randy Quaid |
| 17 | Philip Seymour Hoffman |
| 18 | Delroy Lindo |
| 19 | Rene Russo |
| 20 | Gary Sinise |
| 21 | Matthew Broderick |
| 22 | Jean Reno |
| 23 | Michael Douglas |
| Field Name | Data Type | Description |
|
DirectorID (Primary Key) |
AutoNumber | Automatic number |
| Director | Text | Name of a director such as "Mark Lynn" or directors as a group of such as "The Hughes Brothers" |
| Notes | Memo | Observations about the director or group of directors |
| DirectorID | Director |
| 1 | Roland Emmerich |
| 2 | Renny Harlin |
| 3 | Tony Scott |
| 4 | Ron Howard |
| 5 | Sanjay Leela Bhansali |
| 6 | Eddie Murphy |
| 7 | J. J. Abrams |
| 8 | Jonathan Lynn |
| 9 | Mel Gibson |
| 10 | Steven Spielberg |
| 11 | Joel Gallen |
| 12 | Oliver Stone |
| Field Name | Data Type | Caption |
|
CategoryID (Primary Key) |
AutoNumber | Category ID |
| Category | Text | Category |
| Notes | Memo |
| Category ID | Category |
| Biography | |
| Documentary | |
| Cartoon | |
| Fitness – Aerobic | |
| Comedy – General | |
| Comedy - Parody | |
| Comedy – Police | |
| Comedy – Politic | |
| Comedy – War | |
| Drama – General | |
| Drama – Police | |
| Drama – Politic | |
| Drama – War | |
| Sci-Fi – General | |
| Sci-Fi – Comedy | |
| Sci-Fi – Police | |
| Sci-Fi – Politic | |
| Sci-Fi – War | |
| Adventure | |
| Hindu | |
| Religious |
Creating a Sub-Datasheet
As we have seen so far, to have a relationship between two tables, you must create a primary key in one table and the corresponding foreign key in another table. You can then establish a relationship between both tables in the Relationships window. As stated already, Microsoft Access can take it upon itself to show the related records. You do not have to establish a relation first in order to take advantage of the sub-datasheet effect. If you have created two tables, one with a primary key and another with a foreign key, you can create the sub-datasheet yourself.
To create a non-existing datasheet, open the table with the primary key in Datasheet View. In the Records section of the Home tab of the Ribbon, click More, position the mouse on Subdatasheet, and click Subdatasheet... This would open the Insert Subdatasheet dialog box. In the list of tables (or queries), you must click the table (or query) that has the foreign key that relates to the primary key of the current table. The names of the primary key and the foreign key would appear in the combo boxes. Once you click OK, Microsoft Access would take care of configuring the subdatasheet.
If a relationship has been established and a subdatasheet exists in a table but you do not want the subdatasheet to show anymore, you can remove it. To delete a subdatasheet, open the table with the primary key in Datasheet View. In the Records section of the Home tab of the Ribbon, click More -> Subdatasheet, and click Remove.
![]() Practical Learning: Creating
a Sub-Datasheet
Practical Learning: Creating
a Sub-Datasheet
| Field Name | Data Type | Caption | Field Size |
|
VideoID (Primary Key) |
AutoNumber | Video ID | |
| Title | Text | 120 | |
| DirectorID | Number | Director | Long Integer |
| CopyrightYear | Number | © Year | Integer |
| Length | Number | Integer | |
| CategoryID | Number | Category | Long Integer |
| Rating | Text | 20 | |
| Notes | Memo |
(To get the © character, you can open Microsoft Word, type (c) then select and copy it. Then paste it in the Caption property of the table field)
| Video ID | Title | Director | © Year | Length | Category | Rating |
| 1 | Distinguished Gentleman (The) | 8 | 112 | 8 | R | |
| 2 | Wall Street | 12 | 1987 | 126 | 10 | R |
| 3 | Ransom | 4 | 121 | 11 | R | |
| 4 | Not Another Teen Movie | 11 | 2005 | 100 | 6 | Unrated |
| 5 | Harlem Nights | 6 | 1989 | 116 | 10 | R |
| 6 | M:i:III | 7 | 2006 | 125 | 19 | PG-13 |
| 7 | Devdas | 5 | 175 | 20 | Unrated | |
| 8 | Passion of the Christ (The) | 9 | 2004 | 21 | R | |
| 9 | Platoon | 12 | 1986 | 120 | 13 | R |
| 10 | Day After Tomorrow (The) | 1 | 2004 | 123 | PG-13 | |
| 11 | Beautiful Mind (A) | 4 | 2001 | 135 | PG-13 | |
| 12 | Godzilla | 1 | 1998 | 139 | PG-13 |


|
Referential Integrity |
Introduction
At this time, we know that there is useful functionality to creating relations between tables as they allow the user to select existing information instead of typing it. This flow of information brings up issues about what happens if data that exists in a parent table gets deleted while such information has been made available to another table.
When manipulating data that is in a relationship, it is very important to make sure that data keeps its accuracy from one table or source to the other. To accomplish that goal, some rules must be established to “watch” or monitor the flow of information between two tables. Data or referential integrity is used to check that two tables are related through one (sometimes more than one) field on each table used as the primary key and the foreign key, data entered in the foreign key of a child table must exist in the parent table, otherwise it would be rejected. Only two fields of the same data type are used to establish a relationship between two tables, the tables involved in the relationship belong to the same database.
Cascades on Related Records
After creating a legitimate relationship between two tables, you must make sure that when data changes in the parent table, this change is reflected in the child table. For example, if a bank customer changes her last name after getting married or after a divorce, you should be able to change her name in one object (table) and the related objects, such as the one used to process her transactions would receive the changes without your having to make the change on each object (table). In the same way, when data is deleted, the objects that are related to it must also have that data deleted.
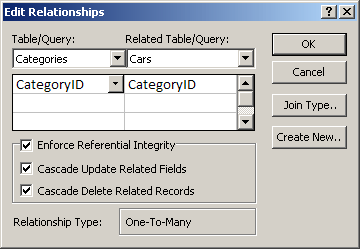
To enforce the rules of data integrity, Microsoft Access provides three check boxes in the Edit Relationship dialog box. First, if you want Microsoft Access to monitor data flow, you can click the Enforce Referential Integrity check box. This would make available two check boxes.
|
The Direction of a Relationship |
The One-To-Many Relationship
As mentioned already, a relationship between two tables allows one table, the parent, to make its information available to another table (the child). Because in this case the user is asked to select information, it is likely that the same record on a parent table can be tied to various records in the child table. For example, one customer at a bank can deposit an amount of money today. The same customer can make another deposit tomorrow and even another deposit next month. In such a case, the relationship between the tables would show various entries of the same customer’s account number in the object (table) used to deposit money but with different transactions. This type of relationship is known as one-to-many because one entry in the parent table can result in many entries in the child table.
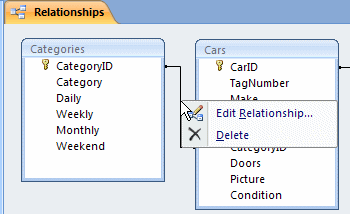
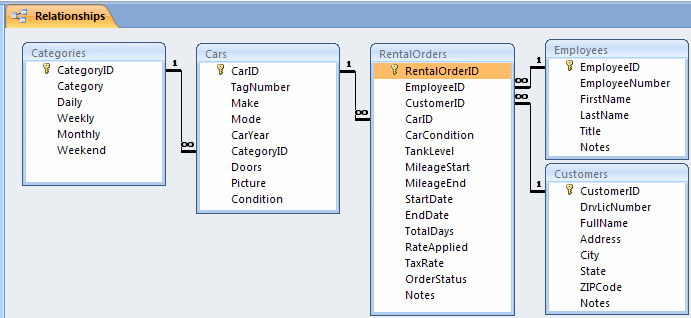
To create a one-to-many relationship, check all three referential integrity check boxes and click Create. The parent table would have a 1 sign on its side of the joining line. The child table would have the infinity symbol on its side of the joining line.
![]() Practical Learning: Managing Referential Integrity
Practical Learning: Managing Referential Integrity
|
The Many-to-Many Relationship |
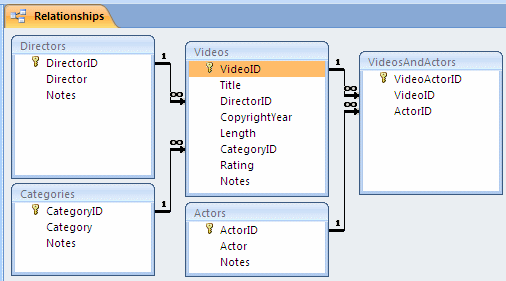
Although one-to-many is the most common type of relationship applied to records of a table, in some databases, you may need to create a relationship in which many records from one table A can have many related records in another table B and vice versa. This type of relationship is known as many-to-many. For example, in our Video Collection database:
To implement this type of relationship, you can create what is called a junction table. A junction table is a table whose main purpose is to bring together fields from other tables, creating a type of cross relationship for the necessary fields:

A junction table contains at least three fields. The first field, almost less engaged, is used as the primary key, the same type of field almost every table has. The other fields hold data that would
originate from other tables.
You can create a junction table either in Datasheet View or in Design View:
You can also switch to either view to create a junction table. In other words, you can create one field in one view and create the other field in the other view.
![]() Practical Learning: Creating Junction Tables
Practical Learning: Creating Junction Tables
| Field Name | Data Type | Caption | Field Size |
|
VideoActorID (Primary Key) |
AutoNumber | Video Actor ID | |
| VideoID | Number | Video | Long Integer |
| ActorID | Number | Actor | Long Integer |
| VideoActorID | VideoID | ActorID |
| 1 | 1 | 1 |
| 2 | 3 | 4 |
| 3 | 2 | 23 |
| 4 | 4 | 6 |
| 5 | 1 | 7 |
| 6 | 9 | 5 |
| 7 | 6 | 2 |
| 8 | 4 | 14 |
| 9 | 1 | 9 |
| 10 | 2 | 8 |
| 11 | 3 | 19 |
| 12 | 1 | 10 |
| 13 | 6 | 17 |
| 14 | 3 | 20 |
| 15 | 1 | 11 |
| 16 | 4 | 16 |
| 17 | 3 | 18 |
| 18 | 1 | 15 |
| 19 | 12 | 21 |
| 20 | 6 | 3 |
| 21 | 2 | 5 |
| 22 | 1 | 13 |
| 23 | 5 | 1 |
| 24 | 12 | 22 |
| 25 | 1 | 12 |
The One-to-One Relationship
A one-to-one relationship is the type of junction between two tables A and B so that one record in table A can have only one corresponding entry in table B and vice versa. Because this is similar to one table of records, this type of relationship is hardly used since you can as well simply create one table.
Data Joins
Introduction
When creating relationships among tables, we were selecting the primary key of one table and the foreign key of a dependent table to join them. Once such a relationship is created, you can create a query that combines both tables to create a set of records, also called a record set, that would include either all records or isolate only the records that have entries. For example, imagine you have created a Persons table as follows where the Gender of a record is selected from a lookup field:
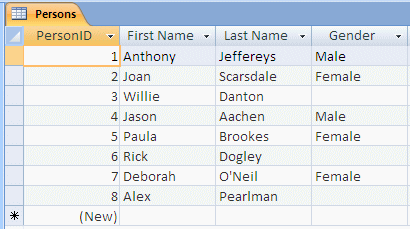
Suppose you want to create a query that includes the persons of this table and their genders. A question that comes is mind is: Do you want to create a list of only people who can be recognized by their gender, or do you want the list to include everybody? This concept leads to what are referred to as joins of queries. There are two ways you can get such queries: you can prepare the relationship between two tables to be aware of this type of relationship or you can directly create it when designing a query.
Inner Joins
When building a query, you select fields and ask Microsoft Access to isolate them as being part of the query. Most of the time, you will want only fields that include a type of validation of your choice (a criterion). An inner join is the kind of query that presents only fields that have matching entries on both tables of a relationship. For example, from the above table, if you want to create a query that includes only persons whose records contain the gender:

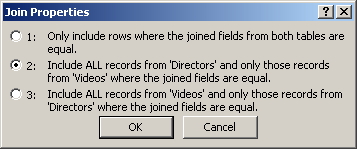
You would create it as an inner join. To specify that a relationship is inner join, after creating the relationship, while in the Relationships, you can display its Edit Relationship dialog box and click Join Type… The Join Properties dialog box presents three options that allow you to define the direction of the relationship between the tables.
To specify an inner join in a SQL statement, you include INNER JOIN in the statement.
![]() Practical Learning: Creating Inner Join Relationships
Practical Learning: Creating Inner Join Relationships

Outer Joins
The queries we have used so far and that were based on related tables allowed us to get only the fields that had entries based on the established relationships. Fields that did not follow the rules were excluded. Instead of excluding fields, the SQL allows you to create a query that includes all fields, not just those that follow rules, as long as the records are part of either table. Such a query is referred to as outer join. To manage the result of this type of query, the SQL considers the direction of a relationship.
When creating relationships, we learned to drag a primary key from one table, the parent, to a dependent table, the child. In this type of relationship, the table (or query) that holds the origin of the relationship is referred to as the Left table. The other table is referred to as the right table. Based on this, there are two types of outer joins: the left join represented in SQL as LEFT JOIN and the right join represented by RIGHT JOIN.
As done with the inner join relationship, the left and right joins can be prepared in the Relationships window on tables. If the query has already been created and you want to change its direction, you can change it in the Design View of the query.
![]() Practical Learning: Creating Outer Join Relationships
Practical Learning: Creating Outer Join Relationships

After creating a relationship or while working on
relationships, you can create a visual report of the result and be able to print
it when necessary. To create the report, in the Tools section of the Ribbon,
click the Relationship Report button ![]() .
This action would automatically generate a report with the relationships
designed on it. To keep the report, you should save it and give it a name. You
can then print it as you would print any other report.
.
This action would automatically generate a report with the relationships
designed on it. To keep the report, you should save it and give it a name. You
can then print it as you would print any other report.
![]() Practical Learning: Creating
a Relationship Report
Practical Learning: Creating
a Relationship Report

Lesson Summary
MCAS: Using Microsoft Office Access 2007 Topics
| S2 | Define and print table relationships |
Exercises
Watts A loan
| Field Name | Data Type | Additional Information |
| LoanEvaluationID | AutoNumber | Primary Key Caption: Loan Evaluation ID |
| LoanAmount | Currency | Caption: Loan Amount Default Value: 0 |
| InterestRate | Number | Field Size: Double Format: Percent Caption: Interest Rate Default Value: 0.0875 |
| NumberOfPeriods | Number | Field Size: Integer Caption: NumberOfPeriods Default Value: 12 |
Save the table as LoanEvaluation and close it
|
|
||
| Previous | Copyright © 2008-2019, FunctionX, Inc. | Next |
|
|
||